How to Create a Sunken Garden UK
How to create a sunken garden in the UK. Covers excavation, retaining walls, drainage, planting, costs, and step-by-step construction for any garden size.
Key takeaways
- Excavation depth of 600mm to 1.2 metres creates shelter from wind and a warmer microclimate
- Retaining walls in natural stone cost forty to eighty pounds per square metre, reclaimed brick twenty to forty pounds
- A drainage layer of 150mm crushed aggregate beneath the base prevents waterlogging on clay soils
- Construction costs range from three thousand pounds for a simple DIY project to fifteen thousand for a professional build
- Sunken gardens suit gardens as small as 4 by 4 metres, though 5 by 6 metres gives better proportions
- The sheltered conditions extend the growing season by two to three weeks compared to the surrounding garden

A sunken garden creates a sheltered, intimate space that feels separate from the rest of the garden. The lowered level blocks wind, traps warmth, and frames planting so every border is visible from above. This is one of the oldest garden design techniques in Britain, used at Kensington Palace since the early 1900s and still one of the most effective ways to add drama and shelter to a flat site.
This guide covers the full construction process: excavation, drainage, retaining walls, steps, planting, and realistic costs for UK gardens. Whether you are working with heavy clay in the Midlands or chalk in the South Downs, the principles remain the same.
What is a sunken garden and why build one?
A sunken garden is a section of garden lowered below the surrounding ground level, enclosed by retaining walls or sloping banks. The drop creates a microclimate that is measurably warmer and calmer than the ground above.
The shelter effect is significant. Wind speed drops by 40 to 60 percent inside a sunken area just 900mm deep. Soil temperatures at the base run 1 to 2 degrees Celsius warmer than the surrounding garden from March onwards. That translates to earlier germination, longer flowering, and the ability to grow plants that would fail in an exposed position.
Sunken gardens suit formal and informal designs equally well. A geometric rectangle with stone walls and symmetrical borders creates a classical feel. An organic shape with dry-stone walls and naturalistic planting feels more relaxed. The underlying construction method is identical.
| Benefit | Detail |
|---|---|
| Wind shelter | 40-60% wind speed reduction at 900mm depth |
| Warmer soil | 1-2 degrees C above surrounding garden level |
| Extended season | 2-3 weeks longer growing at base level |
| Visual impact | Every border visible from above and at eye level |
| Privacy | Below sightline of neighbours and passers-by |
| Noise reduction | Retaining walls absorb and deflect sound |
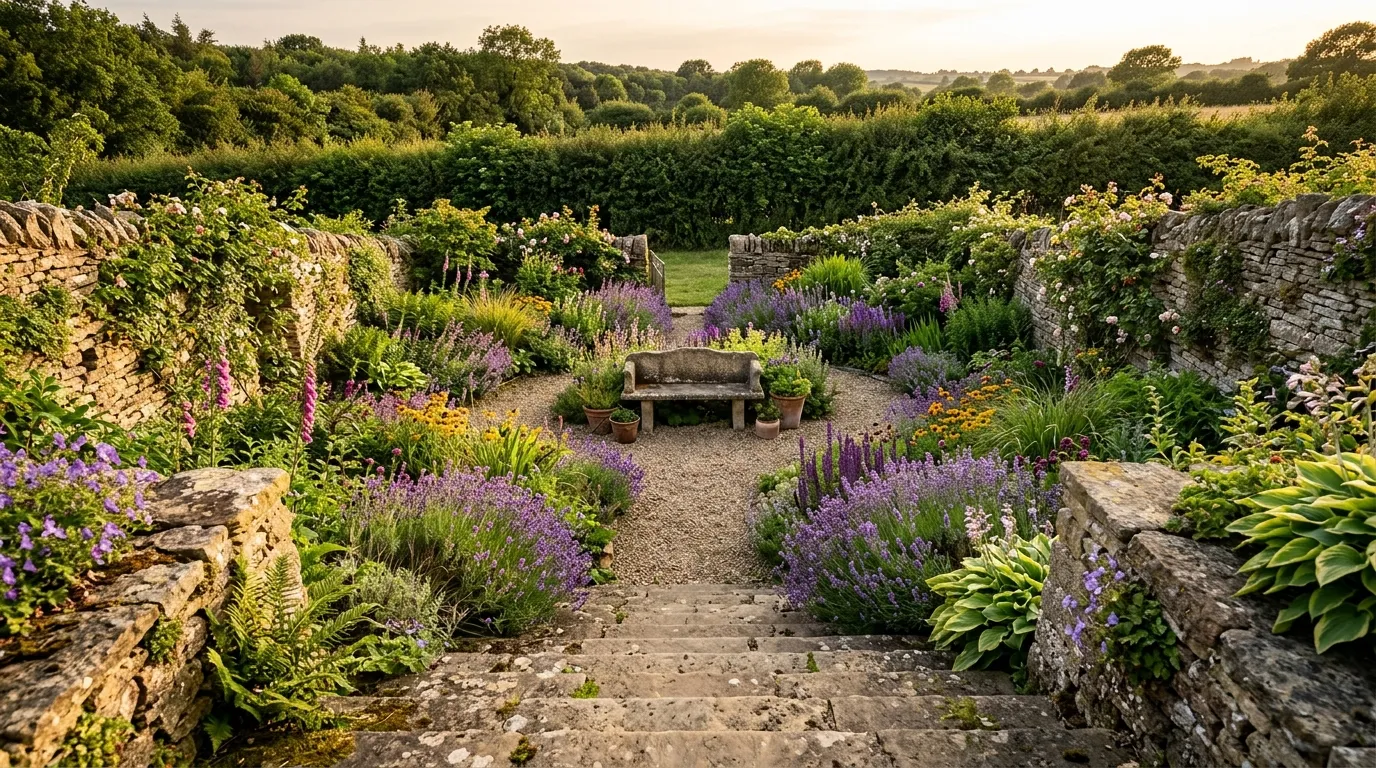 A well-built sunken garden creates a sheltered microclimate and a sense of enclosure that flat gardens cannot match
How much does a sunken garden cost to build?
The total cost depends on three factors: the volume of soil removed, the retaining wall material, and whether you hire a contractor or do it yourself.
A 4 by 4 metre DIY sunken garden at 750mm depth costs approximately three thousand pounds for materials. A professional build of a 5 by 6 metre space with natural stone retaining walls, proper drainage, and stone steps costs eight to fifteen thousand pounds including labour.
| Item | DIY cost (4x4m) | Professional (5x6m) |
|---|---|---|
| Excavation and skip hire | £400-£600 | £1,200-£2,000 |
| Drainage (aggregate, pipe, soakaway) | £200-£400 | £600-£1,200 |
| Retaining wall materials | £1,200-£2,500 | £3,000-£7,000 |
| Steps (stone or brick) | £300-£500 | £800-£1,500 |
| Base surface (gravel/paving) | £200-£400 | £500-£1,500 |
| Planting | £300-£600 | £800-£2,000 |
| Total | £2,600-£5,000 | £6,900-£15,200 |
The retaining wall is consistently the largest single expense. Choosing reclaimed brick over new natural stone saves 30 to 50 percent on wall costs alone.
Hidden costs to budget for
Skip hire for excavated soil catches people out. A 750mm-deep excavation of a 4 by 4 metre area generates roughly 12 cubic metres of spoil. That fills two to three 6-yard skips at ninety to one hundred and fifty pounds each. If you can reuse the soil elsewhere in the garden for raised beds or re-grading, you save three hundred to four hundred and fifty pounds immediately.
How to plan the size and position
Position the sunken garden where it receives at least six hours of direct sunlight between April and September. A north-facing position gets little warmth benefit. A south or west-facing spot maximises the microclimate advantage.
Minimum workable size is 4 by 4 metres at the base. Anything smaller feels cramped once you account for retaining walls (300mm thick minimum) and a path around the base. A 5 by 6 metre base gives space for a central seating area, borders on all four sides, and comfortable movement.
Before excavating, check these constraints:
- Utility services: Call before you dig. Gas, water, electric, and telecoms lines can run through gardens at 450mm to 600mm depth. Hit one and you face a repair bill of five hundred pounds upward.
- Tree roots: Building near mature trees risks damaging roots and triggering a Tree Preservation Order breach. Keep the excavation at least the tree’s canopy width from the trunk.
- Boundary proximity: Retaining walls within 1 metre of a boundary may need a Party Wall Agreement. Check with neighbours early.
- Water table: On low-lying ground, the water table may sit closer to the surface than expected. Dig a test hole 1.2 metres deep in winter and leave it 48 hours. If water collects, your drainage design needs upgrading.
Step-by-step: how to excavate a sunken garden
Step 1: Mark out and set levels
Use string lines and timber pegs to mark the excavation outline. Set a datum peg at the desired finished base level. Allow 150mm below finished level for the drainage layer and 50mm for the base surface (gravel or paving).
For a 750mm-deep sunken garden, you actually excavate 950mm: 750mm visible depth plus 150mm drainage plus 50mm base finish.
Step 2: Excavate the soil
A mini digger (1.5 tonne) handles the excavation efficiently for anything larger than 3 by 3 metres. Hire cost is roughly one hundred and fifty to two hundred pounds per day including delivery. For smaller areas, hand digging is practical but slow: expect two to three days for two people on a 4 by 4 metre plot.
Sort the soil as you dig. Topsoil goes in one pile for reuse in borders. Subsoil goes in a separate pile for skip disposal or use as fill elsewhere. Mixing them ruins both.
On heavy clay soil, excavation is harder work but the finished sunken garden actually benefits. Clay’s water-holding capacity means the retaining walls sit in stable ground. You just need good drainage at the base.
Step 3: Install the drainage system
This is the single most important step. A sunken garden without drainage becomes a pond after heavy rain.
Base layer: Spread 150mm of 20mm crushed aggregate across the entire base. Grade it to fall 1:80 (12.5mm per metre) towards the lowest point.
Land drain: Lay a 100mm perforated land drain pipe along the lowest edge, wrapped in geotextile membrane. Connect it to a soakaway crate positioned outside the sunken area, at least 5 metres from any building.
Wall drainage: Behind each retaining wall, pack 150mm of gravel between the wall and the excavation face. This prevents hydrostatic pressure (water build-up behind the wall) which is the number one cause of retaining wall failure.
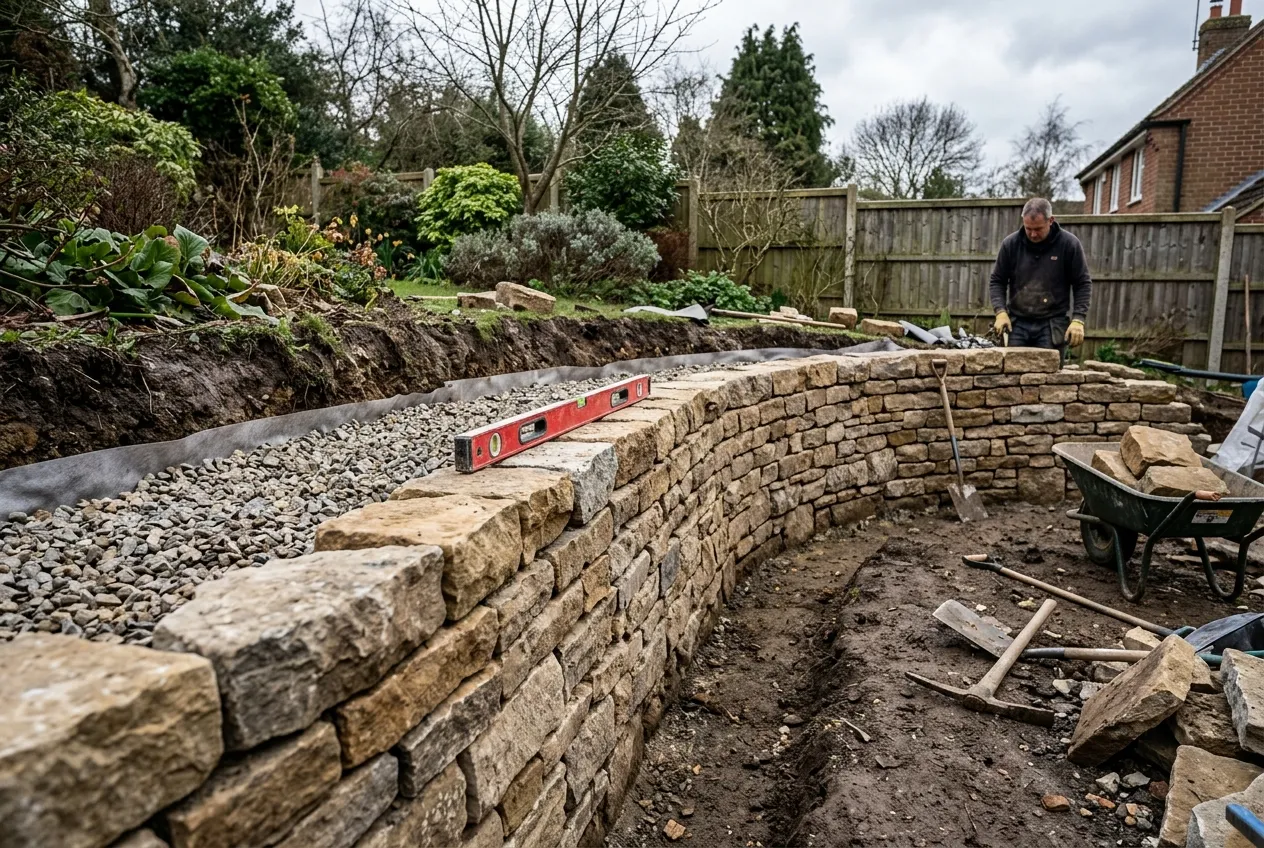 The gravel drainage layer behind the retaining wall prevents water pressure building up and pushing the wall inward
Step 4: Build the retaining walls
The wall must resist the lateral pressure of the soil behind it. For sunken gardens under 1 metre deep, a solid wall 300mm thick in natural stone or 215mm in brick handles the load without engineering. Deeper than 1 metre, consult a structural engineer.
Natural stone walls: Build in courses, tilting each stone slightly back into the bank (a 10-degree batter). This uses gravity to resist soil pressure. Fill behind with gravel as you build each course. Cap with flat coping stones overhanging 30mm on each side to shed rainwater.
Brick walls: Use engineering bricks (Class B minimum) below ground and facing bricks above. A 215mm-wide wall needs a concrete footing 450mm wide and 150mm deep. Include weep holes (gaps in the mortar) at the base every 1.2 metres to let trapped water escape.
Dry-stone walls: The most traditional option and excellent for cottage garden designs. Pack each course tightly and fill behind with gravel. Dry-stone walls flex slightly under pressure rather than cracking, making them forgiving on clay soils that expand and contract seasonally.
Step 5: Build the steps
Steps are the transition between the garden above and the sunken space below. Width, depth, and rise all matter for safety and comfort.
Dimensions: Each step should have a rise of 150mm and a going (tread depth) of 300mm minimum. This matches building regulations for outdoor steps and feels natural to walk. A 750mm-deep sunken garden needs five steps.
Width: The stairway needs a minimum width of 900mm. If space allows, 1.2 metres lets two people pass comfortably and creates a more generous entrance.
Materials: Match the steps to the retaining wall material. Stone walls suit stone treads. Brick walls suit brick-faced risers with stone or brick treads. Timber risers with gravel treads work for informal designs.
Step 6: Finish the base
The base surface needs to drain freely. Compacted gravel (self-binding or 10mm pea gravel over the aggregate layer) is the most practical option. It drains instantly, costs five to fifteen pounds per square metre, and suits any style.
For a more formal look, use permeable paving or natural stone flags laid on a sand bed over the aggregate drainage layer. Avoid solid mortared paving at the base of a sunken garden: it traps water and defeats the drainage system.
What plants thrive in a sunken garden?
The sheltered microclimate of a sunken garden opens up planting options that would fail in exposed positions. Think of the space as having three distinct planting zones: the wall tops, the wall faces, and the base.
Wall-top planting
Plants at the top of the retaining wall trail over the edge and soften the hard line. The best choices are drought-tolerant species that thrive in thin, well-drained soil.
- Aubrieta — purple cascading flowers from March to May, evergreen foliage
- Erigeron karvinskianus — white-to-pink daisies from May to October, self-seeds freely
- Campanula portenschlagiana — blue bell flowers, vigorous spreader, excellent wall plant
- Creeping thyme — fragrant foliage, pink flowers, tolerates poor soil
Wall-face planting
Tuck plants into gaps between stones in dry-stone walls or plant in pockets left during construction. These species root into the wall and colonise gaps naturally.
- Ivy-leaved toadflax (Cymbalaria muralis) — delicate lilac flowers, loves old walls
- Wall pennywort (Umbilicus rupestris) — fleshy round leaves, native to western UK
- Ferns (Asplenium trichomanes, Polypodium vulgare) — thrive in shaded wall faces
 Trailing aubrieta and Erigeron cascading over the retaining walls soften the stonework and add colour from spring to autumn
Base-level planting
The sheltered, warmer base suits plants that need protection. Mix scented plants with structural perennials for year-round interest.
Fragrant choices for sheltered walls:
- Star jasmine (Trachelospermum jasminoides) — evergreen, scented white flowers, needs a sheltered spot
- Honeysuckle (Lonicera periclymenum) — native, evening scent, vigorous climber
- Chocolate vine (Akebia quinata) — unusual burgundy flowers with vanilla scent
Structural perennials for borders:
- Hostas — thrive in the damper, sheltered conditions at the base
- Astilbe — feathery plumes in pink, red, and white, loves moisture
- Japanese anemones — late-season flowers from August to October
- Geranium Rozanne — flowers non-stop from June to first frost
The RHS retaining wall planting guide covers additional species suited to vertical surfaces. For the base borders, follow the same principles as planning a mixed border: tall plants at the back (against the retaining wall), medium in the middle, and low or trailing at the front.
How to design the layout
The internal layout depends on whether you want a formal or informal feel.
Formal design: A rectangular sunken area with symmetrical borders, a central circular feature (water basin, urn, or specimen plant), and matching steps on one or two sides. This echoes the historic sunken gardens at Kensington and Great Dixter.
Informal design: An organic shape with curved walls, asymmetric borders, and a single set of steps. Gravel base, naturalistic planting, and a bench tucked into a corner. This suits courtyard gardens and smaller spaces.
Both designs benefit from a focal point at the centre or far end. A water feature, specimen tree in a large container, or a piece of sculpture draws the eye down into the space and gives it purpose.
Adding a seating area
A sunken garden is a natural sitting space. The retaining walls provide back support when capped with wide coping stones (400mm or wider). Alternatively, build a stone bench into one wall during construction.
Position seating to face south or west to catch afternoon and evening sun. The shelter from wind makes a sunken seating area usable in spring and autumn when exposed patios feel too cold. This is one of the strongest practical arguments for building one.
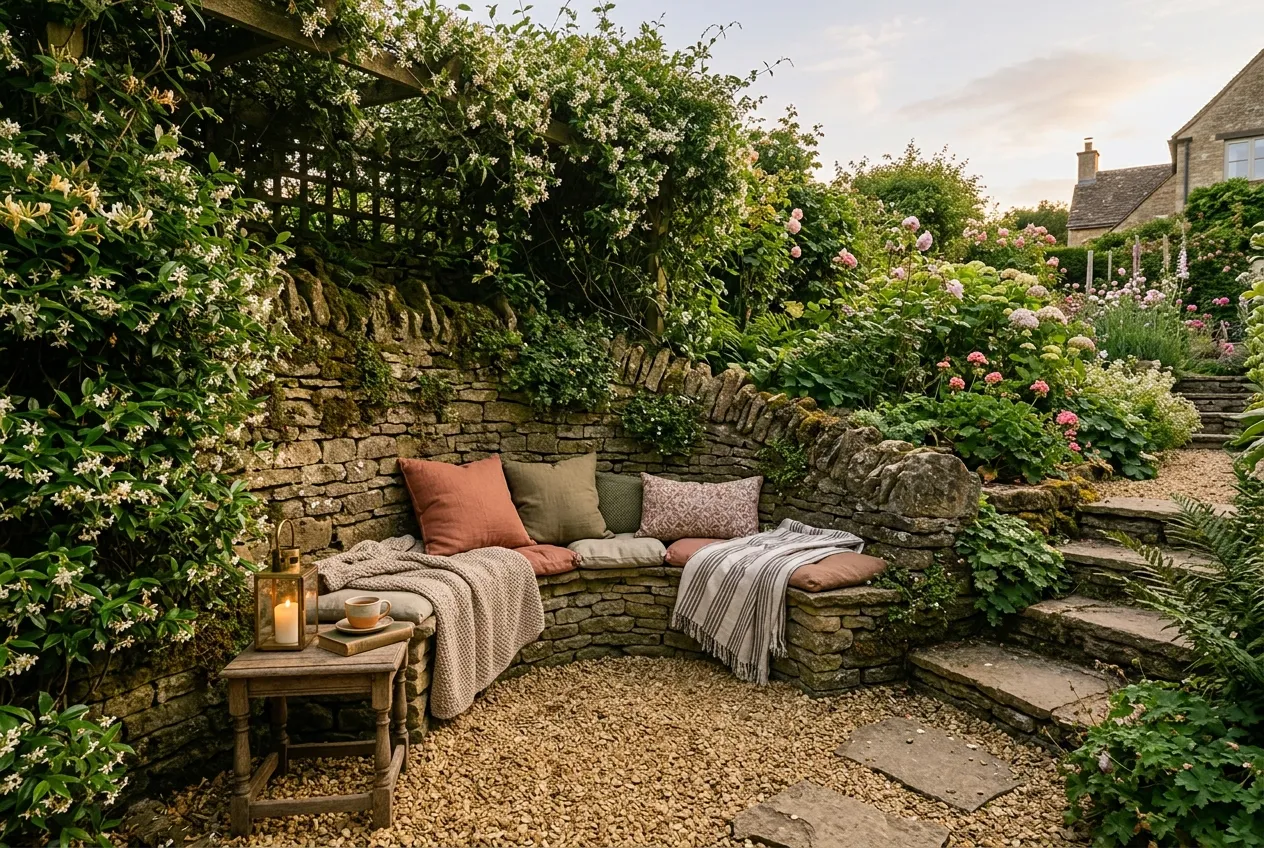 A bench built into the retaining wall creates a sheltered seating area that stays usable well into autumn
Drainage solutions for clay soil
UK clay soils present the biggest challenge for sunken gardens. Clay holds water, swells when wet, and shrinks when dry. Without proper drainage, a sunken garden on clay becomes waterlogged within the first winter.
The three-layer approach works reliably on heavy clay:
- Base layer: 150mm of 20mm crushed stone, compacted, graded to fall
- Linear drain: 100mm perforated pipe at the lowest point, connected to a soakaway
- French drain behind walls: 150mm gravel fill between the clay face and retaining wall, with geotextile separation
Soakaway sizing: For a 20-square-metre sunken garden in a high-rainfall area (over 800mm annually), use a minimum 1-cubic-metre soakaway crate buried at least 500mm below the land drain outlet. In drier areas of eastern England, a smaller soakaway suffices.
Test your drainage before finishing the base surface. Wait for heavy rain, then check the base 24 hours later. Standing water means the fall is insufficient or the soakaway needs enlarging.
For gardens prone to surface water running in from surrounding ground, a rain garden above the sunken area intercepts runoff before it reaches the retaining walls.
Can you build a sunken garden yourself?
A sunken garden is a realistic DIY project if the depth stays under 1 metre and you have access to a mini digger. The skills required are basic bricklaying or dry-stone walling, drainage installation, and the patience to work methodically through each stage.
What you need:
- Mini digger hire: one hundred and fifty to two hundred pounds per day
- Spirit level, string line, timber pegs, tape measure
- Cement mixer (if building mortared walls)
- Compactor plate: forty to sixty pounds per day hire
- Wheelbarrow, spade, shovel, and safety equipment
Realistic timeline for a 4 by 4 metre DIY build:
| Stage | Duration |
|---|---|
| Planning and marking out | 1 day |
| Excavation | 1-2 days (mini digger) |
| Drainage installation | 1 day |
| Retaining walls | 3-5 days |
| Steps | 1-2 days |
| Base surface | 1 day |
| Planting | 1 day |
| Total | 9-13 days |
Spread the work across weekends and the project takes six to eight weeks. The critical thing is getting the drainage right before building the walls. Everything else follows from there.
If you are designing a garden from scratch, consider the sunken garden early in the planning process. Integrating it with paths and other levels from the start produces a more natural result than retrofitting one into an established layout.
Sunken garden lighting ideas
Lighting transforms a sunken garden after dark. The retaining walls provide natural mounting surfaces for low-level fittings, and the enclosed space means even subtle lighting has a big impact.
Wall wash lights: Recessed LED fittings in the retaining wall at 300mm intervals cast a warm glow across the base. Use warm white (2700K) for a welcoming atmosphere.
Step lighting: LED strips or recessed fittings in each step riser improve safety and create a dramatic entrance. Solar-powered step lights work if the steps face south.
Uplighting: Spotlights aimed at specimen plants or a central feature create focal points after dark. Place them at the base of the retaining wall, angled upward.
Run cables during construction, before the base surface goes down. Retrofitting lighting means digging up finished work. Use outdoor garden lighting rated IP67 minimum for anything at or below ground level.
Common mistakes to avoid
Skipping drainage. The single biggest mistake. Every sunken garden needs a drainage system, even on sandy soil. Without it, you create a collection point for every drop of rain that falls within and around the space.
Building walls too thin. A retaining wall under 300mm thick (stone) or 215mm (brick) buckles under soil pressure within two to three years. The soil behind a wall exerts considerable force, especially on clay that swells with moisture.
Forgetting about access. You need to get a wheelbarrow in and out for maintenance. Steps narrower than 900mm or steeper than 150mm rise make this difficult. Plan a service access point wider than the main steps if the design allows.
Excavating too deep. Going beyond 1.2 metres without engineering advice risks wall failure and complicates drainage. The cost of professional engineering doubles for every 300mm beyond 1 metre depth.
Ignoring the water table. On low-lying ground, the water table may sit at 600mm to 900mm. Digging below it creates a permanent pool. Test in winter before committing.
Maintenance through the seasons
A sunken garden needs regular but straightforward maintenance.
Spring: Clear debris from drainage channels. Check weep holes in brick walls are not blocked. Cut back trailing wall plants that have grown too long. Top up gravel base if thin spots have appeared.
Summer: Water base-level borders during dry spells. The sheltered position reduces wind desiccation but retaining walls can create rain shadows. Deadhead perennials to extend flowering.
Autumn: Clear fallen leaves from the base before they block drainage. Cut back perennials to prevent dead material collecting in corners. Check the soakaway is flowing freely before winter rains arrive.
Winter: Inspect retaining walls for frost damage. Mortared walls may need repointing after a hard frost. Brush steps clear of algae and ice. Avoid using salt on natural stone, which causes surface spalling.
A well-built sunken garden on a proper drainage foundation lasts decades. The retaining walls age and weather, the planting matures, and the space improves with every passing year.
Lawrie has been gardening in the West Midlands for over 30 years. He grows his own veg using no-dig methods, keeps a wildlife-friendly garden, and writes practical advice based on real UK growing conditions.