How to Grow Shallots in the UK
Learn how to grow shallots in the UK from sets or seed. Covers varieties, planting, spacing, harvesting, curing, and storage for British gardens.
Key takeaways
- Plant shallot sets from late February to mid-April, pushing them in until just the tip shows above the soil
- Space sets 15cm apart in rows 30cm apart for full-sized clusters
- Each set multiplies into a cluster of 6-12 bulbs, giving a much higher yield than onions
- Golden Gourmet and Longor are the most reliable UK varieties for beginners
- Harvest when the foliage yellows and topples, typically July to August
- Well-cured shallots store for 8-12 months in a cool, dry place — longer than most onions
Shallots are one of the most rewarding alliums for UK gardeners. Plant a single set in spring and by midsummer it splits into a cluster of 6-12 copper-skinned bulbs, each one sweeter and more delicate than a standard onion. That multiplication makes shallots one of the highest-yielding crops per square metre in a small garden or allotment.
Shallots thrive across Britain. They tolerate cold springs, cope with heavy clay if drainage is decent, and store for up to a year after curing. This guide covers varieties, planting, growing, harvesting, and long-term storage, all tested in British conditions. If you are new to growing food, our guide to starting a vegetable garden covers the broader essentials first.
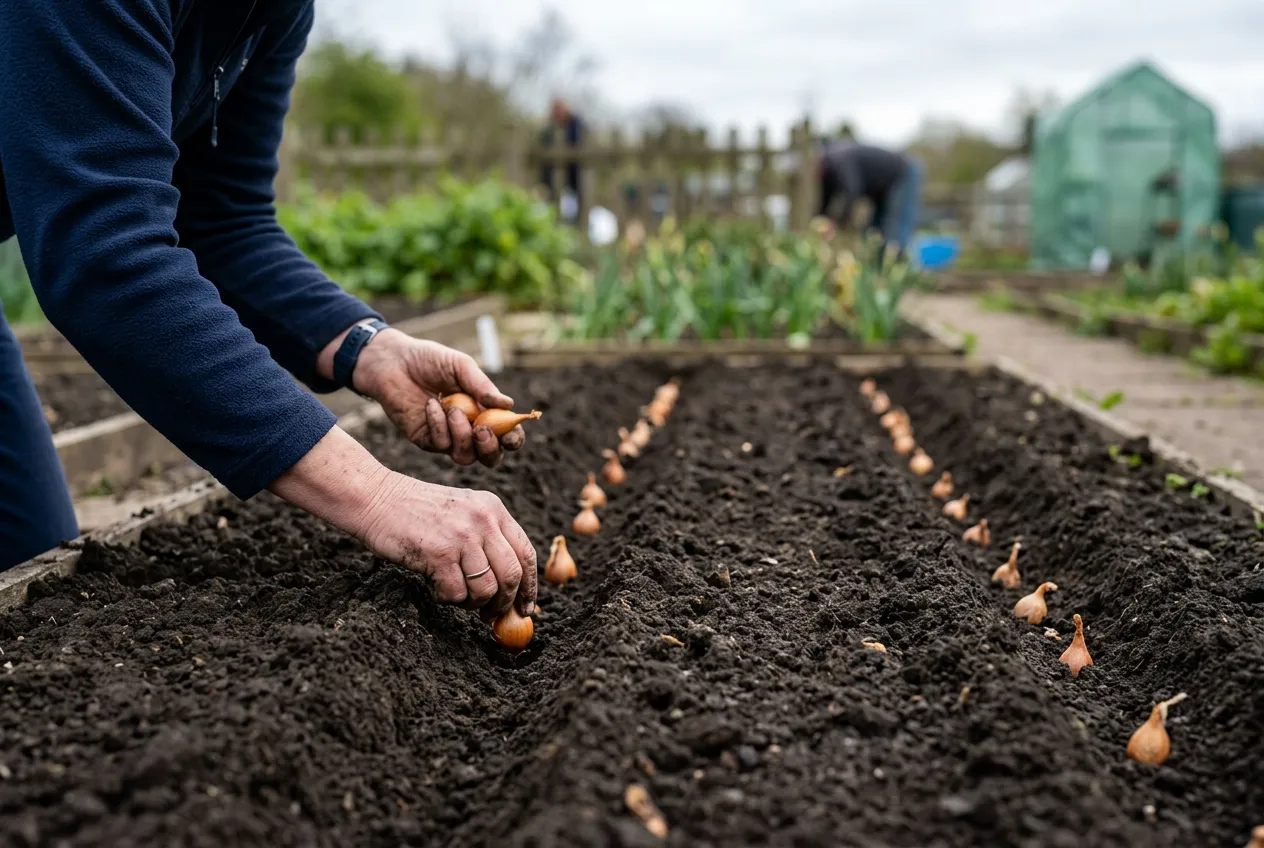 Planting shallot sets in rows at an allotment. Push each set into the soil until just the tip shows.
Should I grow shallots from sets or seed?
This is the first decision, and for most UK growers the answer is sets. The two methods produce different results.
Shallot sets are small, dormant bulbs sold from January onwards at garden centres and online suppliers. You push them into the soil in spring. Each set divides underground during the growing season and produces a cluster of 6-12 new bulbs by midsummer. Sets are quicker, simpler, and naturally form the clumps that make shallots so productive.
Shallot seed is sown indoors in January or February and transplanted outside in April. Seed-grown shallots produce a single bulb per plant rather than a cluster. They take 4-6 weeks longer to mature than sets. Seed is cheaper per plant and gives access to a wider range of varieties, but the yield per plant is lower.
| Factor | Sets | Seed |
|---|---|---|
| Ease | Very easy | Moderate |
| Time to harvest | 14-18 weeks | 20-24 weeks |
| Yield per plant | 6-12 bulbs (cluster) | 1 bulb (single) |
| Variety choice | 6-8 common varieties | 15+ varieties |
| Cost per bulb | 5-8p | Under 2p |
| Planting time | Feb-Apr (outdoors) | Jan-Feb (indoors) |
For beginners and anyone wanting the classic multi-bulb shallot clusters, sets are the clear choice.
Best shallot varieties for UK gardens
Choosing the right variety matters. These are proven performers in British conditions, all available from UK suppliers.
Yellow and brown varieties
- Golden Gourmet - the most popular UK shallot. Large, elongated bulbs with golden-brown skin and mild, sweet flesh. Each set produces 6-8 bulbs. Stores for 10-12 months. RHS Award of Garden Merit holder. The best all-round choice.
- Longor - a French banana-shaped shallot with coppery skin. Produces 8-10 elongated bulbs per set. Excellent flavour, slightly stronger than Golden Gourmet. Stores for 10-12 months. Ideal for fine dicing and French cooking.
- Jermor - another French favourite with long, torpedo-shaped bulbs and copper-pink skin. Produces 6-8 bulbs per set. Rich, concentrated flavour that caramelises beautifully. Stores for 8-10 months.
- Pesandor - elongated, pinkish-brown bulbs. Produces 6-8 per set. Slightly milder than Jermor. Good keeper at 8-10 months. Less widely available but worth seeking out.
Red varieties
- Red Sun - round, copper-red bulbs with pinkish flesh. Produces 5-7 bulbs per set. Milder than yellow varieties. Beautiful in salads. Stores for 6-8 months.
- Pikant - deep red-purple skin with white-and-red flesh. Strong flavour. Produces 5-6 bulbs per set. Stores for 6-8 months.
Variety comparison table
| Variety | Shape | Bulbs per set | Flavour | Storage | Best for |
|---|---|---|---|---|---|
| Golden Gourmet | Elongated | 6-8 | Mild, sweet | 10-12 months | All-round, beginners |
| Longor | Banana | 8-10 | Medium | 10-12 months | French cooking, yield |
| Jermor | Torpedo | 6-8 | Rich, complex | 8-10 months | Caramelising, chefs |
| Pesandor | Elongated | 6-8 | Mild-medium | 8-10 months | Everyday cooking |
| Red Sun | Round | 5-7 | Mild | 6-8 months | Salads, colour |
| Pikant | Round | 5-6 | Strong | 6-8 months | Pickles, raw eating |
Why we recommend Golden Gourmet for UK beginners: After 6 seasons of trialling shallot varieties on Staffordshire clay, Golden Gourmet consistently produces the largest clusters and keeps the longest in storage. It tolerates heavier soils better than the French elongated types and is available from every major UK seed supplier.
How to plant shallot sets
Planting shallot sets is straightforward. Get the timing and spacing right, and they need very little attention until harvest.
When to plant
Spring sets go in from late February to mid-April. Wait until the soil is dry enough to work without clogging. Soil temperature should reach at least 5C. In southern England, late February is fine. The Midlands suits mid-March. Northern England and Scotland should wait until late March or early April. For regional timing across all crops, see our UK vegetable planting calendar.
Autumn planting is possible with some varieties. Plant in October or November. Autumn-planted shallots overwinter in the ground and mature 4-6 weeks earlier the following summer. The risk is higher losses from frost damage and waterlogging on heavy soils.
Preparing the soil
Shallots prefer a sunny, open site with well-drained soil at pH 6.0-7.0. Dig in well-rotted compost several weeks before planting. Do not use fresh manure. High nitrogen causes soft, lush growth that stores poorly and increases the risk of neck rot.
On heavy clay, improving drainage is more important than adding fertility. Work in sharp grit at 1 bucketful per square metre. Our guide to improving clay soil covers the techniques that work best. Alternatively, grow shallots in raised beds filled with free-draining compost.
If you are unsure about your soil, a simple soil pH test takes minutes and saves a season of poor results.
Spacing and planting depth
Push each set into prepared soil so that just the tip shows above the surface. This means roughly two-thirds of the bulb sits below ground. Firm the soil gently around each one.
- Between sets: 15cm (shallots need more room than onions because each set produces a cluster)
- Between rows: 30cm
- A 3m row holds about 20 sets, which produces 120-240 individual shallots
Do not plant too deep. Buried sets rot in wet soil. Do not plant too shallow. Birds pull exposed sets out of the ground. The “tip just showing” rule gets the balance right.
Dealing with birds
Blackbirds and pigeons pull freshly planted sets from the soil. They mistake the papery tips for food. Cover newly planted rows with fleece or netting for 2-3 weeks until roots anchor the sets firmly. Alternatively, trim the wispy tip off each set before planting, leaving only the firm neck visible.
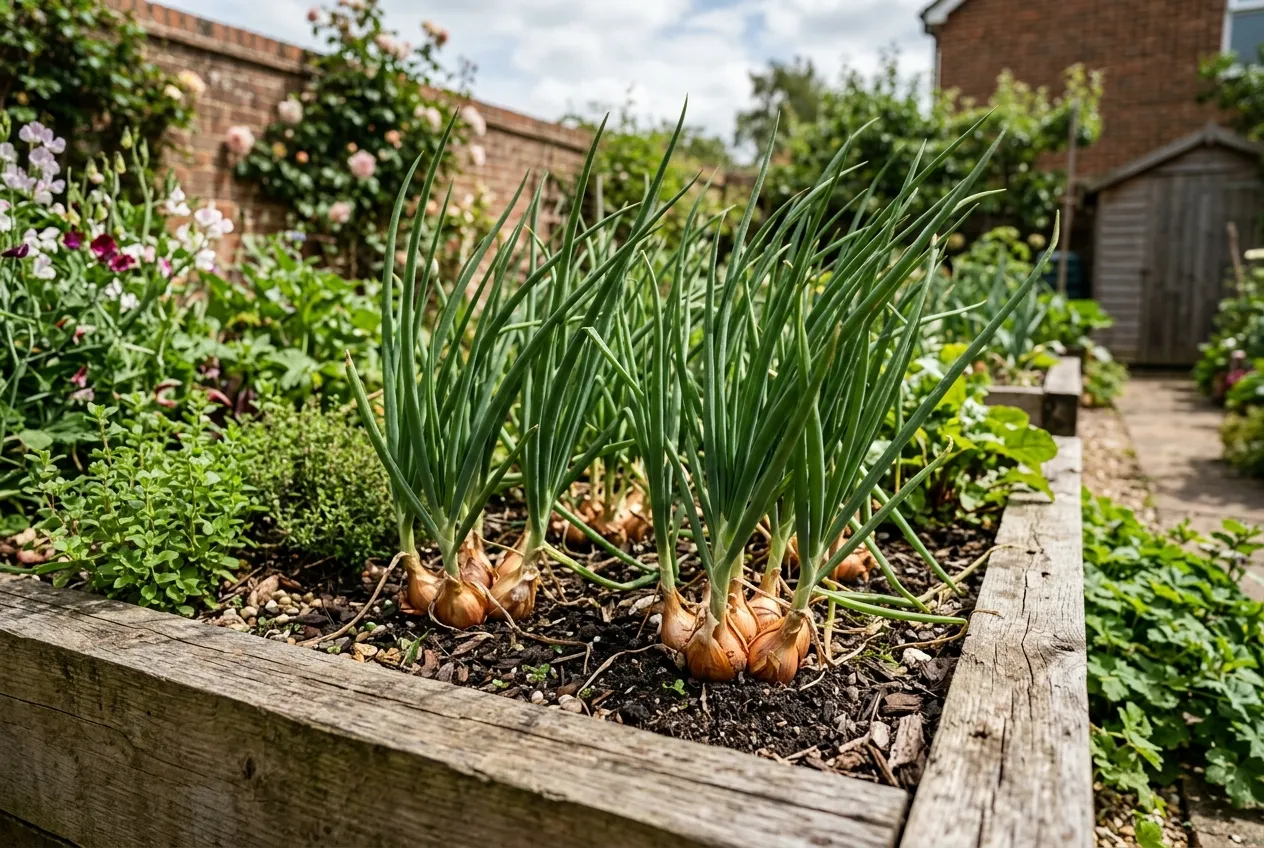 Shallots forming clusters in a raised bed. Each set has divided into multiple bulbs by midsummer.
Growing shallots through the season
Once planted, shallots are low-maintenance. A little attention at the right times makes a real difference to final bulb size.
Watering
Water during dry spells from April to June while the bulbs are dividing and swelling. One deep soak per week is better than frequent light watering. Overwatering causes rot, particularly on clay soils. Stop watering completely from early July as the foliage starts to die back. Wet bulbs at this stage will not cure or store well.
Feeding
Shallots are not hungry plants. If you dug in compost before planting, additional feeding is rarely needed. On poorer soils, a single application of a balanced fertiliser in April helps. Avoid high-nitrogen feeds. Too much nitrogen promotes leaf growth at the expense of bulb division and wrecks storage quality.
Weeding
Shallots compete badly with weeds. Their upright, narrow leaves cast almost no shade. Hoe between the rows regularly with a shallow, flat blade. Hand-weed within the clusters carefully to avoid disturbing the roots. A 3cm layer of mulch between rows suppresses weeds and retains moisture without holding dampness against the bulbs.
Companion planting
Shallots grow well alongside carrots. The strong scent of alliums deters carrot root fly, and carrots in turn repel onion fly. Avoid planting shallots near beans or peas, which can inhibit allium growth. Our companion planting guide covers these partnerships in detail.
Pests and diseases
Shallots share most pests and diseases with onions, but their faster establishment and stronger root systems make them slightly less vulnerable overall. For a broader view, see our organic pest control guide.
Onion fly
The adult fly lays eggs at the base of plants from May to July. Larvae burrow into the bulbs, causing rot. Cover rows with fine mesh from May onwards. Sets are less affected than seed-raised plants because they establish faster.
White rot
A soil-borne fungus causing white fluffy mould at the bulb base. There is no chemical cure for home gardeners, and spores persist in the soil for 15-20 years. Practice strict crop rotation. Never grow alliums in the same bed for more than two consecutive years. If your plot has a history of white rot, grow shallots in raised beds with fresh compost.
Downy mildew
Grey-purple patches on leaves, worst in wet summers. Improve airflow by spacing correctly. Remove badly affected leaves. The RHS allium growing guide covers identification and treatment.
Bolting
Shallots bolt (produce flower stems) less frequently than onions. Cold snaps after planting are the usual trigger. Choose bolt-resistant varieties and avoid planting into cold, waterlogged soil. Remove any flower stems immediately to redirect energy into the bulbs.
Month-by-month shallot calendar
| Month | Task |
|---|---|
| January | Order sets from suppliers. Sow seed indoors in modules at 15-18C if growing from seed |
| February | Plant sets in southern England from late month. Prepare beds with compost and grit |
| March | Main planting month across most of the UK. Cover rows with netting against birds |
| April | Complete planting in northern regions. Begin weeding. Water if dry |
| May | Hoe between rows. Water during dry spells. Watch for onion fly |
| June | Continue watering in dry periods. Bulbs are dividing and swelling |
| July | Foliage begins to yellow. Stop watering. Prepare for harvest |
| August | Harvest remaining shallots. Begin curing. Clear beds for autumn crops |
| September | Complete curing. Move cured bulbs to storage. Save best sets for next year |
| October | Plant overwintering varieties if desired. Order spring sets |
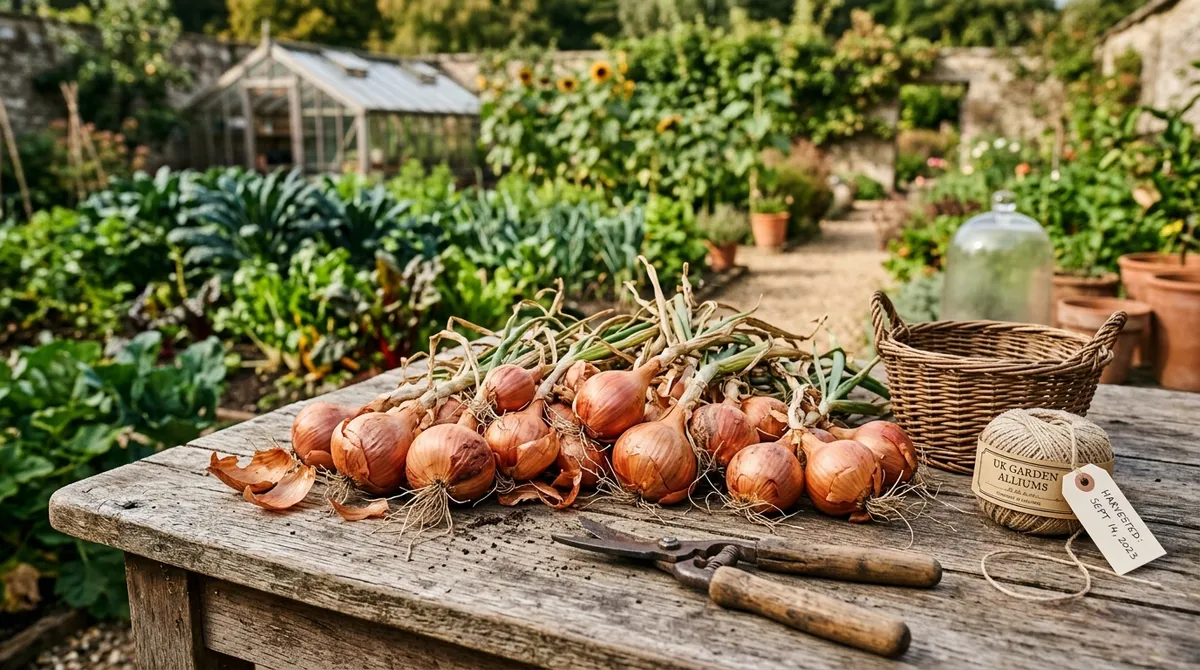
How to harvest shallots
 Copper and red shallots drying on a wire rack in a garden shed. Cure for 10-14 days before storing.
Timing the harvest correctly determines how long your shallots will keep.
When to harvest
Shallots are ready when the foliage yellows, dries, and topples over naturally. This happens between late July and mid-August for spring-planted sets. Do not bend the tops over yourself. This old practice damages the neck and introduces disease.
Each cluster should contain 6-12 firm bulbs with papery outer skins. If the skins are still green or soft, leave the plants for another week.
How to lift
Ease a fork under the cluster and lift gently. Do not pull by the stems. Shake off loose soil but do not wash the bulbs. Wet shallots rot quickly. Separate the clusters into individual bulbs.
Curing
Lay individual bulbs in a single layer on a wire rack, greenhouse bench, or wooden pallet. Choose somewhere dry, warm, and airy with good airflow. A greenhouse, shed, or covered porch all work well.
Cure for 10-14 days until the outer skins rustle when touched, the neck feels dry and tight with no soft spots, and the roots are shrivelled and brittle. Once cured, trim roots to 1cm and cut stems to 3cm above the bulb.
Storing shallots
Properly cured shallots store far longer than most onion varieties. This is one of their greatest advantages for home growers.
Store in nets, old tights, or open crates hung or placed in a cool, dry, frost-free spot. Aim for 5-10C with good airflow. A garage, shed, or unheated utility room is ideal. Avoid kitchens, where warmth shortens storage life.
Storage life by variety:
- Golden Gourmet: 10-12 months
- Longor: 10-12 months
- Jermor: 8-10 months
- Pesandor: 8-10 months
- Red Sun: 6-8 months
- Pikant: 6-8 months
Check stored shallots every 3-4 weeks. Remove any that feel soft, show mould, or have started sprouting. One spoiled bulb spreads rot to its neighbours quickly.
Saving sets for next year
Select 15-20 of the firmest, medium-sized bulbs from each variety at harvest. Store these separately. Plant them the following spring. This is the traditional method of propagating shallots and costs nothing after the first year. After 3-4 seasons, buy fresh stock to avoid accumulated disease.
Growing shallots in containers
Shallots grow well in pots and troughs at least 25cm deep with good drainage holes. Fill with multipurpose compost mixed with 20% perlite or grit. Space sets 12cm apart. Water regularly, as containers dry out faster than open ground. Feed once in April with a balanced liquid fertiliser. One 40cm container holds 5-6 sets and produces 30-50 individual shallots by summer.
Container growing is ideal for balcony gardens or plots with soil disease problems. The contained compost can be replaced each year, avoiding white rot issues that persist in open ground. For more container ideas, our guide to growing in grow bags covers the technique in detail.
Shallots vs onions: which should you grow?
Both deserve space in a UK kitchen garden. They fill different roles.
| Factor | Shallots | Onions |
|---|---|---|
| Flavour | Mild, sweet, less sulphur | Stronger, more pungent |
| Yield | 6-12 bulbs per set | 1 bulb per set |
| Bulb size | 3-5cm | 6-10cm |
| Storage life | 8-12 months | 3-6 months |
| Planting depth | Tip just showing | Tip just showing |
| Spacing | 15cm x 30cm | 10cm x 25cm |
| Harvest | July-August | July-September |
| Best use | French cooking, sauces, pickling | Everyday cooking, bulk |
If you only have space for one allium, shallots give better value per square metre. If you want both, our guides to growing onions and growing garlic cover the full details.
Cooking and preserving shallots
Home-grown shallots taste noticeably different from shop-bought. The flesh is firmer, the sweetness more pronounced, and the lack of sulphur compounds means less eye-watering when chopping.
Best uses in the kitchen:
- Diced finely for vinaigrettes and French sauces (the classic sauce béarnaise relies on shallots)
- Roasted whole with balsamic vinegar until caramelised
- Pickled in malt vinegar with a bay leaf and peppercorns
- Sliced raw in salads where standard onions would overpower
For preserving larger harvests, our guide to preserving fruit and vegetables covers pickling and other methods that extend the season further.
Lawrie has been gardening in the West Midlands for over 30 years. He grows his own veg using no-dig methods, keeps a wildlife-friendly garden, and writes practical advice based on real UK growing conditions.