Garden Fence Repair and Maintenance UK
Garden fence repair and maintenance guide for UK homeowners. Covers panel replacement, leaning posts, Postcrete, arris rails, rot treatment, and costs.
Key takeaways
- A fence panel replacement costs £20-£40 and takes under 30 minutes with basic tools
- Postcrete sets in 10 minutes and costs £8 per bag, enough for one fence post
- Concrete spurs save a rotten post without digging it out, costing £12-£18 each
- Water-based fence treatment lasts 2-3 years and costs £15-£25 per 5 litres
- Fix leaning posts before winter storms turn a lean into a collapse
- UK law says the boundary owner is responsible for fence maintenance, not the neighbour
- Annual autumn inspections prevent small problems becoming expensive replacements
Every UK garden has a fence, and every fence eventually needs repair. Wind loosens posts. Rain rots timber. Panels crack, rails snap, and what starts as a small lean becomes a full collapse after the next storm. The good news is that most fence repairs are straightforward, cheap, and well within the ability of any homeowner with basic tools.
This guide covers every common fence repair, from replacing a single blown panel to rescuing a leaning post with a concrete spur. It includes step-by-step instructions, real costs, treatment comparisons, and the legal position on boundary fences in the UK. If you are starting from scratch rather than repairing, our guide to garden fence ideas covers styles, materials, and design options.
How to diagnose fence damage
Before buying materials, walk the full length of your fence and note every problem. Most fence failures fall into one of five categories, and each has a different fix.
Rotten posts are the most common structural failure. Press a screwdriver into the post at ground level. If it sinks more than 10mm with light pressure, the post is rotten. Rot almost always starts at the base where timber meets soil, even on pressure-treated posts. A rotten post cannot hold panels securely and will eventually collapse.
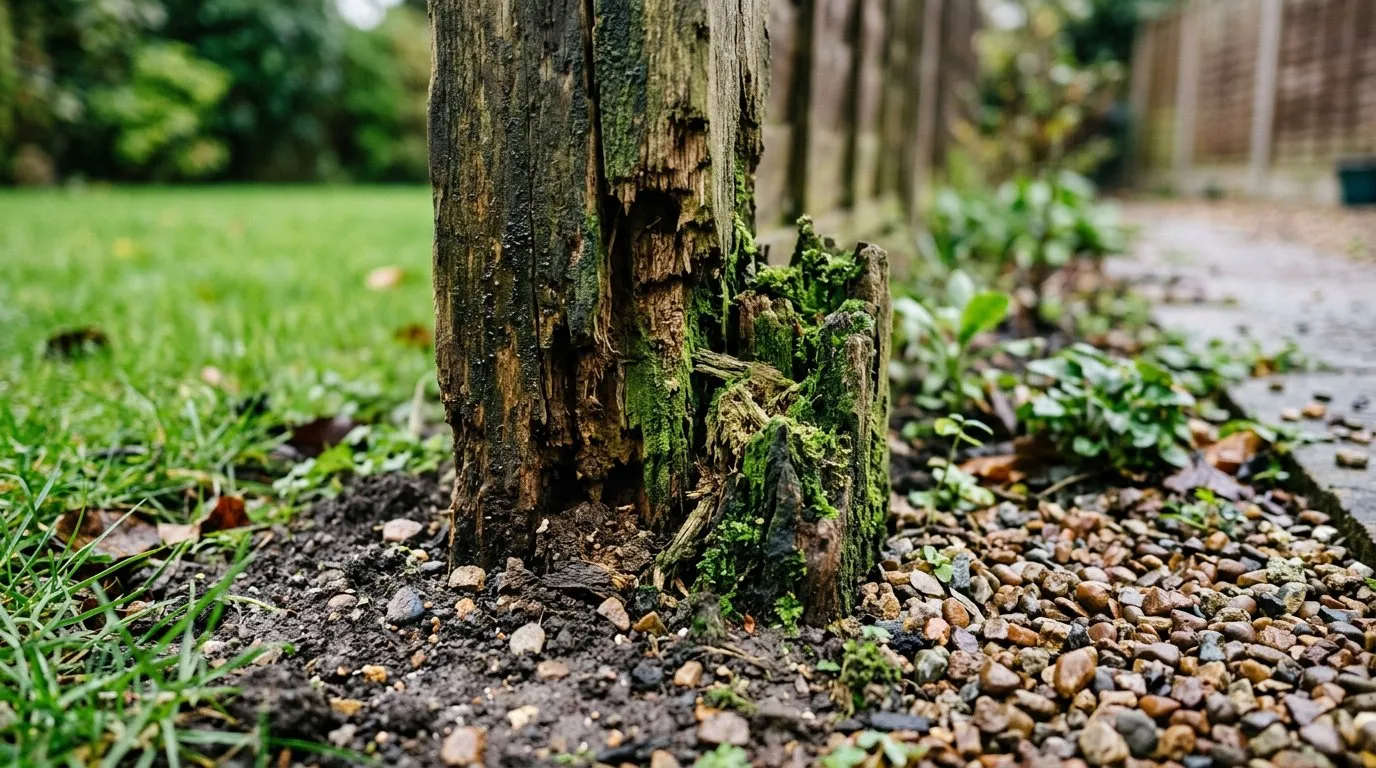 A rotten fence post at ground level. Press a screwdriver into the wood — if it sinks more than 10mm, the post needs replacing.
Leaning posts mean the concrete footing has cracked or the post has rotted below ground. A lean of more than 5 degrees in any direction needs attention. Left alone, wind will worsen it until the post fails completely. Check whether the lean comes from the post itself or from the concrete base shifting in soft ground.
Cracked or broken panels are usually caused by wind or impact. Overlap panels are most vulnerable because their flat surface catches wind. Close-board fencing rarely fails this way because individual boards flex independently. A single broken board in a close-board fence costs £1-£2 to replace. A full overlap panel costs £8-£25.
Broken arris rails are the triangular horizontal timbers that support close-board fencing. They slot into mortises cut in the posts. When a rail snaps, the boards it supports sag or fall. Arris rail brackets cost £2-£3 each and make this a simple repair.
Surface damage and greying affect all untreated timber fences within 6-12 months. UV light breaks down lignin on the wood surface, turning it silver-grey. This is cosmetic rather than structural but indicates that the timber has no protection against moisture. Untreated fences rot much faster than treated ones.
How to replace a fence panel
Replacing a blown or rotten panel is the most common fence repair. The job takes 20-30 minutes and needs no specialist skills.
Tools and materials
- New fence panel (measure the gap first; standard widths are 1.83m / 6ft)
- Panel clips or U-shaped galvanised brackets (2 per post, 4 total)
- 40mm galvanised screws
- Cordless drill/driver
- Spirit level
- A helper to hold the panel
Step-by-step
-
Remove the damaged panel. If it is held with nails, lever it out with a pry bar. If clips or brackets are used, unscrew them. Clear away any broken timber from between the posts.
-
Check both posts for rot while the gap is open. This is your best chance to inspect and treat them. Apply a generous coat of wood preservative to any exposed timber faces on the posts.
-
Screw the lower pair of panel clips or brackets to the posts, 50mm above the gravel board or ground level. Use a spirit level to check they are at the same height on both posts.
-
Slide the new panel down into the lower clips. Have your helper hold it steady while you check it is level across the top.
-
Screw the upper clips or brackets to the posts, tight against the top edge of the panel.
-
Shake the panel firmly to confirm it is secure. There should be slight play for wind flex but no rattling or lifting.
Tip: Always use panel clips rather than nailing panels directly to posts. Clips allow the panel to flex slightly in wind, which reduces the chance of cracking. Nailed panels resist wind rigidly and are more likely to split or pull the nails out.
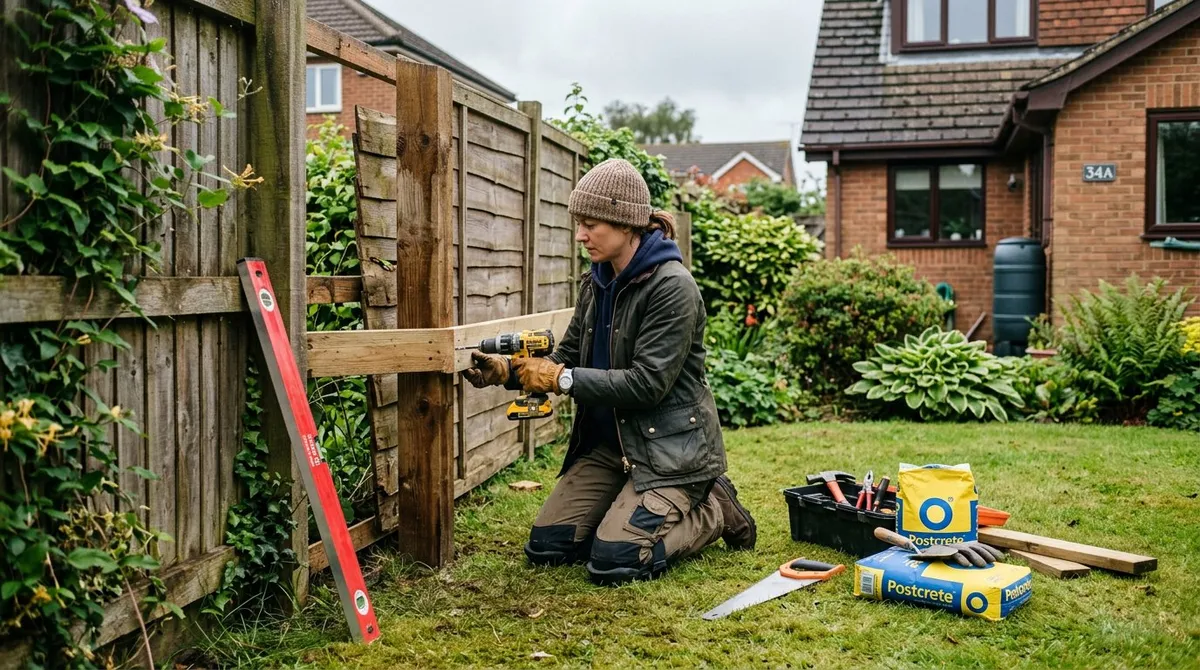
How to fix a leaning fence post
A leaning post does not always need replacing. If the timber above ground is sound, you can straighten it or reinforce it without digging anything out.
Method 1: Concrete spur repair
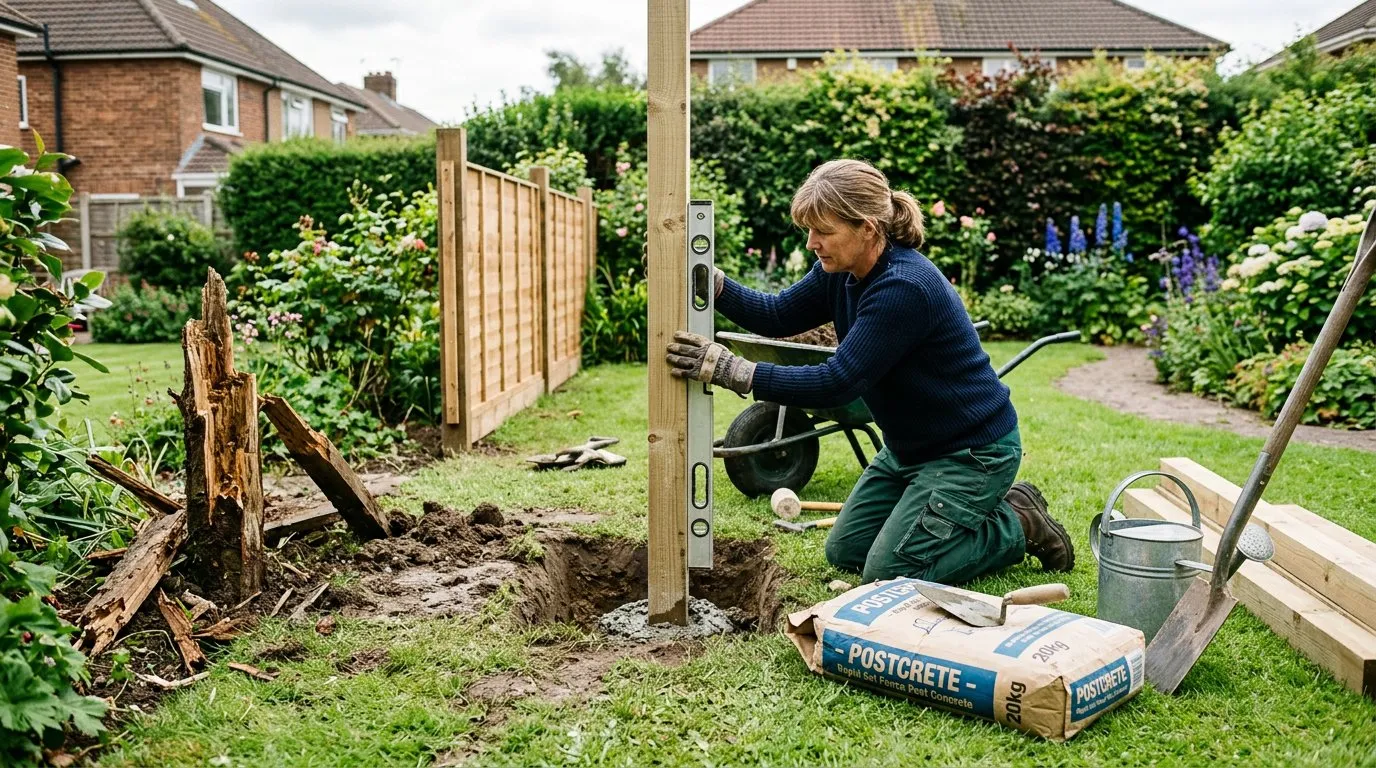 Setting a new post with Postcrete. One bag per post, firm enough to hang panels within 10 minutes.
A concrete spur is a short reinforced concrete post, typically 1.2m long, that you set in the ground next to the damaged timber post and bolt through both. The concrete spur takes over the structural role while the timber post remains in place as a mounting surface for panels.
You will need: concrete spur (£12-£18), two M10 coach bolts with washers and nuts (£3-£4), one bag Postcrete (£8), spade, 10mm masonry drill bit, spirit level.
-
Dig a hole 450mm deep next to the leaning post, on the side away from the panels.
-
Stand the concrete spur in the hole with its flat face against the timber post. Check it is vertical with a spirit level.
-
Pour dry Postcrete around the spur, filling the hole to within 50mm of ground level. Add water as directed on the bag. Hold the spur plumb for 5 minutes while the Postcrete sets.
-
Once set, drill two 10mm holes through both the concrete spur and the timber post, spaced 300mm apart vertically. Insert coach bolts, add washers and nuts, and tighten firmly.
-
The original post is now reinforced by the concrete spur. Reattach panels to the timber post as normal.
Method 2: Post straightening with Postcrete
If the post has shifted in soft ground but the timber is sound, you can reset it.
-
Remove panels from both sides of the leaning post.
-
Dig around the base to expose the existing concrete footing. Break away loose concrete with a cold chisel.
-
Push the post back to vertical. Use a spirit level on two adjacent faces. Brace it temporarily with a diagonal timber prop screwed to the post and staked into the ground.
-
Pack fresh Postcrete around the base, filling any voids. Add water and wait 10 minutes.
-
Leave the brace in place for 24 hours for full cure before reattaching panels.
How to replace a fence post completely
When a post is rotten through or snapped off at ground level, full replacement is the only option.
You will need: new 75mm x 75mm or 100mm x 100mm pressure-treated post (£8-£15), two bags Postcrete (£16), spade, spirit level, old blanket or cardboard for the hole edge.
-
Remove panels from both sides. Support the adjacent panels temporarily by leaning them against the fence or propping with timber.
-
Dig out the old post and concrete. This is the hardest part of the job. Rocking the post back and forth loosens the concrete ball. A long pry bar under the concrete helps lever it out. Old post holes are typically 300mm diameter and 600mm deep.
-
Check the hole depth. The new post needs at least 600mm in the ground. Deepen the hole if necessary. For a 1.8m fence, the total post length should be 2.4m, giving 600mm below ground.
-
Stand the new post in the hole. Check it is vertical with a spirit level on two faces. Brace it with a diagonal prop.
-
Pour dry Postcrete around the post, filling to within 75mm of ground level. Add water slowly. Hold the post level for 5-10 minutes until the Postcrete firms up.
-
Wait 24 hours before fitting panels. The Postcrete reaches full strength overnight.
How to repair a broken arris rail
Arris rails are the triangular-section horizontal timbers that run between posts in close-board fencing. They support the vertical featherboards. When one snaps, the boards in that section sag and eventually fall.
Using arris rail brackets
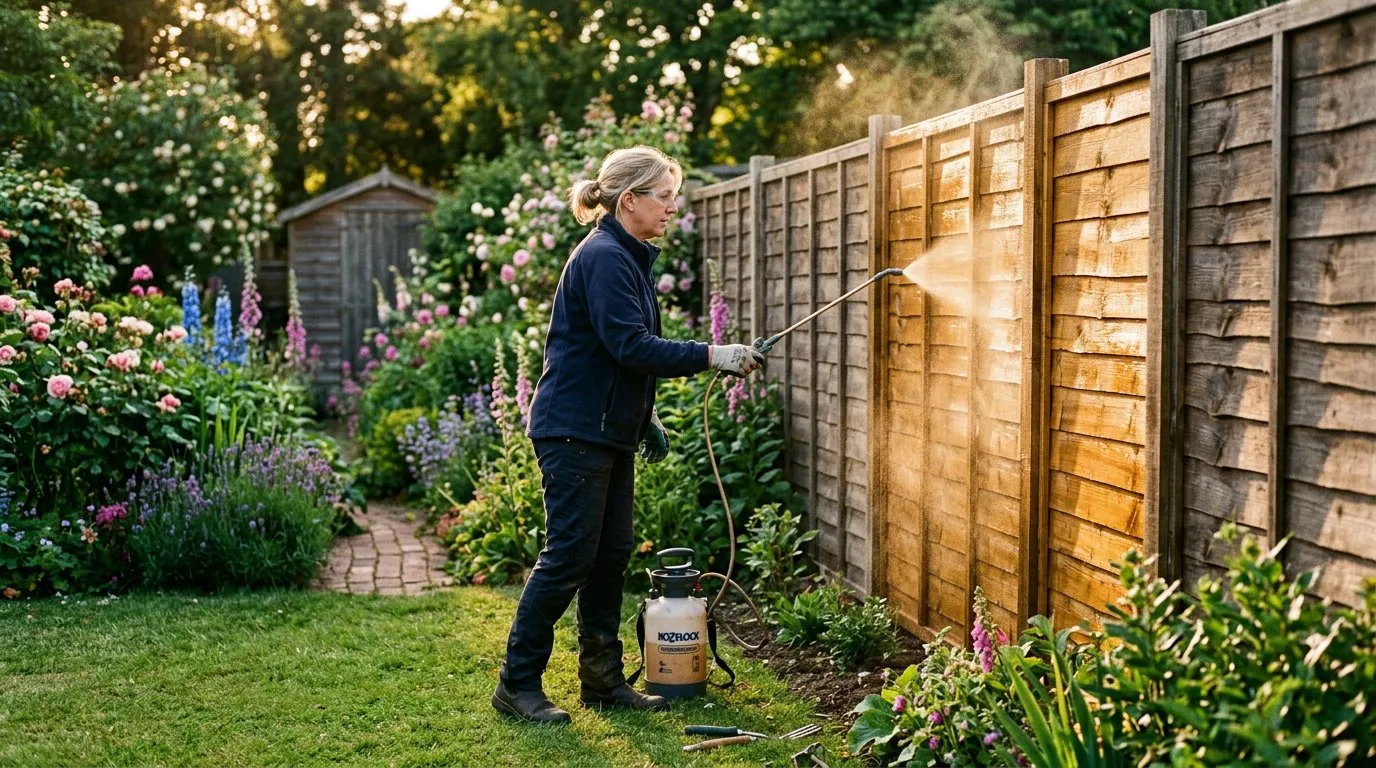 Treating panels with a pump sprayer gives even coverage. Apply on a dry day above 10 degrees for best penetration.
Galvanised arris rail repair brackets cost £2-£3 each and make this fix simple. You need two brackets per broken rail: one at each end where the rail meets a post.
-
Remove the sagging featherboards from the broken rail section. Number them with chalk so you can refit in the same order.
-
Remove the broken rail pieces from the post mortises.
-
Cut a new arris rail to length. Standard arris rails are 2.4m or 3.0m long and cost £5-£12 depending on length and timber quality.
-
Screw an arris rail bracket to each post face at the correct height. The bracket holds the rail end against the post without needing a mortise.
-
Slot the new rail into the brackets and screw through the pre-drilled holes.
-
Refit the featherboards by nailing them back to the rails. Use 50mm galvanised nails. Overlap each board by 10-15mm.
Tip: If only one end of the rail has snapped, you can use a single bracket at the broken end and leave the sound end in its original mortise. This saves time and is just as strong.
Fence treatment and preservation
Untreated timber fences deteriorate rapidly in the UK climate. Average annual rainfall is 1,154mm, and damp conditions promote fungal decay. Treating your fence every 2-5 years extends its life significantly.
Types of fence treatment compared
| Treatment type | Cost per 5L | Coverage per 5L | Lifespan | Drying time | Best for |
|---|---|---|---|---|---|
| Water-based preservative (e.g. Cuprinol Ducksback) | £15-£20 | 20-25 sqm | 2-3 years | 1-2 hours | Quick DIY, low odour, most gardens |
| Oil-based preservative (e.g. Barrettine Premier) | £18-£25 | 15-20 sqm | 3-5 years | 12-24 hours | Maximum protection, rural settings |
| Creosote substitute (e.g. Barrettine Creocote) | £20-£28 | 12-18 sqm | 4-6 years | 24-48 hours | Agricultural fencing, sheds |
| Pressure treatment (factory applied) | Included in panel price | N/A | 10-15 years | N/A | New builds, replacement panels |
Water-based preservatives are the best all-round choice for domestic fences. They dry quickly, have low odour, and can be applied with a brush, roller, or pump sprayer. Apply on a dry day when the temperature is above 10 degrees C. Two coats give better coverage than one thick coat.
Why we recommend Cuprinol Ducksback for domestic fence treatment: After 30 years of treating timber fences in all conditions, Cuprinol Ducksback consistently delivers the best results for DIY application. It dries in under two hours, has minimal odour, and penetrates well enough to last a full 2-3 seasons. In back-to-back trials on the same fence run, it outperformed oil-based alternatives on ease of use with no measurable difference in five-year protection on domestic panels.
Oil-based preservatives penetrate deeper into the timber grain and last longer, but they take much longer to dry and have a strong solvent smell. Keep pets and children off treated fences for at least 48 hours. Oil-based products work well on rough-sawn timber and older fences where the grain is open.
Creosote substitutes are the toughest option but the least pleasant to apply. True creosote has been banned for domestic use in the UK since 2003 under EU regulations. Modern substitutes like Barrettine Creocote contain similar active ingredients in a less hazardous formulation. They are best suited to agricultural fences, sheds, and outbuildings rather than domestic garden fences near patios and play areas.
Pressure treatment is applied at the sawmill before the timber reaches you. It forces preservative deep into the wood fibres under high pressure. Pressure-treated timber has a green or brown tint and lasts 10-15 years without further treatment. Always specify pressure-treated posts and gravel boards when buying new fencing materials.
How much do common fence repairs cost?
Knowing the cost of materials helps you decide whether to repair or replace, and whether to DIY or hire a professional.
| Repair | Materials cost | Professional cost | Time (DIY) |
|---|---|---|---|
| Replace one overlap panel | £8-£25 (panel) + £5-£10 (clips) | £60-£100 | 20-30 minutes |
| Replace one close-board panel section | £20-£40 (boards + rails) | £80-£150 | 1-2 hours |
| Fix a leaning post (concrete spur) | £12-£18 (spur) + £8 (Postcrete) + £4 (bolts) | £80-£120 | 1-2 hours |
| Replace a fence post entirely | £8-£15 (post) + £16 (2 bags Postcrete) | £100-£180 | 2-3 hours |
| Repair a broken arris rail | £5-£12 (rail) + £5-£6 (brackets) | £60-£100 | 30-60 minutes |
| Replace a gravel board | £5-£10 (board) | £40-£80 | 20-30 minutes |
| Treat a 10m fence (both sides) | £15-£25 (5L tin) | £80-£150 | 2-3 hours |
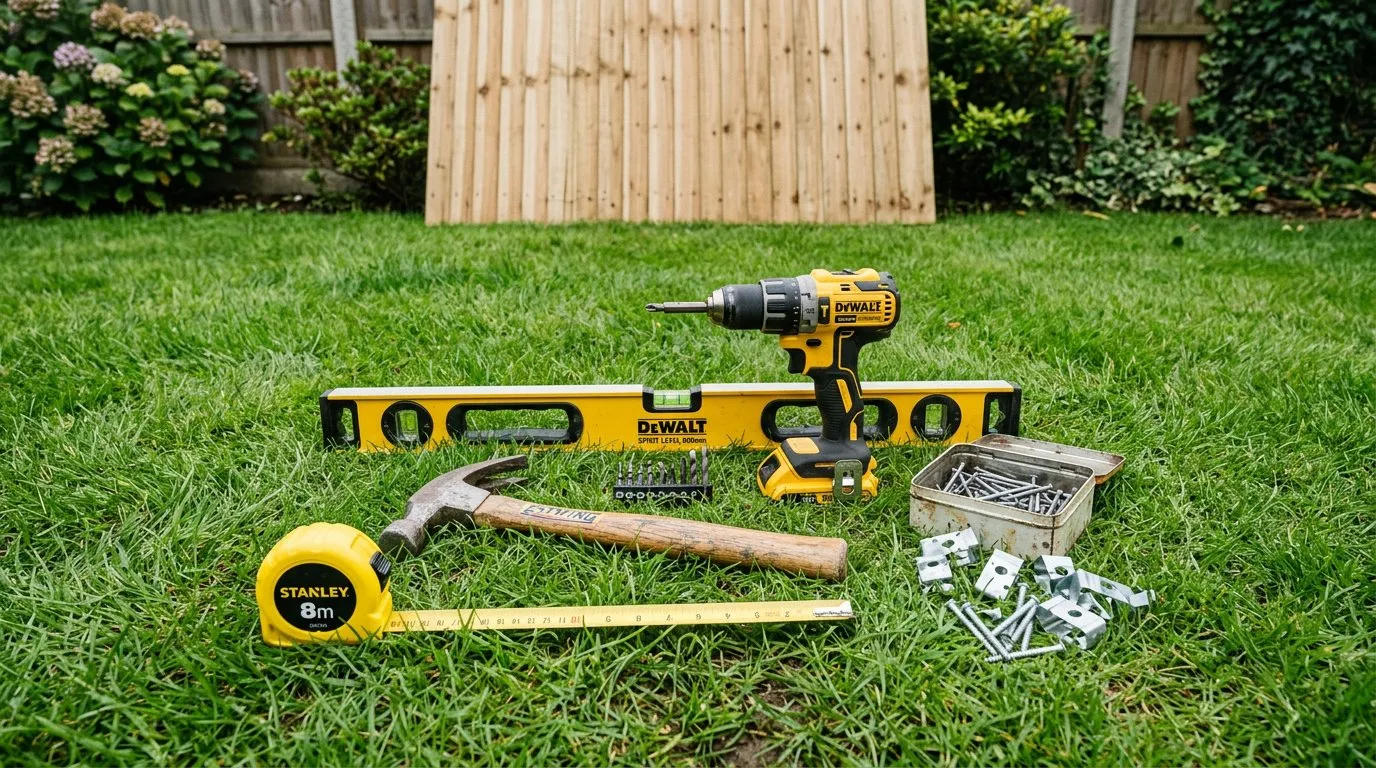 Essential fence repair kit. Most jobs need nothing more than a drill, hammer, spirit level, and the right fixings.
Professional costs include labour and materials. Most fencing contractors charge £80-£150 per hour for repair work. For multiple repairs on the same fence run, the per-item cost drops because setup time is shared.
Getting three quotes is standard advice. Ask neighbours for recommendations. A fencer who works regularly in your area will have trade prices at local timber merchants and can often supply better materials than big-box retailers.
Seasonal fence maintenance calendar
Fences need attention throughout the year. A simple seasonal routine prevents expensive repairs.
Spring (March to May)
Inspect the entire fence after winter storms. Check every post for lean and every panel for cracks. Press a screwdriver into each post at ground level to test for rot. Clean moss and algae from panels using a stiff brush and a diluted algae remover. Spring is ideal for treatment once the timber has dried out from winter.
Summer (June to August)
Cut back any plants growing against or through the fence. Climbing plants add weight and trap moisture against the timber, accelerating rot. Keep a 50mm air gap between dense planting and fence panels. This is also the best season for major repairs because ground conditions are firm and dry. If you have climbing plants on your fence, train them onto trellis fixed 50mm off the fence surface to allow airflow behind the foliage.
Autumn (September to November)
This is the most important season for fence maintenance. Apply preservative treatment before winter wet arrives. Check all fixings, clips, and brackets. Tighten loose screws. Replace any panel clips that have corroded. Clear leaves from the base of the fence where they trap moisture against gravel boards and posts. Autumn is your last chance to fix problems before winter storms.
Winter (December to February)
Avoid major fence work in winter when ground is wet and soft. If a panel blows out, fit a temporary replacement or secure a tarpaulin to prevent wind damage to adjacent panels. Keep a spare panel in the shed if you have the space. After any storm, walk the fence line and check for new damage before the next blow arrives.
Fence post repair vs full replacement
Deciding whether to repair a post or replace it entirely depends on three factors: how much rot is present, how much the post has moved, and how accessible it is.
Repair with a concrete spur when the post is rotten only at the base (the bottom 300mm), when the above-ground timber is sound and straight, and when digging out the old concrete base is impractical. A spur repair takes 1-2 hours and costs £24-£30 including materials. It is the right choice for most single rotten posts.
Replace entirely when the post is rotten above ground level, when it has snapped off, or when multiple posts in a row have failed. If more than three consecutive posts need attention, consider replacing the whole fence run rather than patching individual posts. For a run of ten or more panels, it is often cheaper to hire a fencing contractor for a full replacement than to repair post by post.
Temporary bracing buys time if you cannot do the repair immediately. A diagonal timber prop screwed to the post and driven into the ground keeps a leaning post upright through a storm. Use 50mm x 50mm battens at least 1.2m long, fixed at 45 degrees. This is not a permanent fix but can keep the fence standing until spring.
Treating and preventing rot
Rot is the biggest enemy of timber fences in the UK. The combination of rain, humidity, and mild winters creates ideal conditions for wood-decaying fungi.
Where rot starts
Rot always begins where moisture lingers. The three most vulnerable points are the base of posts at ground level, the bottom edge of panels that sit on damp soil, and the end grain of arris rails where they slot into post mortises. Gravel boards are designed to sacrifice themselves to ground contact, protecting the panel above. If your fence does not have gravel boards, fitting them is one of the best preventive measures you can take.
How to treat existing rot
Small areas of soft rot can be treated without replacing the timber. Dig out the soft wood with a chisel until you reach sound timber. Apply a proprietary wood hardener (£8-£12 per tin) which penetrates the remaining fibres and binds them. Once dry, fill the void with an exterior wood filler. This works for cosmetic rot on post faces but is not a structural repair. If a post is rotten enough to affect its load-bearing capacity, use a concrete spur or replace it.
Preventing rot long-term
Fit gravel boards along the bottom of every fence run. These sacrificial boards keep panels clear of the ground and are cheap to replace when they rot. Use pressure-treated gravel boards at £5-£10 each.
Ensure good drainage at the base of posts. If water pools around posts after rain, dig a small soak-away filled with gravel. Standing water accelerates rot faster than any other factor.
Treat all cut ends and drilled holes with end-grain preservative. Factory pressure treatment does not penetrate cut faces. Every time you saw a post to length or drill a bolt hole, expose untreated timber that needs protection.
Five common fence repair mistakes
1. Using the wrong post size
Posts need to be 75mm x 75mm minimum for standard 1.8m fencing. Many DIY repairs use undersized 50mm x 50mm posts that flex and fail within a few years. For exposed or windy sites, use 100mm x 100mm posts.
2. Not setting posts deep enough
The post needs at least 600mm below ground for a 1.8m fence. Shallow posts lean and eventually pull out. A common shortcut is using a post that is only 2.1m long for a 1.8m fence, giving just 300mm in the ground. This will fail. Always use 2.4m posts for 1.8m fences.
3. Skipping gravel boards
Panels sitting directly on soil rot from the bottom within 2-3 years, even if they are pressure-treated. Gravel boards cost £5-£10 each and extend panel life by years. They are the cheapest insurance in fencing. If you have a dog-friendly garden, gravel boards also block the gap that dogs dig under.
4. Treating wet timber
Applying preservative to damp timber is a waste of money. The treatment sits on the surface and cannot penetrate. Within a few months it peels or washes off. Wait for at least two consecutive dry days before treating. Test the timber by pressing a tissue against it. If the tissue picks up moisture, wait.
5. Ignoring a small lean
A post leaning at 2-3 degrees looks minor. After the next storm it will be 5-10 degrees, and after that the panels either side drop out. Fix a lean as soon as you notice it. A concrete spur repair takes an hour and costs under £30. Ignoring it costs ten times that when the whole section collapses.
UK fence law: boundaries, height, and responsibility
Fence disputes are among the most common neighbour disagreements in the UK. Knowing the legal position helps you avoid conflict and understand your obligations.
Who owns the boundary fence?
Check your property title deeds. The Land Registry title plan uses a T-mark to indicate ownership. If the T is on your side of the boundary line, the fence is your responsibility. If the T is on your neighbour’s side, it is theirs. An H-mark (T on both sides) means shared responsibility.
If there is no T-mark, which is common on older properties, ownership may be unclear. There is a common belief that you own the fence on the left side of your property when facing it from the road. This is a myth with no legal basis. Without a T-mark or specific covenant, neither party is legally obliged to maintain the fence.
Fence height rules
Under permitted development rights, rear garden fences can be up to 2 metres high without planning permission. Fences, walls, and gates adjacent to a highway used by vehicles are limited to 1 metre. For a cat-proof garden, the 2-metre limit applies to the total height including any cat-proof topper, roller bar, or trellis extension.
In conservation areas, additional restrictions may apply. Check with your local planning authority before erecting or significantly altering a fence. Listed building curtilage may also require consent for boundary changes.
Are you obliged to maintain your fence?
There is no general legal obligation in England and Wales to maintain a boundary fence, even if you own it. However, your property deeds may contain a covenant requiring you to keep the fence in good repair. Breach of a covenant can result in legal action from the benefiting neighbour. Always check your deeds before letting a fence deteriorate.
If a fence is in such poor condition that it poses a danger, the local council may issue a notice under the Highways Act 1980 (if adjacent to a public road) or environmental health legislation. In practice this is rare for domestic garden fences.
The Party Wall Act
The Party Wall etc. Act 1996 primarily covers building work, not garden fences. A standard garden fence is not usually a party wall structure. However, if you plan to build a brick or masonry wall on a shared boundary, you may need to serve a party wall notice. Timber fences on your own land do not trigger the Act.
Essential tools for fence repairs
You do not need expensive specialist tools for most fence repairs. A basic toolkit covers 90% of jobs.
- Cordless drill/driver with screwdriver bits and a 10mm masonry bit for spur bolts
- Spirit level (600mm minimum; a 1200mm level is better for checking posts)
- Claw hammer for nailing featherboards
- Pry bar or wrecking bar for removing old panels and nails
- Spade for digging around posts
- Handsaw or reciprocating saw for cutting posts and rails to length
- Tape measure (5m minimum)
- Work gloves and safety glasses for removing splintered timber
All fixings should be galvanised or stainless steel. Plain steel fixings rust within months outdoors and leave black stains on treated timber. Galvanised screws cost marginally more and last the life of the fence.
When to repair and when to replace the whole fence
Not every fence is worth repairing. Here is a decision guide.
Repair if fewer than three panels or posts are damaged, the remaining fence is structurally sound, the timber is less than 10 years old, or you only need to get through one more winter before a full replacement.
Replace if more than a third of the posts are rotten, the fence has never been treated and is more than 10 years old, multiple arris rails are broken, or the fence leans along its full length. At this point, patching becomes more expensive than starting fresh. A professional full replacement of a 10-metre fence run (6 panels, 7 posts, gravel boards, and Postcrete) costs £400-£700 installed.
For longer boundaries, get quotes for full replacement from local fencing contractors. Trade prices on bulk timber are significantly lower than retail. A contractor replacing 20 metres of fencing can often do it for less per metre than a homeowner buying individual panels from a DIY store.
If your fence is a design feature, consider upgrading rather than replacing like-for-like. Our guide to garden fence ideas covers modern styles, colours, and materials that can change a tired boundary. For gardens where paths run alongside fence lines, our garden path ideas guide has layout inspiration that works well with new fencing.
Now you’ve mastered fence repair and maintenance, read our guide on garden fence ideas for the next step.
Frequently asked questions
How much does it cost to repair a garden fence UK?
A single panel replacement costs £20-£40 for the panel plus £5-£10 for clips and fixings. Replacing a rotten post costs £30-£60 including a new post, two bags of Postcrete, and coach bolts. A broken arris rail repair costs £5-£12 for the rail plus £5-£6 for galvanised brackets. Professional fencing contractors typically charge £80-£150 per hour for repair work including materials. Most single-item repairs are completed within an hour.
Can I repair a fence post without removing it?
Yes, a concrete spur repair avoids digging out the old post entirely. A concrete spur is a short reinforced post set in fresh Postcrete next to the damaged timber post. Two coach bolts through both posts transfer the load to the concrete spur. This method costs £24-£30 in materials and takes 1-2 hours. It works best when the timber above ground is still sound and only the base has rotted.
How long does Postcrete take to set?
Postcrete sets firm enough to hold a post upright in 5-10 minutes. Full structural cure takes 24 hours. One 20kg bag is enough for one standard fence post in a hole 300mm wide and 600mm deep. Pour the dry mix around the post, add the specified amount of water, and hold the post level with a spirit level for 5 minutes while the mix firms up. Do not attach panels until after the full 24-hour cure.
What is the best fence treatment UK?
Water-based preservatives like Cuprinol Ducksback and Ronseal One Coat Fence Life are the most practical choice for domestic fences. They dry in 1-2 hours, have minimal odour, clean up with water, and last 2-3 years before reapplication. Oil-based treatments last 3-5 years but take 24 hours to dry and have a strong solvent smell. For maximum longevity, buy pressure-treated panels and posts which last 10-15 years without any additional treatment.
Who is responsible for a garden fence UK?
The boundary owner shown on the property title deeds is responsible. A T-mark on the title plan indicates which side owns the fence. If the T is on your side, the fence is yours to maintain. If there is no T-mark, ownership may be shared or unresolved. There is no general legal obligation in England and Wales to maintain a boundary fence unless a covenant in the property deeds requires it. The common belief about always owning the left-side fence has no legal basis.
How high can a garden fence be without planning permission?
Rear garden fences can be up to 2 metres high without planning permission under permitted development rights. Fences and walls adjacent to a highway are limited to 1 metre. These limits apply to the total height of the structure including any trellis, lattice, or other extension on top. Conservation areas and listed building curtilage may have additional restrictions. Always check with your local planning authority if you are unsure. Full details are available on the UK government planning portal.
When is the best time to treat a garden fence?
Late spring (April to May) or early autumn (September to October) gives the best results. The timber needs to be completely dry for preservative to penetrate properly. Choose a day when no rain is forecast for at least 48 hours and the temperature is above 10 degrees C. Avoid treating in direct midday sun during summer because the product dries on the surface before soaking into the grain. Morning or late afternoon application is ideal.
How do I stop fence panels blowing out in wind?
Use galvanised panel clips or U-shaped brackets screwed to the fence posts rather than nailing panels directly. Clips allow panels to flex slightly in gusts, reducing the stress that causes cracking. Ensure every post is vertical and firmly set. Replace any post that leans more than 5 degrees. For very exposed sites, consider upgrading from overlap panels to close-board fencing, which handles wind far better because individual featherboards flex independently rather than catching gusts as a flat surface. Our guide to creating a dog-friendly garden also covers wind-resistant fencing for secure boundaries.
Lawrie has been gardening in the West Midlands for over 30 years. He grows his own veg using no-dig methods, keeps a wildlife-friendly garden, and writes practical advice based on real UK growing conditions.