How to Build a Raised Deck: UK Guide
Step-by-step guide to building a raised deck in a UK garden. Covers planning, building regulations, timber vs composite, joist spacing, and costs.
Key takeaways
- Decks over 300mm high need building regulations approval in England and Wales
- Softwood timber costs fifteen to thirty pounds per square metre but needs annual treatment
- Composite decking costs forty to eighty pounds per square metre and lasts 25 years maintenance-free
- Joist spacing of 400mm centres is standard for both timber and composite boards
- Handrails at least 900mm high are required on any deck over 600mm from ground level
- A medium 3m x 4m raised deck costs 800 to 1,500 pounds in materials depending on board type
- Always use stainless steel or coated screws to prevent rust staining on the boards
Raised decks turn unusable slopes, uneven ground, and dull corners into level outdoor living areas. A well-built deck sits above damp soil, catches the evening sun, and adds genuine value to a property. Building one is within reach of a confident DIYer who owns a circular saw and a spirit level.
This guide covers everything from planning and regulations through frame construction to board fixing and finishing. It applies to UK conditions, UK building regulations, and UK timber sizes. If you are working with a smaller space, our guide to patio garden ideas covers how to make the most of compact outdoor areas.
Builder’s note: I have built raised decks on clay, chalk, sand, and London gravel. The single most common failure is inadequate foundations. Every deck that sags, bounces, or wobbles traces back to posts sitting in bare soil rather than on proper concrete pads. Spend the time on foundations and the rest follows.
Do you need building regulations for a raised deck?
Building regulations are the most important consideration before you start. Getting this wrong means enforcement action, fines, or having to dismantle the finished deck.
In England and Wales, the rules are clear. A deck platform that sits 300mm or less above the existing ground level is exempt from building regulations. Anything higher requires a building regulations application through your local authority. The Gov.uk guidance on decking and building regulations sets out the requirements.
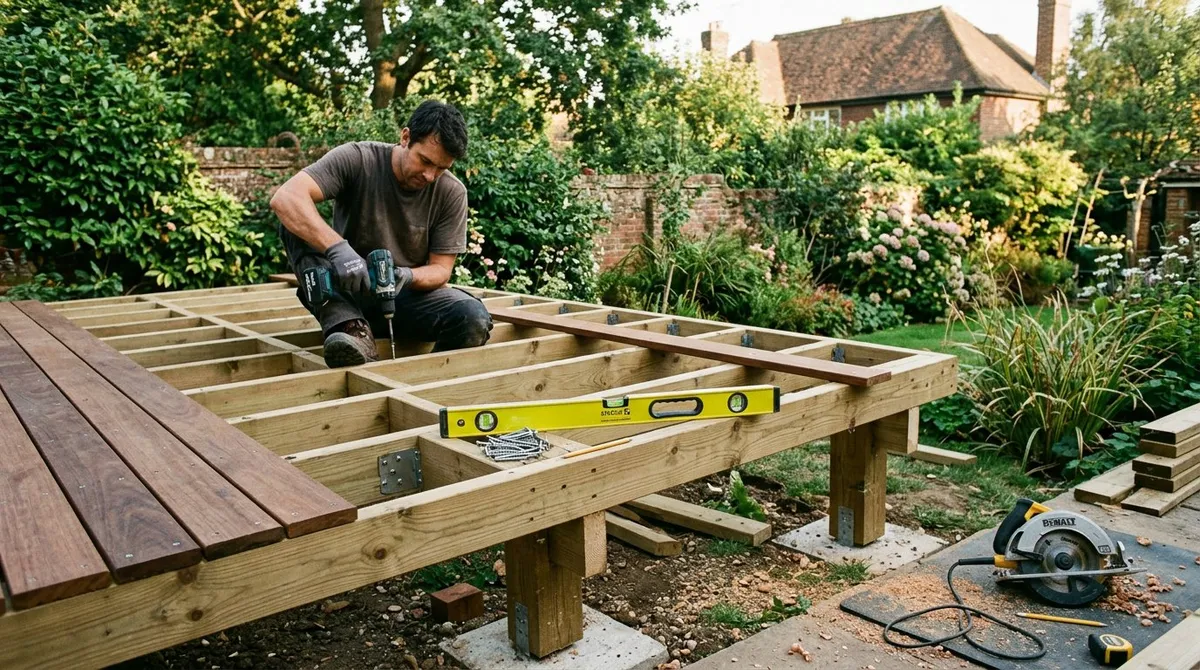
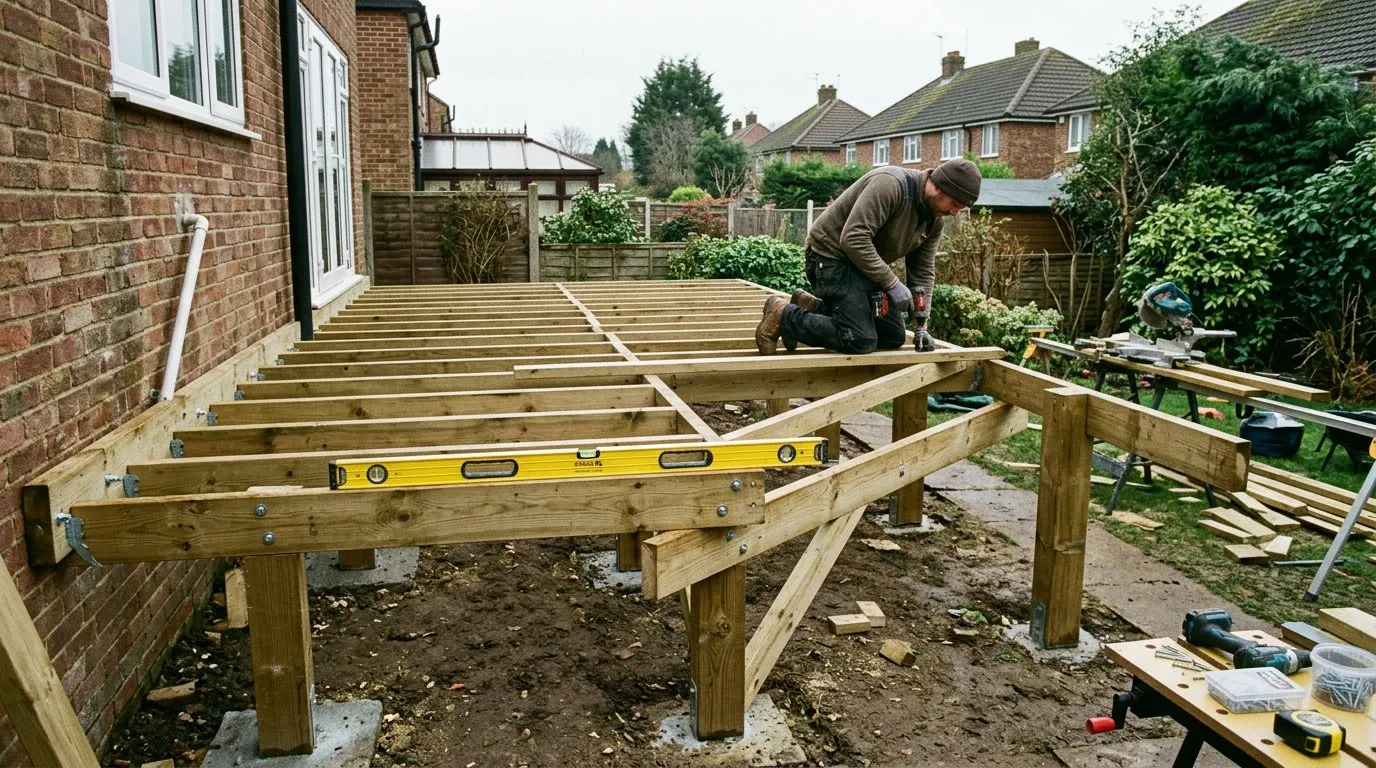 A raised deck subframe on concrete pad foundations. Diagonal bracing prevents the wobble that plagues poorly built decks.
Key thresholds to know:
- Under 300mm above ground: no building regulations needed (but must not cover more than 50% of the garden, and the house must not be listed)
- 300mm to 600mm: building regulations required, handrail recommended but not mandatory
- Over 600mm: building regulations required, handrails mandatory at minimum 900mm height with maximum 100mm gaps between balusters
- Adjacent to a boundary: check with your local planning authority for boundary setback requirements
Scotland has different regulations under the Building (Scotland) Act 2003. Decks above 150mm may need a building warrant. Always check with your local authority.
Planning your raised deck
Good planning prevents expensive mistakes. Measure the area carefully and consider these factors before buying materials.
Choosing the right position
South-facing or west-facing positions catch afternoon and evening sun. Place the deck where you will actually use it, not just where it is easiest to build. Consider privacy from neighbours, shelter from wind, and proximity to the house for carrying food and drinks.
A deck that extends from a back door creates a natural flow from inside to outside. If the deck sits away from the house, plan a proper path or stepping stones to reach it. Think about garden lighting from the start. Running cables under the deck during construction is far easier than retrofitting later.
Size and shape
Common raised deck sizes and their practical uses:
- 2m x 3m (6 sq m): fits a bistro table and two chairs, works as a morning coffee spot
- 3m x 4m (12 sq m): seats four comfortably around a dining table, the most popular UK garden deck size
- 4m x 6m (24 sq m): full outdoor living space with dining area, loungers, and planter boxes
Odd shapes increase cost and waste. Rectangular decks use materials most efficiently. L-shapes and curves look good but generate more offcuts and require more complex framing.
Height considerations
The height of your deck determines foundation requirements, railing needs, and cost. Measure the drop from your intended deck surface to the lowest point of the ground beneath.
- Up to 150mm: simple frame sitting on concrete paving slabs
- 150-300mm: posts on concrete pad foundations, no regulations required
- 300-600mm: concrete pad foundations, building regulations application, diagonal bracing essential
- Over 600mm: engineered foundations may be needed, handrails mandatory, consider professional structural advice
Decking materials compared
The board material affects cost, lifespan, maintenance, and slip resistance. Here is how the four main options compare.
| Material | Cost per sq m | Lifespan | Annual maintenance | Slip resistance (wet) | Best for |
|---|---|---|---|---|---|
| Pressure-treated softwood | £15-£30 | 10-15 years | Stain or oil annually | Poor without treatment | Budget builds, DIY-friendly |
| Hardwood (oak, iroko) | £50-£90 | 25-40 years | Oil once a year | Moderate | Premium natural look |
| Composite (wood-plastic) | £40-£80 | 25+ years | Wash annually | Good (textured surface) | Low maintenance, families |
| PVC (cellular) | £50-£100 | 30+ years | Wash annually | Good | Marine environments, pools |
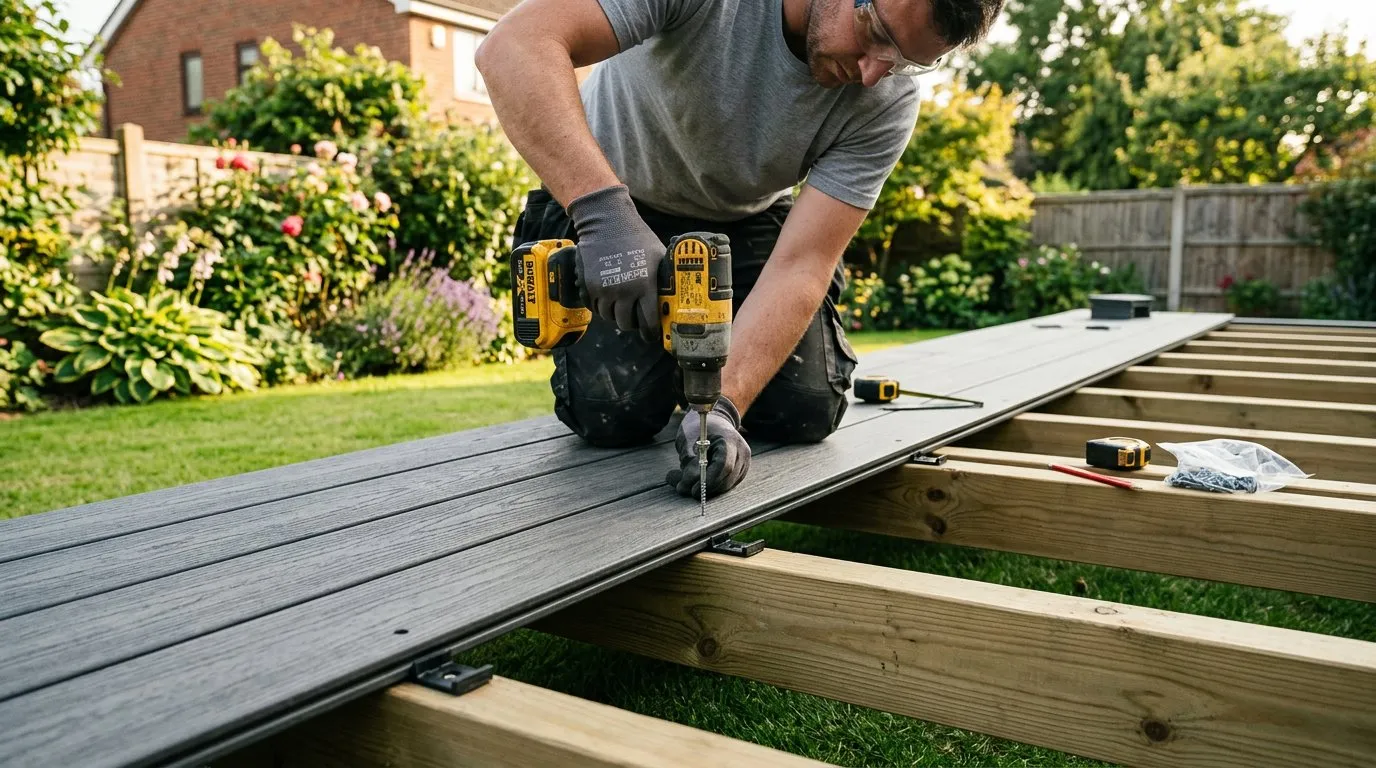 Fixing boards with stainless steel screws and spacing clips. Two screws per board per joist, pre-drilled to prevent splitting.
Softwood timber decking
Pressure-treated softwood (usually Scandinavian redwood or British spruce) is the cheapest option and the easiest to work with. It cuts, drills, and screws like any construction timber. The green or brown tanalised treatment protects against rot for 10-15 years.
The downside is maintenance. Untreated softwood turns grey within 6 months and becomes dangerously slippery when wet. Annual cleaning, sanding, and staining or oiling is essential. Budget fifty to eighty pounds per year for treatment products on a medium-sized deck.
Hardwood decking
Oak, iroko, balau, and garapa are harder, denser, and naturally more durable than softwood. They resist rot without chemical treatment. Iroko and balau are particularly slip-resistant even when wet, thanks to their tight grain.
Hardwood is heavier and harder to cut. You will wear through saw blades faster. Pre-drilling every screw hole is mandatory because hardwood splits easily. Cost is two to three times higher than softwood, but the 25-40 year lifespan offsets this.
Composite decking
Composite boards are a blend of recycled wood fibres and plastic polymers. They do not rot, splinter, or need staining. Most come with textured surfaces that provide grip in wet conditions. Colour choices range from grey and black to natural wood tones.
Composite expands and contracts more than timber with temperature changes. Leave 5-6mm expansion gaps between boards and at the ends where boards meet walls or edges. Composite also heats up more than timber in direct sun, which matters if you walk barefoot.
PVC decking
Solid PVC cellular boards contain no wood at all. They are waterproof, slip-resistant, and completely maintenance-free. PVC is the best choice for waterside locations and areas with standing water. It is also the most expensive option and feels less natural underfoot.
Tools and materials list
Gather everything before starting. Running to the builder’s merchant mid-project costs time and breaks momentum.
Tools needed
- Circular saw or mitre saw
- Cordless drill/driver with impact function
- Spirit level (1200mm minimum)
- Builder’s string line and pegs
- Post hole spade or auger
- Tape measure (8m)
- Speed square or combination square
- Adjustable spanner
- Socket set (10mm, 13mm, 17mm)
- Shovel and wheelbarrow
- Safety glasses, ear protection, dust mask
- Chalk line
Materials needed (for a 3m x 4m deck at 450mm height)
- Posts: 6x 100mm x 100mm treated timber, 900mm long (450mm above ground + 450mm buried or bolted)
- Beams: 3x 50mm x 200mm treated timber, 4m long
- Joists: 11x 50mm x 150mm treated timber, 3m long at 400mm centres
- Decking boards: 28-30 boards at 4m long (allowing for 5-8mm gaps)
- Bracing: 50mm x 100mm treated timber for diagonal braces
- Concrete: 6 bags of postcrete or 12 bags of ballast + cement for pad foundations
- Fixings: 200x stainless steel decking screws (60mm), 24x coach bolts (M10 x 150mm), joist hangers
- DPC membrane: to separate timber from concrete
- Weed membrane: for ground beneath deck
Step-by-step build guide
Step 1: Mark out and prepare the ground
Set out the deck footprint using string lines and pegs. Check for square by measuring diagonals. Both diagonal measurements must match within 5mm for a rectangular deck.
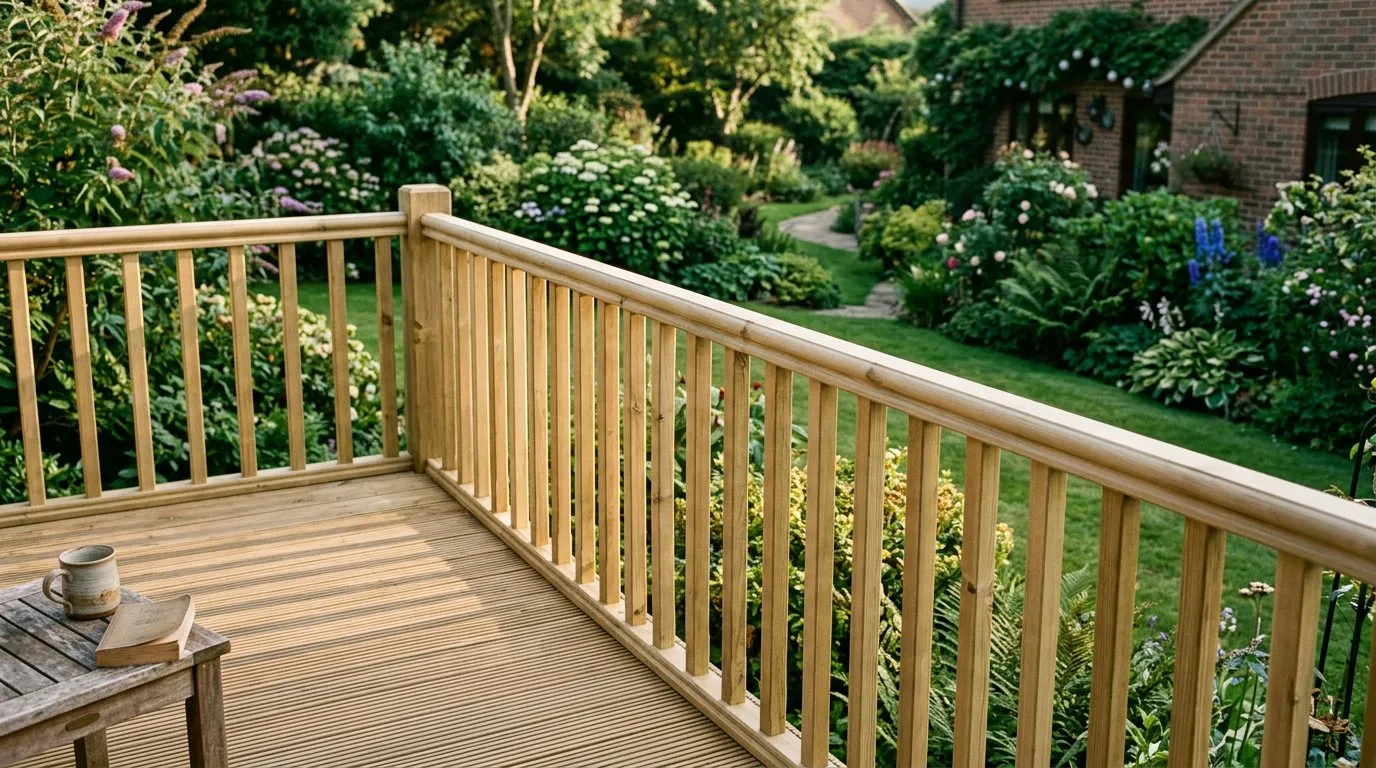 A timber balustrade with vertical spindles. Handrails are mandatory on any deck over 600mm from ground level.
Clear vegetation from the area. Lay weed membrane over the entire footprint, overlapping joins by 150mm. This prevents plant growth under the deck. Weigh down edges with gravel. Do not use plastic sheeting as it traps moisture and accelerates timber rot.
Step 2: Dig foundations and set posts
Dig post holes 450mm deep and 300mm square. Space posts at maximum 1800mm centres along each beam line. For a 3m x 4m deck you need 6 posts in two rows of three.
Pour 100mm of concrete into the base of each hole. Set a post shoe or galvanised post bracket into the wet concrete. Level each bracket before the concrete sets. Allow 24 hours to cure fully.
Alternatively, use bolt-down post bases on concrete pads. Cast 450mm x 450mm x 200mm concrete pads, set bolt anchors while wet, and bolt posts on after curing. This method keeps timber out of the ground entirely, which extends post lifespan.
Step 3: Fix beams to posts
Cut posts to the correct height using a spirit level and string line stretched across all posts. Bolt double beams to the sides of the posts using M10 coach bolts. Use two bolts per post, minimum 100mm apart vertically. Beams run parallel to the house wall in most designs.
Check beams for level in both directions. Shim if necessary using thin plywood packers between beam and post. Every millimetre matters here because errors multiply across the whole deck surface.
Step 4: Install joists
Fix joists across the beams at 400mm centres using joist hangers or by skew-nailing. Run joists perpendicular to the direction you want the boards to run. Most decks look best with boards running away from the house, which means joists run parallel to the house.
Add noggins (short cross pieces) between joists at 1200mm intervals. These prevent joists from twisting and provide extra rigidity. Double up joists where two boards will butt-join end to end.
Step 5: Add bracing
Raised decks need diagonal bracing to prevent racking (sideways movement). Fix 50mm x 100mm braces diagonally between posts, running from the top of one post to the base of the next. Use one brace per bay minimum.
For decks over 600mm high, add cross-bracing between joists as well. This is a legal requirement under building regulations and makes a noticeable difference to how solid the deck feels underfoot.
Step 6: Fix decking boards
Start at the house wall and work outward. Fix the first board parallel to the wall, leaving a 10mm gap from the wall for expansion and drainage.
For timber boards:
- Pre-drill two holes per joist position to prevent splitting
- Drive 60mm stainless steel screws through the board face into each joist
- Use a 5mm spacer between boards (a carpenter’s pencil is exactly the right width)
- Stagger end joints so they never line up on adjacent boards
- Let boards overhang the frame by 25-30mm. Trim in a straight line after all boards are fixed using a chalk line and circular saw
For composite boards:
- Follow the manufacturer’s clip system if provided (hidden fixings)
- Leave 5-6mm gaps between boards for thermal expansion
- Leave 25mm gaps at ends where boards meet walls
- Cut with a fine-tooth blade to prevent chipping
- Face-fix the first and last board, use clips for the rest
Step 7: Trim and finish edges
Snap a chalk line along the overhanging board ends and cut in one pass with a circular saw guided by a clamped straight edge. Fix fascia boards around the deck perimeter to cover the joist ends and give a clean finish. Fascia also prevents animals nesting under the deck.
Building a balustrade and handrail
Handrails are mandatory on any deck over 600mm above ground level. Even on lower decks, they add safety and define the space. The garden fence ideas guide covers privacy options that complement deck balustrades.
Building regulations for balustrades
- Minimum handrail height: 900mm above deck surface (1100mm if the deck is above 600mm and next to a staircase)
- Maximum gap between balusters: 100mm (a 100mm sphere must not pass through)
- Horizontal rails spaced more than 100mm apart are not permitted because children climb them
- The balustrade must withstand a lateral load of 0.36 kN/m
Balustrade construction
- Bolt 100mm x 100mm newel posts to the deck frame (not the decking boards). Use M12 coach bolts through the outer joist
- Fix a bottom rail between newels at 75-100mm above the deck surface
- Cut balusters to length and fix between top and bottom rails at maximum 90mm spacing (to keep gaps under 100mm)
- Cap the top rail with a smooth handrail piece, rounded or chamfered for comfort
- Sand all edges and corners smooth. Splinters on handrails are a constant annoyance
Material options for balustrades
- Timber: matches wooden decks, easy to build, needs annual treatment
- Metal: powder-coated aluminium or stainless steel, zero maintenance, modern look
- Glass panels: frameless or framed, preserves views, expensive but striking
- Wire rope: stainless steel cables between timber posts, contemporary look, meets regulations if horizontals are spaced under 100mm
Anti-slip treatment options
Wet decking is dangerously slippery. This is the main safety concern with timber decks, especially in the UK where surfaces stay damp for months. If you have children or dogs (see our dog-friendly garden guide for more outdoor safety tips), slip resistance is non-negotiable.
| Treatment | Method | Lifespan | Cost |
|---|---|---|---|
| Anti-slip deck stain | Brush or roll on | 1-2 years | £30-£50 per 5 litres |
| Anti-slip strips | Peel and stick to boards | 3-5 years | £2-£4 per strip |
| Chicken wire mesh | Staple over boards | 2-3 years | £15-£25 per roll |
| Grooved boards | Built into the board profile | Permanent | Included in board cost |
| Resin-bonded grit | Professional application | 5-10 years | £15-£25 per sq m |
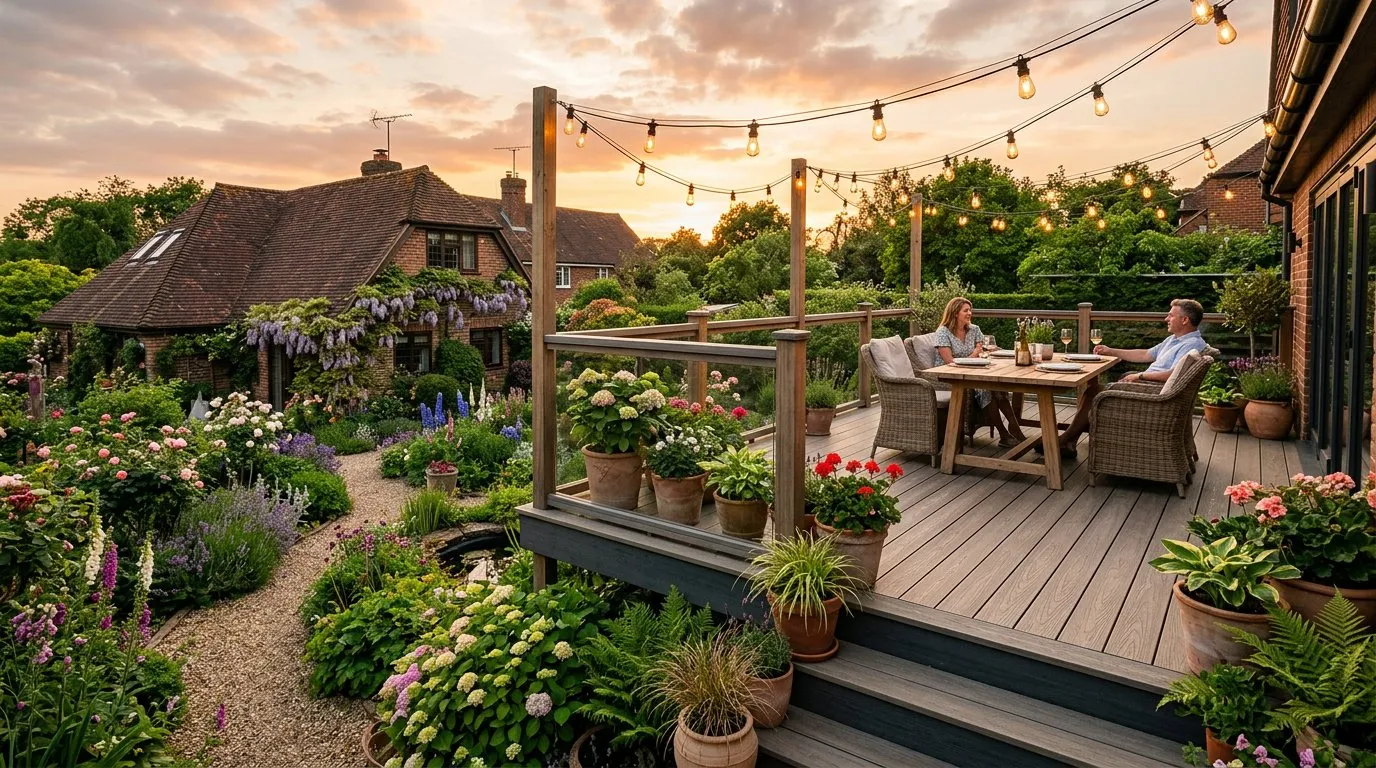 A finished raised deck with furniture and lighting. Composite boards need no annual treatment and last 25 years.
Grooved or textured boards (whether timber or composite) are the best long-term solution because the grip is permanent. If using smooth boards, apply anti-slip stain annually as part of your maintenance routine.
For north-facing or shaded decks, algae growth is the biggest slip hazard. Clean with a stiff brush and diluted deck cleaner in spring. Avoid pressure washers on softwood as they damage the grain and raise fibres.
Budget guide by deck size
Material costs vary by region and supplier. These figures use mid-range pressure-treated softwood and mid-range composite for comparison. Labour is not included.
| Deck size | Area | Softwood materials | Composite materials | Build time (DIY) |
|---|---|---|---|---|
| Small (2m x 3m) | 6 sq m | £400-£600 | £700-£1,100 | 1 weekend |
| Medium (3m x 4m) | 12 sq m | £800-£1,200 | £1,200-£1,800 | 2 weekends |
| Large (4m x 6m) | 24 sq m | £1,500-£2,200 | £2,400-£3,600 | 3 weekends |
These figures include boards, frame timber, posts, concrete, fixings, and weed membrane. They do not include balustrades (add £30-£50 per linear metre for timber, £80-£120 for glass), steps, or finishing products.
A professional carpenter or landscaper charges £150-£250 per day. A medium deck typically takes a professional 3-5 days including foundations, making total labour £450-£1,250. For a project of this scale, getting three quotes is worth the time.
Why we recommend composite decking for any deck that will be used year-round in the UK: After 30 years of building decks in every UK climate zone, composite boards consistently outperform treated softwood on north-facing and west-facing aspects where moisture and shade accelerate timber deterioration. On decks we built in 2010 using both materials side by side, the composite sections needed only an annual wash; the softwood sections needed sanding and re-oiling every spring and showed surface cracking within 8 years. On a 3m x 4m deck, the extra upfront cost of composite is recouped in treatment materials and labour within 6-7 years.
Finishing and protecting your deck
Timber decks need protection within two weeks of completion. Untreated timber absorbs water, swells, and starts greying within 6 months.
Timber finishing options
- Decking oil (teak oil, linseed oil): penetrates the grain, enhances natural colour, needs reapplying every 12 months. Best for hardwood.
- Decking stain: adds colour while protecting, semi-transparent or solid options, lasts 2-3 years per coat. Best for softwood.
- Decking paint: solid colour coverage, hides imperfections, can peel over time, lasts 3-5 years. Not recommended for high-traffic areas.
Apply finish on a dry day when the timber moisture content is below 18%. Do not apply in direct sun or temperatures below 10C. Two thin coats are better than one thick coat.
Composite maintenance
Composite decking needs only annual cleaning. Sweep regularly to prevent leaf debris staining the surface. Wash with warm soapy water and a stiff brush each spring. Remove any mould or algae with a composite-specific cleaner. Never use a wire brush or abrasive cleaner on composite boards.
Five common mistakes to avoid
These errors appear on deck after deck. Each one is preventable with basic planning.
1. Skipping proper foundations. Posts driven into bare soil move within 12 months. Clay soil heaves in frost. Sandy soil settles. Always use concrete pad foundations or bolt-down post bases on concrete pads.
2. Using the wrong fixings. Standard zinc screws rust within two years, staining boards with brown streaks. Use stainless steel (A2 grade minimum) or polymer-coated decking screws. The extra cost per screw is pennies. The stain damage from rust is permanent.
3. No expansion gaps. Timber expands across the grain by 2-4mm seasonally. Composite expands even more. Boards butted tight together buckle upward in summer heat. Leave 5mm between boards and 10mm at walls.
4. Inadequate ventilation underneath. Decks built tight to the ground with no airflow underneath trap moisture. The underside of the boards rots before the top surface shows any problem. Maintain at least 150mm clearance beneath the lowest joist, or add ventilation gaps in the fascia boards.
5. Ignoring drainage. Water pooling on or under the deck accelerates rot and creates slip hazards. Grade the ground beneath the deck to slope away from the house. Leave gaps between boards for surface drainage. Do not lay decking over blocked drains or downpipe outlets.
Now you’ve mastered building a raised deck, read our guide on garden lighting ideas for the next step in making the most of your new outdoor space after dark.
Frequently asked questions
Do I need planning permission for a raised deck UK?
You do not need planning permission if the deck is under 300mm above ground level and covers less than 50% of the garden. Raised decks above 300mm need building regulations approval. Decks in conservation areas, listed buildings, or near highways may also need planning permission regardless of height. The rules differ in Scotland, where decks above 150mm may need a building warrant.
How high can a deck be without building regulations?
A deck platform must be no higher than 300mm above the existing ground level to avoid building regulations. This is measured from the lowest adjacent ground, not the average. Any deck above 300mm needs a building regulations application through your local authority. The application typically costs £200-£400 and takes 5-8 weeks.
What is the best joist spacing for decking?
400mm centres is the standard joist spacing for most decking boards. This provides adequate support without excessive flex underfoot. Some thinner composite boards require 300mm centres, and some thicker hardwood boards span 500mm comfortably. Always check the manufacturer’s recommended maximum span before fixing boards.
Is composite decking worth the extra cost?
Composite decking costs two to three times more than pressure-treated softwood upfront. Over a 25-year period, composite works out cheaper because timber needs annual treatment costing fifty to eighty pounds in materials each year. Composite also avoids the labour of sanding, staining, and recoating every spring. For a small garden with limited deck area, the price difference is modest and composite makes strong financial sense.
How do I stop a raised deck from wobbling?
Wobble comes from inadequate bracing between posts and joists. Add diagonal braces running from the top of one post to the base of the next. Use cross-bracing between joists on decks over 600mm. Bolt connections rather than screwing them. Check all fixings after the first month of use, as timber shrinks and fixings loosen slightly.
What screws should I use for decking?
Use stainless steel or coated decking screws, 60-75mm long for face-fixing boards. Standard zinc-plated screws corrode within two years and leave permanent rust stains. Stainless steel A2 grade is the minimum. Use two screws per board per joist, pre-drilling hardwood to prevent splitting. Countersink heads 2mm below the surface.
How long does treated timber decking last?
Pressure-treated softwood decking lasts 10 to 15 years with annual maintenance including cleaning, sanding, and staining or oiling. Without treatment it rots within 5 years. Hardwood decking such as oak or iroko lasts 25 to 40 years with minimal maintenance. Composite decking lasts 25 years or more with no maintenance beyond occasional cleaning.
Can I build a raised deck on a slope?
Sloping ground is ideal for raised decks because the frame compensates for the gradient naturally. Use longer posts on the lower side and shorter posts on the upper side. Set heights using a spirit level and string line stretched across the slope. For steep gradients, consider a stepped deck with two or three levels dropping 150-200mm per step. Stepped decks also create distinct zones for dining, lounging, and planting.
Lawrie has been gardening in the West Midlands for over 30 years. He grows his own veg using no-dig methods, keeps a wildlife-friendly garden, and writes practical advice based on real UK growing conditions.