How to Make Leaf Mould
Step-by-step guide to making leaf mould in the UK. Covers which leaves to use, bin building, the bin bag method, timings, and garden uses.
Key takeaways
- Leaf mould takes 1 year for mulch grade and 2 years for fine seed compost grade
- Oak, beech, and hornbeam leaves decompose fastest and produce the best leaf mould
- A wire mesh bin costs under ten pounds to build and holds a full autumn's leaf fall
- Shredding leaves with a mower halves the decomposition time
- Finished leaf mould holds up to 500% of its own weight in water
- Unlike compost, leaf mould is broken down by fungi, not bacteria
Leaf mould is the most undervalued material in British gardening. Every autumn, millions of leaves fall in UK gardens and get swept up, bagged, and sent to council green waste. Those leaves, left to decompose for a year or two, produce a dark, crumbly material that turns soil, feeds fungi, and replaces expensive shop-bought composts. It costs nothing. It takes almost no effort. And it works better than many products you can buy.
I have been making leaf mould in my West Midlands garden for fifteen years. Two wire mesh bins behind my shed process every leaf that falls on the property. The result is a steady supply of free mulch and the best seed compost I have ever used. This guide covers everything: which leaves work, how to build a bin, how long it takes, and how to use the finished product. The RHS leaf mould guide confirms the method, and the Woodland Trust’s leaf identification resources help you identify which trees are dropping which leaves.
What is leaf mould?
Leaf mould is tree leaves that have been decomposed by fungi. This is the critical difference between leaf mould and garden compost. Compost is broken down by bacteria in a warm, aerobic process that takes months. Leaf mould is broken down by fungi in a cool, slow process that takes 1-2 years.
Why fungi matter
The white threads you see running through a pile of decomposing leaves are fungal mycelium. These fungi (principally species of Penicillium, Trichoderma, and Mucor) break down the tough cellulose and lignin in leaf tissue. Bacteria cannot digest these compounds efficiently. This is why leaves decompose so slowly in a standard compost heap: the bacterial community cannot process them.
Fungal decomposition produces a material with a completely different character from bacterial compost. Leaf mould is:
- Low in nutrients (nitrogen, phosphorus, and potassium are minimal)
- Exceptionally high in moisture retention (holds up to 500% of its own weight in water)
- Excellent for soil structure (creates a crumbly, open texture)
- Rich in beneficial fungi that form symbiotic relationships with plant roots
Two grades of leaf mould
| Grade | Age | Texture | Best uses |
|---|---|---|---|
| Mulch grade | 1 year | Coarse, partially broken down, leaf shapes still visible | Mulching borders, paths, around trees |
| Seed compost grade | 2 years | Fine, dark, crumbly, no recognisable leaves | Seed compost, potting mix ingredient, soil conditioner |
Both grades are valuable. Year-one leaf mould is the perfect autumn mulch. Year-two leaf mould rivals the best peat-free seed composts on the market. Running two bins on rotation gives you a continuous supply of both.
Which leaves work best?
Not all leaves decompose at the same rate. Thin, soft leaves break down fastest. Thick, leathery, or waxy leaves resist fungal attack and can take 3 years or more.
Best leaves for leaf mould
- Oak: The gold standard. Thin, high in tannins that feed beneficial fungi. Produces the finest leaf mould in 12-18 months
- Beech: Excellent. Thin leaves break down within a year. Beech leaf mould has a beautiful dark colour
- Hornbeam: Similar to beech. Quick to decompose and produces high-quality leaf mould
- Birch: Small, thin leaves that break down quickly. Good mixed with larger leaves
- Maple (field and Norway): Good medium-speed decomposition. Large leaves benefit from shredding
- Lime: Decomposes well. Leaves are soft and thin
Leaves to use with caution
- Sycamore: Thick leaves that take longer than oak or beech. Fine if shredded first
- Horse chestnut: Large, thick leaves. Shred before adding or they form dense mats
- Sweet chestnut: Work well but the spiny seed cases take much longer to break down
Leaves to avoid
- Walnut: Contains juglone, a chemical that inhibits the growth of many plants. Walnut leaf mould can suppress germination and stunt seedlings. Keep walnut leaves separate or avoid using the leaf mould near sensitive plants
- London plane: Extremely tough, waxy leaves that take 3 or more years to decompose. The fine hairs on plane leaves can irritate lungs when dry. Not worth the trouble
- Evergreen leaves (laurel, holly, holm oak, bay): Far too thick and leathery for leaf mould. They take years to break down. Shred and add to the regular compost bin in small quantities instead
- Conifer needles: Very acidic (pH 3.5-4.5) and resinous. Make a separate pile for acidic leaf mould useful around shade-loving plants, blueberries, and rhododendrons. Takes 2-3 years
Gardener’s tip: Mix fast-decomposing leaves (oak, beech) with slower types (sycamore, chestnut) for a good average decomposition rate. The fast decomposers seed the pile with fungi that then colonise the tougher leaves.
Collecting leaves efficiently
The biggest barrier to making leaf mould is collecting enough leaves. A mature oak drops 200,000-500,000 leaves each autumn. Even a modest garden with two or three trees produces more leaves than you might expect.
Collection methods
Raking: The traditional approach. A wide, flexible leaf rake (spring-tine rake) covers ground quickly on lawns and borders. Rake onto a large tarpaulin or sheet and drag it to the bin.
Mowing: Run a lawn mower over fallen leaves on the grass. The mower shreds the leaves, which halves decomposition time. Collect the shredded leaves from the mower box and tip straight into the leaf mould bin. This is my preferred method for lawn leaves.
Leaf blower/vacuum: Blower-vacs collect and shred leaves in one pass. Useful for large gardens and hard surfaces like drives and paths. The shredding action is a significant advantage.
By hand: For borders and around established plants, gathering leaves by hand avoids disturbing the soil and plant roots. Gentle and precise, if slow.
Timing
Collect from October through December as leaves fall. Do not wait until spring. Leaves that sit on lawns through winter smother the grass, block light, and create dead patches. Leaves on paths become dangerously slippery.
Collect after rain when leaves are damp. Dry leaves blow everywhere. Wet leaves stay put and pack into bins more easily.
Building a wire mesh leaf mould bin
A wire mesh bin is the simplest and cheapest container for leaf mould. It holds a large volume, allows air circulation, and takes thirty minutes to build.
Materials
| Item | Quantity | Cost |
|---|---|---|
| Galvanised wire mesh (25mm or 50mm holes) | 4 metres | Six to ten pounds |
| Wooden stakes (50mm x 50mm, 1.2m long) | 4 | Three to five pounds total |
| Galvanised wire or cable ties | Enough to attach mesh to stakes | One to two pounds |
Total cost: ten to seventeen pounds for a bin that lasts 10 or more years.
Construction
- Hammer four stakes into the ground in a 1-metre square, about 30cm deep
- Wrap the wire mesh around the outside of the stakes
- Secure the mesh to each stake with galvanised wire or heavy-duty cable ties
- Overlap the mesh edges by 15-20cm at the join and wire together
The finished bin stands about 90cm tall and holds roughly 500 litres. One bin is enough for most gardens. Large gardens with many trees benefit from two bins on rotation.
Location
Place the bin in a shaded or semi-shaded spot. Full sun dries the leaves out, slowing fungal activity. Behind a shed, under a tree, or along a boundary fence are ideal spots. The bin does not need to sit on soil (unlike a compost bin), but ground contact is fine.
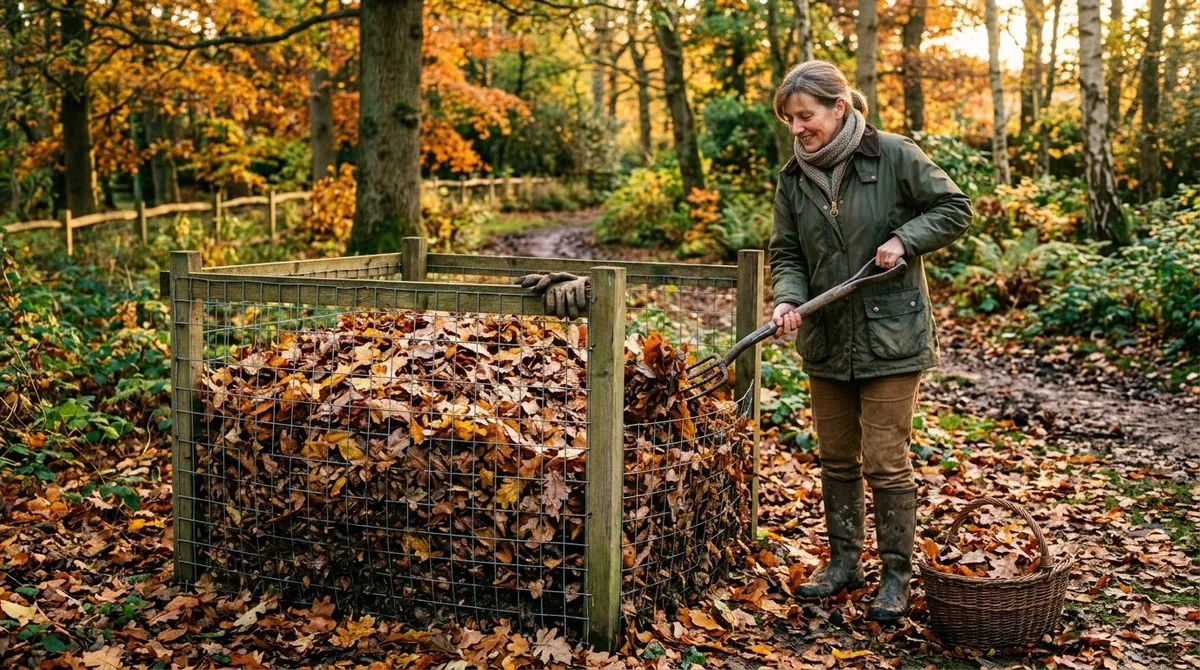
 Turning the leaf mould bin in spring. The outer leaves are still dry and recognisable. The inner material is dark and breaking down well.
The bin bag method
If you do not have space for a wire mesh bin, black bin bags work well for small quantities.
How to use bin bags
- Fill heavy-duty black bin bags with damp leaves
- Pierce 10-15 holes in each bag with a garden fork for air circulation
- Tie the top loosely (do not seal completely; some air exchange is needed)
- Stack bags behind a shed, in an unused corner, or along a fence
- Shake or turn the bags every 3-4 months to redistribute moisture
- Ready in 12-18 months
Bin bags vs wire mesh bin
| Factor | Wire mesh bin | Bin bags |
|---|---|---|
| Capacity | 500 litres or more | 60-80 litres per bag |
| Cost | Ten to seventeen pounds | Free (reuse old bags) |
| Maintenance | Almost none | Occasional shaking |
| Appearance | Tidy and permanent | Untidy |
| Access | Easy to add and remove | Awkward |
| Decomposition speed | 12-24 months | 12-18 months (bags retain warmth) |
Bin bags actually decompose leaves slightly faster than open wire bins because they trap heat and moisture. The downside is limited capacity and the plastic waste. Use bags as a starter method or supplement to a main bin.
Managing the leaf mould pile
Leaf mould needs far less attention than a compost heap. The fungal process works slowly and reliably with minimal intervention.
Moisture
Keep the pile damp but not waterlogged. Dry leaves do not decompose. Fungal mycelium needs consistent moisture to grow through the leaf tissue.
In dry spells (yes, autumn and winter can be dry), water the pile with a watering can. In prolonged wet weather, cover the top with a piece of old carpet or heavy cardboard to prevent the pile becoming sodden. Standing water drives out oxygen and slows fungal activity.
Turning
Turning is optional. An annual turn in April or May mixes the dry outer leaves with the damp inner core and introduces some air. This can speed decomposition slightly but is not essential.
If you do turn, fork the outer material into the centre. The material closest to the middle will be darkest and most decomposed. After turning, water the pile if it looks dry.
Speeding up decomposition
Several techniques reduce the time from collection to finished leaf mould.
Shredding: The single most effective method. Run a mower over leaves on the lawn. Shredded leaves have far more surface area for fungi to colonise and decompose 40-50% faster than whole leaves.
Moisture: A consistently damp pile decomposes faster than a dry one. Check monthly from April to September and water if needed.
Urine: A light watering with diluted urine (nitrogen source) kick-starts fungal activity. Sounds odd, but it works. One application when you build the pile is enough.
Comfrey activator: Layer a few handfuls of comfrey leaves through the pile. Comfrey is rich in nitrogen and minerals that feed the fungal community.
Why we recommend shredding leaves before binning them: After 30 years of making leaf mould in my West Midlands garden, shredding is the single intervention that makes the biggest practical difference. In my own bins, a batch of shredded oak leaves reaches usable mulch grade in 9-10 months, compared to 14-16 months for whole leaves in the same conditions. Running a mower over the lawn before raking takes under five minutes and halves the wait for your first harvest.
Using finished leaf mould
Leaf mould has more uses than most gardeners realise. Both grades serve different purposes.
Year-one leaf mould (mulch grade)
Coarse, partially decomposed, with leaf shapes still visible. Use as:
- Mulch: Spread 5-8cm thick around borders, shrubs, and trees. Suppresses weeds, retains moisture, feeds soil fungi. Excellent around woodland plants and shade-lovers
- Soil improver: Dig coarse leaf mould into heavy clay soil to open up the structure. The partially decomposed material creates air pockets as it continues breaking down
- Path covering: A 5cm layer on informal garden paths looks natural and suppresses weeds
- Winter mulch: Spread over empty vegetable beds in autumn to protect soil structure from winter rain
Our mulch guide covers the broader principles of mulching and how leaf mould compares to bark, straw, and other materials.
Year-two leaf mould (seed compost grade)
Fine, dark, crumbly, with no recognisable leaf structures. This is the premium product.
- Seed compost: Sieve through 6mm mesh. Mix 1 part leaf mould with 1 part sharp sand. The result is a superb, free, peat-free seed compost. Low nutrients mean no risk of seedling burn
- Potting mix ingredient: Replace up to half the multipurpose compost in potting mixes with sieved leaf mould. It improves moisture retention dramatically
- Homemade John Innes: Mix 3 parts sieved leaf mould, 1 part sharp sand, 1 part sterilised loam for a close approximation of John Innes seed compost
- Soil conditioner: Work into the top 15cm of any soil. Improves structure, moisture retention, and biological activity
- Container growing: Add 20-30% sieved leaf mould to container compost for pots and raised beds. Reduces watering frequency
Gardener’s tip: Sieved two-year leaf mould is the best seed compost I have ever used, including shop-bought alternatives. It holds moisture evenly, drains freely, and contains no nutrients that burn delicate seedlings. I use it for all my spring seed sowing and have not bought commercial seed compost in years.
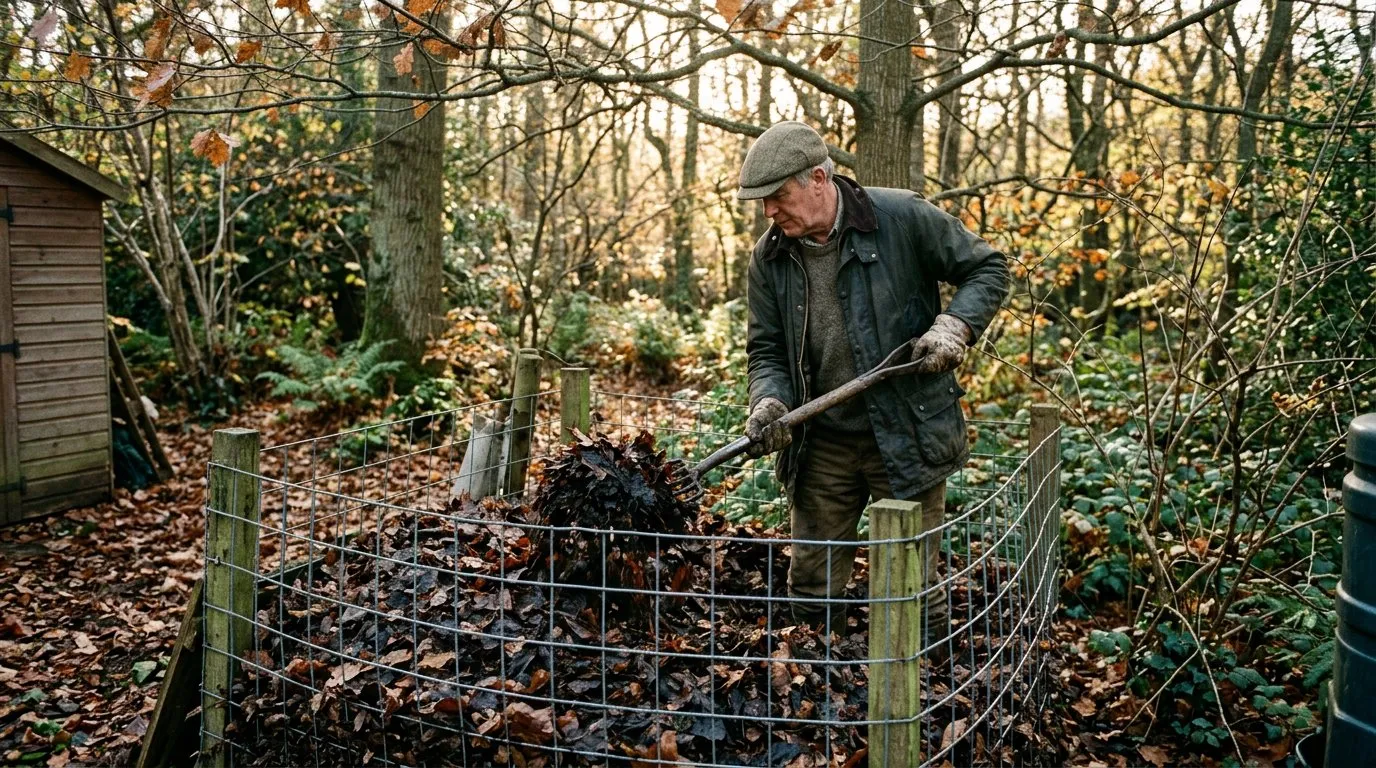
 Two-year leaf mould, sieved and ready for use as seed compost. Dark, crumbly, and smells like a woodland floor. This is the finished product worth waiting for.
How much leaf mould can you make?
The volume of finished leaf mould is far less than the raw leaves you start with. Leaves compress and decompose to a fraction of their original volume.
| Raw leaf volume | After 6 months | After 1 year | After 2 years |
|---|---|---|---|
| 500 litres | 300 litres | 150-200 litres | 80-120 litres |
A single wire mesh bin (500 litres capacity) filled in autumn produces roughly 150 litres of year-one mulch or 100 litres of year-two seed compost. This is enough to mulch a 20-square-metre border at 5cm depth, or fill 100 or more seed trays with sieved compost.
For a larger garden, two bins on rotation mean you always have one bin filling and one bin maturing. Three bins give you a continuous production line: current year, year one (mulch ready), and year two (seed compost ready).
Supplementing your leaf supply
If your own trees do not produce enough leaves, collect from:
- Local streets and parks: Bag fallen leaves from pavements and verges. Avoid leaves near busy roads (heavy metal contamination)
- Neighbours: Most people are delighted to have someone take their leaves away
- Council leaf sweepings: Some councils allow collection from green waste sites
- Local woodland: Ask the landowner’s permission. Collect from footpaths and rides rather than stripping the woodland floor
Leaf mould in the wider garden ecosystem
Leaf mould is more than a soil amendment. It supports a web of life that benefits your entire garden.
Soil biology
Leaf mould introduces beneficial fungi into your soil. Mycorrhizal fungi form partnerships with plant roots, extending their reach into surrounding soil and improving nutrient and water uptake. Research shows that soils rich in fungal life grow healthier plants with better disease resistance.
Wildlife habitat
A leaf mould pile provides winter habitat for beetles, woodlice, centipedes, hedgehogs, toads, and slow worms. Leave the base of your leaf mould bin undisturbed from November to March. These creatures are garden allies: beetles and centipedes eat slugs, and toads consume vast numbers of pest insects.
Worm food
Earthworms feed on partially decomposed leaf mould. A 5cm mulch of year-one leaf mould on a border attracts earthworms to the surface, where they pull leaf fragments down into the soil. This natural incorporation improves soil structure without digging.
 Year-one leaf mould spread as mulch around perennials in a shady border. It suppresses weeds, retains moisture, and slowly feeds the soil as it continues to break down.
Month-by-month leaf mould calendar
| Month | Activity |
|---|---|
| October | Begin collecting fallen leaves. Fill bins or bags as trees drop |
| November | Peak leaf fall. Collect regularly to prevent lawn smothering |
| December | Final leaf fall. Top up bins. Water pile if dry |
| January-March | Leave pile alone. Fungi work slowly through winter |
| April | Optional: turn year-one pile to mix dry outer with damp inner |
| May | Check moisture. Water if dry spell. Leaf mould should feel damp throughout |
| June-August | Occasional moisture check. Year-one pile shrinking visibly |
| September | Assess year-one and year-two piles. Sieve year-two for seed compost |
| October | Empty finished bin. Refill with fresh autumn leaves. Cycle continues |
Common questions about leaf mould
Can I add grass clippings to the leaf mould bin?
No. Grass clippings decompose by bacterial action and create a hot, slimy layer that smothers the fungal process. Add grass to your compost bin instead, where it serves as an excellent nitrogen-rich green material.
Do I need to add anything to the leaf pile?
Nothing is strictly required. The fungi that decompose leaves are everywhere. They colonise any damp pile of leaves within days. A light watering with diluted urine or a scattering of comfrey leaves can accelerate the process slightly, but plain leaves and moisture are all you need.
Is leaf mould acidic?
Freshly made leaf mould is slightly acidic (pH 5.0-6.5), depending on the tree species. Oak and beech leaf mould tends to be more acidic than maple or lime. As leaf mould matures and is incorporated into soil, it moves toward a neutral pH. For acid-loving plants, conifer needle leaf mould (pH 3.5-4.5) is the most acidic option.
Can I use leaf mould from diseased trees?
The cool fungal decomposition process does not reliably kill plant pathogens. If your tree has a significant disease (coral spot, honey fungus, bacterial canker), keep those leaves out of the leaf mould bin. Burn them or send them to council green waste, where industrial composting reaches temperatures high enough to destroy pathogens.
Leaf mould is one of the simplest things you can make in the garden. Collect leaves, keep them damp, wait. The result is a material that improves every soil type, replaces expensive composts, and connects you with the natural cycles that drive healthy garden ecosystems. Start this autumn with a single wire mesh bin. In two years, you will wonder why you ever bought seed compost.
Now you’ve mastered making leaf mould, read our guide on how to make compost at home for the next step in building a complete, free, soil improvement system from your garden waste.
Lawrie has been gardening in the West Midlands for over 30 years. He grows his own veg using no-dig methods, keeps a wildlife-friendly garden, and writes practical advice based on real UK growing conditions.