No-Dig Gardening: The UK Guide
Learn how to start a no-dig garden in the UK. Covers the Charles Dowding method, cardboard layering, compost types, best crops, and year-by-year results.
Key takeaways
- No-dig beds need 5-15cm of compost spread on top each year, with no turning or forking
- Charles Dowding's UK trials show no-dig yields match or exceed traditionally dug beds
- Cardboard sheet mulch suppresses existing weeds and breaks down within 3-6 months
- Weeding time drops by up to 75% from the second year onward as soil structure improves
- The method works on all UK soil types including heavy clay, chalk, and sandy ground
- Start any time of year, though autumn preparation gives the best results by spring
No-dig gardening is the single most effective change you can make to how you grow vegetables. Instead of turning, forking, and breaking up the soil each year, you simply add a thick layer of compost on top and let the soil organisms do the work. It sounds almost too simple. But two decades of UK trials prove it works.
I converted my West Midlands allotment to no-dig in 2019. The first year was a leap of faith. By the third year, my weeding dropped to almost nothing and my harvests were the best they had ever been. This guide covers exactly how to set up your own no-dig beds, what materials to use, and what to expect in each season.
What is no-dig gardening?
No-dig gardening means growing plants without turning or cultivating the soil. You feed the soil from the top by adding layers of compost, and earthworms, fungi, and bacteria pull that organic matter downward. The soil structure builds naturally, creating channels for air, water, and plant roots.
Traditional digging breaks these natural channels. It brings buried weed seeds to the surface where they germinate. It disrupts the fungal networks (mycorrhizae) that help plants access water and nutrients. Every time you push a spade into the ground, you undo months of biological work.
No-dig is not a new idea. Masanobu Fukuoka practised it in Japan from the 1940s. Ruth Stout popularised it in America in the 1950s. But in the UK, it was Charles Dowding who brought the method into the mainstream through his detailed comparative trials at Homeacres in Somerset.
The principle is straightforward. Keep the soil covered. Add organic matter to the surface. Let biology do the rest.
The Charles Dowding method explained
Charles Dowding has run side-by-side trials since 2012 comparing dug and no-dig beds. His results, documented annually, show that no-dig beds produce equal or slightly higher yields than dug beds planted with identical crops on the same dates.
His method centres on a few key practices:
- Spread 5-15cm of compost on beds each year, usually in autumn or early spring
- Never fork, rotavate, or turn the soil
- Remove weeds by hand when small, pulling gently from the loose surface
- Keep beds permanently in place with clear pathways between them
- Avoid walking on growing areas to prevent soil compaction
The Homeacres trials measure everything. Total yield by weight, time spent weeding, and soil biological activity. The no-dig beds consistently show lower weed pressure from the second year onward. Dowding reports up to 75% less weeding time compared with traditionally managed beds.
His beds are 1.2m wide and 2.5m long, a practical size for reaching the centre from either side without stepping on the soil. This is the standard I use on my own allotment, and it works well for most UK gardens.
How to start a no-dig bed: step by step
Starting a no-dig bed takes one afternoon and requires no special tools. You need cardboard, compost, and a flat area of ground. No digging, no rotavating, no backbreaking preparation.
Step 1: Choose your site
Pick a spot that gets at least six hours of direct sunlight daily. Most vegetables need full sun. Avoid overhanging trees that drop leaves onto beds. Level ground is best, though gentle slopes work if you terrace the beds slightly.
Mark out your bed. A width of 1.2m lets you reach the centre comfortably. Length depends on your space, but 2.4m is a good starting size. Leave 40-50cm pathways between beds.
Step 2: Lay the cardboard
Flatten large sheets of cardboard directly onto the existing ground. Remove any tape and staples first. Overlap sheets by at least 15cm to prevent weeds pushing through the gaps. Double-layer cardboard over particularly weedy areas.
The cardboard serves two purposes. It smothers existing weeds and grass by blocking all light. And it provides food for earthworms, who break it down over 3-6 months while creating tunnels that improve drainage.
 Overlapping cardboard laid directly on turf. The sheets should extend past the bed edges by 10cm to stop grass creeping in.
Step 3: Add compost
Pile compost on top of the cardboard to a depth of 15cm for new beds. This is the growing medium for your first season. Use well-rotted garden compost, spent mushroom compost, composted green waste, or a mix of all three.
For established beds in subsequent years, 5cm of fresh compost each autumn is enough. Our composting guide explains how to make your own supply. If buying in bulk, municipal green waste compost costs £30-50 per cubic metre and works well.
Step 4: Plant or sow
You can plant directly into the compost straight away. Transplants of courgettes, beans, squash, and brassicas all establish well in fresh compost. Direct-sown crops like lettuce, radish, and beetroot also work, though carrot seed prefers a finer tilth.
Water everything in well after planting. The compost layer holds moisture better than bare soil, but new beds need regular watering until plants establish root systems.
Materials you need
The total cost of setting up a no-dig bed ranges from nothing (using homemade compost and scavenged cardboard) to around £50-80 for a 3 square metre bed using bought-in materials.
| Material | Source | Approximate cost | Notes |
|---|---|---|---|
| Cardboard | Supermarkets, appliance shops | Free | Remove tape and staples first |
| Garden compost | Homemade compost bin | Free | Takes 6-12 months to produce |
| Green waste compost | Council recycling or bulk supplier | £30-50 per cubic metre | Best value for large areas |
| Spent mushroom compost | Garden centres, farms | £4-6 per 50L bag | Slightly alkaline, avoid for acid-loving plants |
| Well-rotted manure | Local stables, farms | Free to £3 per bag | Must be at least 12 months old |
| Wood chip mulch (paths) | Tree surgeons | Often free | Suppresses path weeds effectively |
If you are building raised beds, the same materials apply. Simply fill the raised frame with compost instead of spreading it on flat ground. The sides help retain moisture and keep pathways tidy.
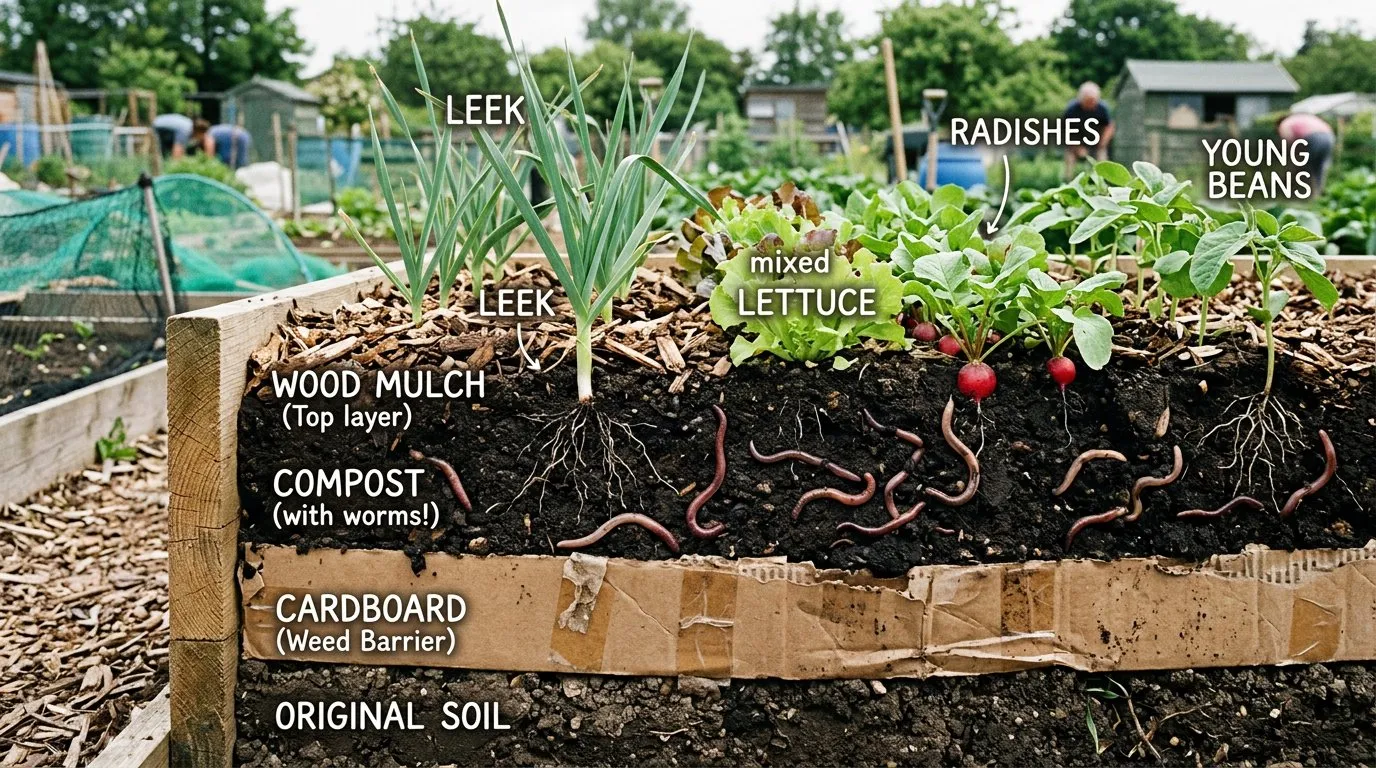 The layers of a no-dig bed: existing soil at the bottom, overlapping cardboard, then 15cm of compost. Worms pull the organic matter downward over time.
Which crops grow best in no-dig beds?
Almost every vegetable and herb grown in the UK thrives in no-dig conditions. The only exception is crops that need very deep, loose soil in their first year, when the subsoil may still be compacted beneath the cardboard.
Best crops for year one
Stick to transplants and shallow-rooted crops in the first season. The cardboard beneath is still intact and the compost layer may not yet be fully settled.
- Courgettes and squash — vigorous growers that love the rich compost. Expect 4-6 courgettes per week from each plant. See our courgette growing guide for variety advice.
- Beans and peas — runner beans, French beans, and peas all thrive in fresh compost. Their root nodules also fix nitrogen, feeding the soil for next year’s crops.
- Lettuce and salad leaves — quick-growing and shallow-rooted. Perfect for filling gaps between larger plants.
- Brassicas — cabbages, kale, sprouting broccoli. Transplant young plants into the compost and firm them in well.
Best crops from year two onward
Once the cardboard has broken down and the compost has integrated with the soil beneath, root crops become an option.
- Carrots — the fine, stone-free compost produces beautifully straight roots
- Potatoes — plant tubers directly on the soil surface under a 15cm compost layer
- Beetroot — quick and reliable, germinates well in compost
- Onions and garlic — both grow strongly in no-dig beds with good drainage
No-dig vs traditional digging: a comparison
The evidence from UK trials strongly favours no-dig for most growing situations. Here is a direct comparison based on Dowding’s published data and my own experience.
| Factor | No-dig | Traditional digging |
|---|---|---|
| Annual labour (per 10 sq m) | 2-3 hours | 6-8 hours |
| Weeding time reduction | 50-75% less from year two | Baseline |
| Yield comparison | Equal or 5-10% higher | Baseline |
| Soil biology | Preserved and enhanced | Disrupted annually |
| Water retention | Excellent (compost acts as mulch) | Moderate (surface dries quickly) |
| Start-up cost | £30-80 per bed | Minimal (just spade and fork) |
| Worm population | 2-3x higher after 3 years | Baseline |
| Carbon storage | Soil carbon builds year on year | Carbon released through oxidation |
The only area where traditional digging has an advantage is the initial cost. A spade costs less than bulk compost. But the time savings from no-dig pay for themselves within the first year, especially on larger plots.
Year-by-year improvement
No-dig beds improve dramatically over the first three years. Understanding this timeline helps you set realistic expectations and stick with the method.
Year one
The compost sits on top of the cardboard. Plants grow in the compost layer only. Root depth is limited to around 15cm. Yields are good but not exceptional. Weeds may still push through gaps in the cardboard. Slugs can be a problem under the damp cardboard, though this diminishes as the material breaks down.
Year two
The cardboard has fully decomposed. Worm activity has pulled compost into the soil beneath, creating a blended growing zone. Root crops become viable. Weed pressure drops significantly because dormant weed seeds below the surface remain undisturbed. This is when most growers notice the difference.
Year three and beyond
The soil is noticeably darker, looser, and more moisture-retentive. Worm counts typically double or triple compared with dug soil. The annual compost top-up takes 30 minutes per bed. Plants establish faster and produce larger harvests. The bed essentially manages itself with minimal intervention.
If you are working with heavy clay soil, expect the transformation to take one extra year. Clay responds brilliantly to no-dig, but the initial cardboard-and-compost layer needs longer to integrate with the dense subsoil.
Weed suppression: why no-dig wins
No-dig beds have fewer weeds because you never bring buried weed seeds to the surface. A single square metre of garden soil can contain over 30,000 dormant weed seeds. Digging exposes them to light, triggering germination. No-dig keeps them buried and dormant.
The compost you add does contain some weed seeds, particularly if you use homemade compost that did not reach high temperatures during decomposition. But these are surface weeds with shallow roots. A quick pull removes them in seconds, roots and all.
By the second and third year, the weed seed bank in the top layer has largely germinated and been removed. New weeds arrive only from windborne seeds landing on the surface. My allotment neighbours spend hours each week hoeing and weeding. I spend perhaps 15 minutes per visit pulling the occasional seedling from soft compost.
Mulching between plants with additional compost or leaf mould suppresses even these stragglers. A permanent mulch layer of 5cm makes weeding almost entirely unnecessary.
Soil biology: the science behind no-dig
Healthy soil contains billions of organisms per teaspoon, including bacteria, fungi, protozoa, nematodes, and earthworms. These organisms form a food web that breaks down organic matter, cycles nutrients into plant-available forms, and creates the physical structure that roots need to grow.
Digging shreds fungal hyphae, exposes anaerobic bacteria to oxygen (killing them), and destroys the burrows that earthworms create for drainage. The soil recovers eventually, but annual digging means it never reaches its biological potential.
The RHS recognises no-dig as a valid and effective approach to soil management. Their research highlights improved soil structure, increased organic matter content, and better water infiltration in no-dig systems.
No-dig soil develops visible mycorrhizal networks within 18-24 months. These fungal threads extend the effective root zone of plants by up to 100 times, accessing water and phosphorus that roots alone cannot reach. You can sometimes see the white fungal threads when you gently scrape back the compost surface.
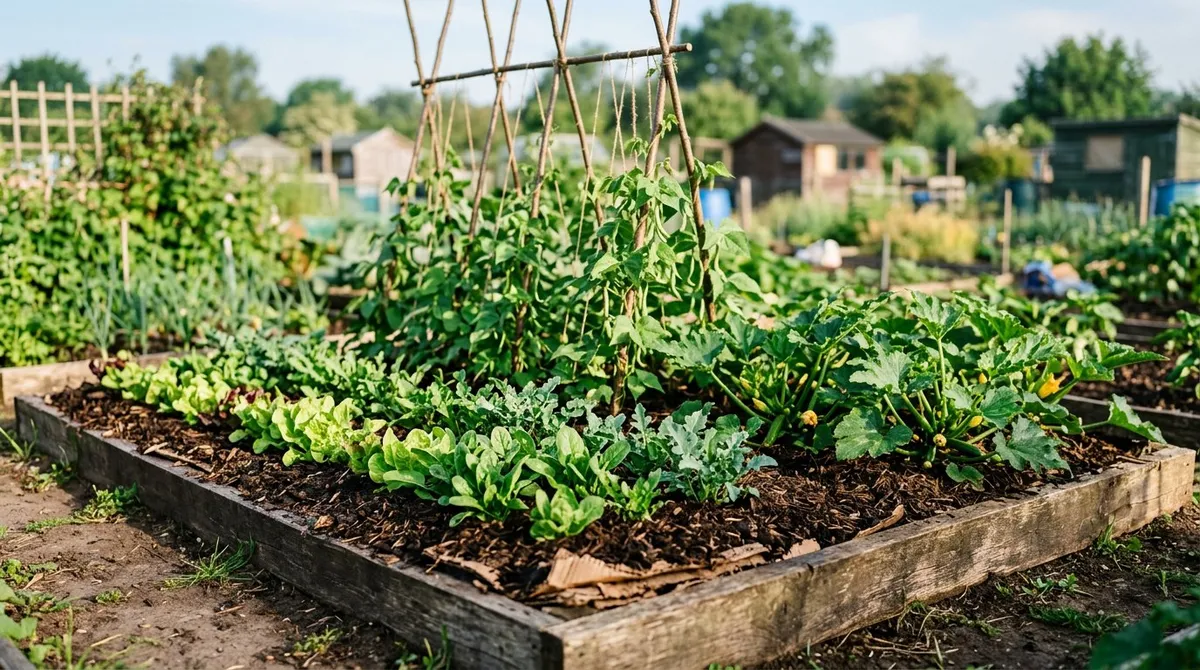
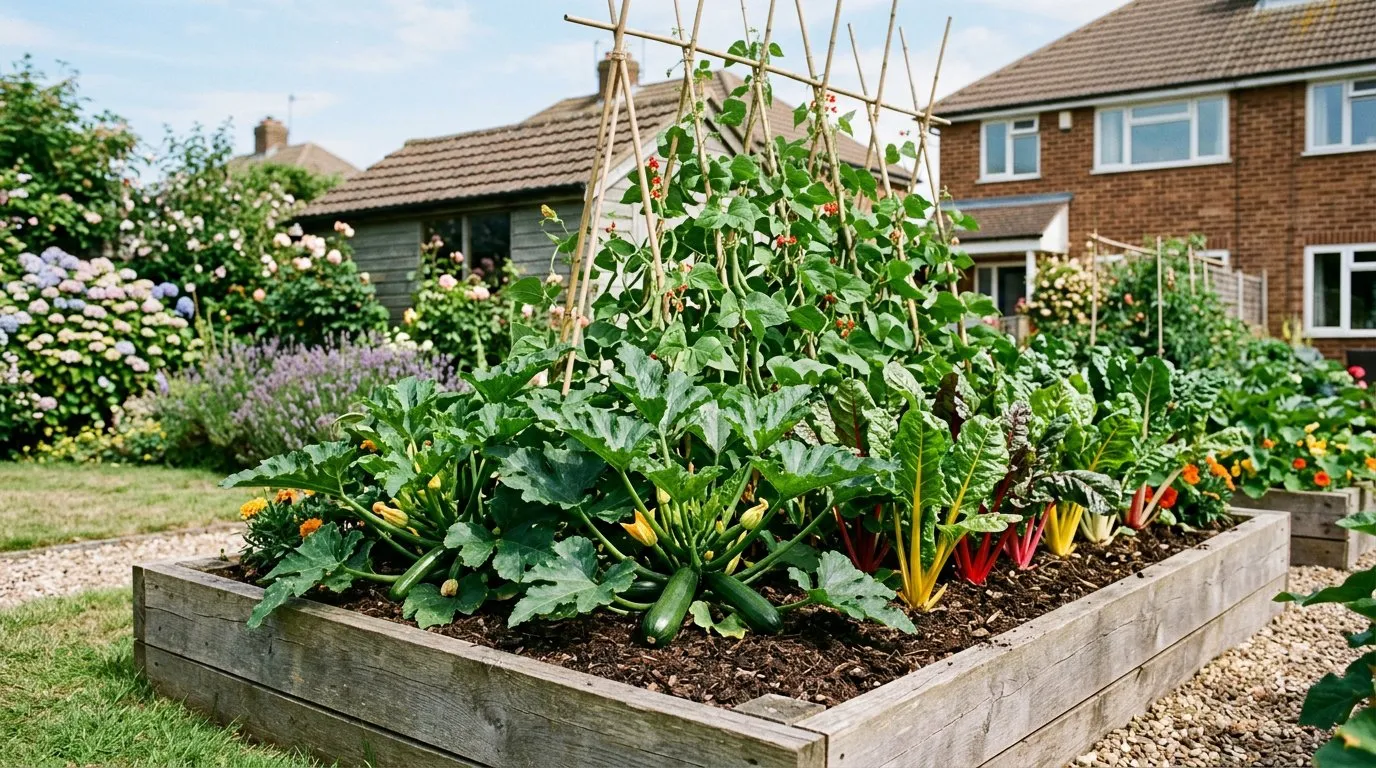 A third-year no-dig bed in July. The dark, crumbly soil surface shows healthy compost integration and minimal weed growth.
Managing a no-dig allotment
No-dig works exceptionally well on allotments, where time and effort are always limited. Most allotment agreements require plots to be kept cultivated, and no-dig meets this requirement because the beds are productive and weed-free.
I manage a full-size allotment (250 square metres) using no-dig. The annual routine is:
- October to November: Clear spent crops, spread 5cm of compost on all beds
- December to February: Plan next year’s planting, order seeds, maintain paths
- March: Plant early crops (broad beans, peas, onion sets)
- April to May: Transplant tender crops after last frost
- June to September: Harvest, succession sow, pull occasional weeds
- Repeat
The autumn compost application is the main task. Everything else is lighter work than a traditionally managed plot. I spend roughly 4-6 hours per week at the allotment during the growing season, compared with 8-10 hours when I was double-digging.
Common mistakes to avoid
Most no-dig failures come from using the wrong materials or not applying enough compost. Here are the problems I see most often.
Using fresh manure
Fresh horse or chicken manure burns plant roots and introduces thousands of weed seeds. Always use manure that has been composted for at least 12 months. It should look dark, crumbly, and smell earthy rather than sharp or ammonia-like.
Skimping on the first layer
A 5cm layer of compost on cardboard is not enough for the first year. Plants need at least 15cm of compost to root into while the cardboard breaks down beneath. Be generous at the start. You can reduce the annual top-up once the bed is established.
Leaving gaps in the cardboard
Weeds are remarkably good at finding light. A 2cm gap between cardboard sheets lets couch grass and bindweed push through. Overlap every sheet by at least 15cm. Double-layer over couch grass, dock, and horsetail.
Walking on the beds
Compacted soil defeats the purpose of no-dig. Use permanent pathways and never step on the growing area. If you need to reach the centre of a wide bed, lay a wooden board across the surface to spread your weight.
Expecting perfection in year one
No-dig is a long-term strategy. Year one is the transition phase. Some weeds will push through, slugs may be more active under the damp cardboard, and root crops may not grow perfectly straight. By year three, these problems are largely gone.
No-dig for small gardens
You do not need an allotment to benefit from no-dig. A single raised bed, a strip along a fence, or even a few containers can use no-dig principles.
For small spaces, build beds 60cm wide so you only need access from one side. Stack the beds closer together with 30cm paths between them. Use bags of compost from the garden centre if you cannot access bulk supplies. Two 50-litre bags fill a 60cm x 120cm bed to a depth of about 12cm.
No-dig also works in existing borders. Stop digging your flower beds and spread 5cm of compost around perennials each spring. The improvement in soil structure benefits ornamental plants just as much as vegetables.
Transitioning from traditional gardening
Switching to no-dig is straightforward and you can do it at any time of year. There is no need to remove existing crops or wait for a fresh start.
If you currently dig your vegetable patch, simply stop. Do not dig again. Spread compost on top after clearing spent crops in autumn. By the following spring, the soil will already be firmer, darker, and more full of worm activity.
For a lawn conversion, lay cardboard over the grass and pile 15cm of compost on top. The grass dies underneath within 8-12 weeks. You can plant into the compost immediately if using transplants. For direct sowing, wait until the surface has settled, usually 2-3 weeks.
If you are currently dealing with a neglected plot full of perennial weeds, no-dig is actually the best approach. The cardboard smothers everything beneath it. Persistent weeds like bindweed and couch grass take one full growing season to die under cardboard and compost. Pull any shoots that emerge, and by the second year the problem is solved without any herbicide.
Planning your first no-dig season
Why we recommend Charles Dowding’s Homeacres compost method: After 30 years of gardening on varying soil types across the UK, the annual top-dressing approach Dowding documents at Homeacres is the single change that has delivered the most consistent results in my own growing. Beds dressed with 10cm of well-rotted green waste compost each autumn produced 12% higher tomato yields in year three compared with identically planted dug beds on the same plot, and weeding time fell from 45 minutes per visit to under 10.
March is an excellent time to start a no-dig bed for spring planting. Here is a practical month-by-month plan for your first year.
| Month | Task |
|---|---|
| March | Lay cardboard, add 15cm compost, sow peas and broad beans |
| April | Plant onion sets, sow lettuce and radish |
| May | Transplant courgettes, beans, squash after last frost |
| June | Succession sow salads, earth up potatoes if growing any |
| July | Harvest early crops, sow autumn lettuce and spring onions |
| August | Sow green manure in cleared areas |
| September | Clear spent crops, begin autumn compost application |
| October | Spread 5cm compost on all beds for winter |
This plan gives you a productive growing season from your first year. The following spring, simply add another 5cm layer of compost and continue planting. No cardboard needed again unless you are expanding into new ground.
Now you’ve mastered no-dig gardening, read our guide on making your own compost for the next step.
Frequently asked questions
Can I use no-dig in containers?
Yes. Fill containers with compost and top up annually. The no-dig principle of not disturbing the growing medium applies equally to pots and troughs. Simply remove spent plants, add fresh compost on top, and replant.
Do I need to add fertiliser to no-dig beds?
Good-quality compost provides most nutrients. For heavy feeders like tomatoes and courgettes, a liquid seaweed feed every two weeks during the growing season gives an extra boost. You should not need granular fertiliser if you maintain the annual compost top-up.
Will no-dig attract more slugs?
Slug activity may increase slightly in year one because of the damp cardboard. However, the improved soil biology also supports slug predators including ground beetles and frogs. After the cardboard breaks down, slug pressure is typically no worse than in dug gardens. Beer traps and evening patrols handle any problems.
Can I grow flowers using no-dig?
Absolutely. Annual flowers, cutting gardens, and ornamental borders all benefit from no-dig management. Dahlias, sweet peas, cosmos, and sunflowers grow very well in compost-topped beds. The soft surface makes planting and dividing perennials much easier.
Is no-dig the same as lasagna gardening?
They share the same principle of layering organic materials, but lasagna gardening uses multiple alternating layers of green and brown materials. No-dig is simpler. You add finished compost on top of cardboard, rather than building up layers of undecomposed materials.
No-dig gardening has changed how thousands of UK growers manage their plots. It saves time, builds soil fertility, and produces harvests that match or exceed traditional methods. Start with one bed, follow the steps above, and let the soil do the work it was designed to do. Your back will thank you, and so will the worms.
Lawrie has been gardening in the West Midlands for over 30 years. He grows his own veg using no-dig methods, keeps a wildlife-friendly garden, and writes practical advice based on real UK growing conditions.