Soil Testing and pH Adjustment UK
How to test soil pH and adjust it for better plant growth in UK gardens. Covers testing kits, meters, lab tests, lime, sulphur, and soil types.
Key takeaways
- Most UK vegetables grow best at pH 6.0-7.0 and most ornamentals prefer pH 5.5-7.0
- A basic colour-change pH test kit costs two to five pounds and gives results in minutes
- Add garden lime at 200-400g per square metre to raise pH by approximately one point
- Work in sulphur chips at 50-100g per square metre to lower pH on alkaline soils
- Test soil every 2-3 years because UK rainfall gradually acidifies garden soil
- Professional lab tests cost fifteen to thirty pounds and also measure NPK and trace elements
Soil pH is the single most overlooked factor in garden success. I have seen gardeners pour money into fertilisers, composts, and plant food when the real problem was a soil pH that locked up nutrients and made them unavailable to roots. A five-minute test with a two-pound kit can tell you more about your garden’s potential than any amount of guesswork.
This guide covers how to test your soil, understand the results, and adjust pH to give your plants exactly what they need. Whether you grow vegetables on an allotment or ornamentals in a suburban border, getting pH right is the foundation of healthy growth. The RHS soil types guide explains the broader picture of soil structure, and the British Geological Survey soil viewer shows the underlying geology of your area.
What is soil pH and why does it matter?
Soil pH measures how acidic or alkaline your soil is on a scale from 0 to 14. A reading of 7.0 is neutral. Below 7.0 is acidic. Above 7.0 is alkaline. Most UK garden soils fall between pH 4.5 and 8.5.
How pH affects nutrient availability
pH controls which nutrients plants can absorb through their roots. At the wrong pH, nutrients are present in the soil but chemically locked up and unavailable.
| pH range | Nutrient availability | Effect on plants |
|---|---|---|
| Below 5.0 | Aluminium and manganese become toxic; calcium and magnesium deficient | Stunted growth, root damage |
| 5.0-5.5 | Iron and manganese freely available; phosphorus limited | Suits ericaceous plants |
| 6.0-7.0 | Maximum availability of nitrogen, phosphorus, potassium | Ideal for most crops |
| 7.0-7.5 | Iron and manganese becoming limited | Some yellowing in sensitive plants |
| Above 8.0 | Iron, manganese, zinc, and boron severely limited | Widespread chlorosis |
The sweet spot for most vegetables and garden plants is pH 6.0-7.0. At this range, all major and minor nutrients are available. Outside this range, you can add as much fertiliser as you like, but the plants cannot use it.
pH preferences by plant group
Different plants have evolved to thrive at different pH levels. Matching your soil to your plants (or adjusting your soil to suit them) is the key to strong, healthy growth.
| Plant group | Preferred pH | Examples |
|---|---|---|
| Ericaceous | 4.5-5.5 | Rhododendrons, azaleas, blueberries, camellias, heathers |
| Soft fruit | 5.5-6.5 | Strawberries, raspberries, blackberries |
| Most vegetables | 6.0-7.0 | Tomatoes, potatoes, beans, lettuce, carrots |
| Brassicas | 6.5-7.5 | Cabbage, broccoli, cauliflower, Brussels sprouts |
| Lavender and Mediterranean herbs | 6.5-8.0 | Lavender, rosemary, thyme, sage |
| Clematis and many perennials | 6.5-7.5 | Clematis, delphiniums, dianthus |
This is why hydrangeas are the gardener’s pH indicator. On acidic soil (below pH 5.5), mophead hydrangeas produce blue flowers. On alkaline soil (above pH 6.5), the same variety flowers pink. Between these values, you get shades of purple. The flower colour tells you your soil pH without any testing kit.
UK soil types and their typical pH
The underlying geology determines your starting pH. Knowing your local soil type saves time because you can predict roughly where your pH sits before testing.
Clay soils
Heavy, sticky when wet, cracked when dry. Common across the Midlands, Thames valley, and many lowland areas. Typically pH 6.0-7.5 depending on the underlying rock. Clay soils are rich in nutrients but slow to warm in spring and difficult to work.
Our guide to improving clay soil covers the structural problems in detail. Organic matter is the long-term solution for both structure and pH management.
Sandy soils
Light, free-draining, quick to warm in spring. Found across parts of East Anglia, Surrey, Hampshire, and coastal areas. Typically pH 4.5-6.5 because rain leaches alkaline minerals downward. Sandy soils lose nutrients quickly and need regular feeding.
Chalk and limestone soils
Shallow, stony, very free-draining. Found on the chalk downlands of southern England, the Cotswolds, and limestone areas of the Peak District and Yorkshire. Typically pH 7.5-8.5 and sometimes higher. These soils make it nearly impossible to grow ericaceous plants without raised beds.
Loam soils
The ideal garden soil. A balanced mix of clay, sand, and silt with good drainage and nutrient retention. Typically pH 5.5-7.0. If you have loam, you are fortunate. Most gardens need work to approach loam conditions.
Peat soils
Dark, spongy, moisture-retentive. Found in the Fens, parts of Lancashire, and upland areas. Typically pH 3.5-5.5. Naturally acidic and rich in organic matter. Excellent for ericaceous plants but too acidic for vegetables without liming.
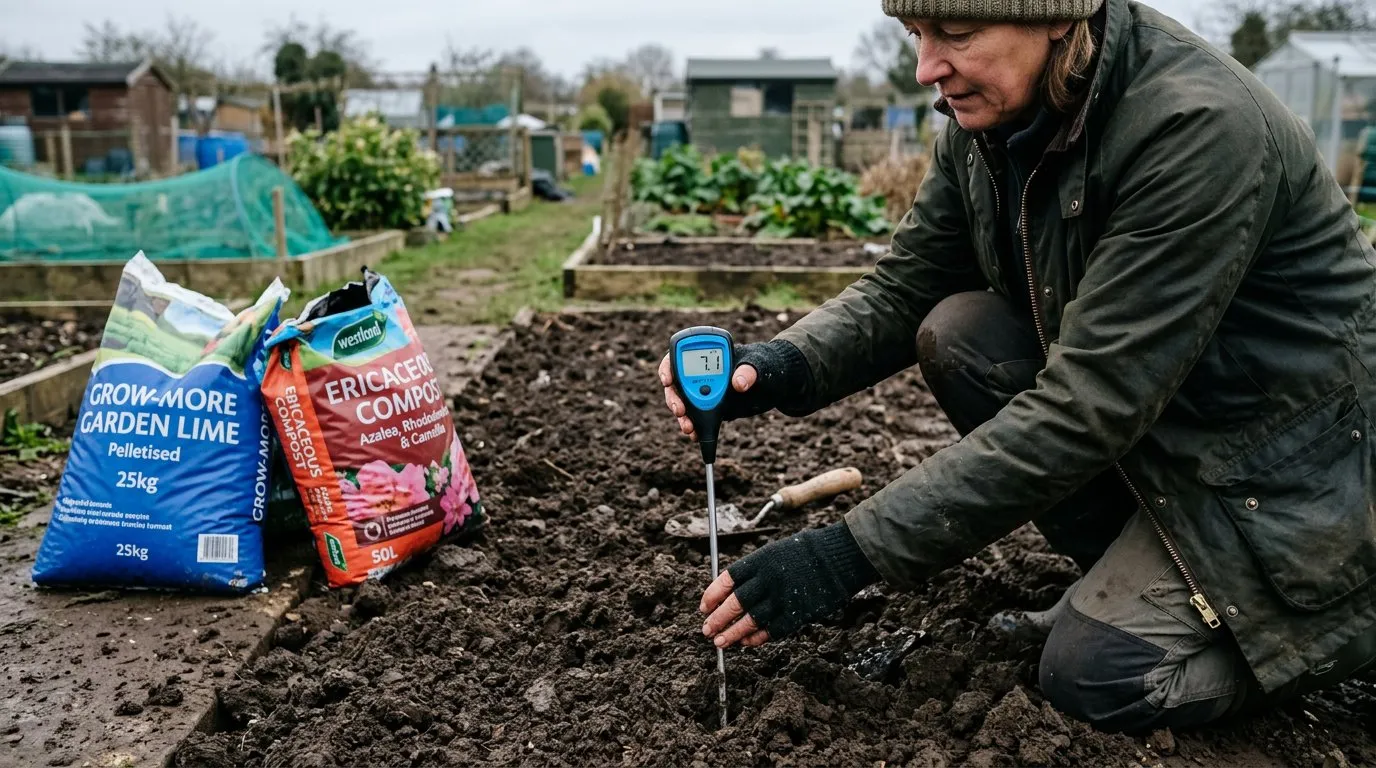 A digital pH meter gives a precise numerical reading. Calibrate before use and test at 10-15cm depth for accurate results.
How to test your soil pH
Three methods are available, ranging from a two-pound DIY kit to professional laboratory analysis. All work. The choice depends on how much detail you need.
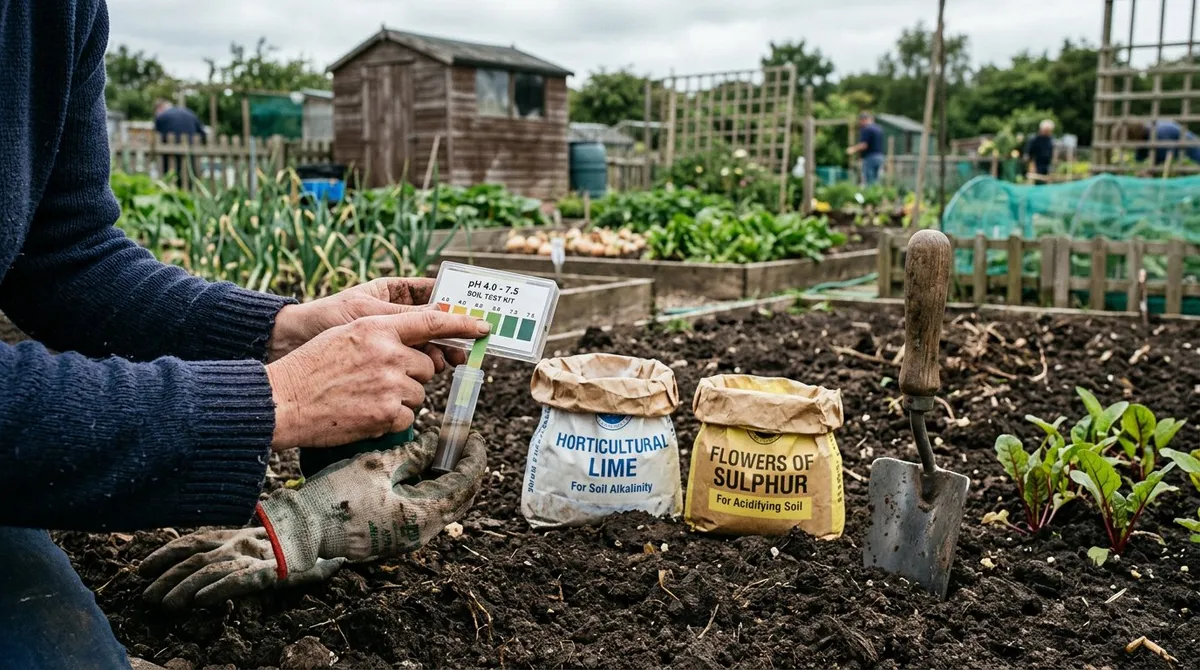
Method 1: Colour-change test kits
The cheapest and quickest option. Available from every garden centre for two to five pounds.
How to use:
- Collect soil from 10-15cm depth (below the surface organic layer)
- Take samples from 5-6 spots across the area and mix them together
- Place a teaspoon of soil in the provided test tube
- Add the indicator solution and shake
- Let the soil settle for 5-10 minutes
- Compare the liquid colour against the chart
Accuracy: Plus or minus 0.5 pH units. Good enough for most garden decisions. You do not need decimal-point precision to decide whether your soil needs lime.
Method 2: Digital pH meters
Electronic meters cost fifteen to forty pounds and give a numerical reading on a screen.
How to use:
- Calibrate the meter with the provided buffer solutions (pH 4.0 and 7.0)
- Collect soil and mix with distilled water (not tap water, which has its own pH)
- Insert the probe and wait for the reading to stabilise
- Record the result
Accuracy: Plus or minus 0.2 pH units with proper calibration. More precise than colour kits, and useful if you are making ongoing adjustments and want to track changes.
Warning: Cheap meters under ten pounds are often inaccurate and give inconsistent readings. The probe quality determines accuracy. Spend at least fifteen to twenty pounds for reliable results.
Method 3: Professional laboratory analysis
The gold standard. Send a soil sample to an accredited lab and receive a full report covering pH, NPK levels, trace elements, organic matter content, and specific recommendations.
UK labs and costs:
- RHS Soil Analysis Service (members): approximately twenty-five pounds
- NRM Laboratories: fifteen to thirty pounds depending on the package
- Local agricultural colleges often offer soil testing services
When to use lab testing:
- Starting a new allotment or large vegetable garden
- Persistent plant health problems despite good care
- Before planting an orchard or major tree planting
- When establishing raised beds and need to know what amendments to buy
Sampling technique for accurate results
Poor sampling gives misleading results. Follow this method.
- Test when soil is moist but not waterlogged (spring or autumn ideal)
- Avoid testing within 6 weeks of adding lime, fertiliser, or manure
- Use a clean trowel. Residue from other materials skews results
- Dig to 10-15cm depth. Surface soil pH differs from root-zone pH
- Take 5-6 samples in a W-pattern across the area
- Mix all samples together in a clean bucket
- Test the mixed sample
Gardener’s tip: Test different parts of your garden separately. The vegetable patch, front border, and lawn may have quite different pH levels, especially if previous owners applied lime or ashes to one area.
Understanding your results
A single pH number tells you a lot once you know how to read it.
What your reading means
| Your pH | Soil condition | Action needed |
|---|---|---|
| Below 5.0 | Very acidic | Lime heavily for vegetables; ideal for blueberries and rhododendrons |
| 5.0-5.5 | Acidic | Lime for most crops; good for soft fruit and potatoes |
| 5.5-6.0 | Slightly acidic | Light liming for brassicas; fine for most plants |
| 6.0-7.0 | Ideal range | No adjustment needed for most garden plants |
| 7.0-7.5 | Slightly alkaline | Fine for brassicas and lavender; too high for ericaceous plants |
| 7.5-8.0 | Alkaline | Sulphur or acidic organic matter for acid-lovers; fine for chalk-loving plants |
| Above 8.0 | Very alkaline | Raised beds with imported compost for sensitive plants |
Regional patterns across the UK
Understanding your local geology helps explain your results and predict how quickly pH will drift.
- South-east England (chalk downs): pH 7.5-8.5. Underlying chalk makes it nearly impossible to permanently lower pH
- Midlands clay: pH 6.5-7.5. Stable, well-buffered soils that resist pH change in either direction
- East Anglia (sandy and peaty soils): pH 4.5-6.5. Light soils that respond quickly to lime
- Wales and Lake District (slate and granite): pH 4.5-6.0. Naturally acidic bedrock produces acidic soils
- Scottish Highlands (peat and granite): pH 3.5-5.5. Among the most acidic soils in the UK
- Limestone areas (Cotswolds, Peak District, Yorkshire Dales): pH 7.0-8.5. High calcium carbonate content
How to raise soil pH with lime
Liming is the most common pH adjustment in UK gardens. Our naturally acidic rainfall (pH 5.0-5.6) slowly lowers soil pH over time, and most vegetable crops prefer neutral to slightly alkaline conditions.
Types of lime
| Lime type | Chemical name | Speed of action | Best for |
|---|---|---|---|
| Garden lime | Calcium carbonate | 3-6 months | General garden use, slow steady adjustment |
| Dolomite lime | Calcium magnesium carbonate | 3-6 months | Magnesium-deficient soils |
| Hydrated lime | Calcium hydroxide | 2-4 weeks | Quick results, but easy to over-apply |
| Ground chalk | Calcium carbonate (finer) | 2-4 months | Light, sandy soils |
Garden lime (calcium carbonate) is the safest choice for home gardeners. It is difficult to over-apply because it dissolves slowly. Hydrated lime acts faster but can burn plant roots if used excessively.
How much lime to apply
The amount depends on your current pH, target pH, and soil type. Clay soils need more lime than sandy soils because they buffer pH changes.
| Current pH | Target pH 6.5 (sandy soil) | Target pH 6.5 (clay soil) |
|---|---|---|
| 5.0 | 400g per sq metre | 600g per sq metre |
| 5.5 | 250g per sq metre | 400g per sq metre |
| 6.0 | 100g per sq metre | 200g per sq metre |
When and how to apply
Apply lime in autumn or winter, at least 4-6 weeks before sowing or planting. Spread evenly over the soil surface by hand or with a hand-held spreader. Let rain wash it in naturally. Do not dig it in deeply.
Never apply lime at the same time as manure or fertiliser. Lime reacts with ammonium nitrogen in manure, releasing nitrogen as ammonia gas. You lose the nitrogen and create an unpleasant smell. Apply manure in autumn and lime 4-6 weeks later, or vice versa.
 Applying garden lime by hand. Spread evenly at 200-400g per square metre and let rain wash it in. Wear gloves to avoid skin irritation.
Liming and crop rotation
In a traditional four-bed rotation, lime the brassica bed every 3-4 years. Brassicas prefer slightly alkaline soil (pH 6.5-7.5), and liming discourages clubroot, a devastating soil-borne disease that thrives in acidic conditions. Do not lime the potato bed. Potatoes prefer slightly acidic soil (pH 5.0-6.0), and alkaline conditions encourage common scab.
Our composting guide explains how organic matter interacts with soil chemistry. Well-made garden compost has a roughly neutral pH (6.5-7.5) and acts as a buffer, preventing wild pH swings in either direction.
How to lower soil pH
Lowering pH is harder and slower than raising it. Alkaline soils, especially those on chalk or limestone, resist acidification because the underlying rock continually releases calcium carbonate.
Methods for lowering pH
Sulphur chips: The most effective chemical method. Soil bacteria convert elemental sulphur to sulphuric acid over 3-6 months. Apply 50-100g per square metre to reduce pH by roughly 0.5 units. Finer sulphur works faster than coarse chips.
Ericaceous compost: Acidic peat-free compost with a pH of 4.0-5.0. Mix into the top 20cm of soil or use as a mulch around acid-loving plants. Needs annual top-ups as organic acids break down.
Composted pine bark: Naturally acidic (pH 4.0-5.0) and long-lasting. Excellent as a permanent mulch under rhododendrons, camellias, and blueberries. Breaks down slowly over 3-5 years.
Iron sulphate (ferrous sulphate): Acts faster than elemental sulphur. Apply at 30-50g per square metre. Also provides iron, which is deficient in alkaline soils. Stains paths, clothing, and hands brown.
Rainwater collection: Tap water in hard-water areas has a pH of 7.5-8.5 and gradually raises soil pH. Using collected rainwater (pH 5.0-5.6) for watering prevents this. Especially important for container-grown ericaceous plants.
The chalk soil problem
If you garden on chalk, permanently lowering the soil pH is practically impossible. The underlying chalk dissolves continuously, flooding the soil with calcium carbonate. Every application of sulphur is overwhelmed within a season.
The practical solutions are:
- Raised beds filled with imported acidic compost for ericaceous plants
- Containers with ericaceous compost for blueberries, camellias, and azaleas
- Choose plants that thrive on chalk: lavender, clematis, viburnums, box, yew, and many native wildflowers
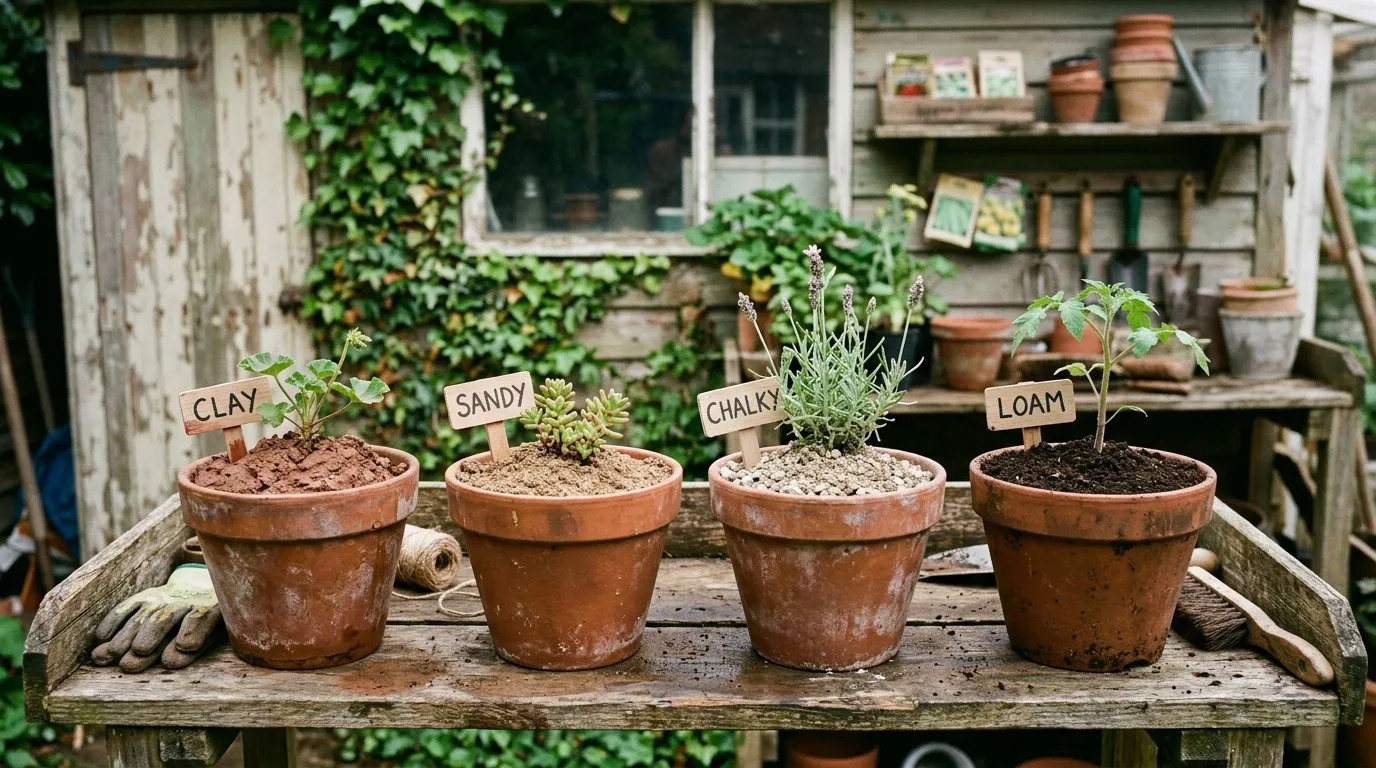 UK soil types vary hugely. From left: heavy clay, sandy, chalk, loam, and peat. Each has a different natural pH and nutrient profile.
Testing for nutrients beyond pH
pH is the starting point, but a full soil test reveals much more about what your soil needs.
NPK: the big three
| Nutrient | Role | Deficiency signs | Organic source |
|---|---|---|---|
| Nitrogen (N) | Leaf and stem growth | Pale yellow leaves, slow growth | Compost, manure, blood meal |
| Phosphorus (P) | Root development and flowering | Purple-tinged leaves, poor rooting | Bone meal, rock phosphate |
| Potassium (K) | Fruit and flower production | Brown leaf edges, poor fruiting | Comfrey feed, wood ash, potash |
Trace elements
Professional lab tests also measure trace elements: iron, manganese, zinc, boron, copper, and molybdenum. Deficiencies are less common but devastating when they occur. Boron deficiency causes hollow stems in brassicas. Manganese deficiency produces interveinal yellowing in beans and peas.
Organic matter content
Lab tests report organic matter as a percentage. UK garden soils typically contain 3-8% organic matter. Below 3% indicates poor biological activity and weak soil structure. Above 8% is excellent and usually means someone has been adding compost for years.
Adding organic matter through composting, mulching, and green manures improves soil in every measurable way. It increases nutrient holding capacity, improves drainage in clay, adds moisture retention to sand, feeds soil organisms, and buffers pH changes.
When and how often to test
Recommended testing schedule
| Situation | How often |
|---|---|
| Established vegetable garden | Every 2-3 years |
| New allotment or garden | Test before first planting |
| After heavy liming or sulphur application | Retest after 3-6 months |
| Persistent plant health problems | Test immediately |
| Raised beds with imported compost | Annually for first 3 years |
| Orchard or fruit planting | Before planting, then every 3-5 years |
Best time to test
Autumn is ideal. Soil is moist and warm, giving representative readings. Avoid testing in midsummer (soil may be too dry) or midwinter (waterlogged soil gives misleading results). Spring testing works well if you missed the autumn window.
Do not test within 6 weeks of applying lime, fertiliser, manure, or other amendments. These temporarily alter the soil chemistry and give artificially high or low readings.
Gardener’s tip: Keep a garden journal recording your soil test results, what you applied, and when. Over 5-10 years, you build a picture of how your soil is changing and whether your management is working. I test my West Midlands clay every other autumn and record the results on a simple chart.
Making the most of your soil test
A test result is only useful if you act on it. Here is a practical decision framework.
If your pH is 5.0-5.5 (acidic)
Your soil suits ericaceous plants and soft fruit beautifully. For vegetables, apply garden lime at 300-400g per square metre in autumn. Potatoes and strawberries are happy at this pH. Brassicas, carrots, and beetroot need liming.
If your pH is 6.0-7.0 (ideal)
Maintain this range with regular organic matter additions. Well-made compost buffers pH and prevents drift. Test every 3 years to confirm you are staying in range. Most vegetables, ornamentals, and fruit grow well here.
If your pH is 7.5-8.0 (alkaline)
Avoid ericaceous plants in open ground. Apply sulphur chips at 50-100g per square metre for beds where you want slightly lower pH. Use raised beds with imported acidic compost for blueberries. Choose chalk-tolerant plants for borders and concentrate vegetable growing where you can manage the soil most intensively.
If your pH is above 8.0 (very alkaline)
Focus on plants adapted to chalk and limestone. Many beautiful garden plants thrive on alkaline soil: lavender, rosemary, clematis, delphiniums, scabious, viburnum, beech, and box. For vegetables, build raised beds and fill with a mix of topsoil and compost to create a neutral growing medium above the alkaline ground.
A practical first-year soil improvement plan
For gardeners starting with untested soil, follow this plan.
| Month | Action |
|---|---|
| September | Take soil samples and test pH |
| October | Apply lime if pH is below 6.0 for vegetables |
| November | Spread 5-10cm of garden compost or well-rotted manure |
| January | Retest to check pH after lime application |
| March | Begin planting based on your soil conditions |
| September (year 2) | Retest. Adjust lime or sulphur application as needed |
Soil improvement is a long game. Each season of organic matter, sensible liming, and good management moves your soil closer to that ideal pH 6.0-7.0 range. Within 3-5 years of consistent attention, even difficult soils become productive growing ground. Test, understand, adjust, and retest. Your plants will show you the difference.
Why we recommend garden lime over hydrated lime for home gardeners: After 30 years of adjusting pH across clay borders, sandy allotments, and raised beds, garden lime (calcium carbonate) consistently produces better outcomes in amateur hands than hydrated lime. Hydrated lime acts in 2-4 weeks versus 3-6 months, but the speed is also its danger — overshoot by even 50g per square metre and you can push a vegetable bed to pH 8.0 in a single application, locking out iron and manganese for an entire season. Garden lime dissolves slowly enough that overcorrection is nearly impossible. In 30 years of recommending it to gardeners, I have never seen a case of overliming with calcium carbonate at the stated rates.
Now you’ve mastered soil testing and pH adjustment, read our guide on raised bed gardening for beginners for the next step in building the ideal growing conditions from the ground up.
Lawrie has been gardening in the West Midlands for over 30 years. He grows his own veg using no-dig methods, keeps a wildlife-friendly garden, and writes practical advice based on real UK growing conditions.