How to Freeze Garden Produce
Complete UK guide to freezing garden fruit and vegetables. Blanching times, open-tray method, syrup packs, storage times, and defrosting safely.
Key takeaways
- Blanch vegetables in boiling water for 1-4 minutes before freezing to preserve colour, flavour, and texture
- Open-tray freezing on a lined baking sheet keeps individual pieces separate for easy portioning
- Most frozen vegetables store at -18C for 8-12 months without significant quality loss
- Syrup pack fruit in a 40% sugar solution (400g sugar per litre water) for the best frozen texture
- Lettuce, cucumber, radishes, and whole potatoes do not freeze well and should be preserved by other methods
- Label every bag with contents and date to maintain a first-in-first-out rotation system
A chest freezer is the UK gardener’s single most useful tool for dealing with a summer glut. When the runner beans produce faster than you can eat them and the pea harvest comes all at once, freezing captures that just-picked freshness in minutes. Home-frozen vegetables from your own garden taste noticeably better than anything from a supermarket freezer aisle.
Freezing works by slowing bacterial activity to near zero at -18C. But throwing raw vegetables into a bag produces disappointing results. Enzymes continue to degrade colour, flavour, and texture even at freezer temperatures. The solution is blanching: a brief dip in boiling water that deactivates these enzymes before freezing. This guide covers blanching times for every common UK garden vegetable, the open-tray method for fruit, syrup and dry packs, storage times, the best containers, and safe defrosting.
Blanching: why it matters and how to do it
Blanching is a short immersion in boiling water followed by immediate cooling in iced water. It is the most important step in freezing vegetables. Without it, frozen vegetables lose colour within weeks, develop off flavours within 2 months, and turn mushy when thawed.
How to blanch vegetables
- Bring a large pan of water to a rolling boil. Use at least 4 litres of water per 500g of vegetables.
- Prepare vegetables: wash, trim, and cut to the size you want after thawing
- Drop vegetables into the boiling water. Start timing from the moment the water returns to a boil.
- Blanch for the exact time listed in the table below. Under-blanching is worse than not blanching at all because it stimulates enzyme activity rather than stopping it.
- Lift vegetables out with a slotted spoon or sieve
- Plunge immediately into a bowl of iced water. Cool for the same length of time as the blanching.
- Drain thoroughly. Shake off excess water. Pat dry with a clean tea towel.
- Pack into freezer bags or containers and freeze immediately.
Warning: Under-blanching actually accelerates deterioration. If you cannot time accurately, err on the side of a few seconds longer rather than shorter. A kitchen timer is essential.
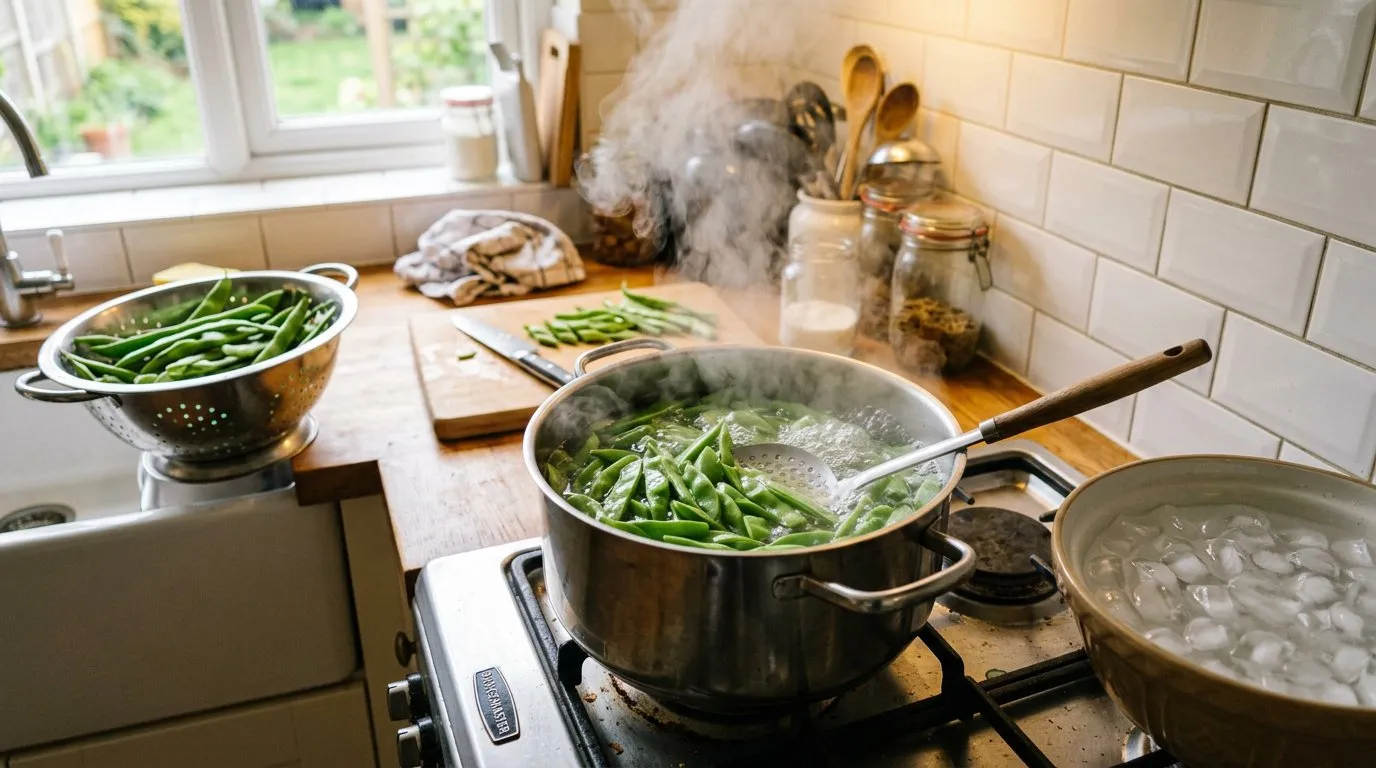
Runner beans being blanched in boiling water before freezing — a colander and ice bowl standing by for the rapid cooling step.
Complete blanching times for UK garden vegetables
This table covers every vegetable commonly grown in UK gardens. Times are for pieces of normal size. Cut larger pieces will need an extra 30-60 seconds.
| Vegetable | Preparation | Blanching time | Notes |
|---|---|---|---|
| Runner beans | Slice diagonally, 2-3cm pieces | 2 minutes | Freeze very well. Best within 10 months. |
| French beans | Top, tail, leave whole | 2 minutes | Excellent frozen. Blanch small batches. |
| Broad beans | Shell from pods | 3 minutes | Slip skins off after blanching for best texture. |
| Peas | Shell from pods | 1 minute | Freeze the day of picking. Sugars convert fast. |
| Sweetcorn | Strip kernels from cob | 4 minutes | Or freeze whole cobs: blanch 6-8 mins. |
| Broccoli | Cut into 3cm florets | 3 minutes | Soak in salted water first to remove insects. |
| Brussels sprouts | Trim, halve if large | 3-4 minutes | Small: 3 mins. Medium: 4 mins. |
| Cauliflower | Cut into 3cm florets | 3 minutes | Add 1 tbsp lemon juice to blanching water. |
| Spinach | Wash, remove thick stems | 1-2 minutes | Squeeze out all water after cooling. |
| Kale | Remove stems, tear leaves | 2 minutes | Blanch in small batches. |
| Courgettes | Slice 1cm thick | 1 minute | Texture softens. Best in cooked dishes. |
| Carrots | Slice, dice, or leave baby whole | 3-4 minutes | Sliced: 3 mins. Whole baby: 4 mins. |
| Parsnips | Peel, dice into 2cm cubes | 2 minutes | Roast from frozen for best results. |
| Beetroot | Cook fully first, slice | No blanch needed | Cook until tender, cool, then freeze. |
| Turnips/Swede | Peel, dice into 2cm cubes | 2 minutes | Or cook and mash before freezing. |
| Leeks | Slice into 1cm rings | 2 minutes | Useful for soups straight from frozen. |
| Onions | Peel, dice or slice | No blanch needed | Freeze raw. Texture softens but flavour holds. |
| Peppers/Chillies | Halve, deseed, slice | No blanch needed | Freeze raw. Open-tray first. |
| Asparagus | Trim woody ends | 2-3 minutes | Thin: 2 mins. Thick: 3 mins. |
| Tomatoes | Whole, halved, or pureed | No blanch needed | Skin splits on freezing. Peel after thawing. |
Gardener’s tip: Blanch and freeze peas within 2 hours of picking. Pea sugars convert to starch rapidly after harvest. The difference between peas frozen within 2 hours and those left overnight is dramatic. This is why frozen peas from the garden taste better than supermarket fresh peas that are days old.
Open-tray freezing: the method for everything
Open-tray freezing is the technique that separates good home freezing from the block-of-ice approach. Instead of packing produce straight into bags where it freezes into a solid lump, you freeze items individually on a tray first.
How to open-tray freeze
- Line a baking sheet with baking parchment or a silicone mat
- Spread prepared produce in a single layer with pieces not touching
- Place the tray in the freezer, uncovered, for 2-4 hours until solid
- Transfer the individually frozen pieces into labelled freezer bags
- Squeeze out all air and seal
- Return to the freezer for long-term storage
This method works for blanched vegetables, berries, sliced fruit, herbs, and cooked items. The result is a bag of free-flowing pieces you can pour out and use exactly the quantity you need without defrosting the entire batch.
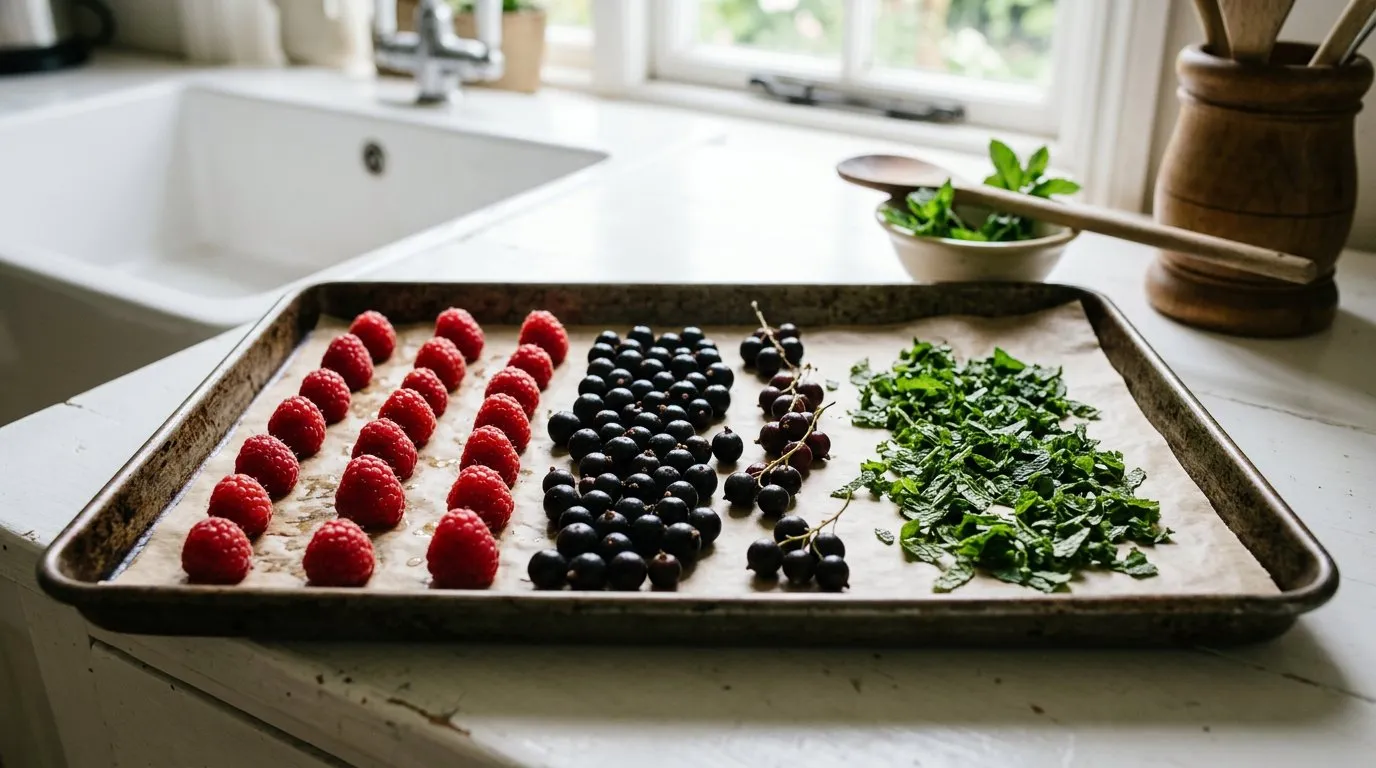
Raspberries, blackcurrants, and chopped mint spread on a baking tray for open freezing — each piece will freeze individually for easy portioning.
What to open-tray freeze
- All berries: raspberries, blueberries, strawberries (halved), blackberries, gooseberries, redcurrants, blackcurrants
- Blanched peas, broad beans, sweetcorn kernels
- Sliced blanched courgettes, peppers, chillies
- Herb cubes (chop herbs, pack into ice cube trays, top with water or olive oil, freeze, pop out and bag)
Freezing fruit: syrup pack vs dry pack
Fruit freezes differently from vegetables. Most fruit has a high sugar content that prevents the worst enzyme damage, so blanching is not needed. The main concern with frozen fruit is texture: ice crystals rupture cell walls, causing softness on thawing.
Dry pack method
Spread fruit on a tray, freeze until solid, then bag. This is the quickest method and works well for fruit destined for smoothies, cooking, baking, and jam making. The fruit softens on thawing but retains full flavour.
Best for: raspberries, blueberries, blackberries, gooseberries, currants, rhubarb (cut into 3cm chunks)
Syrup pack method
Pack fruit into rigid containers and cover with cold sugar syrup. The syrup protects the fruit’s structure and colour during freezing, producing a better texture on thawing. Syrup-packed fruit is ideal for eating raw after defrosting or using in desserts.
Standard syrup: dissolve 400g granulated sugar in 1 litre of cold water. Stir until dissolved. Chill in the fridge before using.
- Pack prepared fruit into rigid freezer containers, leaving 2cm headspace
- Pour cold syrup over the fruit until it is fully submerged
- Place a small piece of crumpled baking parchment on top to keep fruit below the syrup surface
- Seal, label, and freeze
Best for: peaches, nectarines, apricots, plums, pear halves, apple slices (add 1 tablespoon lemon juice per litre to prevent browning)
Fruit freezing comparison
| Fruit | Dry pack | Syrup pack | Storage time | Notes |
|---|---|---|---|---|
| Raspberries | Excellent | Good | 12 months | Open-tray freeze. Handle gently. |
| Strawberries | Good (halved) | Good | 8 months | Lose firmness. Best for cooking/smoothies. |
| Blueberries | Excellent | Good | 12 months | Freeze whole. No preparation needed. |
| Blackberries | Excellent | Good | 12 months | Open-tray freeze to prevent crushing. |
| Gooseberries | Good | Good | 12 months | Top and tail before freezing. |
| Plums | Fair | Excellent | 10 months | Halve and stone. Syrup prevents browning. |
| Apples | Fair | Excellent | 10 months | Peel, core, slice. Add lemon juice. |
| Pears | Poor | Good | 8 months | Must use syrup pack. Browns quickly. |
| Rhubarb | Good | Good | 12 months | Cut into 3cm chunks. No need to peel. |
| Redcurrants | Excellent | Good | 12 months | Strip from stems. Open-tray freeze. |
| Blackcurrants | Excellent | Good | 12 months | Strip from stems. Open-tray freeze. |
What freezes well and what does not
Not everything from the garden is worth freezing. High-water-content crops turn to mush. Some textures do not survive the freeze-thaw cycle.
Freezes well
- Peas - arguably better frozen than fresh if frozen within hours of picking
- Runner beans and French beans - excellent texture when blanched properly
- Broad beans - blanch and slip skins for the best result
- Sweetcorn - strip kernels from the cob for easiest use
- Broccoli and cauliflower - good in cooked dishes
- Spinach and kale - squeeze dry after blanching
- All berries - outstanding results with open-tray method
- Tomatoes - whole or pureed, well suited to sauces and soups
- Herbs - freeze in ice cube trays with water or oil
- Chillies - freeze raw, use from frozen
Freezes poorly
- Lettuce and all salad leaves: cell walls collapse completely. Becomes slimy.
- Cucumber: turns translucent and watery. Inedible after thawing.
- Radishes: lose all crunch. Become soft and waterlogged.
- Celery: loses texture entirely. Only usable in cooked dishes if frozen.
- Whole raw potatoes: turn grainy and grey. Blanched chips or cooked mash freeze acceptably.
- Courgettes (raw): become waterlogged. Only freeze after blanching, and accept softer texture. Better preserved by other methods.
Freezer storage times
Frozen food remains safe indefinitely at -18C, but quality declines over time. Use this table for maximum quality storage periods.
| Produce | Maximum storage at -18C |
|---|---|
| Peas | 12 months |
| Runner beans | 10 months |
| French beans | 12 months |
| Broad beans | 12 months |
| Sweetcorn | 12 months |
| Broccoli | 12 months |
| Cauliflower | 12 months |
| Spinach/Kale | 8 months |
| Carrots | 12 months |
| Courgettes | 6 months |
| Tomatoes (whole) | 10 months |
| Tomato puree | 12 months |
| Raspberries | 12 months |
| Strawberries | 8 months |
| Blueberries | 12 months |
| Blackberries | 12 months |
| Apples (syrup packed) | 10 months |
| Plums (syrup packed) | 10 months |
| Rhubarb | 12 months |
| Herbs (in ice cubes) | 6 months |
| Chillies | 12 months |
These times assume consistent storage at -18C in thick freezer bags or rigid containers. Thin bags, temperature fluctuations, and frequent opening of the freezer door all reduce quality faster.
Labelling and rotation
Labelling is not optional. After 3 months in the freezer, bags of blanched green vegetables all look identical. Without dates, you will use the newest produce first and find year-old bags buried at the bottom.
Labelling system
Write the following on every bag or container:
- Contents (be specific: “runner beans, sliced” not just “beans”)
- Date frozen
- Quantity (weight or number of portions)
- Use by (date based on the storage time table)
Use a permanent marker directly on freezer bags. For rigid containers, use freezer-safe labels or masking tape.

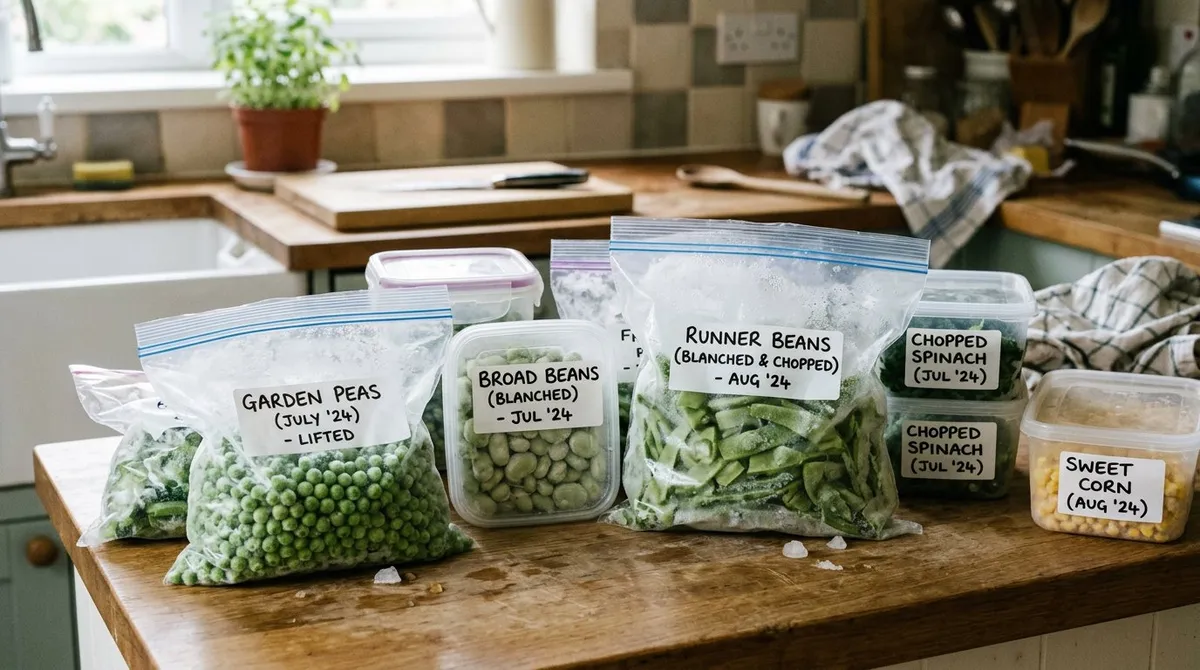
Labelled freezer bags of peas, beans, and chopped courgettes stacked in a freezer drawer — handwritten date labels make first-in-first-out rotation easy.
First in, first out
Organise your freezer so the oldest items are on top or at the front. When adding new bags, place them at the bottom or back. This simple rotation ensures nothing is forgotten for years. A chest freezer benefits from wire baskets or dividers to separate categories: fruit, vegetables, herbs, sauces.
Gardener’s tip: Keep a chest freezer inventory list on the lid. Update it each time you add or remove items. This sounds tedious but it prevents waste. WRAP research found that UK households throw away 20% of frozen food because they forget what they have.
Best containers for freezing
The container you choose affects shelf life, freezer burn risk, and how much space your produce takes up.
Freezer bags
Thick freezer bags (200 gauge or above) are the most practical option for most garden produce. They are cheap, flatten for space-efficient storage, and can be sealed with minimal trapped air. Squeeze out all air before sealing, or use a straw to suck air from the bag before pressing the seal closed.
Do not use thin sandwich bags. They are too permeable and allow freezer burn within weeks.
Rigid containers
Plastic freezer boxes with tight-fitting lids suit liquids (soups, purees, syrups), delicate items that crush easily, and produce packed in syrup. Leave 2cm headspace for liquid expansion. Rigid containers are reusable for years but take up more freezer space than bags.
Vacuum-sealed bags
Vacuum sealers remove all air before heat-sealing the bag. This gives the longest shelf life and the best protection against freezer burn. The bags lie flat, stack neatly, and the absence of air extends quality by 30-50% compared to standard bags. A vacuum sealer costs thirty to fifty pounds and is worth it if you freeze large quantities each year.
Why we recommend a mid-range vacuum sealer for serious glut freezing: After 30 years of processing large harvests, sometimes 20kg of beans in a single August week, a vacuum sealer is the single most impactful upgrade to the home freezing setup. Runner beans vacuum-sealed immediately after blanching retained colourful colour and firm texture at 11 months in the freezer, while the same batch stored in standard thick freezer bags had visibly softened and lost colour by month eight. A decent mid-range model (£40-60) pays for itself within a single season if you grow more than 10kg of produce annually.
Ice cube trays
Well suited to herbs, pesto, tomato paste, and stock. Fill trays, freeze, pop out the cubes, and transfer to a labelled bag. Each cube is a ready-measured portion.
Defrosting safely
How you defrost frozen produce matters for both food safety and quality.
Vegetables: cook from frozen
Most frozen vegetables should go straight from the freezer into the pan. Do not thaw them first. Add to boiling water and cook for 3-5 minutes, or toss frozen into stir-fries, casseroles, and roasting trays. Cooking from frozen retains more nutrients and produces better texture than defrosting first.
Exceptions: thaw spinach and kale in a colander, then squeeze out excess water before adding to recipes. Thaw tomatoes if you need to peel them (the skin slips off easily once softened).
Fruit: thaw in the fridge
Defrost fruit slowly in the refrigerator for 4-6 hours or overnight. Slow thawing gives the best texture. Rapid thawing (microwave, warm water) causes more cell damage and produces waterier results.
For smoothies and baking, use fruit straight from frozen. No need to thaw.
Food safety rules
- Never defrost at room temperature for more than 2 hours. Bacteria multiply rapidly above 5C.
- Thaw in the fridge, in cold water (changed every 30 minutes), or in the microwave on the defrost setting.
- Cook defrosted food within 24 hours.
- Never refreeze raw food that has fully thawed to room temperature. Refreezing is safe only if the food was thawed in the fridge and still feels cold.
Check our easy recipes for home-grown vegetables for ideas on using your frozen produce throughout the year.
Seasonal freezing calendar
Plan your freezing around the UK growing season. Having bags and containers ready before each harvest peak saves time.
| Month | What to freeze | Method |
|---|---|---|
| May | Asparagus, spring greens | Blanch and open-tray |
| June | Strawberries, gooseberries, broad beans, peas | Open-tray (fruit), blanch (veg) |
| July | Raspberries, blueberries, French beans, courgettes | Open-tray (fruit), blanch (veg) |
| August | Runner beans, sweetcorn, tomatoes, blackberries, plums | Blanch (beans, corn), whole (tomatoes), open-tray (berries), syrup pack (plums) |
| September | Apples, pears, broccoli, spinach, kale | Syrup pack (apples, pears), blanch (greens, broccoli) |
| October | Pumpkin/squash puree, chillies, late beans, beetroot | Cook and puree (squash), freeze raw (chillies), blanch (beans), cook first (beetroot) |
| November | Leeks, parsnips, Brussels sprouts | Blanch all. Roast parsnips from frozen. |
Check our vegetable planting calendar and monthly harvest guide to plan your growing and freezing schedule together.
Common mistakes when freezing garden produce
Skipping the blanching step
This is the most frequent error. Unblanched vegetables look fine going into the freezer but deteriorate within 2-3 months. Colours fade, flavours turn bitter or flat, and textures become mushy. The 1-4 minutes spent blanching makes a dramatic difference to what you take out of the freezer 6 months later.
Freezing too slowly
Slow freezing creates large ice crystals that damage cell walls. Fast freezing creates small crystals that cause less damage. Spread items in a single layer for open-tray freezing. Do not overload the freezer with large amounts of warm food at once. Most freezers have a fast-freeze function: use it when adding more than 1kg of new produce.
Not removing air from bags
Air left inside bags causes freezer burn within weeks. Squeeze bags flat, pressing out all trapped air before sealing. A simple test: if you can feel spongy air pockets in the sealed bag, it is not tight enough. Vacuum sealing eliminates this problem entirely.
Freezing old or damaged produce
Freeze only the freshest, best-quality produce. Freezing does not improve anything. Limp carrots, bruised fruit, and wilted leaves produce poor results. Pick in the morning when produce is coolest and firmest. Blanch and freeze the same day for the best quality.
Losing track of stored items
Without labels and dates, your freezer becomes a tomb of unidentified frozen objects. Everything looks the same after 3 months. Label every bag. Date everything. Keep a running inventory on the freezer lid. Practise first in, first out. The effort is small and the waste reduction is significant.
Now you’ve mastered freezing garden produce, read our guide on other ways to preserve fruit and vegetables for pickling, bottling, and drying methods that complement your freezer stores.
Frequently asked questions
Do I need to blanch vegetables before freezing?
Yes, blanching is essential for most vegetables. It stops enzyme activity that causes colour loss, off flavours, and mushy texture during frozen storage. Blanch in boiling water for 1-4 minutes depending on the vegetable, then cool immediately in iced water. The exceptions are onions, peppers, and chillies, which freeze well raw without blanching.
How long can you freeze garden vegetables?
Most blanched vegetables store at -18C for 8-12 months. Peas, beans, and sweetcorn last the full 12 months with good quality. Courgettes and spinach are best used within 6-8 months. Quality declines gradually after these periods but the food remains safe to eat indefinitely. Label bags with the date to track storage time and maintain rotation.
What is the best way to freeze soft fruit?
Open-tray freeze berries in a single layer on a lined baking sheet for 2-3 hours until solid. Transfer to labelled freezer bags and seal with all air removed. This keeps individual berries separate so you can pour out the exact quantity needed. For fruit that browns, such as apples and pears, use a syrup pack with 400g sugar per litre of cold water.
Which vegetables should not be frozen?
Lettuce, cucumber, radishes, celery, and whole raw potatoes freeze poorly. Their high water content forms large ice crystals that rupture cell walls, producing a watery, mushy result on thawing. Salad leaves become slimy. Raw potatoes turn grainy and grey. Preserve these crops by other methods or eat them fresh from the garden.
Should I defrost frozen vegetables before cooking?
Cook most frozen vegetables straight from frozen without thawing. Add to boiling water, stir-fries, casseroles, or roasting trays directly from the bag. They cook in 3-5 minutes. Defrosting first causes waterlogging and nutrient loss through drip. The exceptions are spinach and kale, which should be thawed and squeezed dry before adding to recipes.
What containers are best for freezing garden produce?
Thick freezer bags of 200 gauge or above are the most practical option for most produce. Squeeze out all air before sealing. Rigid plastic containers with tight lids suit liquids, purees, and delicate items. Vacuum-sealed bags give the longest shelf life by completely eliminating air contact. Avoid thin sandwich bags, which allow freezer burn within weeks.
Can I refreeze vegetables after defrosting?
Refreezing is safe if the food was thawed in the fridge and still feels cold below 5C. Quality drops with each freeze-thaw cycle as ice crystals cause more cell wall damage. The texture becomes softer and waterier each time. Freeze in small portions from the start so you only defrost what you need for a single meal.
How do I prevent freezer burn?
Remove all air from bags before sealing. Use thick freezer bags of at least 200 gauge or a vacuum sealer for the best protection. Wrap items tightly with no gaps between the food and packaging. Store at a steady -18C and avoid opening the freezer door unnecessarily. Freezer burn causes dry, discoloured patches with an off flavour but it is not dangerous to eat.
Lawrie has been gardening in the West Midlands for over 30 years. He grows his own veg using no-dig methods, keeps a wildlife-friendly garden, and writes practical advice based on real UK growing conditions.