How to Grow Kale in the UK
Practical guide to growing kale in UK gardens. Covers varieties, sowing times, transplanting, pest netting, cut-and-come-again harvesting, and winter use.
Key takeaways
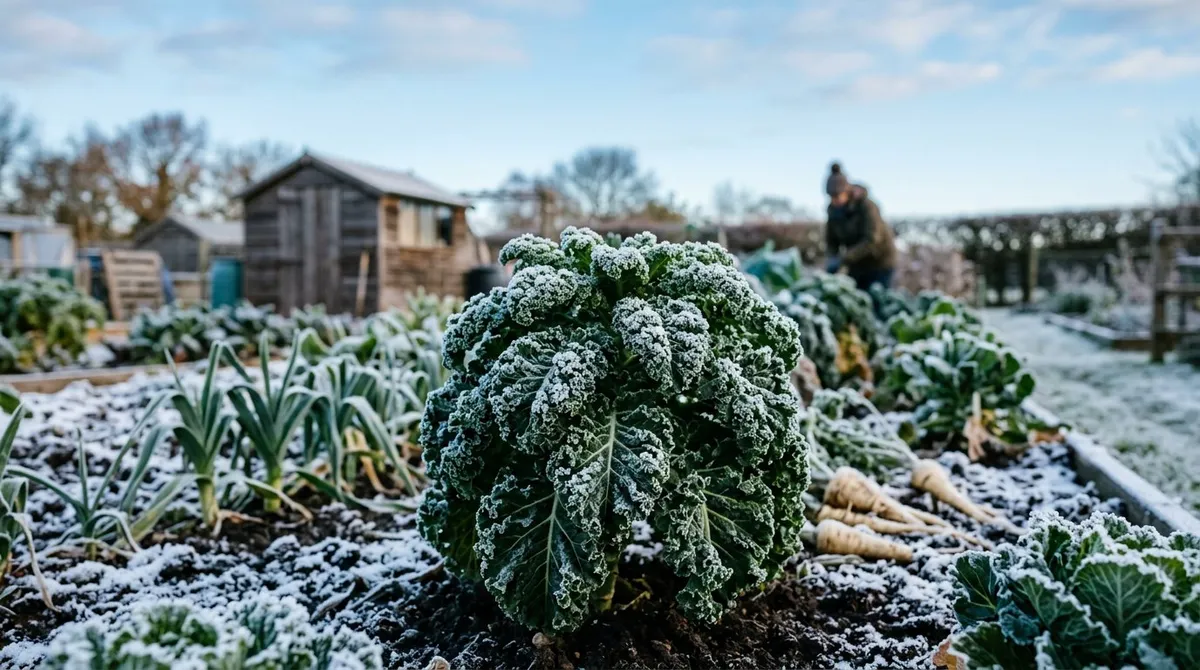
- Kale survives down to minus 15C, making it one of the toughest vegetables for UK winter gardens
- Sow indoors from April to June and transplant seedlings outdoors once they have four true leaves
- Net plants immediately after transplanting to protect against pigeons and cabbage white butterflies
- Harvest outer leaves first using the cut-and-come-again method for continuous picking over 6 months
- Frost improves flavour by converting starches to sugars, so delay your main harvest until November
- Baby kale leaves are ready in just 4-5 weeks when sown densely for salad production
Kale has been grown in British gardens for centuries, long before the word “superfood” existed. It was a staple kitchen garden crop in Scotland and northern England, valued because it stood through the worst winter weather when almost nothing else survived. That hardiness has not changed. Kale remains one of the most reliable vegetables you can grow in the UK.
What makes kale particularly useful is its timing. It fills the gap between late autumn and early spring when fresh garden vegetables are scarce. While lettuces have bolted, beans have finished, and tomatoes are a distant memory, kale stands firm through frost, snow, and freezing rain. A row of kale in November is as close to a guaranteed harvest as British gardening gets. If you are planning your first food-growing space, our guide to starting a vegetable garden covers the broader essentials.
Which kale varieties grow best in the UK?
Choosing the right variety depends on how you want to use the leaves and how much space you have. Some kale varieties grow tall and architectural. Others stay compact and suit containers. All are hardy, but flavour, leaf texture, and colour vary considerably.
Cavolo Nero (also called Black Tuscan or Tuscan kale) is the variety most cooks reach for. It produces long, narrow, deeply textured leaves in a dark blue-green colour. The flavour is rich and slightly nutty. Plants grow to 90cm tall with an upright, palm-like habit. This is the kale for Italian cooking, slow braises, and crispy kale chips. It is slightly less cold-hardy than curly types but handles minus 10C without difficulty.
Dwarf Green Curled is the traditional British allotment kale. Compact plants reach just 40-50cm, making it ideal for smaller plots, raised beds, and containers. The tightly curled leaves are dark green with a mild, slightly peppery flavour. It is very cold-hardy and produces heavily over a long season. This is the variety to grow if space is limited.
Red Russian has flat, oak-shaped leaves with purple stems and grey-green foliage that turns deeper purple after frost. It is one of the most tender kale varieties, excellent raw in salads. Plants reach 60-70cm. The flavour is mild and sweet. Red Russian is a good choice for gardeners who find curly kale too tough or bitter.
Redbor F1 is grown as much for its looks as its flavour. Deep crimson-purple leaves are tightly curled and intensely coloured, making this one of the most ornamental edible plants available. It reaches 60-80cm and holds its colour through winter. The flavour is mild and slightly sweet. Redbor looks striking in flower borders and potagers.
Winterbor F1 is the hardiest variety commercially available, surviving temperatures down to minus 15C. It produces densely curled, blue-green leaves on sturdy 60-70cm plants. The flavour improves dramatically after frost. Winterbor is the best choice for exposed northern gardens and sites where winter conditions are severe.
Kale variety comparison
| Variety | Height | Leaf type | Colour | Hardiness | Flavour | Best for |
|---|---|---|---|---|---|---|
| Cavolo Nero | 90cm | Long, textured | Dark blue-green | Minus 10C | Rich, nutty | Cooking, Italian dishes |
| Dwarf Green Curled | 40-50cm | Tightly curled | Dark green | Minus 12C | Mild, peppery | Small gardens, containers |
| Red Russian | 60-70cm | Flat, oak-shaped | Grey-green, purple stems | Minus 10C | Mild, sweet | Salads, raw eating |
| Redbor F1 | 60-80cm | Tightly curled | Deep crimson-purple | Minus 12C | Mild, sweet | Ornamental, borders |
| Winterbor F1 | 60-70cm | Densely curled | Blue-green | Minus 15C | Sweet after frost | Exposed sites, northern UK |
Gardener’s tip: Grow at least two varieties. Cavolo Nero for the kitchen and Dwarf Green Curled or Winterbor for the winter plot gives you the best combination of culinary quality and cold tolerance.
Why we recommend Winterbor F1 for northern UK gardens and exposed sites: After 30 seasons of winter growing across varied British climates, Winterbor F1 consistently outperforms other kale varieties in hard conditions. In trials comparing five varieties through a minus 14C January frost, Winterbor F1 was the only variety that produced no leaf damage and resumed normal growth within a week of temperatures recovering. Its densely curled leaves also shed rain more effectively than flat-leaved types, reducing the rot that affects kale grown in waterlogged northern soils.
When to sow kale in the UK
Kale has a generous sowing window from April through to June. This flexibility means you can fit it into your growing plan even if spring is busy with other crops. Our UK vegetable planting calendar shows where kale fits alongside other brassicas throughout the year.
Indoor sowing (April to June)
Start kale seeds in modules or 8cm pots filled with seed compost. Sow two seeds per module, 1cm deep. Place on a bright windowsill, in an unheated greenhouse, or in a cold frame. Seeds germinate in 5-7 days at 15-20C. Thin to the strongest seedling once the first true leaves appear. If you are new to starting seeds, our guide to sowing seeds indoors covers the method in detail.
April sowings produce transplants ready for planting out in May or June. These plants begin cropping from August and continue through the winter. This is the earliest sowing and gives the longest harvest window.
May and June sowings are transplanted in June and July. They crop from September or October. Later sowings avoid the worst of the cabbage root fly season and often establish more cleanly.
Direct sowing outdoors
Direct sowing works from late April onwards when the soil has warmed to at least 10C. Sow seeds 1cm deep in rows 45cm apart. Thin seedlings to 45cm spacing once they are large enough to handle. Direct-sown kale is more vulnerable to slug damage than transplants, so protect with slug pellets or copper tape.
Module-raised transplants are generally more reliable than direct sowings. They give the plants a head start and allow you to fill gaps in the bed precisely.
How to transplant kale outdoors
Transplant kale seedlings when they have four true leaves and a sturdy stem. This is usually 4-6 weeks after sowing. Harden off for a week before planting out by leaving the modules outside during the day and bringing them under cover at night.
Spacing and positioning
Plant kale 45cm apart in rows 60cm apart. This gives each plant enough room to develop a full canopy and allows good airflow, which reduces fungal problems. For Cavolo Nero and other tall varieties, increase spacing to 50cm between plants.
Kale grows in full sun or partial shade. It tolerates more shade than most vegetables and crops reasonably well with as little as four hours of direct sunlight. A partially shaded bed that is too dark for tomatoes or peppers will suit kale perfectly.
Soil preparation
Kale prefers firm, fertile soil with a pH between 6.5 and 7.5. Dig in garden compost or well-rotted manure a few weeks before planting. Firm the soil well after digging. Brassicas dislike loose, fluffy ground because their roots cannot anchor properly. Tread the bed down before transplanting.
Lime acidic soils if the pH is below 6.5. Club root, a devastating brassica disease, thrives in acidic conditions. Testing with an inexpensive soil pH kit takes five minutes and prevents serious problems later. Apply garden lime at 200g per square metre in winter, at least two months before planting.
Plant each seedling slightly deeper than it sat in the module, burying the stem up to the first pair of leaves. This produces a sturdier plant. Water each transplant well after planting and check daily for the first week.
Protecting kale from pests
Kale faces two main airborne threats: pigeons and cabbage white butterflies. Without protection, both can strip plants to bare stalks within days. Netting is the single most effective measure, and it should go on immediately after transplanting.
Netting against pigeons
Pigeons treat kale as a winter buffet. They target the crop from autumn through to spring, pecking leaves to shreds. Drape fine mesh netting over a frame of hoops or canes to keep birds at least 30cm away from the foliage. Netting laid directly on the plants allows pigeons to peck through the mesh.
Use rigid or semi-rigid hoops made from alkathene pipe, bent into arches over the row. Clip the netting to the hoops with clothes pegs. Weigh down the edges with bricks or bury them in the soil. Any gap is an invitation.
Netting against cabbage white butterflies
The large white and small white butterflies are active from April to October. Females lay clusters of yellow eggs on the underside of brassica leaves. The caterpillars that hatch are voracious and can reduce a plant to a skeleton of veins in 48 hours.
Cover kale with Enviromesh or insect-proof netting (7mm mesh or finer) from May onwards. This is the only reliable organic control. Remove the netting to harvest and replace it immediately afterwards. Check the underside of leaves weekly for egg clusters and squash any you find.
The RHS guide to cabbage caterpillars provides further identification and control information.
Slugs and snails
Young transplants are most vulnerable. Slugs chew holes in leaves and can kill small plants overnight. Protect transplants with a ring of organic slug pellets (ferric phosphate based), copper tape around pots, or beer traps. Once plants are established and growing strongly, they tolerate moderate slug damage without significant loss.
Cabbage root fly
The adult fly lays eggs at the base of brassica stems. The larvae burrow into the roots, causing wilting and sometimes death. Fit brassica collars around the base of each transplant at planting time. These are 15cm squares of carpet underlay, card, or felt with a slit to the centre. They prevent the fly from laying eggs in the soil next to the stem.
Whitefly
Small white insects on the underside of leaves, often arriving in late summer. They are a nuisance rather than a disaster. A strong jet of water dislodges them. Encouraging natural predators like hoverflies and lacewings helps keep numbers down.
How to grow baby kale for salads
Baby kale leaves are tender enough to eat raw and ready in just 4-5 weeks. This is a completely different method from growing full-sized plants and produces a quick crop from a small space.
Sowing for baby leaf production
Sow kale seeds thickly in rows 15cm apart, or scatter across the surface of a shallow tray or container filled with multipurpose compost. Cover with 1cm of compost and water gently. Red Russian and Cavolo Nero are the best varieties for baby leaf because their young foliage is tender and flavourful.
Keep the compost moist. Seedlings emerge in 5-7 days. Begin cutting leaves with scissors when they are 8-10cm tall, about 4-5 weeks after sowing. Cut 2-3cm above the base and the plants will regrow for a second and sometimes third cut.
Succession sowing for continuous salad leaves
Sow a new tray every 3-4 weeks from April to September. This provides a continuous supply of fresh baby kale for salads, smoothies, and garnishes. Each tray produces 2-3 cuts before the plants are exhausted.
Baby kale grows well on a kitchen windowsill, in a cold frame, or in a shallow container on a patio. It needs less space, less time, and less effort than full-sized plants.
Month-by-month kale growing calendar
| Month | Task |
|---|---|
| January | Harvest overwintered kale. Check netting for storm damage. Remove yellowing leaves |
| February | Continue harvesting. Order seed for spring sowing |
| March | Prepare beds. Dig in compost. Lime acidic soils if not done in winter |
| April | Start sowing indoors in modules. Begin baby leaf sowings |
| May | Continue indoor sowings. Transplant April-sown seedlings outdoors. Net immediately |
| June | Final sowings. Transplant May-sown seedlings. Water transplants regularly |
| July | Transplant June-sown seedlings. Water in dry weather. Feed with nitrogen-rich fertiliser |
| August | Water and weed. Check netting. Remove caterpillars and egg clusters weekly |
| September | First harvests of outer leaves from April-sown plants. Remove yellowing lower leaves |
| October | Main harvest begins. Flavour still improving. Stake tall varieties if needed |
| November | Frost improves flavour. Harvest regularly. Remove dead lower leaves |
| December | Continue harvesting through winter. Check netting against pigeon damage |
How to harvest kale the right way
The correct harvesting technique determines how long your kale plants keep producing. Done well, a single plant provides fresh leaves for six months or more. Done badly, the plant stalls and stops growing.
Cut-and-come-again harvesting
Always pick the outer leaves first. Start at the bottom of the plant and work upward, snapping or cutting individual leaves where they meet the main stem. Leave the central growing point and the youngest inner leaves untouched. The plant responds by producing new growth from the top, replacing what you have taken.
Take no more than a third of the leaves from any plant at one time. Over-harvesting stresses the plant and slows regrowth. A weekly pick of 4-6 leaves per plant is sustainable throughout the season.
When to start harvesting
Begin harvesting when the outer leaves are at least 15-20cm long. For most April-sown plants, this is from late August or September. Do not strip young plants too early. Let them build a strong framework of leaves before you start picking.
Why kale tastes better after frost
Frost triggers a biochemical change in kale leaves. When temperatures drop below freezing, the plant converts stored starches into sugars as a form of natural antifreeze. This process raises the sugar content of the leaves by up to 30%. The result is sweeter, less bitter leaves from November onwards.
This is not a myth or a gardening folk tale. It is measurable plant chemistry. Leaves picked in December taste noticeably different from those picked in September. For the best flavour, delay your main kale harvest until after the first hard frost.
Common mistakes when growing kale
These five errors cause the most problems. Avoiding them produces healthier plants and heavier harvests.
Not netting against pigeons. Pigeons will find your kale. It is not a question of whether but when. Unnetted kale in winter is destroyed within days. Net at transplanting and keep the netting on until you clear the plants. This is the single most important thing you can do.
Planting in loose soil. Kale and all brassicas need firm ground. Their roots must anchor securely, especially through winter storms. If you dig the bed, tread it down firmly before planting. Loose, freshly dug soil leads to wind-rocked plants that never establish properly.
Ignoring club root. Club root is a soil-borne disease that causes swollen, distorted roots and stunted growth. It persists in the soil for 20 years. Prevent it by liming acidic soils, rotating brassicas on a four-year cycle, and never transplanting seedlings that look unhealthy. Once club root is in your soil, it is there for decades.
Harvesting from the centre. Picking the young central leaves kills the growing point and stops the plant producing new foliage. Always harvest from the outside in. The growing point at the top of the stem is what keeps the plant alive and productive through winter.
Leaving yellowing lower leaves. Dead and yellowing leaves at the base of the plant attract slugs, harbour fungal spores, and reduce airflow. Snap them off regularly. A healthy kale plant in winter has a bare stem with a crown of fresh leaves at the top, like a miniature palm tree.
Kale nutrition and health benefits
Kale’s reputation as a nutritional powerhouse is based on measurable data, not marketing. A 100g serving of raw kale provides the following:
| Nutrient | Amount per 100g | % Daily value |
|---|---|---|
| Vitamin K | 817 mcg | 200% |
| Vitamin C | 120 mg | 134% |
| Vitamin A | 9990 IU | 100% |
| Manganese | 0.66 mg | 33% |
| Calcium | 150 mg | 15% |
| Iron | 1.5 mg | 11% |
| Potassium | 491 mg | 10% |
Kale contains more iron per calorie than beef and more calcium per calorie than milk. It is high in antioxidants, including beta-carotene, quercetin, and kaempferol. The fibre content supports digestive health.
Light cooking is the best preparation method for maximising nutrition. Steaming for 3-5 minutes preserves most vitamins while making minerals more bioavailable. Raw kale in salads retains the highest vitamin C levels. Boiling for extended periods reduces nutritional value significantly.
Kale is also one of the lowest-calorie vegetables at just 35 calories per 100g. This combination of high nutrient density and low calories is what earned it the superfood label.
Growing kale in containers
Kale adapts well to container growing, making it accessible to gardeners with only a patio, balcony, or small courtyard. Dwarf Green Curled is the best container variety. Its compact 40-50cm height and dense growth habit suit confined spaces.
Container requirements
Use a pot at least 30cm deep and 30cm wide for a single kale plant. Good drainage is essential. Drill extra holes in the base if needed. Fill with multipurpose compost mixed with 20% perlite to improve drainage and aeration.
Feeding and watering
Container kale dries out faster than ground-grown plants. Water regularly, especially during hot spells in summer. From July onwards, feed every two weeks with a nitrogen-rich liquid fertiliser (seaweed extract or diluted chicken manure pellet tea work well). Nitrogen drives leaf production, which is exactly what you want from kale.
Winter care
Move containers to a sheltered position against a south-facing wall in winter. The wall radiates stored heat overnight, giving the plant a few extra degrees of protection. Even the hardiest kale benefits from avoiding the worst wind exposure. Waterlogging is a bigger risk than frost for container kale, so ensure drainage remains clear.
Ornamental kale varieties
Several kale varieties are attractive enough for flower borders and ornamental planting. Redbor F1 is the standout, with its deep crimson leaves holding their colour all winter. Cavolo Nero’s architectural, palm-like habit makes it a genuine design feature in potagers and mixed borders.
Ornamental kale (Brassica oleracea var. acephala) is sold in garden centres from September as a bedding plant for winter colour. These varieties produce rosettes of pink, purple, white, and cream leaves. They are edible but bred for looks rather than flavour. The leaves are tougher and more bitter than culinary varieties.
For the best of both worlds, grow Redbor F1 or Red Russian in a visible position. You get an ornamental plant that produces genuinely good-tasting leaves all winter. They look as good in a border as they do on a plate.
Kale in crop rotation
Kale is a brassica, belonging to the same family as cabbage, broccoli, cauliflower, and Brussels sprouts. All brassicas share the same pests and diseases, so they must be grouped together in a rotation and moved to a different bed each year.
Follow a three or four-year rotation. Do not grow any brassica in the same spot within that cycle. This breaks the life cycle of club root, cabbage root fly, and other soil-borne problems. Kale follows well after legumes (peas and broad beans) because it benefits from the nitrogen they have fixed in the soil.
After clearing kale in spring, the bed is ready for a summer crop. Potatoes, courgettes, or squash are all good options. They belong to different plant families, maintaining the rotation.
Storing and using kale
Fresh kale keeps in the fridge for 5-7 days. Wrap unwashed leaves loosely in a damp tea towel and store in the vegetable drawer. Do not wash before storing, as moisture accelerates decay.
Freezing kale
Kale freezes well for use in soups, stews, and smoothies. Strip the leaves from the tough central rib, blanch in boiling water for 2 minutes, plunge into ice water, drain thoroughly, and freeze flat on a tray before transferring to bags. Frozen kale keeps for up to 12 months.
Quick kale recipes
Crispy kale chips: Tear leaves into pieces, toss with olive oil and a pinch of salt, spread on a baking tray, and bake at 150C for 12-15 minutes until crisp.
Winter kale soup: Fry onion and garlic, add diced potato and stock, simmer until tender, stir in shredded kale for the last 5 minutes. Blend half, leave half chunky.
Raw kale salad: Shred young Red Russian or baby kale leaves finely. Massage with lemon juice and olive oil for 2 minutes to soften. Add toasted seeds, dried cranberries, and shaved parmesan.
Now you’ve mastered growing kale, read our guide on raised bed gardening for beginners to discover how a raised bed makes growing kale and other winter brassicas even easier and more productive.
Growing kale is one of the smartest choices for UK gardeners
Kale asks for very little and gives back generously. A packet of seed costs under two pounds. Six plants provide enough leaves for a family from September to March. The crop stands through the worst British winter without flinching. Flavour actually improves when the weather turns cold. You can eat it raw, cooked, frozen, or dried into chips. It is packed with vitamins and minerals. It grows in raised beds, containers, borders, and allotments. Very few vegetables match kale for sheer return on effort.
Lawrie has been gardening in the West Midlands for over 30 years. He grows his own veg using no-dig methods, keeps a wildlife-friendly garden, and writes practical advice based on real UK growing conditions.