How to Grow Peas in the UK
Practical guide to growing peas in UK gardens. Covers varieties, sowing times, supporting plants, pea moth prevention, harvesting, and saving seed.
Key takeaways
- Sow peas direct from March to June, with early sowings under cloches from late February in mild areas
- Succession sow every 3-4 weeks for a continuous harvest from June to October
- Peas fix nitrogen from the air, so they need no additional feeding once growing
- Support all varieties with pea sticks, netting, or trellis from the moment tendrils appear
- Avoid pea moth damage by sowing before mid-March or after mid-May to miss the June egg-laying peak
- Pick pods every 2-3 days once ready, as leaving mature pods on the plant halts production
Peas are one of the great pleasures of a British kitchen garden. Picked straight from the plant and eaten raw in the sunshine, they are impossibly sweet. No supermarket pea comes close. They are also one of the easiest crops to grow, fixing their own nitrogen and needing little attention once established.
The UK climate suits peas well. They prefer cool, moist conditions and struggle only in the hottest, driest summers. A single 3m row produces 4-5kg of pods. With succession sowing from March to June, you can harvest from early summer right through to October. This guide covers everything from choosing varieties to saving your own seed. If you are new to vegetable growing, our guide to starting a vegetable garden covers the broader essentials.
Types of peas to grow
There are four main types of pea, each with a different use in the kitchen and garden. Understanding the differences helps you choose what to grow.
Garden peas (also called shelling peas) are the traditional type. You shell the round peas from the pod and discard the pod itself. These are what most people picture when they think of peas. They freeze well and taste superb freshly picked.
Mangetout (meaning “eat all” in French) have flat, tender pods picked before the peas inside develop. The entire pod is eaten, usually stir-fried or steamed. They are ready earlier than garden peas and crop over a longer period.
Sugar snap peas combine the best of both types. They have plump, rounded pods with developed peas inside, but the pod is tender enough to eat whole. They are the sweetest type and excellent eaten raw.
Petit pois are a type of garden pea that produces small, intensely sweet peas. The pods are smaller and the yield per plant is lower, but the flavour is outstanding. They are a gourmet crop worth growing if you have the space.
Choosing varieties for UK gardens
Select varieties suited to your growing space, preferred harvest time, and how you plan to eat them. The RHS pea growing guide lists tested varieties for British conditions.
Variety comparison
| Variety | Type | Height | Weeks to harvest | Best for |
|---|---|---|---|---|
| Kelvedon Wonder | Garden pea | 45cm | 12-14 | Beginners, small gardens, containers |
| Hurst Green Shaft | Garden pea | 75cm | 14-16 | Heavy crops, main season |
| Alderman | Garden pea | 180cm | 16-18 | Tall supports, large gardens, exhibition |
| Meteor | Garden pea | 30cm | 10-12 | Very early crops, exposed sites |
| Oregon Sugar Pod | Mangetout | 100cm | 12-14 | Stir-fries, early cropping |
| Delikett | Sugar snap | 75cm | 12-14 | Eating raw, children’s gardens |
| Shiraz | Mangetout | 120cm | 13-15 | Purple pods, ornamental value |
| Waverex | Petit pois | 50cm | 14-16 | Gourmet cooking, freezing |
Early and dwarf varieties
Kelvedon Wonder is the UK’s most popular garden pea and has been since 1925. It grows just 45cm tall, needs minimal support, and produces heavy crops of sweet peas. It holds an RHS Award of Garden Merit. Well suited to beginners and small spaces.
Meteor is even shorter at 30cm. It is the hardiest variety available and ideal for autumn sowings that overwinter for a May harvest. It tolerates exposed, windy sites where taller varieties would suffer.
Maincrop varieties
Hurst Green Shaft is the benchmark maincrop. It grows 75cm tall and produces long pods packed with 9-10 peas each. Outstanding flavour and heavy yields make it the allotment favourite. It also holds an RHS Award of Garden Merit.
Alderman reaches 180cm and needs strong supports, but rewards the effort with enormous yields over several weeks. The tall vines are productive and decorative. This is the variety for gardeners with space and ambition.
Mangetout and sugar snap
Oregon Sugar Pod produces wide, flat, tender pods on 100cm vines. Pick when the pods are 8-10cm long and the peas inside are barely visible. One of the most reliable mangetout varieties for UK gardens.
Delikett is a sugar snap that produces plump, crunchy pods bursting with sweetness. Children love picking and eating them straight from the plant. The 75cm vines are manageable and productive.
When and how to sow peas
Peas are a cool-season crop. They germinate in soil temperatures as low as 7C, but 10-15C is ideal. They dislike hot weather and stop producing in prolonged temperatures above 25C.
Sowing times
| Sowing period | Method | Varieties | Harvest |
|---|---|---|---|
| October-November | Direct, hardy varieties only | Meteor, Feltham First | May |
| Late February-March | Under cloches or fleece | Kelvedon Wonder, Meteor | June |
| March-April | Direct, open ground | All varieties | June-July |
| April-May | Direct, open ground | Hurst Green Shaft, Alderman | July-August |
| May-June | Direct, open ground | Kelvedon Wonder, Delikett | August-October |
Succession sowing is the key to a long harvest. Sow a new batch every 3-4 weeks from March to June. This gives you fresh peas for four months rather than a single glut. Our UK vegetable planting calendar shows how peas fit into the wider sowing schedule.
Direct sowing method
Peas resent root disturbance, so sow them where they will grow. Direct sowing outdoors is the standard method.
- Dig a flat-bottomed trench 5cm deep and 15cm wide using a draw hoe
- Space seeds 5-7cm apart in two staggered rows within the trench
- Cover with soil and firm gently
- Water well if the soil is dry
- Cover with netting or fleece to protect from mice and pigeons
Space rows 60cm apart for dwarf varieties and 90cm apart for tall types. The gap between rows needs to roughly match the mature height of the variety.
Starting peas indoors
In cold, wet springs, sow peas in lengths of guttering filled with compost. Place three seeds across the width every 7cm. Keep in a greenhouse, cold frame, or on a bright windowsill. Once seedlings are 8-10cm tall with a good root system, slide the entire row out of the gutter and into a pre-dug trench. This avoids root disturbance. Read our full guide to sowing seeds indoors for more on this technique.
You can also use toilet roll tubes or root trainers. Fill with compost, sow one seed per cell, and transplant the whole unit. The cardboard breaks down in the soil.
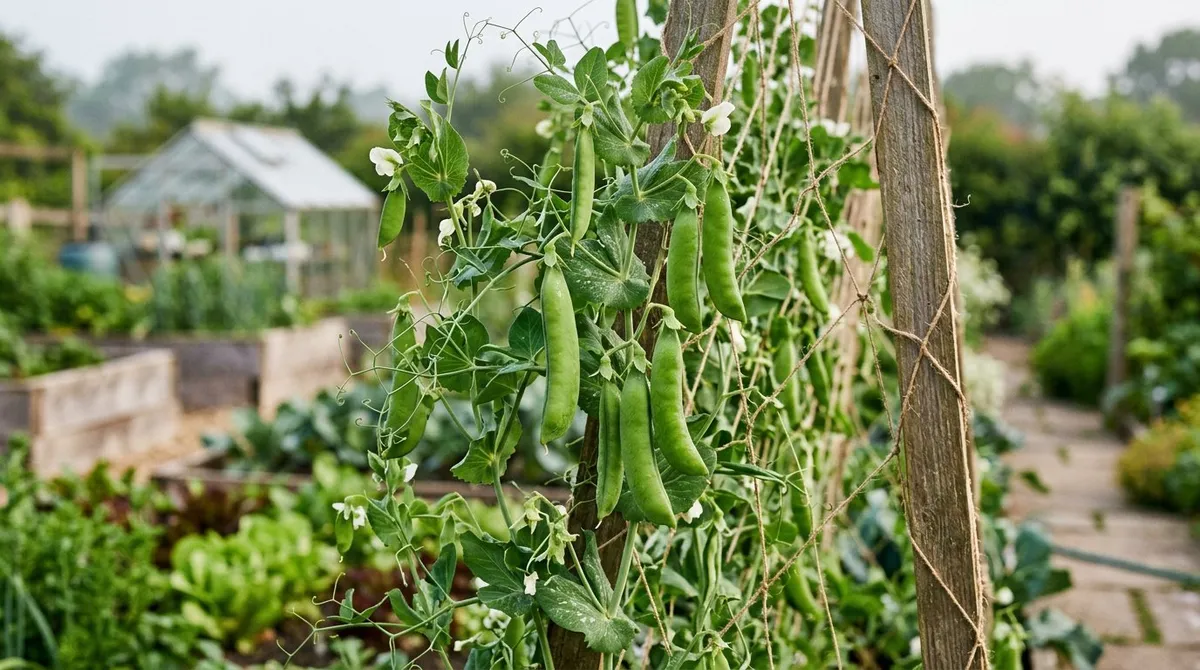
Supporting pea plants
Every pea variety needs support. Even dwarf types at 30cm tall produce better crops when held upright. Without support, plants flop, pods sit on wet soil and rot, and picking becomes a chore.
Support options
Pea sticks are the traditional choice. These are twiggy branches pushed into the soil along both sides of the row. Hazel and birch work best because their fine side branches give tendrils plenty to grip. Push them in firmly when seedlings reach 8-10cm tall. Pea sticks are free if you have access to woodland, and they look far more natural than netting.
Netting or mesh stretched between posts works for longer rows. Use netting with a mesh size of 10-15cm. Fix it at both ends and along the top so it stays taut. Plastic pea netting is cheap and reusable for 3-4 seasons.
Bamboo and string structures suit small spaces. Push bamboo canes into the ground at 30cm intervals and weave string horizontally between them at 15cm heights. The tendrils wind around the string as the plants grow.
For tall varieties like Alderman at 180cm, use strong 2m canes or posts with horizontal wires at 30cm intervals. These heavy vines need strong support, particularly when laden with pods in a summer breeze.
Nitrogen fixing and soil care
Peas belong to the legume family. Their roots form a partnership with Rhizobium bacteria that live in small nodules on the root system. These bacteria capture nitrogen directly from the air and convert it into a form the plant can use.
This means peas need no nitrogen fertiliser. Adding synthetic nitrogen actually suppresses the natural fixing process and pushes the plant to produce excess foliage at the expense of pods. Prepare the soil with garden compost before sowing and the plants take care of their own nutrition.
The benefit extends beyond the peas themselves. When you clear pea plants after harvest, cut the stems at ground level but leave the roots in the soil. The nitrogen-rich root nodules break down and release their stored nitrogen for the following crop. This is why peas and beans are traditionally followed by nitrogen-hungry brassicas (cabbages, broccoli, kale) in a crop rotation.
A well-established pea crop fixes 50-80kg of nitrogen per hectare. In a garden row, that translates to a meaningful boost for whatever you plant next. This is one of the reasons legumes are central to any good vegetable garden rotation.
Gardener’s tip: When pea plants finish cropping, cut the stems at ground level and leave the roots in place. The nitrogen-rich nodules break down over autumn and winter, feeding the soil for free.
Growing peas in raised beds and containers
Peas grow well in raised beds and containers, making them accessible for gardeners without much open ground.
Raised beds
A standard 1.2m wide raised bed is ideal. Sow two or three rows lengthways, spaced 30-45cm apart depending on variety height. Place supports along the centre of the bed or along each row. The improved drainage in raised beds helps in wet springs when direct-sown seed can rot in heavy clay soil.
Containers
Dwarf varieties like Kelvedon Wonder and Half Pint thrive in large pots and troughs. Use a container at least 30cm deep and 45cm wide. Fill with multipurpose compost and sow seeds 5cm apart, 4cm deep. Push a few twiggy sticks or a small trellis into the pot for support.
Water containers regularly. Peas in pots dry out faster than those in the ground, especially once they are flowering and setting pods. Daily watering is necessary in warm weather.
Mangetout and sugar snap varieties work well in large grow bags with a trellis attached to a wall or fence behind them. The combination of decorative foliage, white flowers, and colourful pods makes them attractive on a patio.
Month-by-month pea calendar
| Month | Task |
|---|---|
| January | Order seed. Plan which varieties to grow and where to site supports |
| February | Sow under cloches in mild areas. Prepare beds with compost |
| March | First main outdoor sowing. Protect with fleece in cold spells. See our UK vegetable planting calendar for all March sowings |
| April | Second succession sowing. Put supports in place for earlier sowings |
| May | Third succession sowing. Water in dry spells. Watch for pea moth |
| June | Final succession sowing. Begin harvesting earliest sowings. Pick every 2-3 days |
| July | Main harvest period. Keep picking to encourage more pods |
| August | Harvest later sowings. Allow some pods to dry on the plant for seed saving |
| September | Clear spent plants (leave roots in soil). Sow green manure or plant brassicas |
| October | Sow hardy Meteor or Feltham First for overwintering (mild areas) |
Dealing with pea moth
Pea moth (Cydia nigricana) is the most common pest of garden peas in the UK. The adult moth flies from mid-June to mid-July and lays eggs on pea plants that are in flower. The caterpillars hatch and burrow into developing pods, feeding on the peas inside. You discover the damage at harvest: a small grub curled up inside the pod alongside half-eaten peas.
Prevention through timing
The most effective control is avoiding the problem entirely. Pea moth has a narrow flight period. If your peas are not in flower during mid-June to mid-July, the moth cannot lay eggs on them.
- Early sowings (February to mid-March) flower in May and early June, before the moth is active. Pods are filled and picked before eggs could be laid.
- Late sowings (late May to June) flower from late July onwards, after the moth has finished laying.
- Mid-season sowings (April) flower right in the danger zone and are most vulnerable.
Other controls
Cover plants with fine insect-proof mesh (Enviromesh) from first flowering until pods are well developed. This physically prevents the moth from reaching the plants. It is the only reliable control for mid-season sowings.
Pheromone traps hung near the plants from June help monitor moth numbers but do not control the population. They tell you whether moths are present and active in your area.
There is no effective spray for pea moth once eggs are laid. The caterpillar feeds inside the sealed pod where nothing can reach it. Prevention and timing are the only reliable strategies.
Harvesting peas at the right time
Timing the harvest is critical. Peas go from perfectly sweet to starchy and tough in just a few days.
Garden peas
Pick when the pods are plump and you can feel the peas inside, but before the pods start to lose their bright green colour. The peas should be tender and sweet. Test by picking one pod and eating a pea raw. If it is sweet and bursts in your mouth, start picking. If it tastes starchy, you have left it a day or two too late.
Pick every 2-3 days. Leaving mature pods on the plant signals it to stop producing new ones. Regular picking extends the harvest by 2-3 weeks.
Mangetout
Pick when the pods are flat and the peas inside are barely visible. Pods should be 8-10cm long, tender, and snap cleanly. If you can see the outline of peas through the pod wall, they are past their best for eating whole.
Sugar snap peas
Wait until the pods are plump and rounded, with fully developed peas inside. The pod should still be bright green and snap crisply when bent. Unlike mangetout, sugar snaps taste best when the peas are full size.
Yield expectations
A 3m row of garden peas produces 4-5kg of pods, roughly 2-2.5kg of shelled peas. Mangetout and sugar snap yields are lower by weight (3-4kg per 3m row) because you pick the pods younger and lighter.
Saving pea seed
Peas are one of the easiest crops to save seed from. They are self-pollinating, so the saved seed comes true to type without cross-pollination worries. This means next year’s plants will be identical to this year’s.
Choose your healthiest, most productive plants and leave several pods on them unpicked. Let the pods dry completely on the vine until they turn brown and papery. This takes 4-6 weeks after the normal picking stage.
Pick the dry pods on a sunny day. Shell the peas and spread them on a plate indoors for a week to finish drying. They should be rock hard when fully dry. Store in a labelled paper envelope (not plastic, which traps moisture) in a cool, dry place.
Saved pea seed remains viable for 3-4 years if stored properly. Test germination each spring by placing 10 seeds on damp kitchen paper in a sealed bag. If 7 or more sprout within a week, the seed is still good.
Gardener’s tip: Never save seed from F1 hybrid varieties. The offspring will not come true. Stick to open-pollinated heritage varieties like Kelvedon Wonder, Alderman, and Hurst Green Shaft for seed saving.
Common mistakes when growing peas
Sowing too deep in wet soil
Pea seeds rot in cold, waterlogged ground. In heavy clay soil, sow no deeper than 3-4cm. Use a cloche or fleece to warm the soil for a week before sowing in early spring. On well-drained soil, 5cm depth is fine.
No support until plants collapse
Peas produce tendrils from an early stage. If supports are not in place by the time plants reach 10-15cm, the stems flop and tangle on the ground. Getting supports in after this point is difficult without damaging the plants. Put supports in at sowing time or when seedlings first emerge.
Missing the harvest window
Garden peas go from perfect to starchy in 2-3 days during warm weather. Check plants every other day once pods start to fill. Leaving over-mature pods on the vine tells the plant its job is done, and it stops setting new flowers. Pick consistently and the plant keeps producing.
Growing the same variety all at once
Sowing an entire packet of one variety in a single session gives you a 2-3 week glut followed by nothing. Succession sow small batches every 3-4 weeks for a steady supply over four months. Alternatively, grow an early, a maincrop, and a late variety together.
Why we recommend Kelvedon Wonder for UK beginners: After 30 years of growing peas across very different garden conditions, Kelvedon Wonder is the variety I return to every season. In side-by-side trials sown on the same day in a clay-heavy midlands plot, Kelvedon Wonder germinated in 5 days and produced harvestable pods at 12 weeks, three weeks ahead of Hurst Green Shaft in the same conditions. At 45cm it needs minimal support, making it ideal for anyone who wants results without fuss.
Ignoring mice and pigeons at sowing
Mice dig up freshly sown pea seeds overnight. Pigeons strip young seedlings to the ground. Cover newly sown rows with wire mesh, netting, or cloches until the plants are established. Remove the protection once plants are 15cm tall and growing strongly.
Companion planting and crop rotation
Peas fit naturally into any vegetable rotation. Their nitrogen-fixing ability means they improve the soil for the following crop. The traditional rotation is potatoes, then legumes (peas and beans), then brassicas, then roots.
Good companions for peas include radishes (sow between rows as a fast catch crop), lettuce (benefits from the light shade of pea foliage), and carrots. Avoid growing peas near onions, garlic, and leeks, which are said to inhibit legume growth.
After clearing pea plants, leave the roots in the ground and plant autumn brassicas such as kale, sprouting broccoli, or spring cabbage. These hungry crops make full use of the nitrogen the pea roots have deposited. Read our guide to making compost for more on building soil fertility between crops.
Growing peas is one of the most satisfying things you can do in a British garden. They ask for little more than reasonable soil, some twiggy sticks, and regular picking. In return, they give you handfuls of peas so sweet they rarely make it from the garden to the kitchen.
Now you’ve mastered peas, read our guide on growing radishes in the UK to find the right fast-maturing crop to grow between your pea rows.
Frequently asked questions
When should I sow peas in the UK?
Sow peas outdoors from March to June in most areas. In mild southern counties, start under cloches from late February. Northern gardeners should wait until late March or early April when the soil reaches 10C. Succession sow every 3-4 weeks for a continuous supply from June to October.
Do peas need feeding?
No, peas fix their own nitrogen from the air. Bacteria living in root nodules convert atmospheric nitrogen into a form the plant uses directly. Adding nitrogen fertiliser actually reduces this natural process and promotes leafy growth at the expense of pods. Prepare the soil with compost before sowing and the plants do the rest.
How do I support pea plants?
Push twiggy pea sticks, hazel branches, or bamboo canes into the soil along both sides of the row when seedlings reach 10cm tall. Alternatively, fix netting or wire mesh between posts. Peas climb by wrapping tendrils around thin supports. Without support, plants collapse, pods rot on wet ground, and harvesting becomes frustrating.
What is the best pea variety for beginners?
Kelvedon Wonder is the best beginner variety without question. It grows just 45cm tall, needs minimal support, matures in 12-14 weeks, and produces heavy crops of sweet garden peas. It holds an RHS Award of Garden Merit and has been a UK favourite since its introduction in 1925.
Why are there maggots in my peas?
The maggots are pea moth larvae. The adult moth lays eggs on flowering pea plants during June and July. The caterpillars burrow into developing pods and feed on the peas inside. Avoid this by sowing early (February to March) or late (May to June) so flowering does not coincide with the moth’s egg-laying window.
Can I grow peas in containers?
Yes, dwarf varieties like Kelvedon Wonder and Half Pint grow well in large containers. Use a pot at least 30cm deep and 45cm wide. Fill with multipurpose compost, sow seeds 5cm apart and 4cm deep, and provide a small trellis or sticks for support. Water regularly, as containers dry out faster than open ground.
How do I save pea seed for next year?
Leave the best pods on your healthiest plants until they turn brown and papery. Pick the dry pods and shell the peas. Spread them on a plate indoors for a week to finish drying. Store in a labelled paper envelope in a cool, dry place. Saved pea seed remains viable for 3-4 years when stored correctly.
Lawrie has been gardening in the West Midlands for over 30 years. He grows his own veg using no-dig methods, keeps a wildlife-friendly garden, and writes practical advice based on real UK growing conditions.