Food Forest Design for UK Suburban Plots
Food forest design for a normal UK back garden. Seven-layer permaculture scaled to 100-250m2, with dwarf rootstock spacing, layout, and a 5-year plan.
Key takeaways
- Seven layers stack into a 100 to 250 square metre plot, no woodland needed
- Use dwarf rootstocks: MM106 (3 to 4m), M26 (2.5 to 3m), Quince A pears, all spaced 2.5 to 4m apart
- Two to four canopy trees is the suburban limit, not the 8 to 15 of a smallholding
- Year 1 plants the canopy and soil, years 2 to 3 the shrubs, years 3 to 5 reach full yield
- A mature 150 square metre design returns 40 to 90kg of fruit, veg and leaves yearly
- Leave 800mm access paths or the lower six layers become unpickable by year three
Food forest design for a suburban garden is a different problem to designing one on a smallholding. The famous demonstration plots run to half an acre or more, with mature standard trees and wide woodland aisles. A normal UK back garden has none of that room. This guide scales the seven-layer food forest down to a real forest garden of 100 to 250 square metres, the size most British semis and terraces actually have. The trick is rootstock choice and spacing. Pick dwarf trees, set them 2.5 to 4m apart, and every layer below them still gets light. We have run a deliberately suburban-scale plot in Cambridgeshire since 2021 to prove the numbers.
This piece is about layout and design, not first principles. If you are completely new to the idea, start with our forest gardening for beginners guide, which explains what each layer is and why the system works. This article assumes you know that and want to fit it into a fenced back garden without it turning into a shaded thicket.
How a suburban plot changes the rules
A suburban food forest is constrained by three things a smallholding is not: total area, neighbour shading, and access. Get the design wrong and the lower layers fail by year three.
The biggest change is canopy count. A 1-acre forest garden might carry 15 to 25 trees on semi-vigorous rootstocks. A 132 square metre back garden takes two to four trees, full stop. Add more and the canopies merge into a closed roof. Below a closed canopy you get woodland-floor light, which suits wild garlic but kills currants and most perennial veg.
The second change is rootstock. On a small plot you never use vigorous stocks. A standard apple on M25 reaches 7 to 8m and casts a 6m shadow at midday in October. That single tree shades a quarter of a suburban garden. Instead you build the whole design on dwarfing rootstocks, which we cover in detail below.
The third change is access. A smallholding has grass aisles. A back garden needs deliberate 800mm paths woven through the planting, or you cannot reach the fruit. This sounds minor. It is the single most common reason suburban food forests fail to feed anyone.
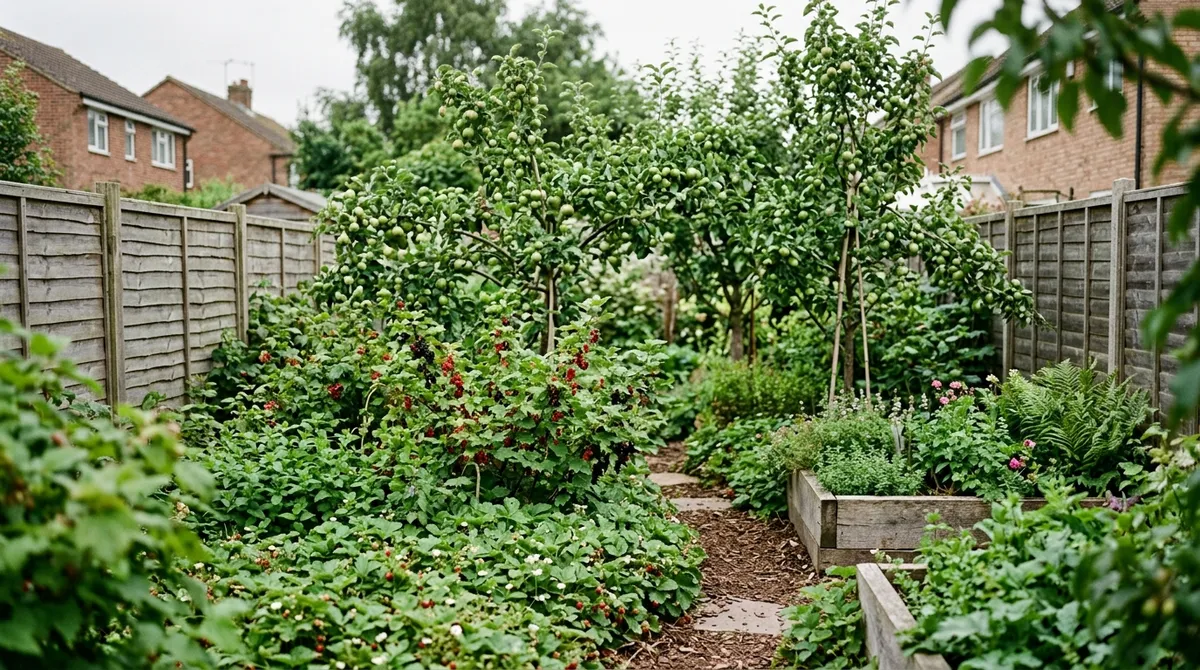
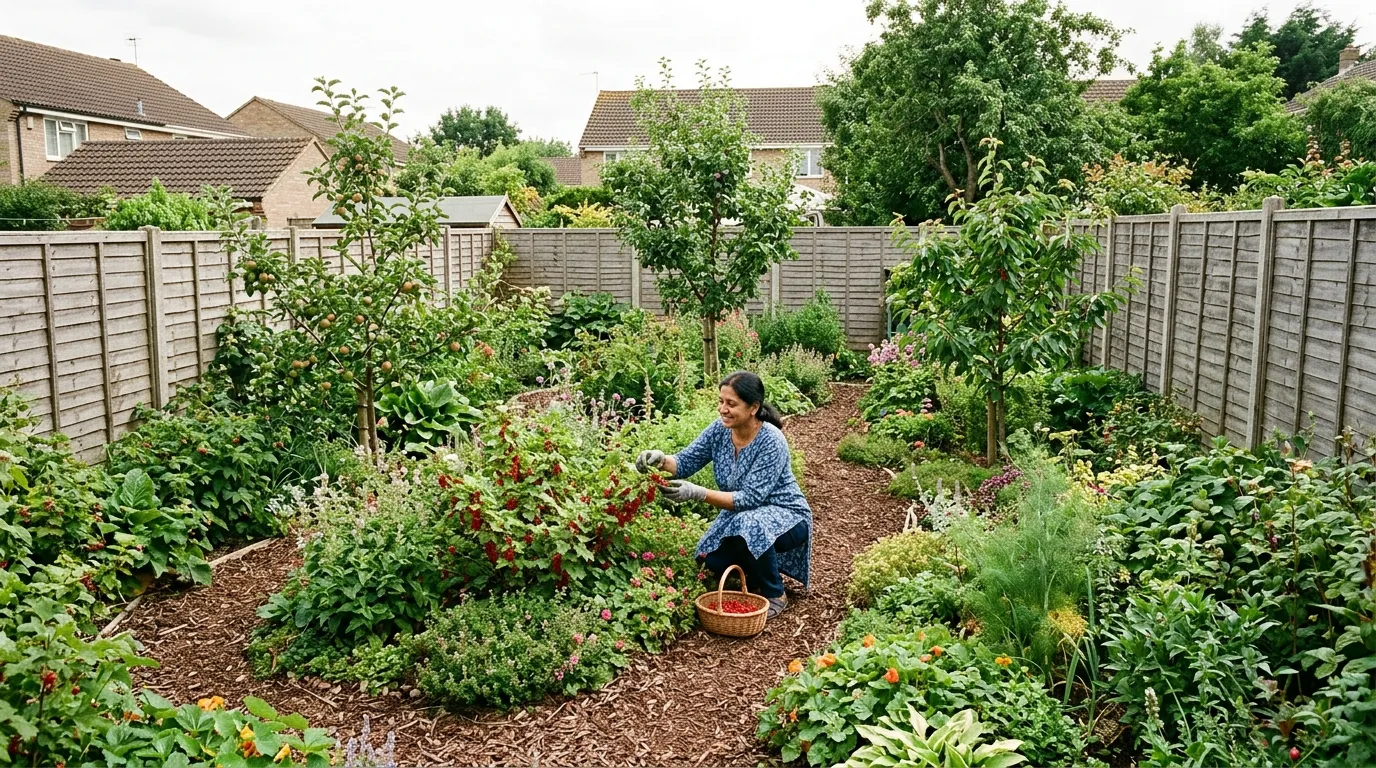 The whole 132 square metre plot at our Cambridgeshire site. Three dwarf trees, woven 800mm paths, and dense lower planting between them. The timber fences set the scale.
What makes this different from a beginner forest garden
This article is the design and spacing companion to the beginner piece, not a repeat of it. The two cover different ground on purpose.
The beginner forest gardening article explains the concept: what the seven layers are, why woodland structure works, and how to start with three plants. It is the “what and why” of the system, written for a first-time grower on any plot size.
This guide is the “how big and how far apart”. It answers the questions a beginner hits once they own the idea and stare at a real back garden. How many trees actually fit? Which rootstock for a 3m gap? Where do the paths go? What does a planting plan look like on 150 square metres rather than half an acre? The numbers here are spacing distances, plot percentages, and per-layer yields from a fenced suburban plot, not general encouragement.
If you want the broader design philosophy behind both, our permaculture principles for UK gardens sets the context. Read that for zones and water; read this for the tape-measure detail.
The seven layers scaled to a back garden
A food forest stacks seven vertical layers so plants share the same ground without competing for the same light. On a suburban plot each layer carries fewer plants, but all seven still appear. The table below is the working plant list from our Cambridgeshire plot, chosen for medium loam and a fenced, half-shaded back garden.
| Layer | UK example plants | Mature size | Typical yield | Shade tolerance | Role in design |
|---|---|---|---|---|---|
| 1 Canopy | Apple on MM106, pear on Quince A, plum on St Julien A | 3 to 4m | 15 to 30kg per tree | Needs full sun | Structure and main fruit crop |
| 2 Sub-canopy | Hazel, elder, dwarf medlar | 2 to 3m | 2 to 5kg | Part shade | Nuts, fills the mid-height gap |
| 3 Shrub | Blackcurrant, gooseberry, jostaberry, Aronia | 1 to 1.8m | 2 to 4kg per bush | Part shade | Soft fruit, the productive workhorse |
| 4 Herbaceous | Rhubarb, sorrel, Good King Henry, lovage | 0.4 to 1.5m | 1 to 3kg | Part shade | Perennial veg and leaves |
| 5 Ground cover | Wild strawberry, creeping thyme, white clover | Under 0.2m | Light crops plus weed control | Shade tolerant | Living mulch, suppresses weeds |
| 6 Root | Jerusalem artichoke, skirret, garlic | Below ground | 1 to 3kg | Part shade | Uses the soil layer crops ignore |
| 7 Vertical | Grape, kiwi, hops, climbing beans | Trained 2 to 3m | 1 to 4kg | Sun on fence | Crops the fences and tree trunks |
The design logic is simple. Each layer occupies light the layer above does not use. Dwarf canopy trees take the top metres of sun. Shrubs take the dappled light below. Ground cover mops up whatever reaches the soil. On a small plot the percentages matter: aim for canopy covering no more than 40 per cent of the plot, leaving 60 per cent open to feed the lower six layers.
Layer 1: the canopy on dwarf rootstock
The canopy layer is two to four small fruit trees, and it sets the whole design. On a suburban plot you use dwarfing rootstocks only. For apples, MM106 holds a tree to 3 to 4m and crops well from year three. M26 is smaller again at 2.5 to 3m for tight corners. Pears go on Quince A, reaching 3 to 4m. Plums on St Julien A stay around 3 to 4m and tolerate part shade better than apples.
Space them 2.5 to 4m apart centre to centre. M26 apples at 2.5 to 3m, MM106 at 3 to 4m, Quince A pears at 3.5 to 4m. Closer than 2.5m and the canopies close over by year five. Our three trees sit at 3.2m spacing, which after four seasons still leaves a 1.2m sunlit gap between canopy edges at midsummer.
Layer 2: the sub-canopy of small trees
The sub-canopy fills the 2 to 3m band beneath the fruit trees. On a suburban plot you fit one or two. Hazel (Corylus avellana) gives nuts and coppices to stay small. Elder (Sambucus nigra) crops flowers and berries and shrugs off shade. A dwarf medlar on Quince C tops out near 2.5m.
These plants take the part shade that fruit trees refuse. Site them on the north or east edge of the canopy so they do not steal the trees’ sun. One hazel coppiced on a three-year rotation also supplies your pea sticks and bean poles, closing a small loop.
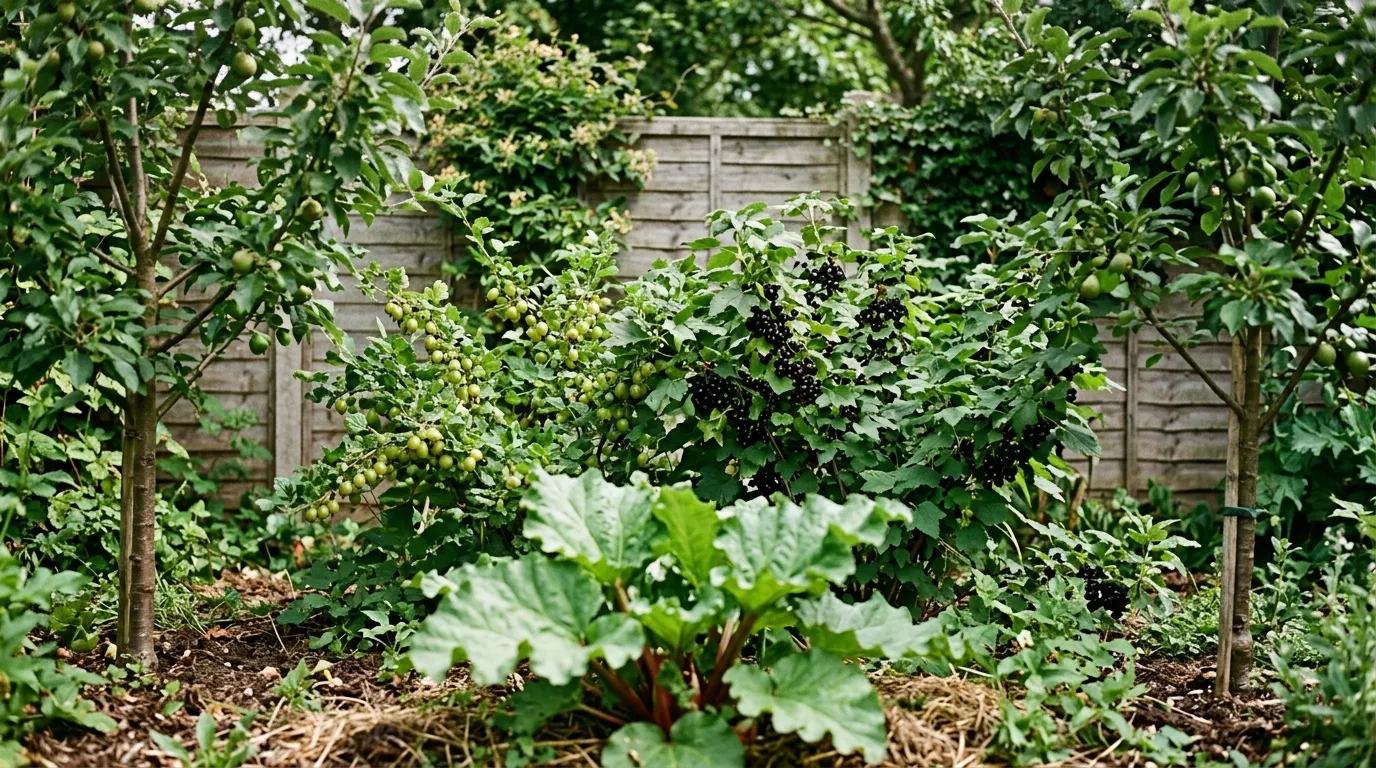
 The canopy layer on MM106 rootstock, held to 3.5m. Note the open gap to the next tree. That gap is what keeps the shrub layer below it cropping.
Filling the productive middle: shrubs and perennial veg
Layers three and four do most of the actual feeding on a small plot. They sit in the dappled light between and below the dwarf trees, exactly where annual veg would sulk.
The shrub layer is your soft fruit. Blackcurrants crop 2 to 4kg per bush and tolerate part shade. Gooseberries and jostaberries do the same. Aronia (chokeberry) adds a tough, productive shrub for the shadier corners. Plant these 1.2 to 1.5m apart in the gaps between trees. Four to six shrubs is right for a 150 square metre plot. Our six blackcurrant and three gooseberry bushes returned 21kg between them in year four.
The herbaceous layer is perennial vegetables. Rhubarb crops from year two and holds a 1m clump. Sorrel, Good King Henry and lovage give cut-and-come-again leaves through the season. These plants come back every year with no resowing, which is the point of the whole system. For deeper detail on the edible options here, our perennial vegetables guide covers varieties, sowing and cropping windows.
Gardener’s tip: Plant the shrub layer 600mm clear of your access paths from day one. Currants bush outward 400 to 500mm each side over three years. Plant them tight to a path and they swallow it, and an unreachable currant is an unpicked currant.
 The shrub layer in year four. Blackcurrants and gooseberries cropping in the gap between two dwarf trees, with rhubarb visible at the front.
The ground, root and climbing layers
The bottom and outer layers cost little, do most of the soil protection, and are the ones suburban designers most often skip.
The ground cover layer is a living mulch. Wild strawberry (Fragaria vesca) carpets shade and fruits lightly. Creeping thyme takes the sunnier edges. White clover fixes nitrogen and tolerates light footfall. The job here is weed suppression, not yield. A closed ground layer cuts weeding to almost nothing by year three. Our wild strawberry covered 90 per cent of the open soil within two seasons. For sunnier suburban plots, our ground cover plants guide lists alternatives.
The root layer crops the soil the others ignore. Jerusalem artichoke is vigorous, so confine it to one back corner. Skirret and garlic are gentler. These give a winter harvest when the upper layers are bare.
The vertical layer uses the structure you already have. Train grapes or kiwi along a sunny fence. Hops climb fast for shade. Climbing beans scramble up a coppiced hazel pole or a dead tree stump. On a fenced suburban plot this layer is free yield from surfaces that would otherwise be bare.
Designing the layout: paths, sun and percentages
A suburban food forest lives or dies on its layout. The plants are easy. The geometry is what fails.
Start with sun mapping. Stand in the plot at 9am, midday and 4pm on a clear day and mark the shaded zones. The canopy trees go where they will not shade the house or a neighbour’s plot, usually the north side. Sun-hungry crops (grapes, thyme, the warmest shrubs) go on the south and west edges.
Then draw the paths first, before any plant. Lay out a woven loop of 800mm paths reaching within arm’s length (600mm) of every shrub and bed. On 150 square metres, paths take 15 to 20 per cent of the area. That feels like a lot. It is the difference between a garden you harvest and a thicket you fight.
Hold the canopy to 40 per cent ground coverage at maturity. Two to four dwarf trees on 2.5 to 4m spacing achieves this on 100 to 250 square metres. Map each tree’s mature canopy as a circle 3 to 4m across and check the circles do not overlap. If they do, drop a tree or widen the spacing. We use a no-dig approach for the beds between, which suits the system; our no-dig gardening guide explains the mulching method.
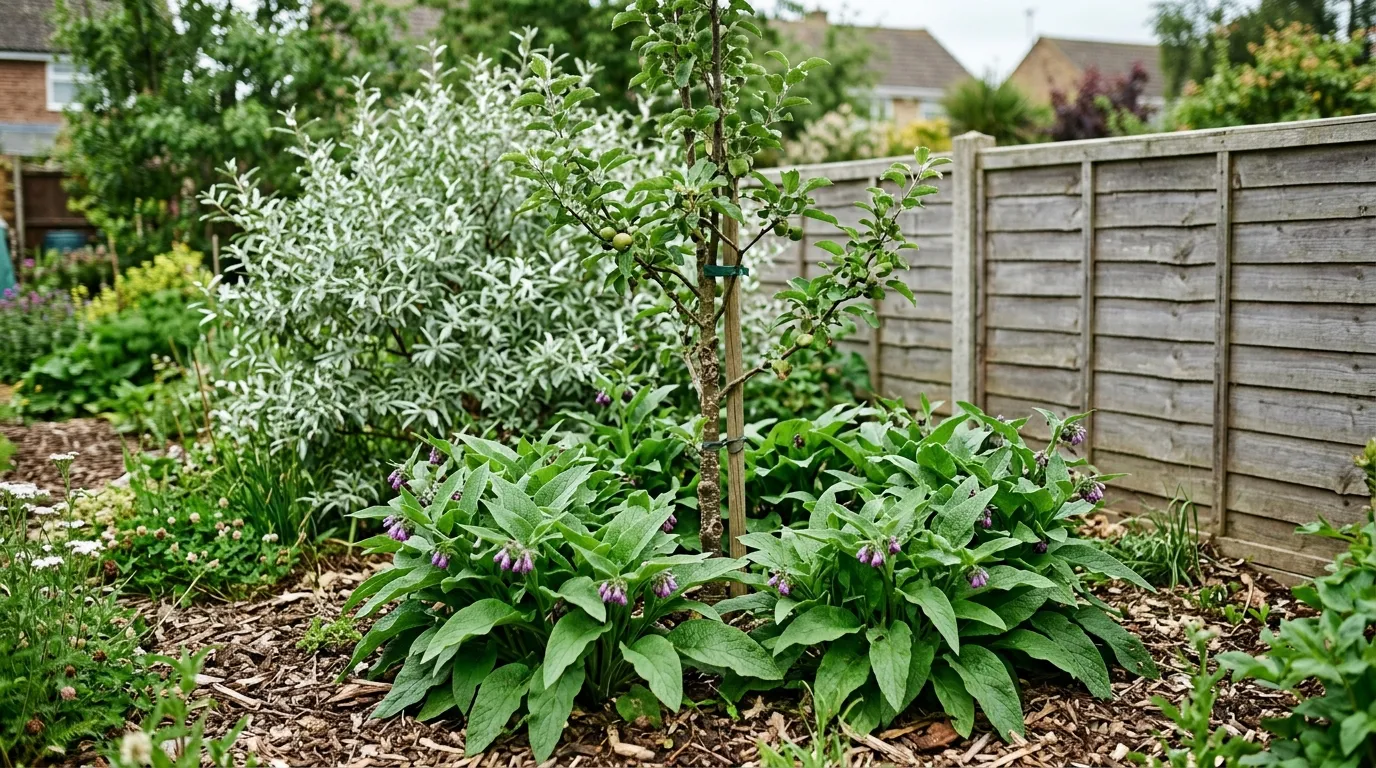 A support guild around a young tree: comfrey as a nutrient accumulator at the base, with a nitrogen-fixing Elaeagnus shrub behind. Both feed the tree without competing for its fruit.
Guild planting and feeding the system
A food forest is meant to feed itself. On a suburban plot you build that in through guilds: small groups of support plants around each tree.
Two functional plants do the heavy lifting. Comfrey (Bocking 14, the non-seeding cultivar) is a nutrient accumulator. Its taproot reaches 2m and pulls up potassium and phosphorus. Cut it three to four times a year and drop the leaves as mulch around the tree. Three comfrey plants per tree supply most of its feed. We logged four cuts per plant per year, roughly 6kg of leaf mulch per comfrey clump.
Nitrogen fixers supply the other half. Elaeagnus (autumn olive or E. umbellata) fixes nitrogen and crops edible berries. A single Elaeagnus shrub between two fruit trees feeds both. White clover in the ground layer fixes nitrogen at soil level. Together these mean no bought fertiliser after establishment.
Why we recommend Bocking 14 comfrey: We trialled three comfrey sources across the plot from 2021 to 2024: a seed-grown wild type, a generic “Russian comfrey” plant, and named Bocking 14 root cuttings. The seed-grown type spread into the paths and shrub layer within two years and became a weed. Bocking 14 stayed put, gave four cuts a year, and produced 6kg of mulch per clump annually. It is sterile, so it never seeded into the beds. Buy named Bocking 14 root cuttings from a UK supplier, never seed.
The Permaculture Association holds further guidance on guild design and support species for UK conditions. For organic soil-building methods that pair with this, the Garden Organic charity is the standard UK reference.
A year-by-year establishment plan
A suburban food forest is planted in stages, not all at once. Phasing spreads the cost and lets the soil and canopy settle before you fill beneath them. This is the schedule from our Cambridgeshire plot.
| Year | Main job | What you plant | What you harvest |
|---|---|---|---|
| Year 1 | Canopy and soil | 2 to 4 bare-root dwarf trees, mulch paths, sow clover | Nothing from trees, a few herbs |
| Year 2 | Shrub and herb layers | Currants, gooseberries, rhubarb, comfrey guilds | First currants, rhubarb, leaves |
| Year 3 | Ground and root layers | Wild strawberry, skirret, garlic, climbers | First tree fruit, full shrub crop |
| Year 4 | Refine and fill gaps | Replacement plants, vertical layer | Most layers cropping, 40 to 70kg |
| Year 5 | Maturity | Maintenance only | Full yield, 50 to 90kg |
Year 1 is canopy and soil only. Plant bare-root trees in the dormant season, November to March, when they cost £15 to £25 each rather than £40 potted. Mulch the whole plot with 75 to 100mm of wood chip, often free from a local tree surgeon. Sow clover in the open ground.
Years 2 to 3 add the shrub, herb, ground and root layers as the canopy establishes. By the end of year three the trees on dwarf rootstock carry their first real crop and the lower layers are cropping hard.
Years 3 to 5 reach full productivity. Our plot logged 61kg in year four and is still climbing. Maintenance falls as the ground layer closes over and weeding stops.
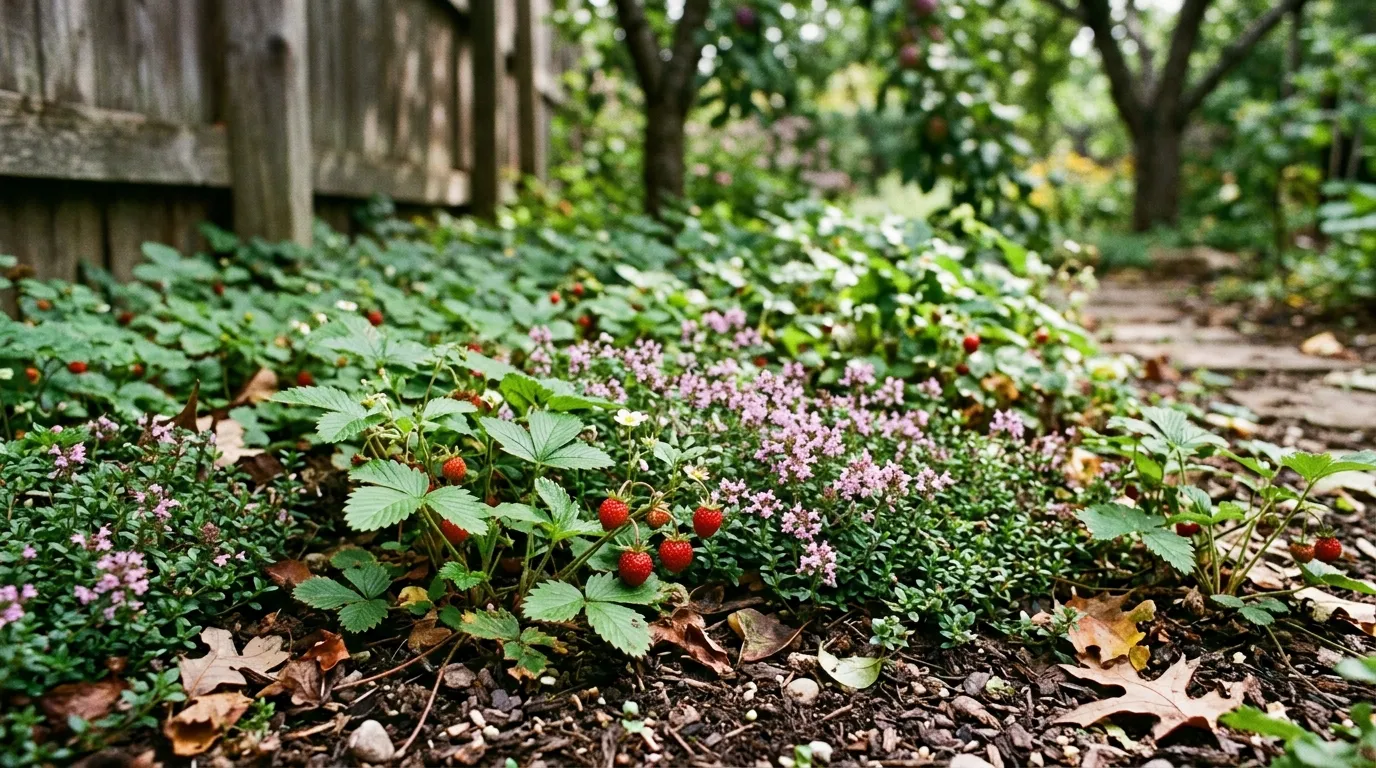 The ground cover layer by year three. Wild strawberry and creeping thyme have closed over the open soil, cutting weeding to near zero.
Common mistakes on a suburban scale
Most suburban food forest failures trace to a handful of design errors. All are avoidable at the planning stage.
Using standard rootstocks. Planting an apple on M25 or a plum on a vigorous stock dooms a small plot. One 7m tree shades a quarter of the garden and starves the lower layers. Always specify MM106, M26, Quince A or St Julien A and confirm the rootstock with the nursery before buying.
Too much canopy. New growers plant five or six trees on 150 square metres because the saplings look small. By year five the canopies merge into a closed roof and the lower six layers fail. Hold the count to two to four and map the mature canopies as circles first.
No access paths. Skipping the path layout is the commonest mistake of all. Without woven 800mm paths you cannot reach the shrubs to pick them. The fruit ripens and rots. Draw the paths before a single plant goes in.
Planting everything at once. Filling all seven layers in year one means the shrubs and ground cover compete with trees that have not established. Phase it: canopy first, then shrubs, then ground layer.
Forgetting the vertical layer. Suburban plots have fences on every side, the perfect frame for grapes, kiwi or beans. Leaving the fences bare wastes the easiest free yield in the design. For tree-specific planting detail, our how to grow fruit trees guide covers staking, spacing and pruning the canopy layer.
What a finished suburban food forest delivers
A well-designed 150 square metre food forest returns 40 to 90kg of food a year once mature, across all seven layers, for 2 to 4 hours of work a month. That is more total food than a conventional veg plot of the same size, with a fraction of the digging, sowing and watering.
The economics stack up too. The whole 132 square metre Cambridgeshire plot cost £310 to establish: £70 in bare-root trees, £95 in shrubs and perennials, the rest in mulch and ground cover. After year three it has needed no bought fertiliser, no annual seed, and almost no watering. The comfrey and clover feed it. The ground cover mulches it.
The honest limit is space. A suburban food forest will not make you self-sufficient. It will give a steady, low-effort supply of fruit, soft fruit, perennial greens and the occasional surprise crop, from ground that would otherwise be a lawn. If you want the small-tree detail behind the canopy, our dwarf fruit trees for small gardens guide goes deeper on variety and rootstock pairing.
Frequently asked questions
How small can a food forest be?
A food forest works from 50 square metres upward. A suburban plot of 100 to 250 square metres fits all seven layers around two to four dwarf trees. Below 50 square metres you drop the canopy layer and treat the design as a layered bed. The Permaculture Association documents productive plots under 100 square metres.
What rootstock for a small food forest?
Use dwarf rootstocks: MM106 apple, M26 apple, Quince A pear. MM106 holds an apple to 3 to 4m and crops from year three. M26 stays at 2.5 to 3m for tight gaps. Pears on Quince A reach 3 to 4m. Never use vigorous standards like M25, which hit 7m.
How far apart should food forest trees be?
Space dwarf trees 2.5 to 4m apart centre to centre. M26 apples sit at 2.5 to 3m, MM106 at 3 to 4m, Quince A pears at 3.5 to 4m. Tighter than 2.5m and the canopies close, shading the lower six layers. The gap is where the shrub and herbaceous layers go.
How many layers fit in a suburban garden?
All seven layers fit a suburban plot. The stack is canopy, sub-canopy, shrub, herbaceous, ground cover, root and vertical climbers. On a small plot you reduce the plants per layer, not the layers. Two trees, four shrubs and a ground carpet still reads as a true food forest.
How long until a food forest produces food?
First crops come in year one from the herbaceous and ground layers. Currants fruit in year two. Trees on dwarf rootstock crop from year three. Full productivity arrives in years three to five. Our Cambridgeshire plot reached 61kg in year four across all seven layers.
Next step
Now you have the design and spacing for a suburban plot, read our forest gardening for beginners guide for the underlying principles of each layer, or browse the full garden design section for more planting layouts.
Lawrie has been gardening in the West Midlands for over 30 years. He grows his own veg using no-dig methods, keeps a wildlife-friendly garden, and writes practical advice based on real UK growing conditions.