How to Grow Sprouts and Shoots at Home
Grow sprouts and shoots at home year-round. Mung beans ready in 3 days, pea shoots in 10. Tested methods, nutrition facts and troubleshooting.
Key takeaways
- Mung bean sprouts are ready in 3-5 days — the fastest crop you can grow at home
- Pea shoots take 10-14 days and are the most productive shoots for kitchen windowsills
- Alfalfa, fenugreek and radish sprouts need only a jar and water — no compost required
- Rinse sprouts twice daily to prevent mould and bacteria; good drainage is non-negotiable
- Sprouts contain 10-15 times more enzymes than raw vegetables according to nutritional research
Sprouts are the fastest food you can grow at home. Mung beans go from dry seed to plate in 3 days, needing nothing but a jar, water and two minutes of rinsing per day. No garden, no grow light, no compost, just a kitchen worktop.
Shoots take a little longer, pea shoots are ready in 10-14 days, sunflower shoots in 12-15, but produce more volume per seed and a satisfying crunch that no supermarket bag matches. Both are genuinely year-round crops. I have been running a continuous rotation of sprouts and shoots since January 2023, and I have had fresh greens on the kitchen worktop every single week of the year.
This guide covers the five most reliable crops: mung beans, alfalfa, fenugreek, pea shoots and sunflower shoots. It is the method I actually use, tested through three UK winters.
How to grow mung bean sprouts in a jar
Mung bean sprouts are the classic sprouting crop for good reason. They are forgiving, fast and taste exactly like the sprouts in Chinese takeaways, because they are.
What you need:
- 1 tablespoon of dried mung beans (available from supermarkets, Asian grocers or health food shops, approximately 80p per 500g bag)
- A clean glass jar (500ml or 1 litre)
- A piece of muslin, mesh or a fine-mesh sprouting lid
- A rubber band or jar ring to secure the cover
The method:
Day 0: Rinse the beans in cold water. Cover with 3-4 times their volume of cool water and leave to soak for 8-12 hours (overnight works perfectly).
Morning of day 1: Drain the soaking water completely. Rinse with fresh water, drain again, and prop the jar at a 45-degree angle in a bowl or dish rack so any residual water drains away. The jar should be upside down at an angle, covered with muslin. This drainage position is the single most important step, standing water causes rot.
Days 1-5: Rinse thoroughly with fresh water twice daily, morning and evening. Drain completely after each rinse. Keep the jar at the draining angle between rinses. A warm kitchen at 18-22°C speeds germination; a cool room (below 15°C) slows it.
Days 3-5: When the tails are 2-3cm long, the sprouts are ready. Give them a final rinse, drain and eat immediately or store in the fridge in a sealed container for up to 3 days.
Yield: 1 tablespoon of dry beans produces approximately 100-150g of sprouts, enough for 2-3 portions.
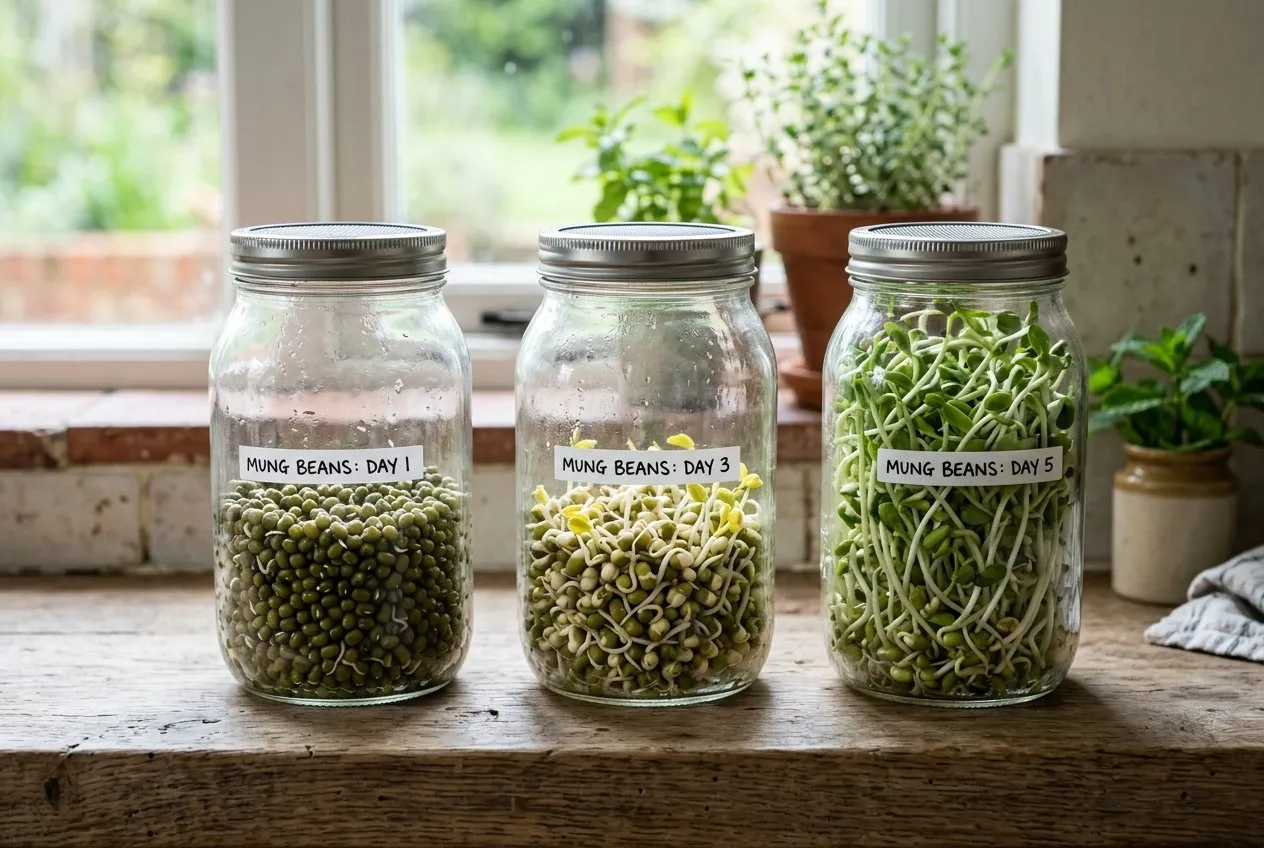
Mung bean sprouts at day 3: tails at 2-3cm, ready to eat. The jar sits in a bowl at 45 degrees to allow drainage between twice-daily rinses.
How to grow pea shoots on a windowsill
Pea shoots are the most productive windowsill shoot crop. They grow quickly, taste sweet and fresh, and, unlike most shoots, produce a second harvest after cutting.
What you need:
- Dried marrowfat peas (50p per bag from supermarkets) or garden pea seeds
- A shallow tray or container with drainage holes (5-8cm deep)
- Multipurpose peat-free compost
- A bright windowsill (south or east-facing is best)
The method:
Day 0: Soak dried peas in water for 12 hours. This softens the seed coat and speeds germination to 2-3 days rather than 4-5.
Sowing: Fill the tray to 3-4cm depth with damp compost. Drain the soaked peas and scatter them densely across the surface, seeds almost touching but not piled up. Press gently into the compost surface. Mist with a spray bottle. Cover with a second tray or sheet of newspaper to keep dark and humid during germination.
Days 2-4: Seeds should germinate and push up the cover. Once sprouts are 2-3cm tall, remove the cover and move to a bright windowsill.
Days 4-14: Keep compost damp but not saturated. Water from below (pour into the saucer) to reduce mould risk. Rotate the tray 180 degrees every 2 days so stems grow straight rather than leaning toward the light.
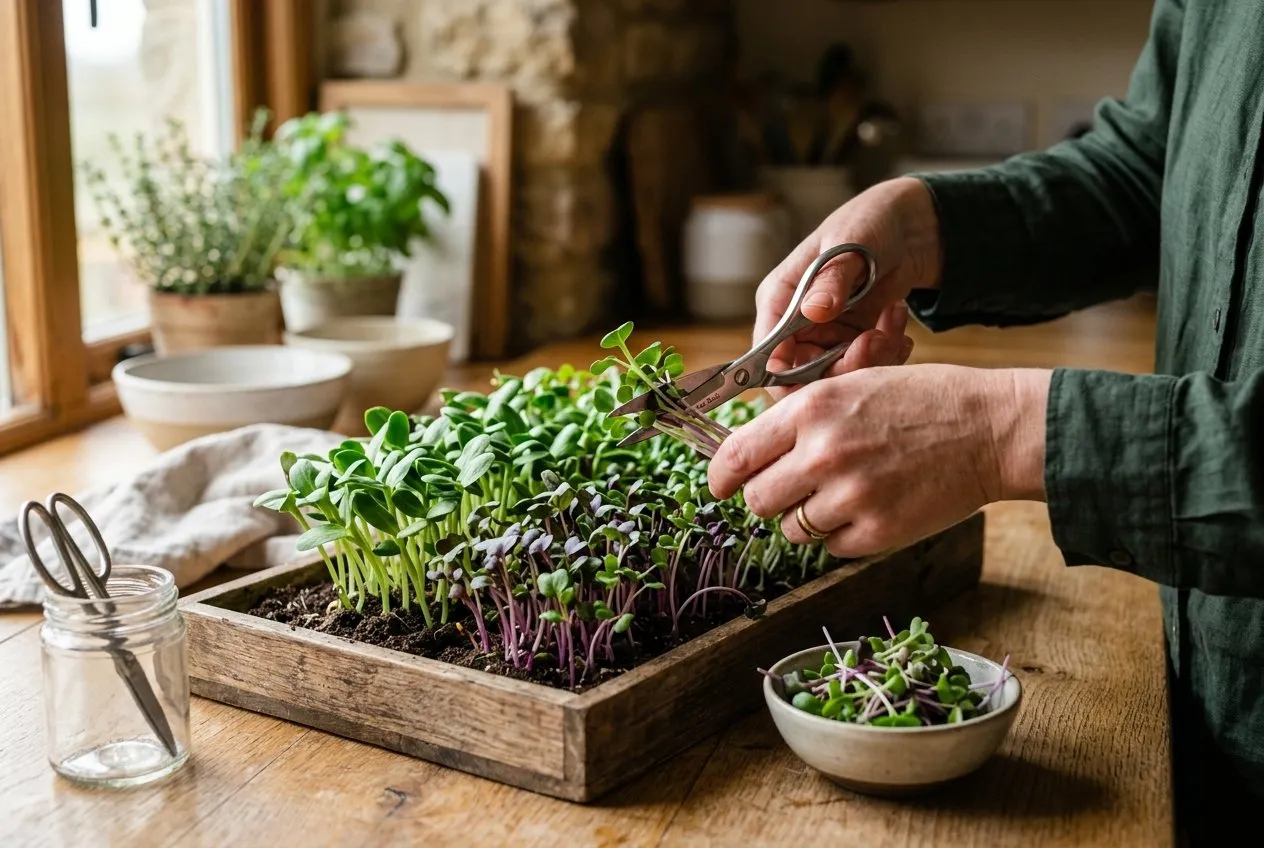
Harvest: Cut with scissors when stems reach 10-15cm, just above the lowest pair of leaves. Do not cut all the way down to the compost, leave the stump. New shoots will regrow for a second harvest in 7-10 days. After the second cut, the tray is finished. Compost the roots and sow again.
Yield: A 25cm x 15cm tray of marrowfat peas produces 80-120g of pea shoots per harvest, enough for four generous salad portions.
This is also an excellent entry point for anyone new to growing food at home, the fast, visible results make it genuinely encouraging.
How to grow alfalfa and other small sprouts
Alfalfa, fenugreek and radish sprouts are all grown the same way as mung beans, jar, water, twice-daily rinsing. They are smaller seeds producing thinner, more delicate sprouts with distinct flavours. For a closer look at the small-seed jar method, our guide to windowsill sprouts using alfalfa and lentil seed walks through timing and rinsing step by step.
Alfalfa: The mildest and most delicate sprout. Ready in 5-6 days. Alfalfa sprouts turn green if given indirect light on day 4-5, which boosts their chlorophyll content and makes them slightly more nutritious. Use 1 teaspoon of seed per jar, they expand dramatically as they sprout.
Fenugreek: A stronger, slightly bitter sprout with a distinctive maple-like aroma. Ready in 3-5 days. Popular in Indian cooking. Add sparingly to salads or use in wraps. Soak for 6-8 hours only, longer soaking can produce a slippery coating.
Radish: Spicy and peppery, ready in 4-6 days. The most flavourful of the small sprouts. Use like mustard cress, scattered over cheese on toast, in egg sandwiches or on top of soups. Do not soak before sprouting; they germinate without soaking and excess moisture promotes rot.
| Sprout/Shoot | Method | Days to Harvest | Flavour | Difficulty | Nutrition Show |
|---|---|---|---|---|---|
| Mung bean | Jar, water only | 3-5 | Mild, fresh | Very easy | High folate, vitamin C |
| Alfalfa | Jar, water only | 5-6 | Mild, grassy | Very easy | Vitamin K, calcium |
| Fenugreek | Jar, water only | 3-5 | Bitter, maple | Easy | Iron, magnesium |
| Radish | Jar, water only | 4-6 | Spicy, peppery | Easy | Vitamin C, antioxidants |
| Lentil | Jar, water only | 3-5 | Earthy, nutty | Very easy | Protein, B vitamins |
| Pea shoots | Tray, compost | 10-14 | Sweet, fresh | Easy | Vitamin C, vitamin A |
| Sunflower shoots | Tray, compost | 12-15 | Nutty, crunchy | Easy | Vitamin E, healthy fats |
How to grow sunflower shoots
Sunflower shoots are the most substantial of the windowsill shoots, thick, crunchy stems with a nutty flavour that works as a salad base rather than a garnish. They are also the most visually impressive, with bold seed leaves on firm stems.
What you need: Unhulled sunflower seeds (black, striped or confectionery sunflower seeds, not the hulled, white-shelled kind). These are available from bird food suppliers at 1-2 pounds per kg, making them one of the cheapest shoot crops.
Soak: 8-12 hours. Remove any floating seeds (they will not germinate) and any shells that have come loose.
Sow: Densely on damp compost in a shallow tray. Press seeds firmly into the surface. The seeds are large enough to benefit from a 3-4mm covering of compost pressed down gently. Cover with a second tray weighted down with a book or brick, the extra weight helps the seeds shed their shells as they push up.
Blackout phase: Keep covered for 4-5 days until sprouts have pushed up the cover and are 4-6cm tall. The weight of the cover helps shell removal; sprouts without this weight often emerge with the shell stuck to the leaves.
Harvest: Move to a bright windowsill once the cover is lifted. Sunflower shoots are ready when they reach 8-12cm and the seed leaves have fully opened, usually at day 12-15. Cut above the base and eat immediately.
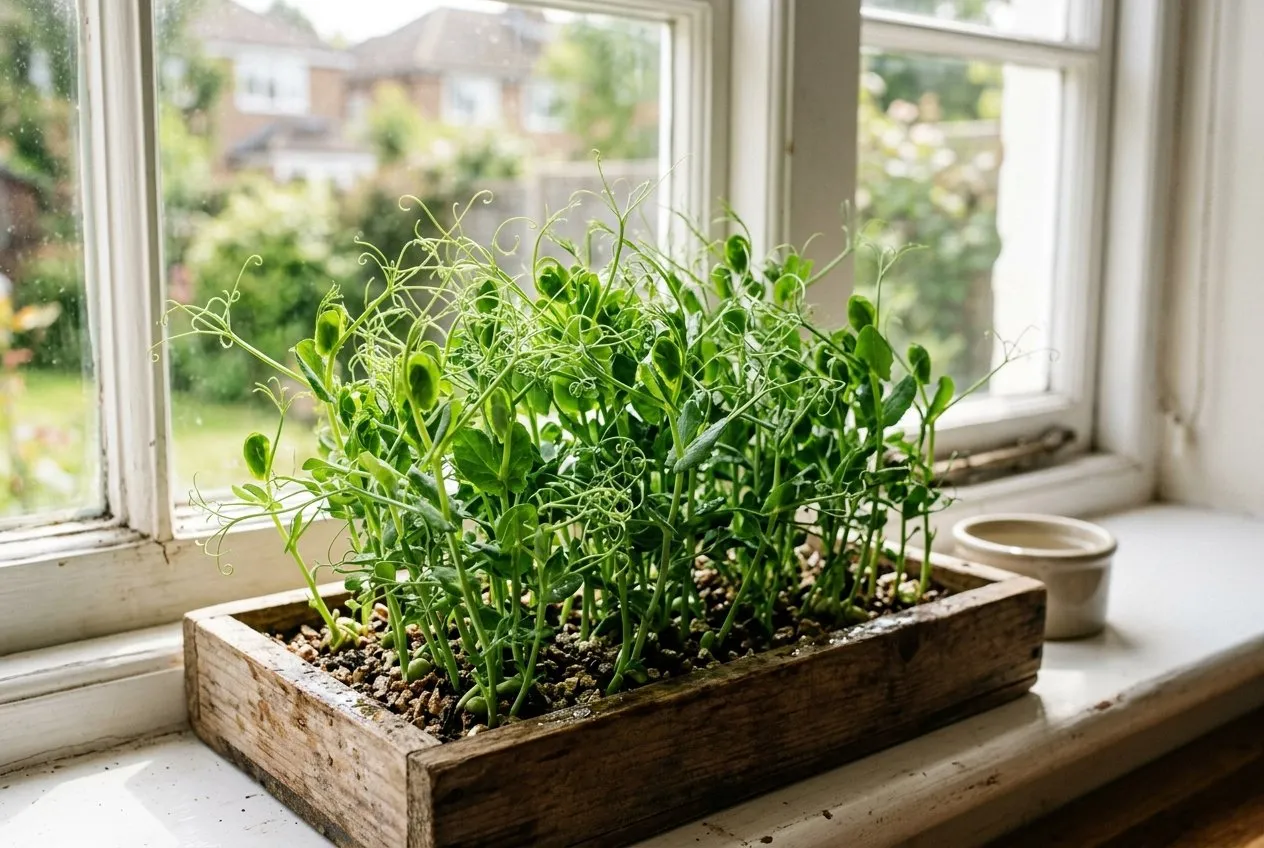
Pea shoots at day 10 in a shallow tray of compost. The stems are 12cm tall and ready for the first harvest. The stump left after cutting will regrow for a second harvest in 7-10 days.
Sprouting nutrition: what the science says
The RHS reports sprouts and shoots as a trending topic in year-round indoor growing, and the nutritional data supports the interest. During germination, seeds undergo dramatic biochemical changes: stored starch converts to simple sugars, enzyme activity increases sharply, and vitamin content rises significantly compared with the dry seed.
Key findings from published research:
- Vitamin C: Mung bean sprouts contain approximately 13mg of vitamin C per 100g, the dry seed contains almost none
- Folate: Lentil sprouts increase in folate content by up to 75% during sprouting compared with dry lentils
- Enzymes: Sprouted seeds contain 10-15 times more active enzymes than raw unsprouted vegetables, which some nutritionists argue improves digestibility
- Anti-nutrients: Sprouting reduces phytic acid (which blocks mineral absorption) by 25-50% in legumes, making minerals more bioavailable
The NHS guidance on sprouted seeds recommends thorough rinsing and notes that cooking sprouts reduces food safety risks for vulnerable groups. For healthy adults, home-grown sprouts rinsed twice daily and eaten fresh present very low risk.
Setting up a continuous rotation
A staggered sprouting rotation means you always have something at a different stage, eliminating the feast-and-famine cycle of sowing everything at once.
My current rotation:
- Mung beans: Sow every 4 days (jar 1 harvesting as jar 2 approaches ready)
- Pea shoots: Two trays, sown 5 days apart, one always at cutting height
- Fenugreek: Sow once a week for a constant supply of the spicy sprouts
This takes about 10 minutes per week to manage and produces fresh sprouts or shoots every 2-3 days.
Equipment for a continuous rotation:
- 3-4 sprouting jars (or wide-mouth jam jars with muslin squares secured with rubber bands)
- 2-3 shallow seed trays
- 1 bag of multipurpose peat-free compost (10L, 3-4 pounds, lasts 3-4 months)
- Seeds: mung beans, marrowfat peas, alfalfa, fenugreek
Total ongoing cost: approximately 1-2 pounds per week in seeds, with compost as an infrequent top-up.
If you enjoy this kind of year-round indoor growing, container vegetable gardening is the next logical step, many of the same principles apply to growing herbs, salad leaves and compact vegetables without a garden.
Sunflower shoots (left) and pea shoots (right) at harvest stage. The sunflower shoots have firm, crunchy stems 10cm tall; the pea shoots are ready for their first cut at 12cm.
Troubleshooting common problems
| Problem | Likely Cause | Fix |
|---|---|---|
| Mould on sprouts | Insufficient drainage; not rinsing enough | Rinse 2-3 times daily; ensure jar drains fully at 45° angle; improve air flow |
| Slimy texture | Oversoaking or standing water | Reduce soak time; drain more thoroughly after each rinse; use a mesh lid |
| Sprouts not germinating | Seeds too old; water too cold; seeds dead | Test seeds, soak 10 seeds, check after 24 hours; use seeds under 2 years old |
| Mould on pea shoot tray | Overwatering; poor drainage; cool damp air | Water from below; reduce watering frequency; remove mouldy seeds immediately |
| Pea shoots yellow, not greening | Insufficient light | Move to a brighter window; south-facing is best; add a basic LED grow light |
| Shells stuck to sunflower leaves | Insufficient weight during blackout phase | Use a weighted board on top of the cover tray; mist shells to soften and remove by hand |
| Bitter or off-flavour sprouts | Harvested too late | Harvest mung beans at 2-3cm tail, alfalfa at 5-6 days; do not let them overrun |
| Uneven growth in trays | Uneven light; uneven watering | Rotate tray 180° every 2 days; level compost surface before sowing |
Sprouts and shoots in the kitchen
Both sprouts and shoots are best eaten raw. Heat destroys the delicate texture and reduces enzyme activity that many people specifically want from sprouts.
Sprouts (mung beans, alfalfa, fenugreek, radish):
- Stir through salads for crunch and freshness
- Stuffed into wraps and flatbreads with hummus and roasted vegetables
- Added to ramen, pho or noodle soups in the final 30 seconds of cooking
- Mixed with cress and watercress for a mixed sprout salad
- On toast with avocado, lemon juice and black pepper
Pea and sunflower shoots:
- As a salad base instead of lettuce, they have more structure and hold dressing well
- Tossed with olive oil and sea salt as a simple side salad
- Scattered over finished pasta dishes or risottos
- In sandwiches as a crunchy alternative to lettuce
- Blended into green smoothies (sunflower shoots are particularly good here)
Storage: Jar sprouts keep for 2-3 days in the fridge, unwashed, in a loosely sealed container with good air circulation. Rinse before eating. Pea and sunflower shoots keep for 3-4 days loosely wrapped in damp kitchen paper inside a sealed container.
Sprouts vs microgreens: which should you grow?
This question comes up often among beginners. The short answer is: grow both, because they serve different purposes.
Sprouts (jar method) are faster (3-6 days), require no compost, cost less per serving and can be grown in a cupboard. They are the best option if you have no windowsill space and want the fastest possible return.
Shoots (tray method) take longer (10-15 days), require compost and a windowsill, but produce more volume per seed and have a better texture for salads and cooking. Pea shoots in particular have a sweetness that sprouts do not.
For a comparison of microgreens grown in compost, see our how to grow microgreens UK guide, which covers broccoli, radish, sunflower and beetroot microgreens using the same tray method.
Both crops are excellent entry points into year-round indoor growing. For a complete picture of what you can grow on a windowsill or in a small outdoor space, the gardening for beginners UK guide covers the essentials.
Related reading
Lawrie has been gardening in the West Midlands for over 30 years. He grows his own veg using no-dig methods, keeps a wildlife-friendly garden, and writes practical advice based on real UK growing conditions.