Choosing an Allotment Shed UK
How to choose an allotment shed in the UK. Materials, size limits, council permission, security and base preparation from years of plot experience.
Key takeaways
- Most UK allotment councils cap shed size at 6x4 feet (1.8x1.2m) and 2.1m total height
- Pressure-treated tongue-and-groove timber lasts 15-25 years and is the best value at 450-850 pounds
- Plastic sheds last 20-30 years and resist theft tools but limit shelf fixing
- Galvanised steel is the most secure (25-40 year life) but heats up in summer
- Most allotment councils need written permission before installation - apply Feb-April
- Foundation matters as much as the shed - a level base on 50mm slabs adds 5-8 years of life
An allotment shed is the single biggest investment most plot-holders make. The right choice lasts 20+ years and pays for itself in protected tools, dry potting space, and a refuge from sudden rain. The wrong choice rots out in 6-8 years, fails site inspections, or attracts the kind of attention from tool thieves that ruins the season.
This guide picks up where our allotment shed ideas and organisation article leaves off. That earlier piece covers what to do inside a shed once you have one. This one covers the buying decision itself - the materials, the council rules, the size limits, the base, the security details, and the costs that determine whether your investment lasts a decade or three.
The four big variables
Every UK allotment shed decision comes down to four interconnected variables. Get all four right and the shed lasts decades. Get one wrong and the rest do not save you.
- Council permission and site rules - what is allowed on your specific plot
- Size and position - footprint, height, and where on the plot it sits
- Material - timber, plastic, or steel, each with different lifespan and security characteristics
- Base preparation - the foundation that determines whether the shed survives wet UK winters
Skip the first variable and you may have to dismantle the shed. Get the fourth wrong and the shed rots whatever material you chose.
Council permission - the conversation to have first
Local authority planning permission rarely applies to allotment sheds, because allotment sites operate under their own tenancy rules. The conversation you need to have is with the site secretary or committee chair.
Three common rule types:
Type 1 - blanket approval. Some sites allow any shed within published size limits without further checks. You install, you tell the secretary, and that is the entirety of the process. Common on private sites and smaller council sites with light-touch management.
Type 2 - written permission required. Most council-managed sites need you to apply in writing with a sketch showing the proposed shed dimensions, material, colour and position. The committee discusses at the next meeting and you receive written approval before installation. Typical processing time is 4-8 weeks.
Type 3 - committee inspection required. A minority of sites (often historic council sites with strict architectural conventions) require a committee inspection of the proposed site before approval. Sometimes a specific shed type or supplier is mandated.
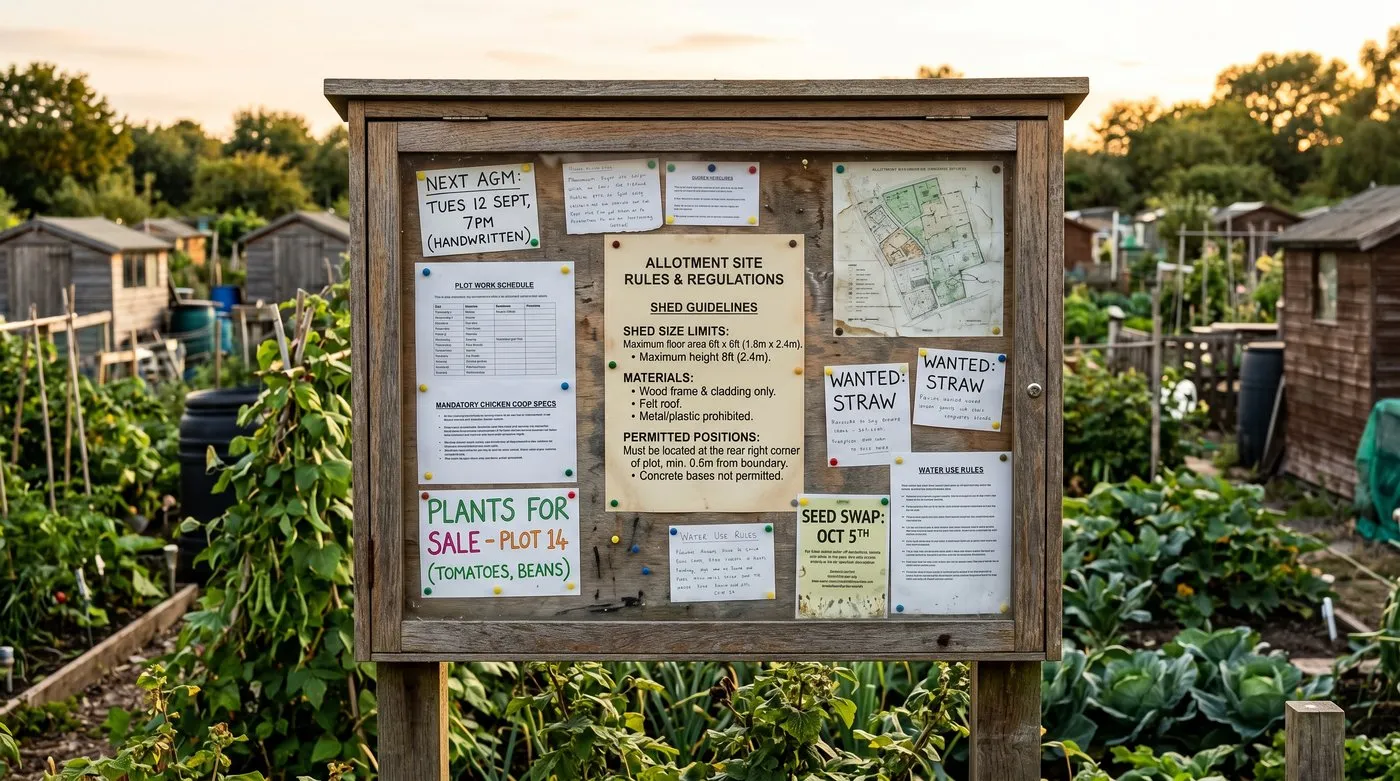 Read the site noticeboard before buying any shed. Local rules vary widely and often override the manufacturer’s recommendations.
Three questions to ask the secretary before buying:
- What is the maximum permitted shed footprint and height on this site?
- Are there material restrictions (some sites ban metal or insist on natural-coloured timber)?
- Is there a defined position rule (front, rear, aligned with neighbours, fixed orientation)?
Get the answers in writing if possible. A polite email exchange becomes documentation if the rules later change.
Standard UK size limits
Most UK allotment councils settle on similar size envelopes. Variation exists but the ranges below cover 80-90% of UK sites:
| Plot type | Footprint cap | Height cap | Typical materials allowed |
|---|---|---|---|
| Full plot (250m²) | 6x4 to 8x6 (1.8x1.2 to 2.4x1.8m) | 2.1-2.4m | Timber, plastic, metal |
| Half plot (125m²) | 4x4 to 6x4 (1.2x1.2 to 1.8x1.2m) | 1.9-2.1m | Timber, plastic, metal |
| Quarter plot (62m²) | 4x3 (1.2x0.9m) | 1.8m | Timber only on some sites |
Some sites apply a maximum-percentage rule instead of fixed dimensions - shed footprint capped at 5-10% of the plot area. A 250m² plot with a 5% rule allows up to 12.5m² of shed, which is generous but rare.
Apex (pitched-roof) and pent (sloping flat-roof) sheds measure differently. Apex height is measured to the ridge; pent height is measured to the high side. A 2.1m height cap may rule out apex sheds and require pent designs - check before buying.
Material comparison - the four main choices
Pressure-treated tongue-and-groove timber (PT T&G)
The mainstream UK allotment shed. Boards interlock tightly, the wood is pressure-impregnated with preservative, and standard sizes are stocked by all major retailers.
Specifications:
- Lifespan: 15-25 years on a proper base, 8-12 years on poor base
- Cost: £450-£850 for 6x4 to 8x6 sizes
- Wall thickness: 12-19mm boards typical
- Roof: Mineral felt over OSB or timber boards
- Floor: 11-15mm pressure-treated OSB or T&G boards
Pros: Traditional look, accepts shelves and hooks freely, easy to repair, holds heat moderately in summer.
Cons: Needs occasional retreatment with preservative every 3-5 years, vulnerable to wet rot at ground contact if base is poor, less secure than steel against sustained attack.
Standard overlap timber (untreated or lightly treated)
The budget option. Overlapping board construction without tongue-and-groove fit. Sold widely at low prices but with shorter expected life.
Specifications:
- Lifespan: 6-12 years
- Cost: £250-£450 for 6x4 to 8x6 sizes
- Wall thickness: 10-12mm boards
- Roof: Mineral felt over OSB or thin timber
Pros: Cheapest entry point, looks acceptable, easy to assemble.
Cons: Boards shrink and warp leaving gaps, water enters easily, treatment needed every 2-3 years to slow rot. Cheap hinges and locks fail within 5 years. False economy for long-term plot holders.
Plastic (HDPE)
UK uptake has grown steadily over the last decade. Heavy-duty plastic sheds resist rot, require no preservative treatment, and survive long periods of unattended exposure.
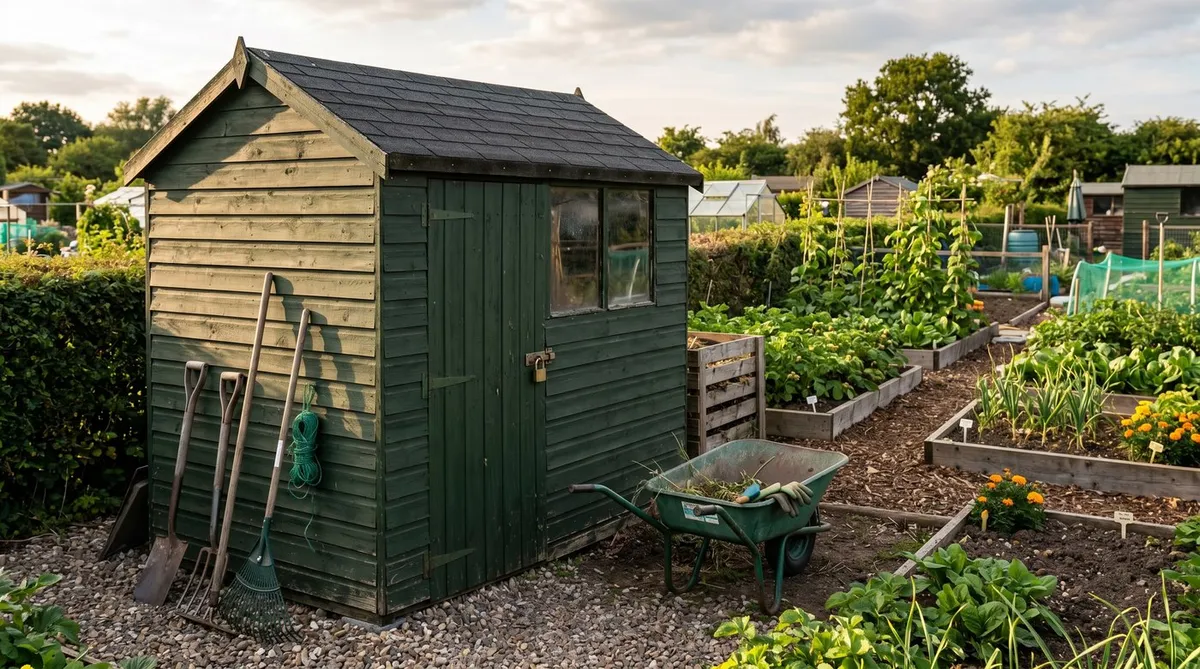
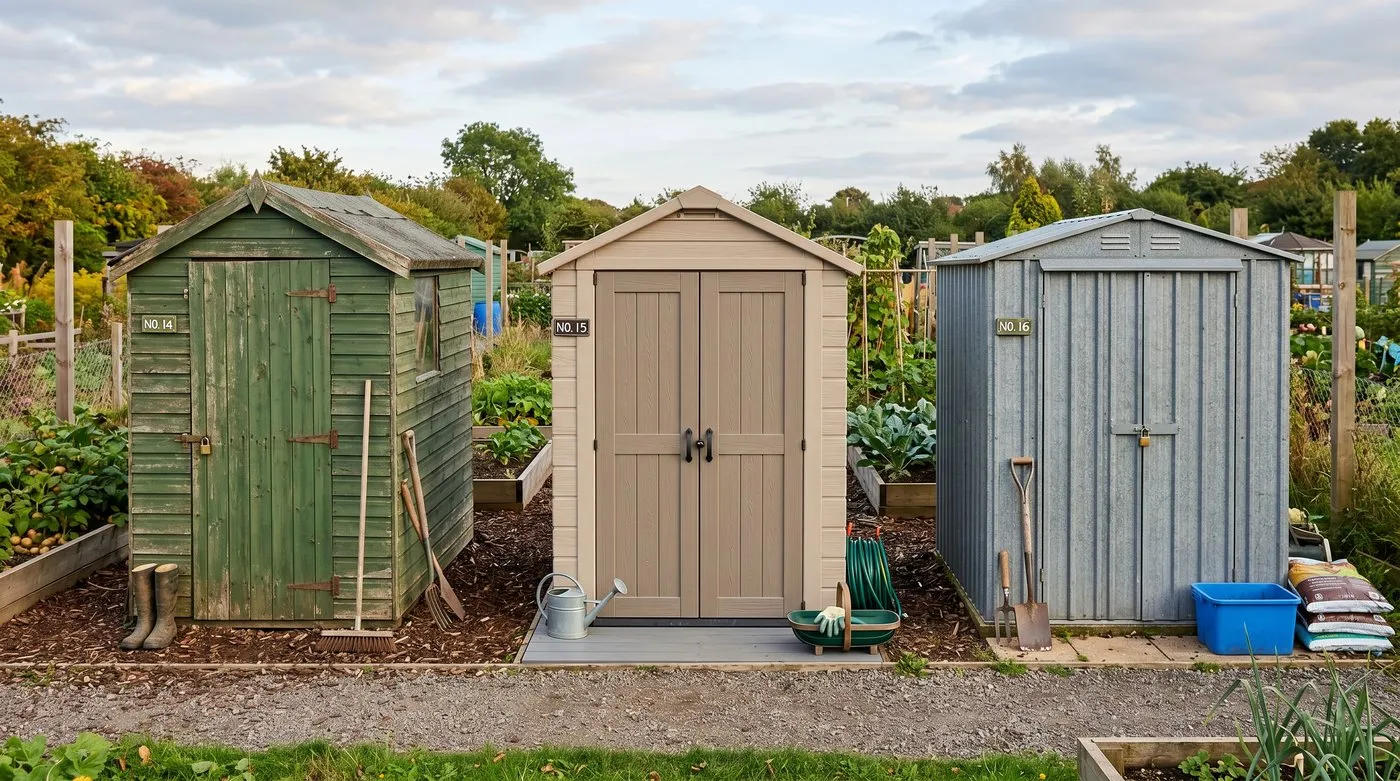 Three common UK allotment shed materials side by side. Each has different security, longevity and maintenance characteristics.
Specifications:
- Lifespan: 20-30 years
- Cost: £350-£650 for 6x4 to 7x4 sizes
- Wall thickness: 3-6mm HDPE panels
- Roof: Same material as walls
- Floor: Same material as walls
Pros: No rot, no preservative, low maintenance, resistant to common shed theft tools, light enough for one person to assemble.
Cons: Internal fixings limited (you cannot screw shelves into HDPE walls), aesthetic divisive on traditional sites, plastic can become brittle in extreme cold over 10+ years.
Galvanised steel
The most secure option, common on sites with theft problems. Heavy steel construction with welded joints and zinc-coated panels.
Specifications:
- Lifespan: 25-40 years
- Cost: £550-£900 for 6x4 to 8x6 sizes
- Wall thickness: 0.5-1.0mm galvanised steel
- Roof: Same material as walls
- Floor: Often not supplied - sits directly on slab base
Pros: Highest theft resistance, longest lifespan, no rot or preservative needed, dimensionally stable.
Cons: Interior temperature swings dramatically (40-55C in summer sun, vulnerable to condensation), internal fixings need self-tapping screws or magnetic attachments, looks utilitarian.
For comparison with sheds and outbuildings in domestic gardens (different rules), see our garden fence ideas guide which covers boundary materials that combine well with garden buildings.
Comparison table - the four materials side by side
| Material | Cost (6x4) | Lifespan | Security | Maintenance | Internal fixings |
|---|---|---|---|---|---|
| PT tongue-and-groove | £550-£850 | 15-25 years | Medium | Treat every 3-5 years | Excellent |
| Overlap timber | £250-£450 | 6-12 years | Low | Treat every 2-3 years | Good |
| HDPE plastic | £350-£650 | 20-30 years | High | None | Limited |
| Galvanised steel | £550-£900 | 25-40 years | Highest | None | Self-tappers only |
PT tongue-and-groove and HDPE plastic are the two most popular UK allotment choices in 2026. Steel suits sites with theft history. Cheap overlap timber is increasingly avoided because the 6-8 year replacement cycle wipes out the upfront saving.
Base preparation - the variable that decides shed lifespan
The base is more important than the shed itself for UK longevity. Wet UK winters destroy poorly-based sheds regardless of material.
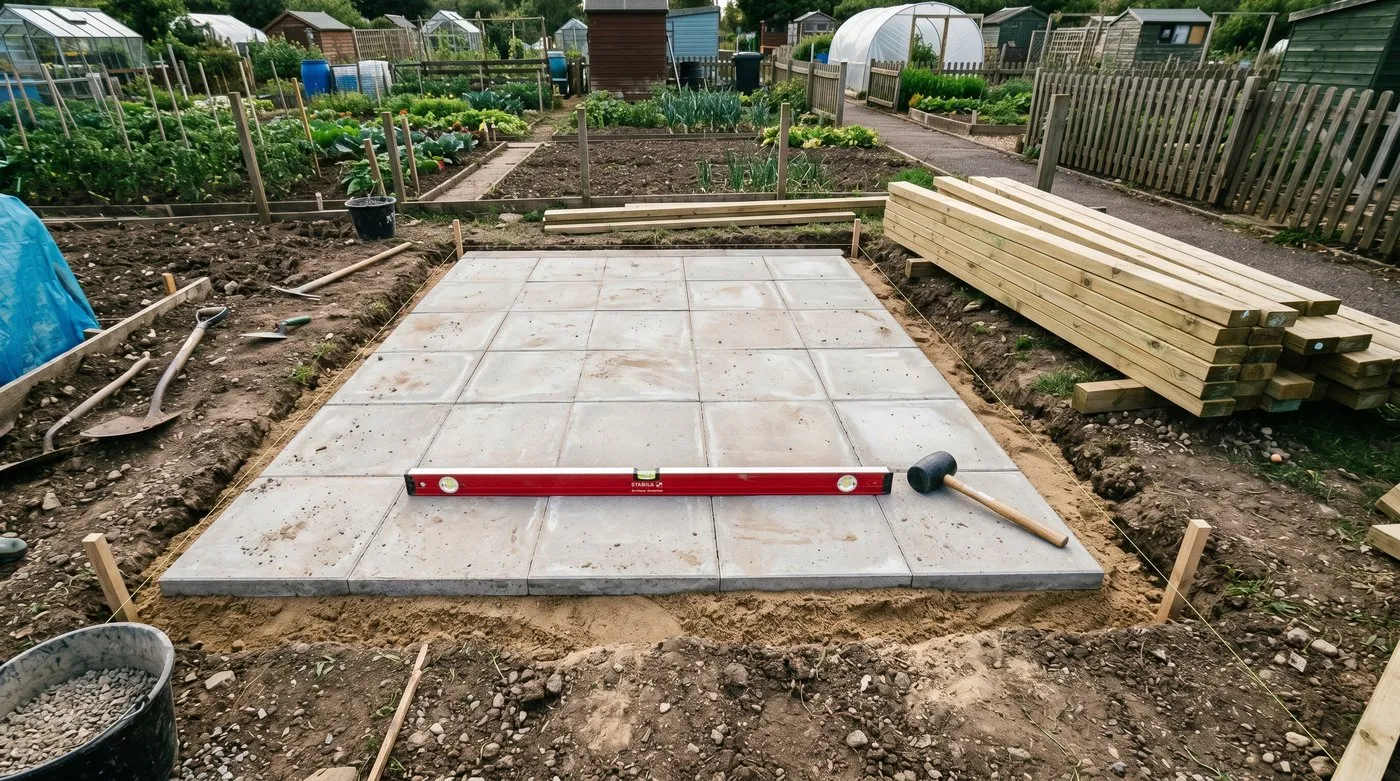 A proper slab base is the foundation of a long-lived shed. The level surface and 100mm under-floor clearance prevent rot at the floor edges.
The four base options ranked
Best - paving slabs on compacted sand-and-cement bed. 50mm slabs on a 50mm bed of 4:1 sand-cement mix, levelled with a long spirit level and rubber mallet. Adds 5-8 years to shed life. Cost £30-£60 in materials for a 6x4 base.
Good - concrete slab. Single poured concrete slab 75-100mm thick with mesh reinforcement. Permanent, very level, slightly more difficult to remove if you ever leave the plot. Cost £80-£140 in materials. Mix on site or buy ready-mix for larger bases.
Acceptable - timber base on concrete pads. Pressure-treated 75x75mm timber rails laid on concrete pads at corners and intermediate points. Allows ventilation. Adequate for plastic and steel sheds, less reliable for timber sheds where the rails themselves rot.
Avoid - bare soil with a wooden floor. The shed floor sits on damp soil. Water wicks up into the timber. Rot starts within 18 months. Even on plastic sheds, the floor base flexes and damages the wall joints.
The detail that matters more than the choice: the base must be level within 5mm across the full footprint, and the shed must sit at least 100mm above ground level to allow airflow under the floor.
For more detail on getting any base right, see our allotment path construction guide which covers the same compaction and levelling techniques.
Security - three layers, not just a padlock
UK allotment shed theft is a real problem. The National Allotment Society reported 12-15% of plot holders experienced shed theft over a recent five-year survey. The fix is layered security, not a single great padlock.
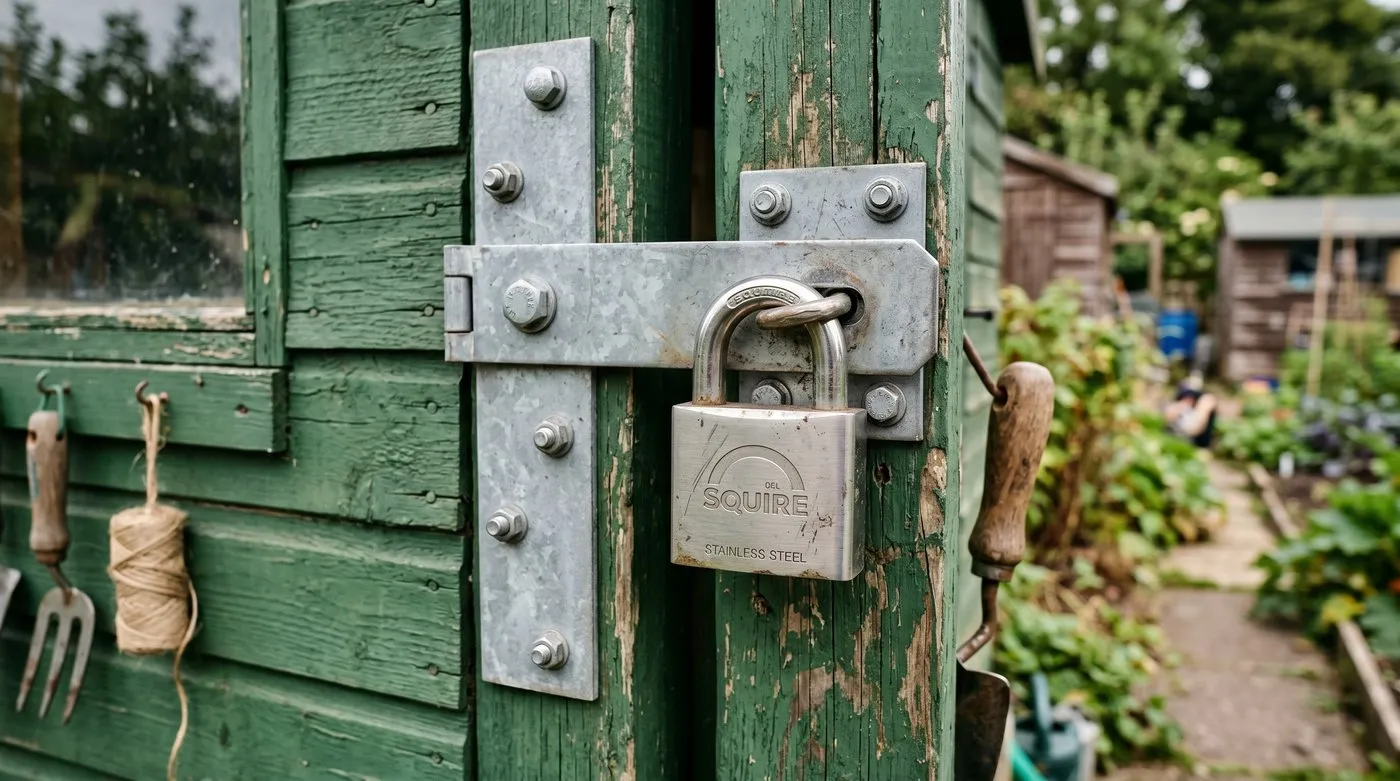 Three-part security setup: a hasp-and-staple bolted through the door, a CEN-rated closed-shackle padlock, and reinforcement plates around the door frame.
Layer 1 - the hasp and staple
The metal plate that the padlock loops through must be bolted through the door, not screwed. Through-bolts with washers on the inside prevent the hasp being prised off. Choose stainless steel or galvanised hardware to avoid rust over the years. Cost £10-£20.
Layer 2 - the padlock
Choose a closed-shackle padlock rated CEN grade 4 or higher. The closed shackle prevents bolt-cutter attacks. Boron-alloy shackles resist hand saws. Avoid combination padlocks - the locking mechanism is easier to defeat than a quality key lock. Cost £20-£50.
Layer 3 - the door surround
The weak point on most allotment sheds is the door surround, not the lock. Reinforce with steel plates bolted to the frame at hinge and latch points. Some manufacturers sell “security packs” with the right hardware - cheaper than fitting separately.
Three other practical measures
- Hinge bolts. Steel pins fitted to the door that engage holes in the frame even when the door is closed and locked. Prevent the lift-off attack on cheap hinges.
- Window security. Cover windows from inside with steel mesh or board them up entirely. The window is the easiest entry point for an experienced thief.
- Don’t leave tools visible. Hide expensive tools behind sacks or in opaque storage. A view through the window of a chainsaw or strimmer is an invitation.
For wildlife-related security (badgers, rats) see pest deterrent options which has overlapping advice on perimeter security.
Realistic cost breakdown
| Item | Budget shed | Standard shed | Premium shed |
|---|---|---|---|
| Shed itself | £280 | £550 | £820 |
| Paving slab base | £40 | £55 | £80 |
| Through-bolted hasp & staple | £12 | £20 | £30 |
| CEN-rated padlock | £18 | £35 | £55 |
| Hinge security bolts | £8 | £15 | £25 |
| Roof sealant / extra felt | £15 | £25 | £30 |
| Wood preservative (first treatment) | £18 | £25 | £35 |
| Total | £391 | £725 | £1,075 |
The middle column is what most UK allotment shed installations actually cost in 2026. The premium option matches a 25-year shed plus a wet-winter-proof base plus serious security.
Common mistakes when buying
Mistake 1: Cheapest shed available. A £150-£250 overlap timber shed is false economy. The 6-8 year replacement cycle costs more across 20 years than buying quality once.
Mistake 2: Skipping the base. Putting a shed straight on uneven ground or four bricks at the corners halves the lifespan and creates rot points at the floor edges.
Mistake 3: Installing before getting permission. Some sites require shed removal at the tenant’s cost if installed without committee approval. Always confirm in writing first.
Mistake 4: Cheap padlock on a quality shed. A £4 brass padlock can be cut with bolt cutters in under 5 seconds. The shed cost is irrelevant if the lock fails on the first attempt.
Mistake 5: No drainage around the base. Water pools against the shed in wet winters and rots the bottom 50-100mm of walls. Install a small drainage trench filled with gravel along the high side if your plot is uneven.
Mistake 6: Buying without thinking about future expansion. Once a 6x4 shed is up, it is rare to upgrade to 8x6 without selling the original. Buy the size you need in 5 years, not just this year.
Council application - what to include
If your site requires written permission, the application is usually informal but the more detail you provide, the faster the approval. Include:
- Plot number and full address
- Proposed shed dimensions (footprint and height)
- Material and colour
- Sketch showing the position on the plot (front, rear, side - with distance from boundaries)
- Photo of the area if you have one
- Manufacturer and model if a kit shed
- Proposed installation date
Most committees respond within 4-8 weeks. Some sites batch decisions at quarterly meetings - apply at least 3 months before the planned install date if possible.
Field note: The National Allotment Society publishes guidance on tenancy rights and shed regulations, and many local sites use their model rules as a template. Worth checking their site if your local committee is unclear on permission processes.
Month-by-month UK allotment shed planning calendar
| Month | Task |
|---|---|
| January | Plan the buy. Compare shed options. Measure the plot. |
| February | Submit committee permission application early in the year. |
| March | Permission granted. Order shed and base materials. |
| April | Prepare the base. Receive shed delivery. |
| May | Install shed during dry, mild weather. Treat any timber. |
| June-August | Use the shed. Check for any settling or roof leaks. |
| September | Top up wood preservative if a treatable timber shed. |
| October | Clean gutters, check roof felt, secure window boards if used. |
| November-December | Quiet winter use. Check security if site is quiet. |
The April-May window is the sweet spot for installation - dry enough to prep the base, mild enough for assembly, and you get a full season of use before the first winter.
Common allotment shed myths
“You can install whatever you like on your own plot.” No - the site rules apply. Most sites have committee permission processes, and the rules are binding under the tenancy agreement.
“Plastic sheds blow away in UK wind.” Modern HDPE plastic sheds anchor properly to a slab base and survive UK winds as well as timber. The risk is improper installation, not the material.
“Metal sheds get too hot to use in summer.” Internal temperatures can hit 40-55C in summer sun. This is a real issue if you store seeds, plants, or sensitive tools, but the shed itself is still functional - just open the door in summer to ventilate.
“You don’t need permission for a small shed.” The minimum-size exemption varies by site. Some allow up to 4x3 without permission; others require permission for any new structure. Always check.
Gardener’s tip: When choosing position on the plot, place the shed where it casts least shade on growing areas. South-side positioning shades a strip 1.5-3m wide for half the day in summer. North-side placement uses the shaded strip for compost bins, which works well.
Maintenance schedule for a 20-year shed
To get the maximum life from a timber allotment shed, follow this schedule:
| Year | Action |
|---|---|
| 0 | Install on level slab base, full preservative coat |
| 3 | Re-treat all timber, check roof felt and patch tears |
| 5 | Replace roof felt entirely, re-coat preservative |
| 7 | Re-treat timber, check door hinges and adjust |
| 10 | Replace roof felt, replace any failing boards, full preservative coat |
| 13 | Re-treat timber, check floor for rot, replace if 30%+ damaged |
| 15 | Full inspection - decide on full replacement vs major repair |
| 17 | If continuing - second full roof felt replacement |
| 20+ | Decision point - rebuild or replace |
Plastic and steel sheds skip most of this schedule but benefit from annual checks of seals, fixings, and base level.
Now you’ve chosen the shed
For ideas on what to do with the inside once the shed is installed, read our allotment shed ideas and organisation guide which covers the practical layouts for tools, seed storage and potting space.
Lawrie has been gardening in the West Midlands for over 30 years. He grows his own veg using no-dig methods, keeps a wildlife-friendly garden, and writes practical advice based on real UK growing conditions.