Potscaping: Grouping Pots for Impact
Potscaping turns scattered pots into a styled cluster. Learn odd-number grouping, height tiers, pot materials and a UK season-by-season swap calendar.
Key takeaways
- Group pots in odd numbers (3, 5 or 7); even numbers look static and split the eye
- Make the tallest pot about 1.5x the height of the next for a clear focal point
- Keep a group spanning 60-90cm so it reads as one display, not random clutter
- Repeat one material or one glaze colour across the cluster for instant cohesion
- A tight cluster holds humidity and cut watering by roughly 30% in our trials
- Raise pots on feet or risers; standing water cracked 4 of 12 unraised terracotta pots one winter
Potscaping is the art of grouping pots into a styled cluster instead of scattering single planters across a garden. Done well, potscaping turns a handful of ordinary pots into a designed display that looks finished from the first week. The method borrows the same rules that make a good border work: odd numbers, varied height, repetition for cohesion and one clear focal point. This guide covers the design science behind grouping pots, how to choose and match materials, a season-by-season swap calendar for year-round interest, and the practical jobs most people get wrong, from watering a tight cluster to overwintering the group.
The advice draws on 50+ pot groupings trialled across Staffordshire patios and a north-facing courtyard over five seasons. The Royal Horticultural Society recommends grouping containers to ease watering and shelter roots, and our own trials back that up with measured numbers.
Why a cluster beats scattered single pots
A cluster of pots reads as one deliberate display; scattered single pots read as clutter. This is the single biggest shift in how a container garden looks. When you dot one pot here and another three metres away, the eye has nowhere to rest. Each pot competes for attention and none wins. Group those same pots together and they become a composition with a clear shape, a focal point and a sense of intent.
There is a practical payoff too. Pots clustered tightly shade each other’s sides and trap humidity in the gaps between them. In our Staffordshire trials, a group of five 30cm pots needed watering every third day in July, while the same five spread along a path needed daily watering. That is roughly a 30% saving in watering over a hot month. Grouped pots also shelter each other from drying wind, which matters on an exposed balcony or a corner that funnels gusts.
Cohesion is the other win. A scattered scheme rarely looks designed because the materials, sizes and colours never line up. A grouped scheme lets you control all three at once. You repeat one glaze, vary the heights on purpose and place your best pot where it counts.
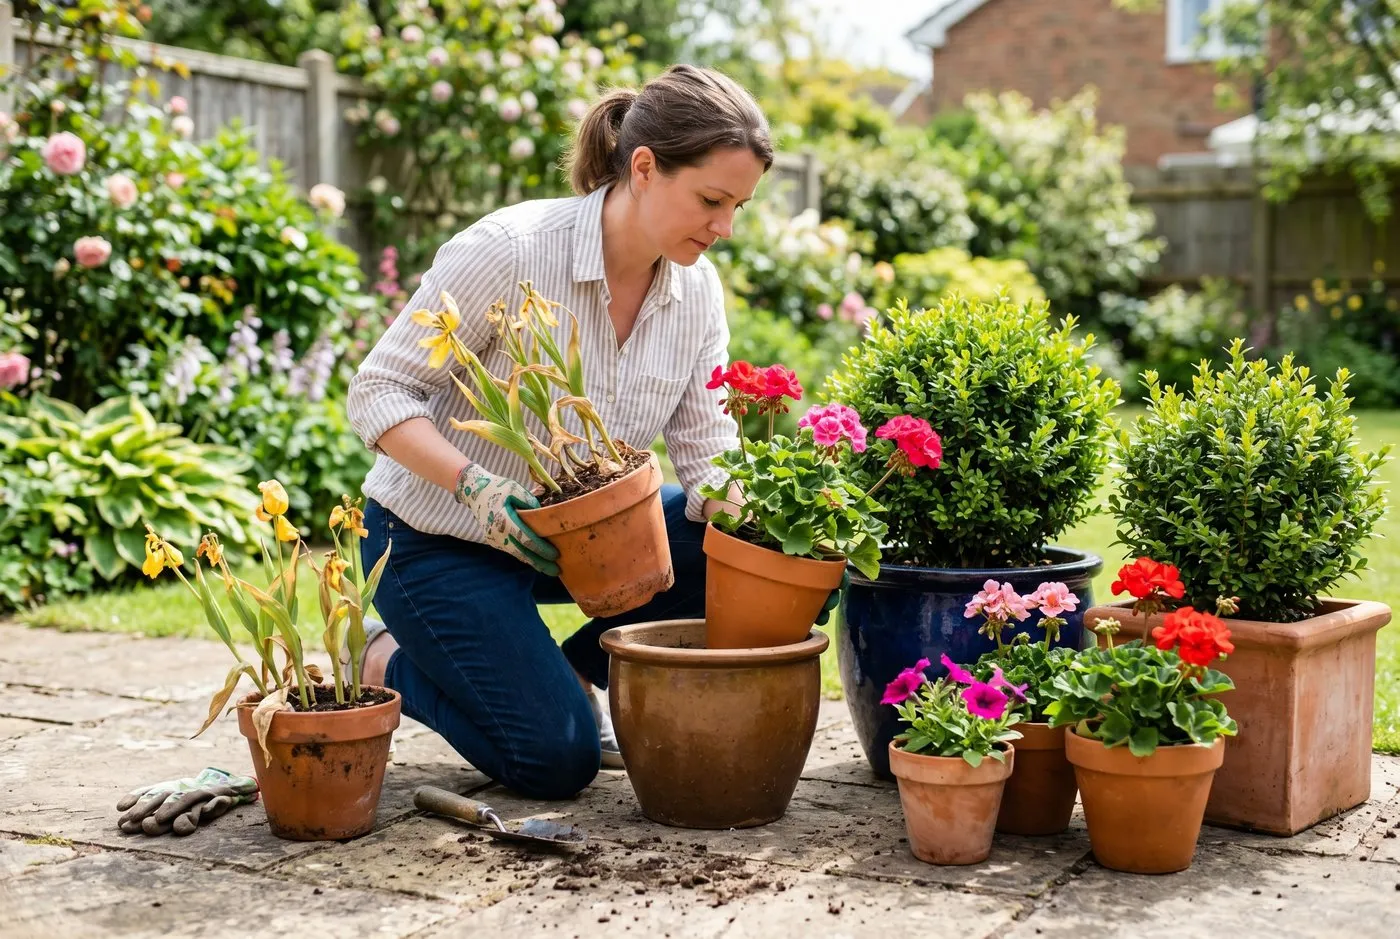
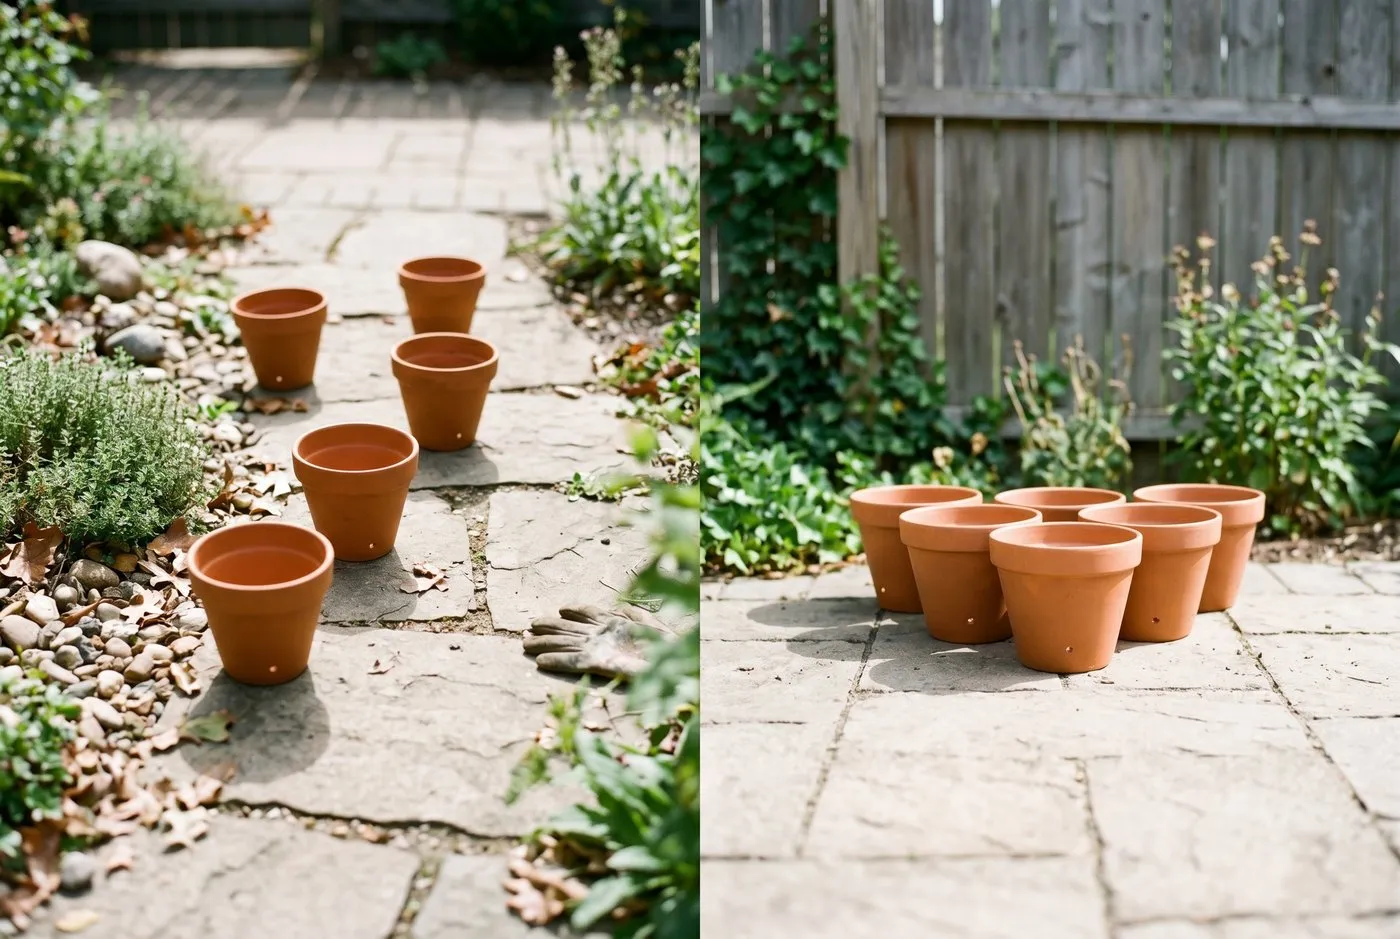 The same six pots, scattered along a path (foreground) versus potscaped as a cluster against the wall. The grouped version reads as one designed display and dries out more slowly.
The design science behind grouping pots
Good potscaping follows a handful of measurable rules borrowed from border design. Understanding why they work lets you adapt them to any space rather than copying a fixed layout.
Odd numbers and the rule of three
Odd numbers of pots look more natural than even numbers. Three, five or seven pots form a triangle or staggered line that the eye reads as a single unit. Even numbers pair off and split the group into two halves, which looks static and formal. Three is the working minimum for a proper cluster. Five suits most patios. Seven works on a large doorstep or in a courtyard where you have the floor space. The principle is the same one used for planting shrubs in a border, where odd-number drifts always settle the eye better than pairs.
The rule of three heights
Vary the height across the group so the tallest pot is roughly 1.5x the height of the next. A typical working set is a 60cm tall pot, a 40cm medium and a 25cm low pot. That stepped profile gives the cluster a clear silhouette. Flat groupings, where every pot is the same height, look dull because there is no peak for the eye to land on. You do not need three different pots to do this. Stand a pot on an upturned pot, a brick plinth or a tier of pot staging to lift it.
Repetition, focal dominance and negative space
Three more rules finish the composition. Repeat one element across the cluster, such as a single material or one glaze colour, so the group hangs together. Give the group one dominant focal pot, usually the tallest or the boldest glaze, so the eye knows where to look. And leave negative space; a group spanning 60-90cm with a little breathing room around it reads better than pots crammed edge to edge. Cohesion plus a focal point plus space is what separates a designed cluster from a pile.
How to vary height with plinths and staging
Height variation is what turns a flat row of pots into a sculpted group. You rarely own pots in three perfect heights, so you build the steps instead. The cheapest method is an upturned spare pot or a stack of two bricks under the back pot, lifting it 15-25cm. Tiered pot staging, a metal or timber plant theatre, raises a back row by 30-50cm in one go.
A reclaimed timber crate, a low stone step or a galvanised trough turned on its side all work as risers. The trick is to hide the support so only the height shows. Tuck a trailing plant such as trailing ivy or Bidens over the rim of the front pot to drape across the riser of the pot behind. The eye then reads a smooth cascade of foliage rather than a stack of bricks. Aim for three clear levels: a tall back accent, a mid-height middle, and a low front pot or two that spill over the edge.
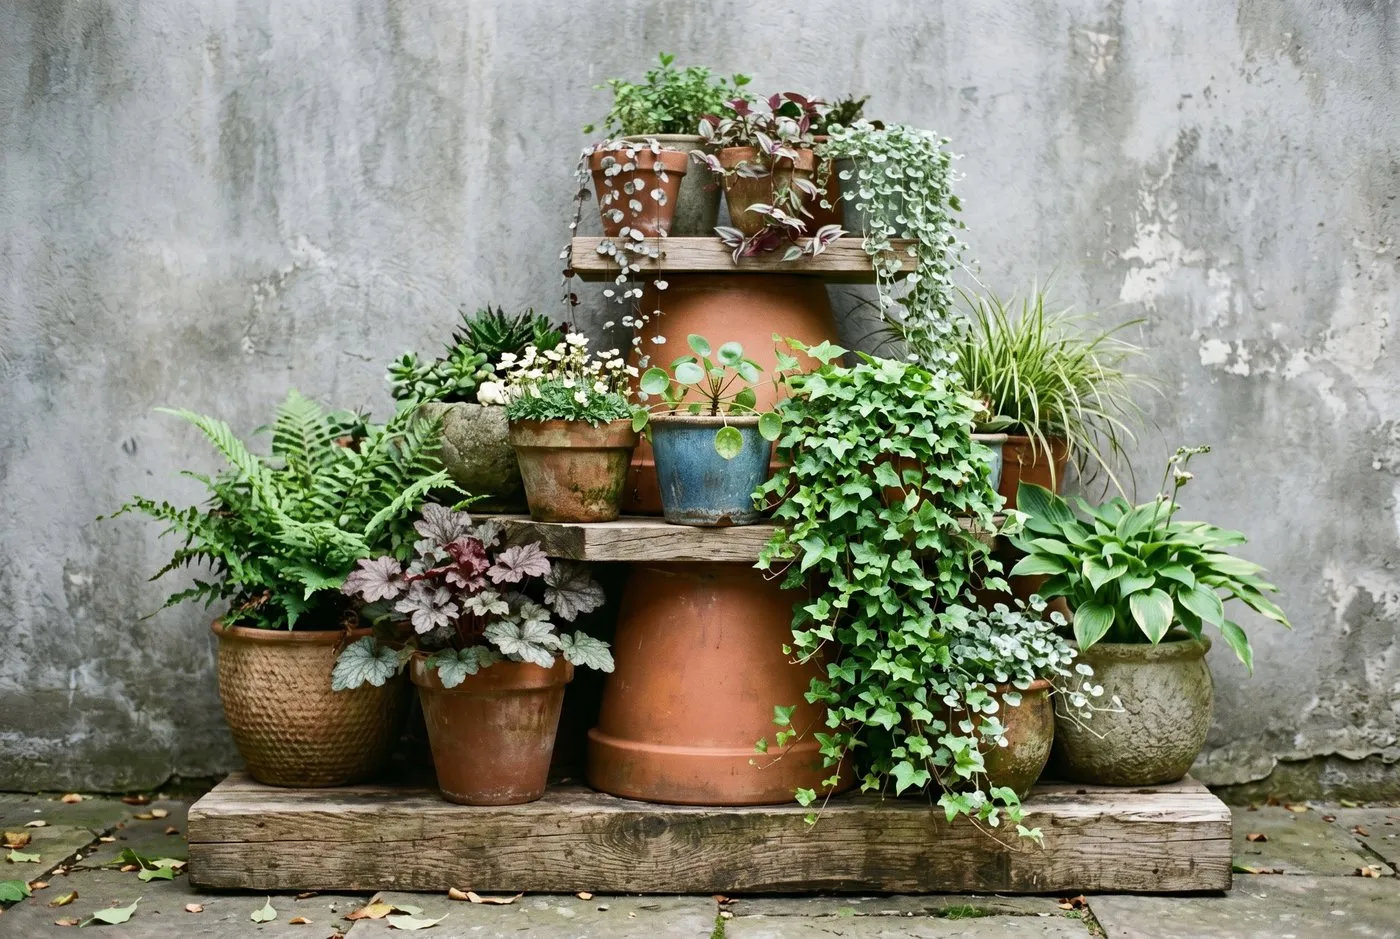 Three clear height levels built with a timber plinth and an upturned pot. The tallest pot sits about 1.5x the height of the middle one, giving the group a sculpted silhouette.
Thriller-filler-spiller across a whole group
The thriller-filler-spiller idea is usually applied inside one pot, but it works better spread across a group. Instead of cramming a tall plant, mid-height fillers and trailers into a single container, you give each role its own pot. One tall thriller pot holds a grass such as Stipa gigantea or a clipped bay. Two or three filler pots at mid height carry the bulk, with heuchera, salvia or hardy geranium. One or two low spiller pots trail helichrysum, ivy or Lysimachia over the front.
This approach gives every plant proper root room and lets you swap one element without disturbing the rest. If the thriller grass tires by late summer, you lift that single pot out and drop in a fresh one. The group still reads as a complete thriller-filler-spiller composition, just split across containers rather than squeezed into one. For more on building the classic in-pot version first, see our guide to container planting combinations.
Choosing pot materials and matching them to plants
Pot material decides the look, the weight, the frost-hardiness and the watering rhythm of your group. Matching the material to both the plant and the setting is half the battle. The table below ranks the five common UK pot materials by how useful they are in a potscaped display, with the role each one tends to play.
| Material | Look | Frost-hardy? | Weight | Cost £ | Role in a grouping |
|---|---|---|---|---|---|
| Terracotta | Warm, classic, ages well | Only if frost-proof grade | Heavy | £15-£60 | The repeating base material; unifies a mixed group |
| Glazed ceramic | Glossy, colourful, bold | Usually, if rated frost-proof | Heavy | £25-£90 | The statement focal pot; one strong glaze leads |
| Fibreclay | Stone-like, matte, modern | Yes, very good | Light | £30-£80 | Tall accent pots; light enough to lift on a balcony |
| Zinc / metal | Industrial, cool grey, crisp | Yes, but heats up | Medium | £20-£70 | Cool-toned accents; pairs with grasses and herbs |
| Recycled plastic | Plain, practical, varied | Yes | Very light | £8-£35 | Hidden workhorse pots; the lifters you raise others on |
Terracotta is the natural unifier. It is porous, so compost dries faster and roots breathe well, which suits Mediterranean herbs, pelargoniums and lavender. Cheap terracotta flakes and cracks in frost, so buy frost-proof grade if pots stay out all winter. Glazed ceramic holds moisture longer, making it kinder to thirsty plants like hostas and hydrangeas, and one bold glaze makes an unbeatable focal pot. Fibreclay mimics stone at a fraction of the weight, which is why it is the go-to for tall pots on balconies and roof terraces. Zinc stays cool-looking but heats up in full sun, so keep roots cool with a thick compost and avoid south-facing scorch. Recycled plastic is the honest workhorse: light, frost-proof and cheap, perfect as the upturned lifter under a better pot.
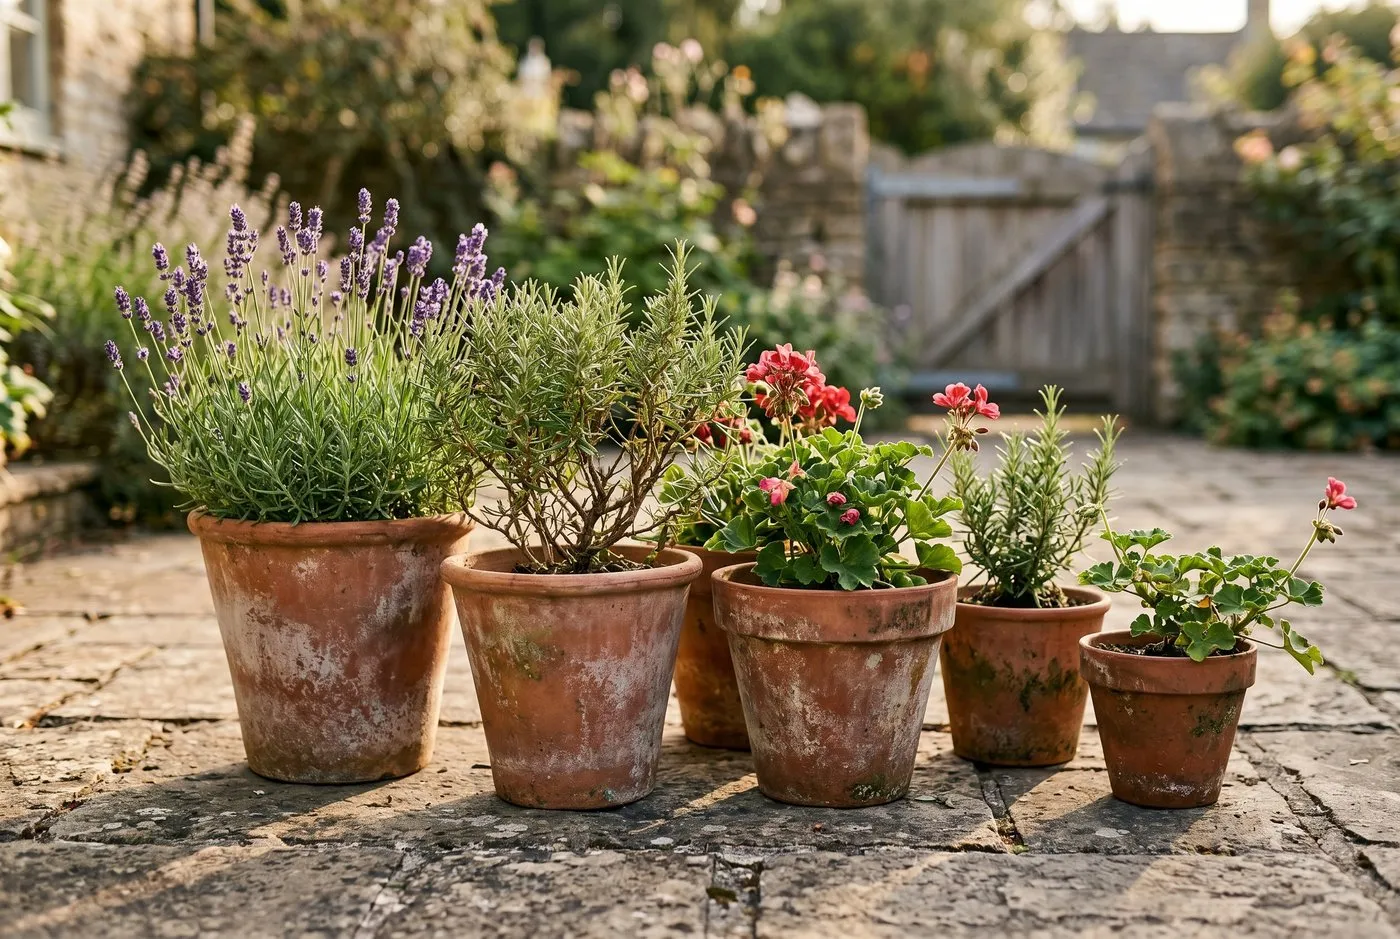 Terracotta as the unifying material: graded sizes of the same pot tie a mixed group together. The porous clay suits Mediterranean herbs, lavender and pelargoniums.
Tonal versus contrasting glaze schemes
Your colour scheme decides whether the group feels calm or punchy. A tonal scheme keeps every pot within one colour family, such as a run of blues from pale duck-egg to deep cobalt, or earthy terracotta tones from buff to burnt orange. Tonal groups feel restful and let the plants do the talking. They suit naturalistic planting with grasses and soft perennials.
A contrasting scheme sets one bold pot against quieter neighbours. A single glossy teal pot among matte terracotta becomes an instant focal point. Contrast works hardest when the bold pot is also the tallest or sits dead centre, so colour and height pull the eye to the same place. The safe rule is one loud pot to every three or four quiet ones. Any more and the group fights itself. If you are nervous, start tonal and add one contrast pot later once you can see the gap it fills.
Scale, proportion and the focal pot
Scale is what most people misjudge. Pots that are too small for the space look mean and dry out fast; pots too large for a tiny balcony swamp it. As a rule, the largest pot in a group should be at least 40cm in diameter on a patio, and the group as a whole should span 60-90cm. On a balcony, scale everything down: a 35cm focal pot with two 20-25cm companions reads well without crowding the floor.
The focal pot earns its place through size, colour or planting. It should be visibly the boldest element, not just slightly bigger. A good focal pot is roughly twice the visual weight of its neighbours. Place it slightly off-centre rather than dead middle, which feels more natural and leaves room for the supporting pots to step down on either side. A clipped box ball, a flowering hydrangea or a tall grass all make strong focal subjects. Browse more ideas in our wider garden design section.
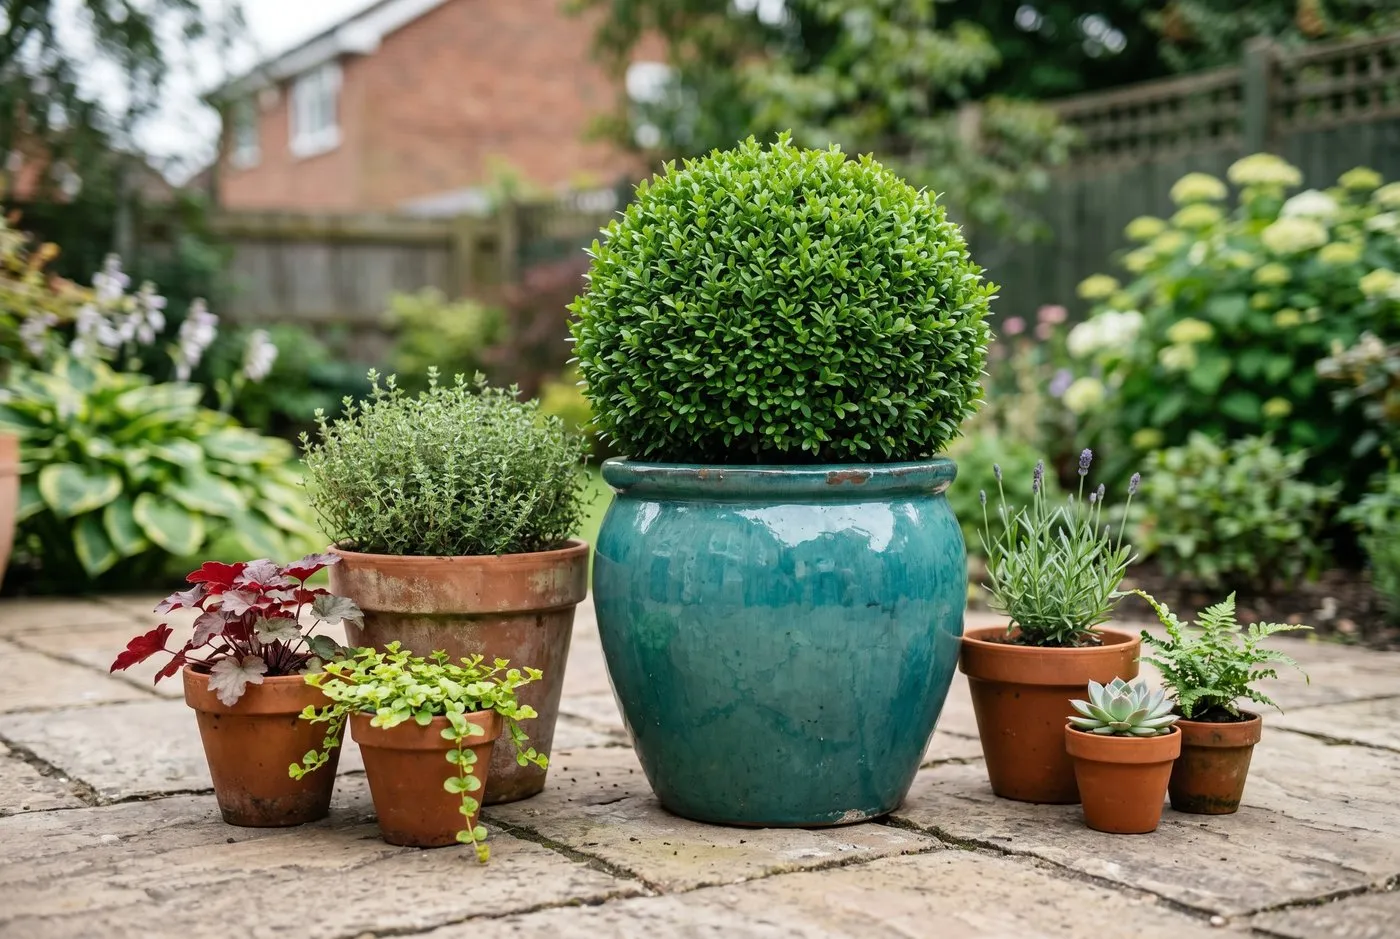 One glazed focal pot, set slightly off-centre and planted with a clipped box ball, anchors the whole group. The terracotta companions step down on either side.
Season-by-season swap calendar for year-round interest
The trick to a group that never looks tired is to swap the seasonal pots while the structural pots stay put. Keep two or three evergreen anchor pots for the bones, and rotate the rest. The calendar below sets out UK timings for what looks good and what to swap in.
| Month | What’s looking good | What to swap in |
|---|---|---|
| January | Evergreen anchors, skimmia, ivy | Pot up forced hyacinths brought from a cold frame |
| February | Snowdrops, early crocus, hellebores | Plant pots of primroses and violas |
| March | Daffodils, muscari, primroses | Sow or buy ranunculus; pot spring bulbs near the front |
| April | Tulips, fritillaria, wallflowers | Harden off pelargoniums under cover |
| May | Late tulips, forget-me-nots, early alliums | Plant summer annuals once frost risk passes |
| June | Pelargoniums, petunias, salvias | Top up trailing lobelia and bidens spillers |
| July | Full summer display, dahlias, cosmos | Deadhead and feed; replace any tired pots |
| August | Late dahlias, grasses, rudbeckia | Pot up autumn crocus and nerines |
| September | Grasses, asters, sedum | Plant spring bulbs deep for next year |
| October | Ornamental kale, cyclamen, berries | Swap summer annuals for violas and heucheras |
| November | Evergreens, cyclamen, seedheads | Add skimmia and gaultheria for berries |
| December | Evergreen anchors, dogwood stems, ivy | Lift in pots of hellebores for winter flower |
The mechanics are simple. When you plant bulbs in autumn, layer them in pots that can slot into the group as the bulbs come up, then lift out once they fade. This bulb-then-annual-then-evergreen cycle is the same logic as a bulb lasagne, but spread across a group of pots rather than stacked in one. For plants that earn their keep all year as anchors, see our list of the best plants for pots year-round.
 Swapping faded tulip pots for summer pelargoniums in late May. The evergreen anchor pots stay put while the seasonal pots rotate through the year.
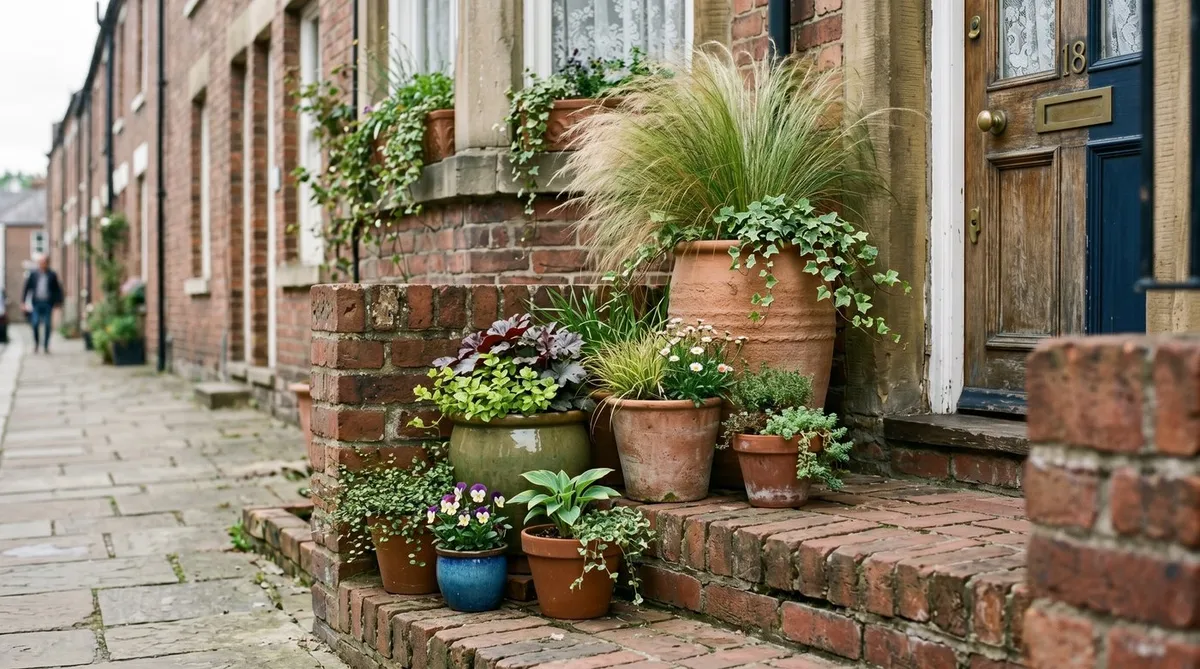
Front door and step displays
A grouped display either side of a front door is the highest-impact potscaping you can do. It is the first thing visitors see and it frames the entrance. The classic arrangement is a matched pair of tall pots flanking the door, then a stepped cluster of three to five smaller pots on the step or path beside them. Symmetry suits a formal door, while an asymmetric cluster on one side suits a cottage or terraced frontage.
On a narrow terraced doorstep, scale matters more than ever. A single 45cm focal pot with two 25cm companions stepped down beside it gives presence without blocking the path. Keep at least 60cm of clear walking width. Evergreen structure earns its place here because the door is on show every day: clipped box, bay, or a neat euonymus holds the frame through winter, with seasonal pots tucked in front for colour. Match the pot material to the house, so warm brick suits terracotta and a painted render suits glazed or zinc.
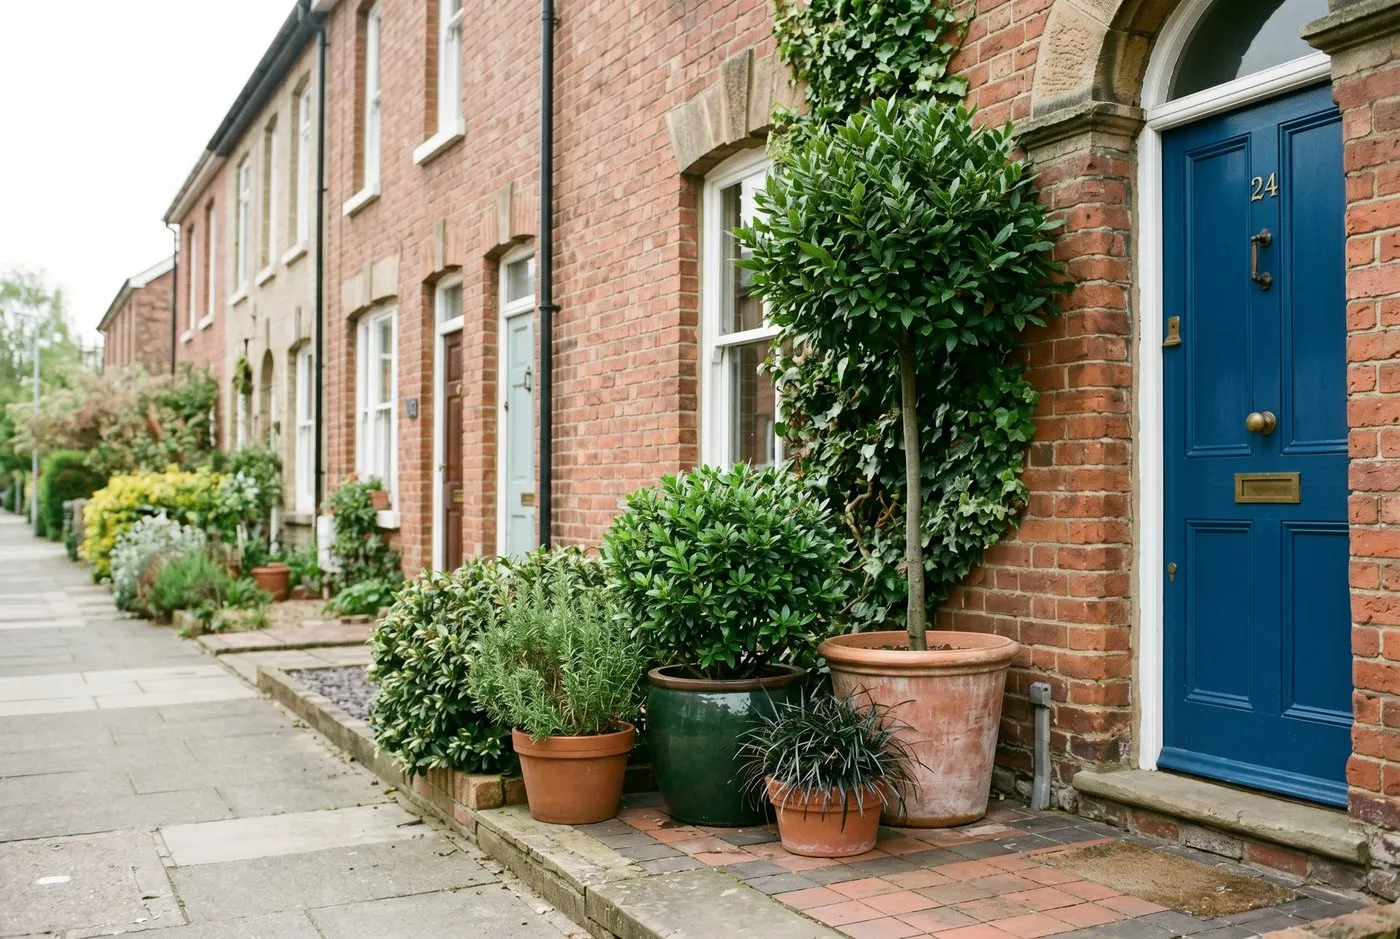 A stepped front-door group on a brick-fronted terrace: one tall bay pot, a medium glazed pot and two low terracotta companions. Evergreen structure keeps it sharp year-round.
Small courtyard and balcony grouping
Small spaces are where potscaping proves its worth. A north-facing courtyard or a city balcony has no room for scattered pots, so a tight, well-scaled group is the only way to get impact. The rules tighten on a balcony. Weight is the first limit. Check your balcony’s load rating and lean on lightweight fibreclay and recycled plastic rather than stone or heavy glazed pots. Wet compost is heavy, so a 40cm pot of soaked compost can top 25kg.
Group against a wall or in a corner to shelter plants from wind, which strips moisture fast at height. A vertical group, with a tall pot at the back and low pots stepping forward, makes the most of a narrow footprint. In a shaded courtyard, lean on foliage that thrives in low light: ferns, hostas, heucheras and Japanese forest grass. Pale pots and variegated leaves lift a dark corner. For a full courtyard and balcony plant list, see our guide to balcony gardening ideas. A trough of low alpines can sit in the group too, as covered in our alpine container display guide.
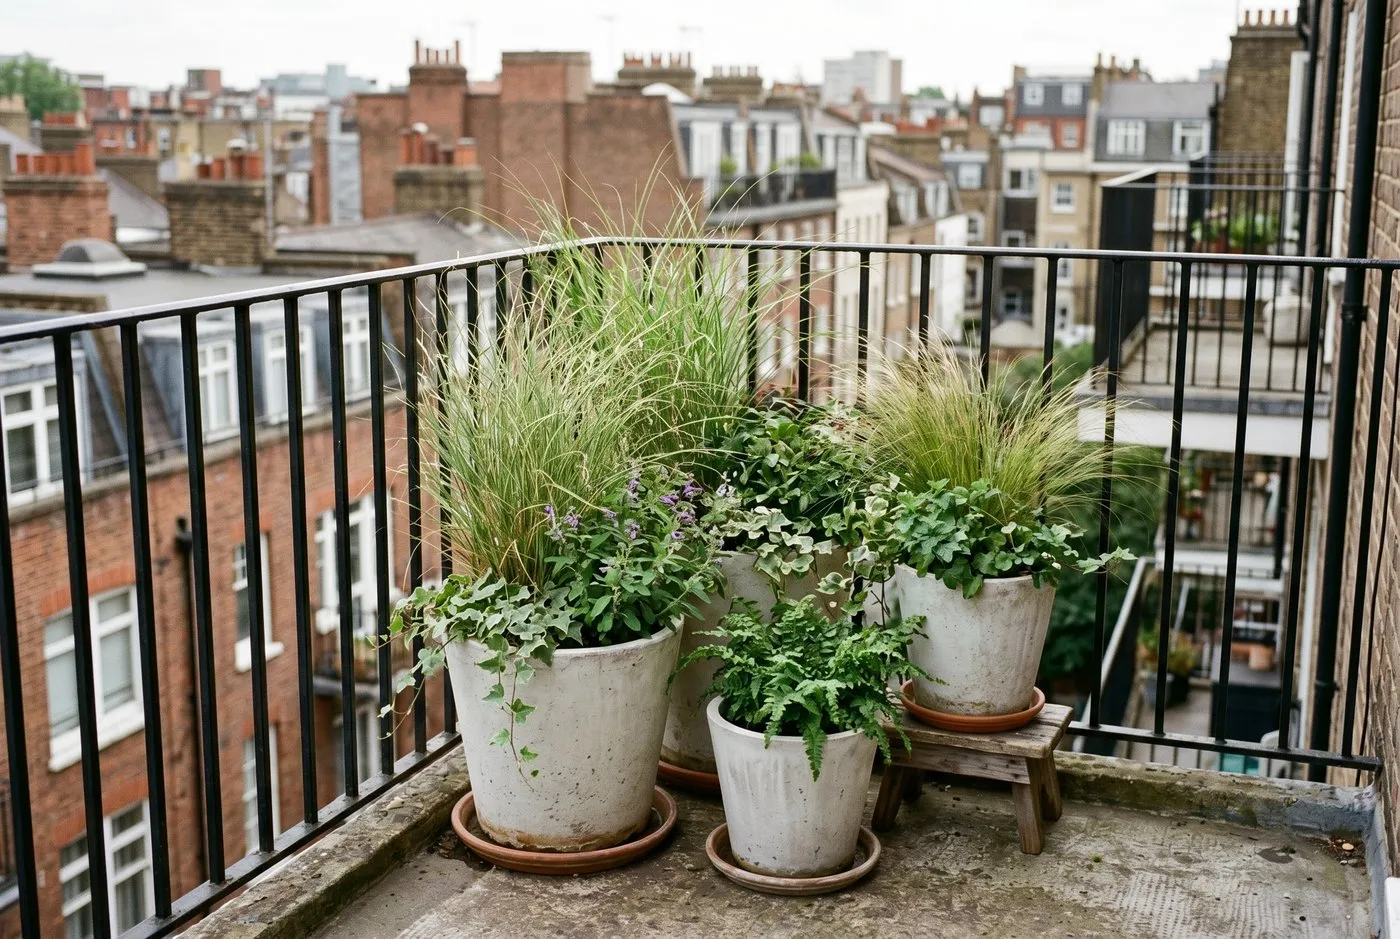 A corner group on a city balcony using lightweight fibreclay pots. Grouping against the wall shelters the plants from wind and keeps the load over the strongest part of the floor.
Watering logistics of a tight cluster
A tight cluster changes how you water, mostly for the better. The pots shade each other’s sides and trap a pocket of humid air in the gaps, so compost dries more slowly than it does in an exposed single pot. That microclimate is why our grouped pots needed watering every third day in July against daily for the scattered set. You can lean on this by packing the pots close, leaving just enough room to reach in.
The catch is drainage. A packed group can hold a lot of water after heavy rain, and the inner pots can sit soggy where you cannot see them. Every pot must have clear drainage holes and free-draining compost with added grit. Check the centre pots after a wet spell by lifting one to feel its weight. Water at the base, not over the foliage, and in summer a single soak in the early morning beats a light splash. A long-spout can is worth its money for reaching the back of a deep group.
Pot feet and risers
Raising every pot on feet or risers is the most important winter job and a quiet help all year. Feet lift the base 2-4cm so water drains away instead of pooling under the pot. In a tight group the floor stays wetter for longer, so unraised pots sit in a film of water that rots roots and breeds slugs. Over one Staffordshire winter, four of twelve unraised terracotta pots cracked when trapped water froze, while every raised pot came through clean. Use proper terracotta or rubber feet, or improvise with offcuts of slate or tile. Three feet per pot is more stable than four on uneven ground.
Root cause: why most container displays look bland or cluttered
Most disappointing pot displays fail for one of two opposite reasons, and both trace back to the same root cause: no plan for height and materials. A bland display happens when every pot is the same height and the group sits flat, with nothing for the eye to land on. A cluttered display happens when too many materials, colours and shapes pile up with no repeating element to tie them together. One is too uniform, the other too random, but neither was composed.
The permanent fix is to design the group as one unit before you buy or plant a thing. Decide your three heights first and build the steps with risers if your pots do not provide them. Then pick one material or one glaze colour to repeat across the cluster, and allow exactly one statement pot to break that repetition as the focal point. Height variation plus controlled repetition is the formula. Get those two right and a group of cheap pots outperforms a scatter of expensive ones. The same diagnosis applies across container schemes; we cover related slip-ups in the biggest garden design mistakes.
Why we recommend pot feet: We trialled terracotta pot feet against bare paving across one full Staffordshire winter, 2023-2024. Twelve identical 35cm terracotta pots, six raised on three feet each and six left flat on the slabs. After two hard frosts, four of the six unraised pots cracked at the base where trapped water had frozen. All six raised pots survived intact. At roughly £6-£10 a set, feet are the cheapest frost insurance you can buy for a grouped display.
Common mistakes when grouping pots
A few repeat errors undo otherwise good potscaping. Fix these and the group looks designed straight away.
Using even numbers of pots. Two or four pots pair off and split the group visually. Stick to three, five or seven so the cluster reads as one shape. If you own four pots, add a fifth small one or move one to another spot.
Mixing too many materials. Three or more materials in one group looks busy and accidental. Limit yourself to one material, or two unified by a single glaze colour. Save variety for the planting, not the pots.
Leaving every pot the same height. A flat group is the most common reason a display looks dull. Build at least three height levels with plinths or upturned pots so the cluster has a peak.
Gardener’s tip: Photograph your group on your phone before committing. The camera flattens the scene and shows up problems your eye glosses over, like a missing height step or a pot that breaks the colour scheme. I do this with every client group before the plants go in.
Warning: A tight cluster can trap water and waterlog the inner pots, and standing water that freezes will crack terracotta. Always raise pots on feet, use free-draining gritty compost, and check the centre pots for weight after heavy rain. Frost-proof grade terracotta plus good drainage is the only reliable defence over a UK winter.
Overwintering a group of pots
Overwintering is where a year of potscaping is won or lost. The threats are frozen roots, cracked pots and waterlogged compost, and all three are manageable. First, raise every pot on feet so winter rain drains away rather than pooling and freezing. This single step saves more pots than any amount of fleece.
Next, regroup for shelter. Move the group against a south or west-facing wall, which radiates stored warmth overnight and lifts the local temperature by a degree or two. Cluster frost-hardy pots together to shelter each other, and bring genuinely tender pots, such as pelargoniums or agapanthus, under cover or into a porch. Wrap vulnerable terracotta and large evergreen specimens in horticultural fleece or hessian during hard frosts, leaving the top open so air still moves. Ease off watering through winter; most pots need only an occasional drink in mild dry spells. The aim is barely moist compost, never wet. Come spring, top-dress with fresh compost and the group is ready to grow on.
Frequently asked questions
What is potscaping?
Potscaping is grouping pots into a styled cluster rather than dotting single planters around. You arrange three to seven pots at varying heights, repeat a material or colour for cohesion, and set one statement pot as the focal point. The group is designed as one composition, the way a border is designed, so it reads as deliberate rather than random.
Why do odd numbers of pots look better?
Odd numbers stop the eye settling and feel natural. Groups of three, five or seven create a triangle or staggered shape that the eye reads as one unit. Even numbers tend to pair off and split into two halves, which looks static. The rule comes from classic planting design and applies to pots the same way it applies to shrubs in a border.
How many pots should I group together?
Start with three pots for a small space and five for a patio. Three is the minimum for a proper cluster, with one tall, one medium and one low pot. Five lets you add a second tall accent and more spillers. Seven suits a large doorstep or courtyard. Keep the whole group spanning 60-90cm so it stays a single display.
Can I group pots of different materials?
Yes, but limit yourself to two materials at most. Too many materials look cluttered and fight each other. A reliable trick is to repeat one element across the cluster, such as all terracotta in different shapes, or mixed materials unified by one glaze colour. One statement pot in a contrasting material can work as the focal point if everything else stays consistent.
Do grouped pots need more or less watering?
Grouped pots usually need less watering than scattered ones. A tight cluster shades each pot’s sides and traps humidity in the gaps, so compost dries more slowly. In our Staffordshire trials, clustered pots needed watering every third day in July while scattered pots needed it daily. Check drainage though, as a packed group can sit waterlogged after heavy rain.
How do I overwinter a group of pots?
Raise every pot on feet or risers before winter so water drains freely. Move tender pots against a south or west wall for warmth, and group frost-hardy pots together for shelter. Wrap vulnerable terracotta or large specimens in fleece or hessian. Standing water that freezes inside a pot is what cracks it, so drainage matters more than the cold itself.
Potscaping costs nothing extra beyond pots you may already own. Pull your single planters together this weekend, build three height levels, pick one material to repeat and one pot to lead. Start with the season-by-season swap calendar above, keep two evergreen anchors for the bones, and you will have a grouped display that earns its keep every month of the year.
Lawrie has been gardening in the West Midlands for over 30 years. He grows his own veg using no-dig methods, keeps a wildlife-friendly garden, and writes practical advice based on real UK growing conditions.