Key takeaways
- Lay hedges between November and early March, never in the bird nesting season from 1 March to 31 August
- Part-cut each pleacher three-quarters through, leaving a 10 to 20mm living hinge so the stem stays alive
- Bend pleachers over to 60 to 70 degrees from upright, always laying uphill so sap keeps rising
- Drive stakes 45 to 50cm apart, then weave hazel or willow binders along the top to lock the hedge
- Hawthorn and blackthorn are the two most reliable species to lay; brittle stems above 100mm need a saw
- A well-laid hedge thickens from the base and needs re-laying only every 10 to 20 years
What hedgelaying actually is
Hedgelaying is a way of managing a hedge by cutting most of the way through each upright stem and laying it over at an angle. The part-cut stems are called pleachers, sometimes plashers. The trick is that a pleacher is never cut off. A thin strip of bark and living wood, the hinge, keeps it attached to the stool and alive.
Laid over and woven together, the pleachers form a low, dense wall of living wood. Vertical stakes hold them in place, and flexible rods called binders, heathers or etherings are woven along the top to lock the line. The whole structure is bound tight enough to lean on.
The point is renewal. A hedge left to grow reaches for the light and goes bare and woody at the base. Laying forces fresh growth from the bottom of each stool. Within a year the hedge thickens from ground level up, exactly where a stock barrier needs to be solid. It is the same principle behind pollarding and coppicing: hard cutting drives vigorous regrowth.
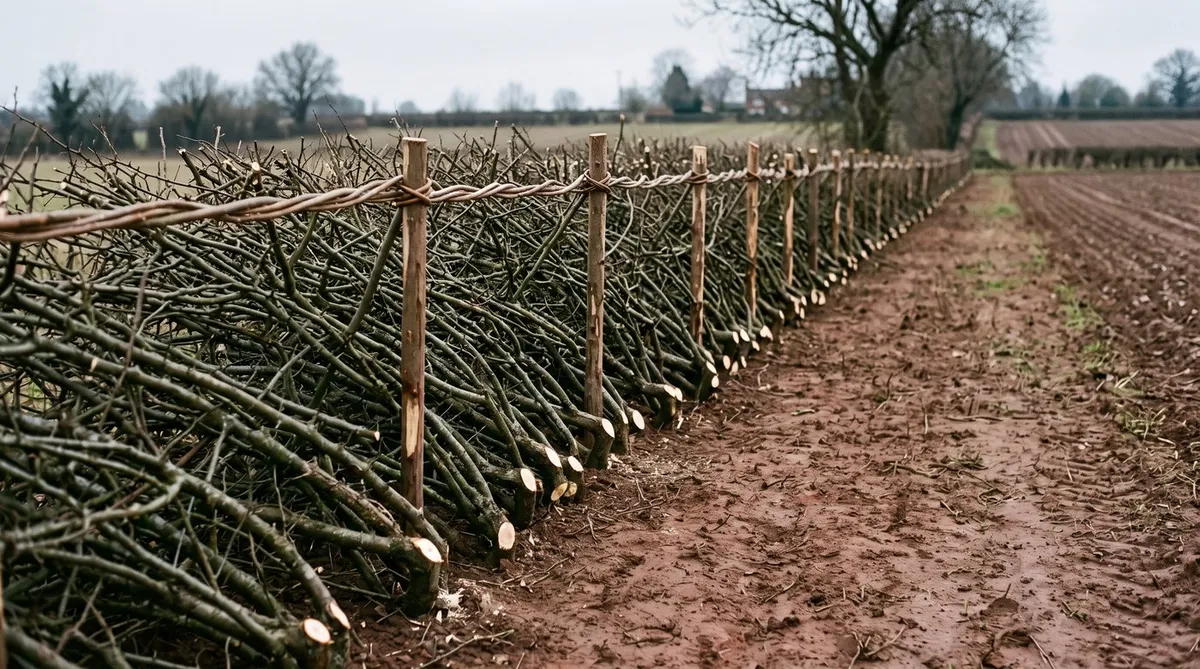
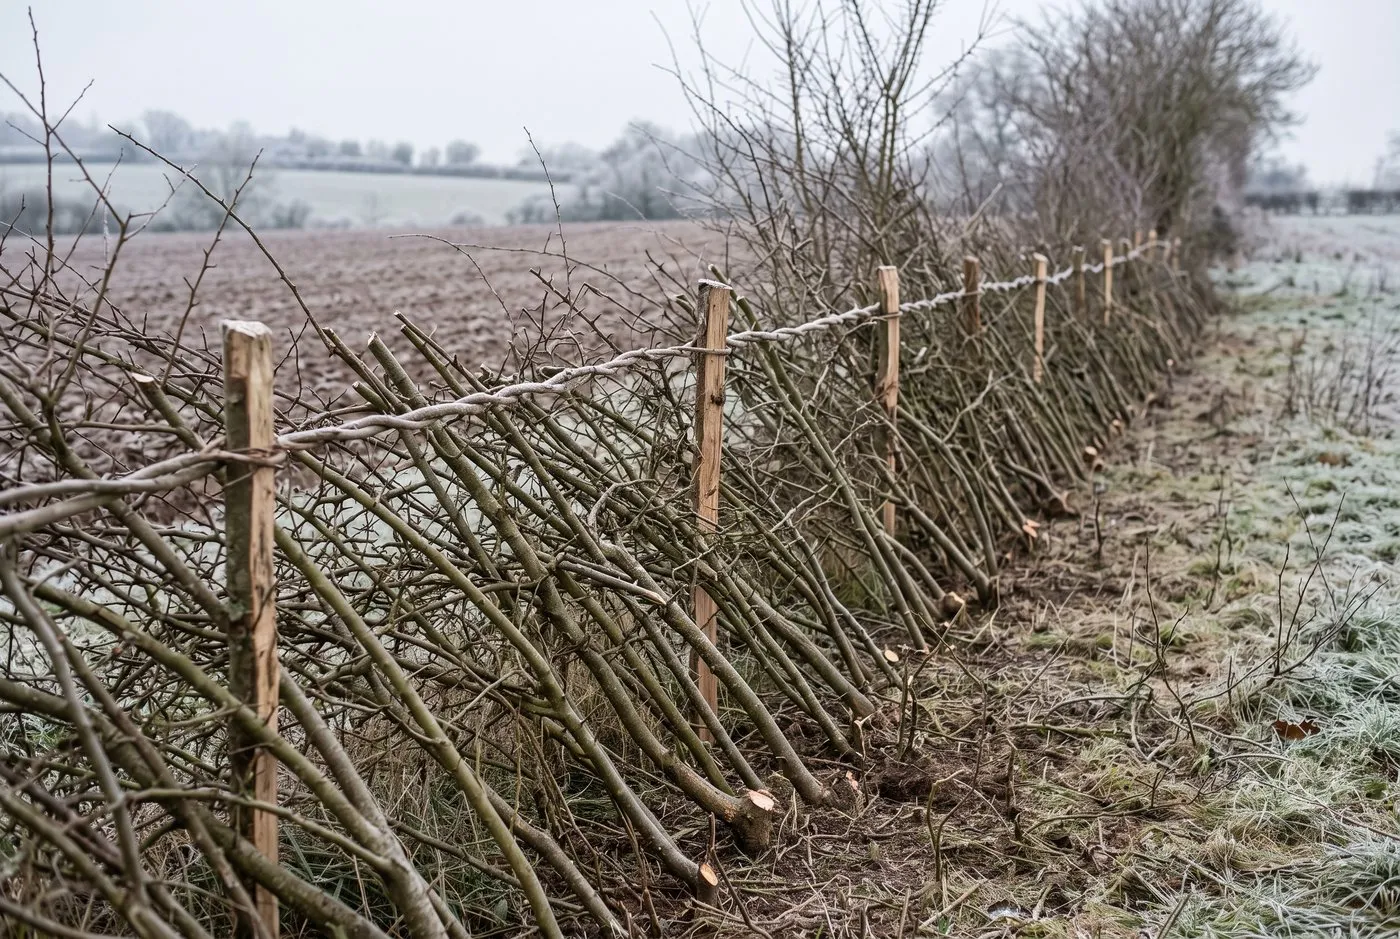 A finished Midland-style hedge on a rural field boundary. The pleachers lie over the stakes, bound with hazel along the top, ready to reshoot from the base in spring.
How a laid hedge stays alive and regrows
Understanding why a laid pleacher survives makes every cut obvious. A hedge stem carries water and sugars in a thin layer just under the bark. Leave enough of that layer intact and the stem lives on, even lying at 65 degrees. The process runs in four stages.
- The cut and the hinge, day one. You cut three-quarters through the stem at ankle height, leaving 10 to 20mm of living sapwood. Too thin and the pleacher dies or snaps. Too thick and it will not bend over.
- Winter shock, weeks one to twelve. The laid stem sits dormant. Sap is down below 5C, so there is no active growth and little bleeding from the wound. This is why we only lay from November to early March.
- Spring reshoot, March to May. As soil warms past about 7C, dormant buds along the laid stem and around the stool wake up. New shoots push straight up from the base of every pleacher.
- Summer thickening, June onwards. Those base shoots harden into next year’s structure. On our hedge they reach 60 to 90cm in the first summer. Within three years the base is a solid thicket.
The critical mistake is cutting the hinge too high or too thin. People new to it cut at knee height to save their backs. That leaves an ugly stub and a hinge under strain, and the pleacher often snaps or dies back. Cut low, cut fat, and lay gently.
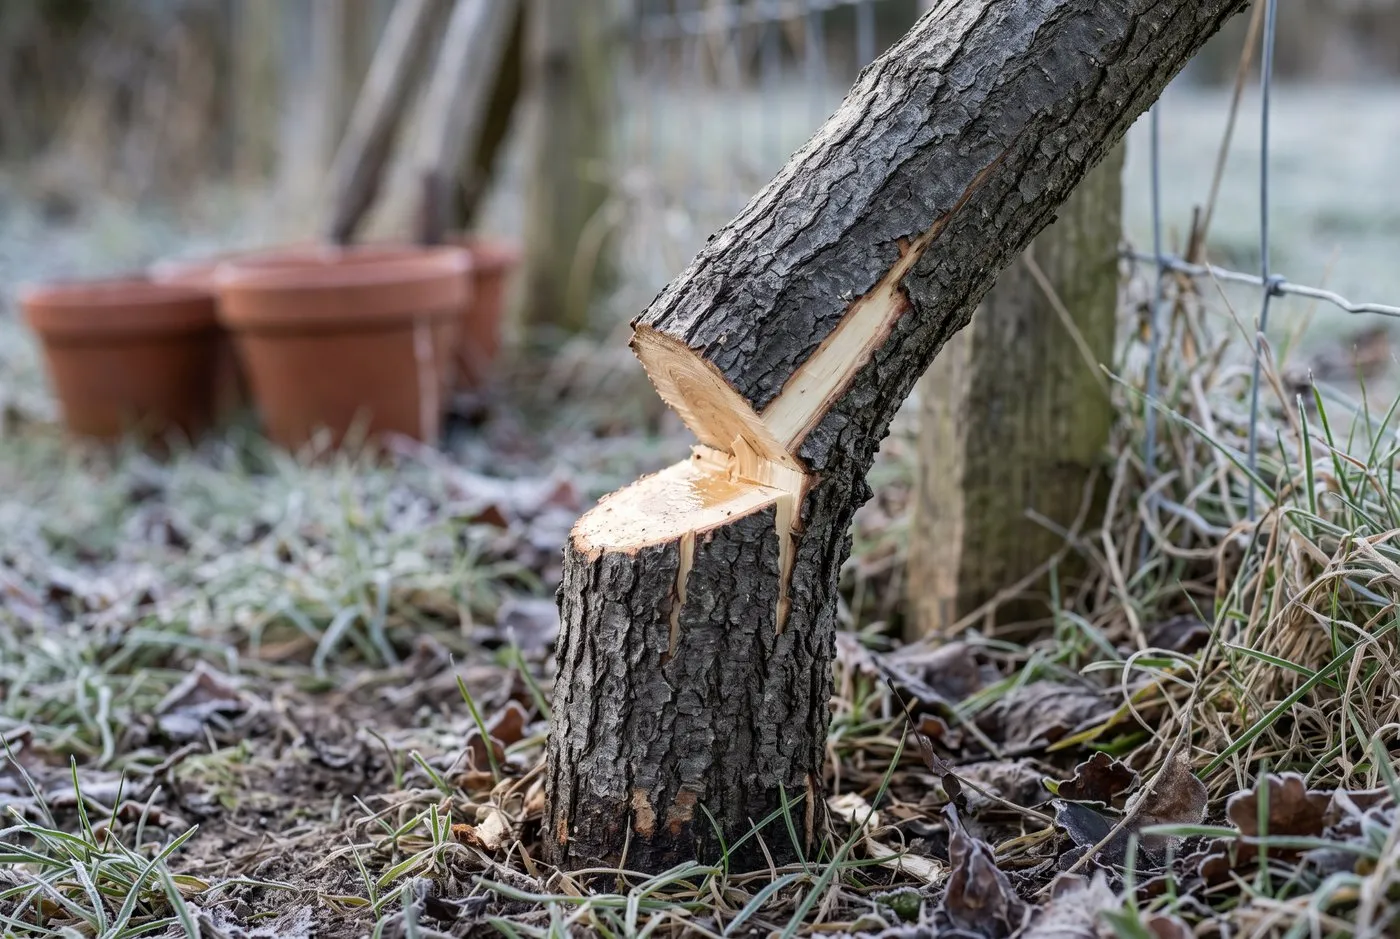 The hinge is everything. This pleacher was cut three-quarters through, leaving a strip of living sapwood that keeps the laid stem fed.
When to lay a hedge in the UK
Lay hedges in winter, from November to early March, while the plant is fully dormant. The sap is down, the wood cuts cleanly, and the pleachers survive the shock. Laying in leaf, during the growing season, kills far more stems and bleeds sap from every wound.
There is a legal reason to stop by spring too. Cutting or laying a hedge during the bird nesting season, 1 March to 31 August, risks destroying active nests, an offence under the Wildlife and Countryside Act 1981. We always finish by the last week of February. For the wider rules on hedge cutting dates, see our guide on when to cut hedges in the UK and the legal dates.
Pick a frost-free, dry day where you can. Frozen wood is brittle and splits badly at the hinge, and driving stakes into frozen ground is miserable work. A still, grey January day at 3 to 6C is close to ideal. Avoid the hard frosts and the sodden spells after heavy rain.
Gardener’s tip: Do not wait for the perfect week. A hedge laid on an average damp January day takes just as well as one laid in bright sun. What matters far more is that you finish before the birds start nesting and before the sap rises in March.
The best species for laying, ranked
Not every hedge lays well. The classic laying hedge is hawthorn (Crataegus monogyna), and for good reason. It is thorny, vigorous, and reshoots hard from the base after cutting. Our full guide to growing hawthorn covers why it is the backbone of the British field hedge.
Blackthorn, hazel and field maple all lay well too. Some species are poor: brittle, hollow, or reluctant to reshoot. The table below ranks the common hedge species by how reliably they lay, based on our own hedge and years of watching others locally.
| Species | Regrowth after laying | Role in the hedge | Laying reliability |
|---|---|---|---|
| Hawthorn (Crataegus monogyna) | Very vigorous, reshoots hard | Backbone, stock-proof and thorny | 1st, gold standard |
| Blackthorn (Prunus spinosa) | Vigorous, suckers freely | Dense thorny infill, sloes for wildlife | 2nd |
| Hazel (Corylus avellana) | Strong, coppices well | Bulk and body, plus stakes and binders | 3rd |
| Field maple (Acer campestre) | Good, steady regrowth | Height and autumn colour | 4th |
| Hornbeam (Carpinus betulus) | Moderate, holds leaf | Structure on clay, winter cover | 5th |
| Holly (Ilex aquifolium) | Slow but reliable | Evergreen cover, tough | 6th |
| Elder (Sambucus nigra) | Brittle, hollow, snaps | Poor, remove or coppice instead | Not suitable |
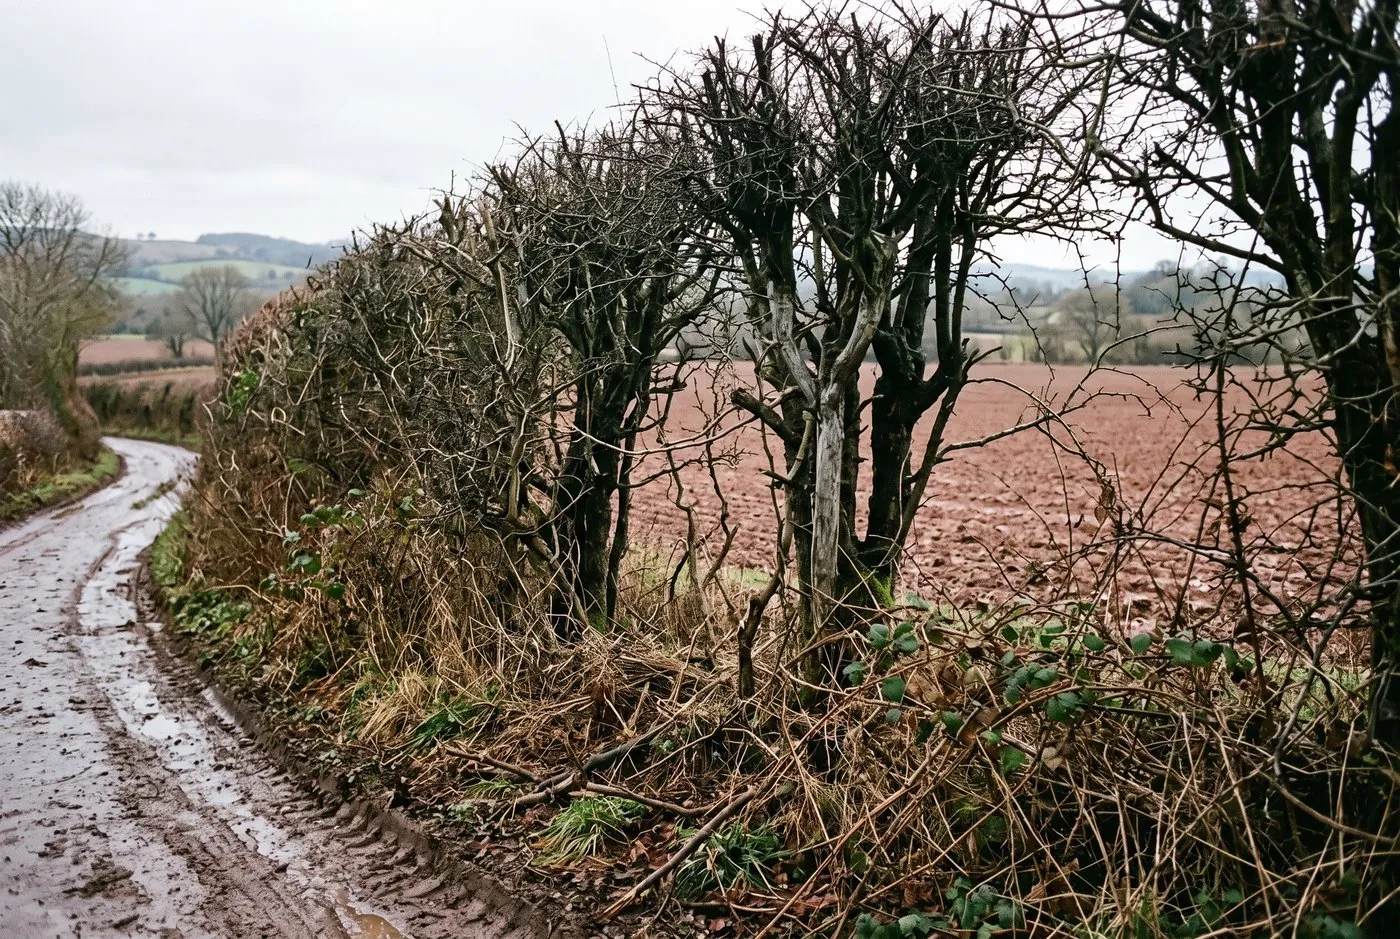 A mixed hawthorn and blackthorn boundary along a country lane. Tall and bare at the bottom, this is exactly the kind of hedge that laying renews.
Regional hedgelaying styles compared
There are roughly 30 recognised regional styles in Britain, each shaped by the local farming and the stock it had to hold. Four styles cover most of what you will see.
Midland or Bullock style
Devon style
The Devon style is laid on top of an earth bank, often 1.2m or more high. Pleachers are laid steeply and pinned with short crooks or spars rather than tall stakes. Cornish and Welsh bank hedges follow the same idea. On the bank, the hedge doubles as a windbreak and a boundary in one.
Welsh border and upland styles
The Welsh border style uses double brushing, with pleachers laid so brush shows on both faces. Upland styles from Lancashire and Westmorland are laid low for hardy sheep, often with no binders at all, relying on tight stakes and a dead-hedged top. Each style is a local answer to a local animal.
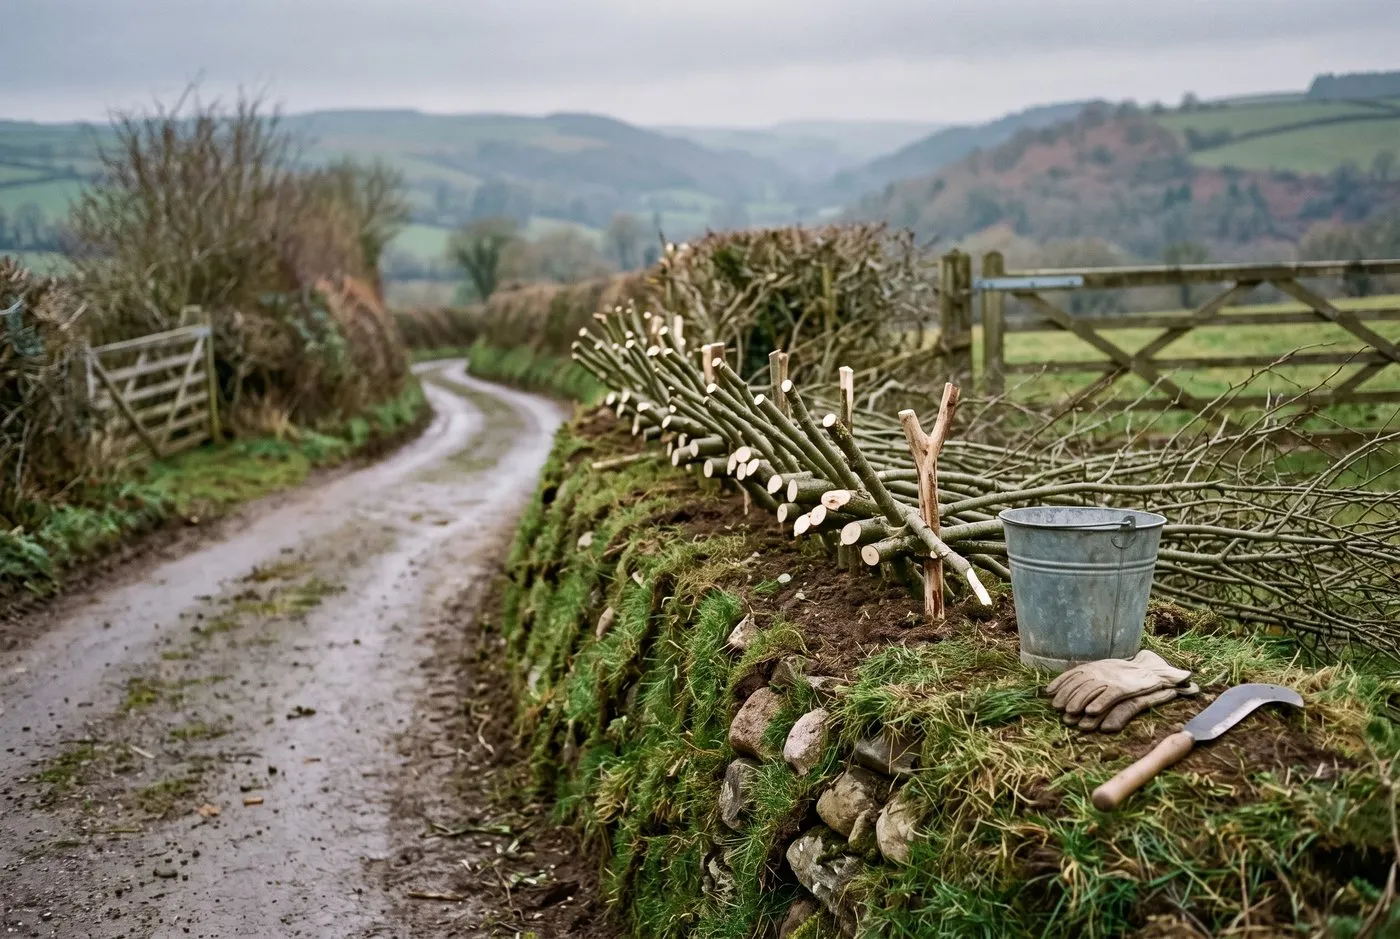 The Devon style is laid on a turf-faced earth bank. Short crooks pin the pleachers, and the bank itself does much of the stock-proofing work.
The tools you need for hedgelaying
The one tool you cannot do without is a billhook. This is a heavy curved blade, usually 1 to 1.4kg, used to cut and shape pleachers. Regional billhook patterns vary, from the single-edged Yorkshire to the double-edged Newtown. A sharp billhook cuts a pleacher in two or three strokes.
For thicker stems above about 80 to 100mm, a chainsaw or a bowsaw saves your arm and gives a cleaner hinge. Add loppers for tidying, and a mell or beetle, a heavy wooden mallet, for driving stakes without splitting them. Wear thornproof gauntlets, because hawthorn and blackthorn punish bare hands.
You also need the timber. Stakes are traditionally sweet chestnut, ash or hazel, about 1.5m long and 40 to 60mm thick. Binders, the long whippy rods woven along the top, are best cut from hazel or willow, 2 to 3m long. Many layers grow their own: our guide to growing hazel and cobnut shows how a small coppiced stool keeps you in stakes and binders for free.
Warning: A billhook is razor-sharp and swung towards your own body. Always cut with your free hand and body out of the arc, never above your knee, and keep a first-aid kit on site. A slip into the shin or thigh is the classic hedgelaying injury.
How to lay a hedge step by step
- Clear out the bottom. Cut away brambles, ivy, dead wood and any old stock wire. You need a clear view of every stem base.
- Select and thin the stems. Keep the straight, healthy pleachers between 20 and 90mm thick. Remove weak, dead or crossing stems so the keepers have room to lie.
- Cut each pleacher low. Cut on the uphill side, at ankle height, three-quarters through at a shallow angle. Leave a 10 to 20mm hinge of living wood.
- Lay it over. Bend the pleacher down to 60 to 70 degrees from upright, laying uphill so sap keeps rising. Lay each one onto the last, all facing the same way.
- Trim the heel. Pare the standing stub flush and clean so it sheds water and does not rot back into the stool.
- Drive the stakes. Knock stakes in vertically, 45 to 50cm apart, along the line of the hedge, using the mell.
- Weave the binders. Twist hazel or willow binders in a figure of eight between the stake tops. This ties the whole hedge into one rigid unit.
- Trim and tidy. Cut the stakes and binders level, clear the brash, and rake the base clean. The hedge is laid.
A fit, practised layer manages 10 to 20m a day. At competitions the standard length is a chain, 22 yards or 20.1m, laid in about four to five hours. Your first attempt will be far slower, and that is normal. Take your time on the cut.
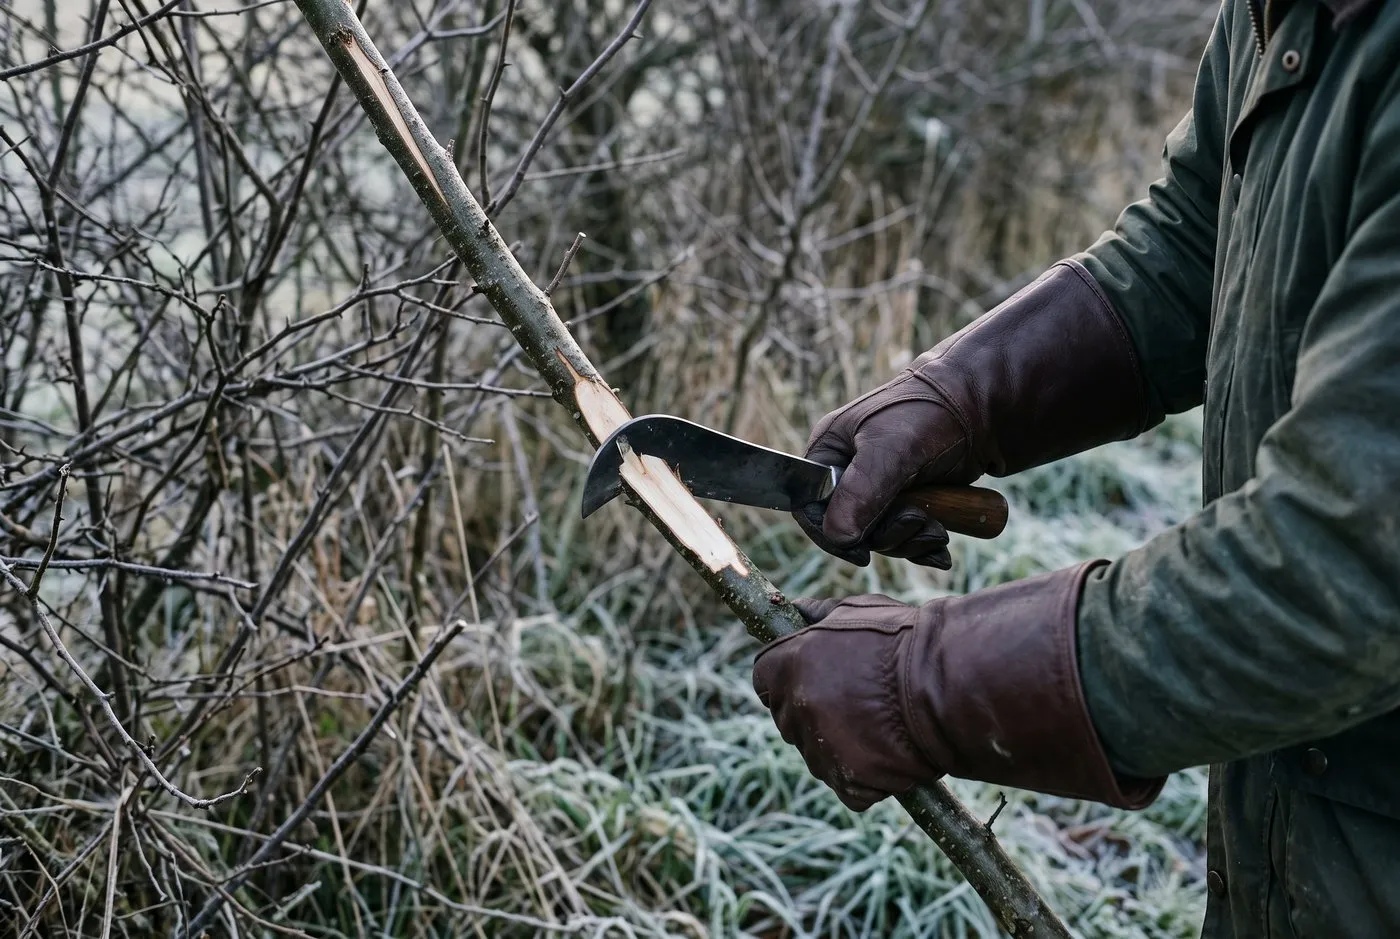 Cutting a pleacher low and clean with a billhook. Keep the free hand clear of the blade and cut on the uphill side of the stem.
The lesson took us three winters to learn. A chainsaw is a felling tool, not a laying tool. It is quick, but the ragged cut it leaves is exactly what kills a thin pleacher. The billhook is slower and gives the smooth, angled hinge the living stem needs.
Aftercare and the re-laying cycle
A newly laid hedge needs almost nothing in its first year. Do not trim it. Let every base shoot grow, because those shoots are the future hedge. On our Staffordshire hedge the first summer’s growth reached 60 to 90cm, and by the second year the base was already dense.
From year two, trim lightly each winter to shape it and thicken it further. Cut a little higher and wider each time, building an A-shaped profile that is broad at the base. A hedge kept this way stays stock-proof and full for years. This gentle trimming is what fixes the root cause of a gappy hedge: annual flailing to the exact same height starves the base of light and hollows it out. Laying, then trimming on a rising profile, keeps the bottom in growth.
Re-lay the whole hedge every 10 to 20 years, when it has grown tall and started to open at the base again. Some upland hedges go 25 years between layings, some hard-grazed lowland ones nearer 10. You are on a long, slow rotation, the same one that has kept British hedges alive for centuries.
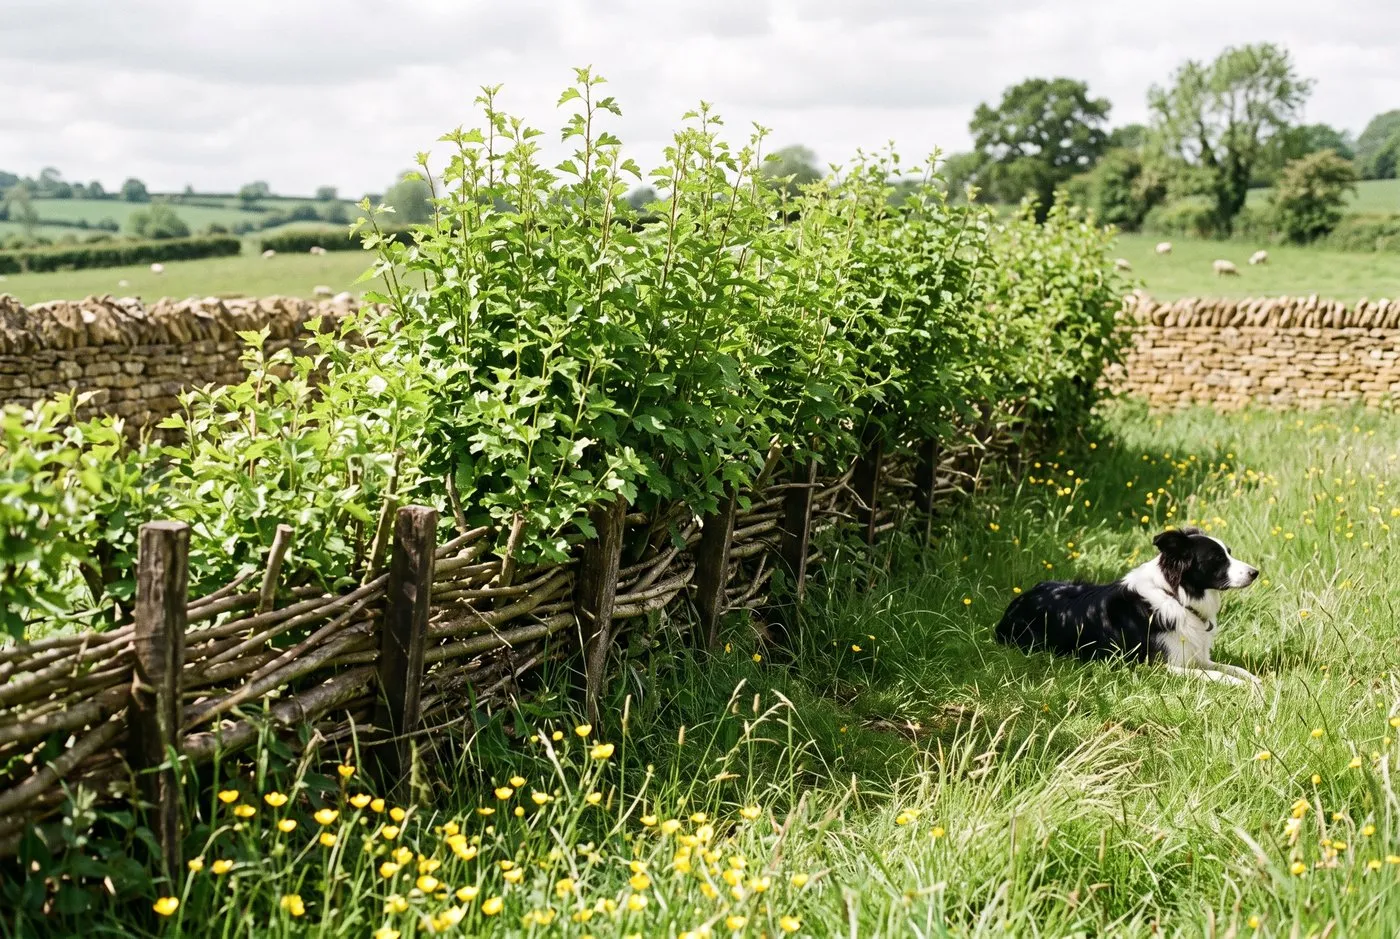 The same hedge one growing season later. Fresh shoots have risen 60 to 90cm from every laid stool, thickening the base exactly where a stock hedge needs to be solid.
What hedgelaying does for wildlife
A laid hedge is one of the best wildlife habitats a farm or large garden can hold. The dense, low structure gives nesting cover that a thin, flailed hedge never does. Yellowhammers, whitethroats and dunnocks nest deep in the thorny base, safe from predators.
The value runs through the year. Spring blossom on hawthorn and blackthorn feeds early bees and hoverflies. Autumn haws and sloes feed thrushes, redwings and fieldfares through winter. At ground level, the tangle of stems and leaf litter shelters hedgehogs, and a laid hedge sits perfectly alongside a hedgehog highway linking gardens. Conservation bodies estimate hedges support up to 80 percent of our woodland birds and half of our mammals. The Wildlife Trusts rate well-managed hedges among the richest habitats in the wider countryside.
There is a craft body behind all this too. The National Hedgelaying Society, formed in 1978, runs the annual National Hedgelaying Championships and keeps the regional styles alive. Their competitions rotate around the country and draw hundreds of layers each year.
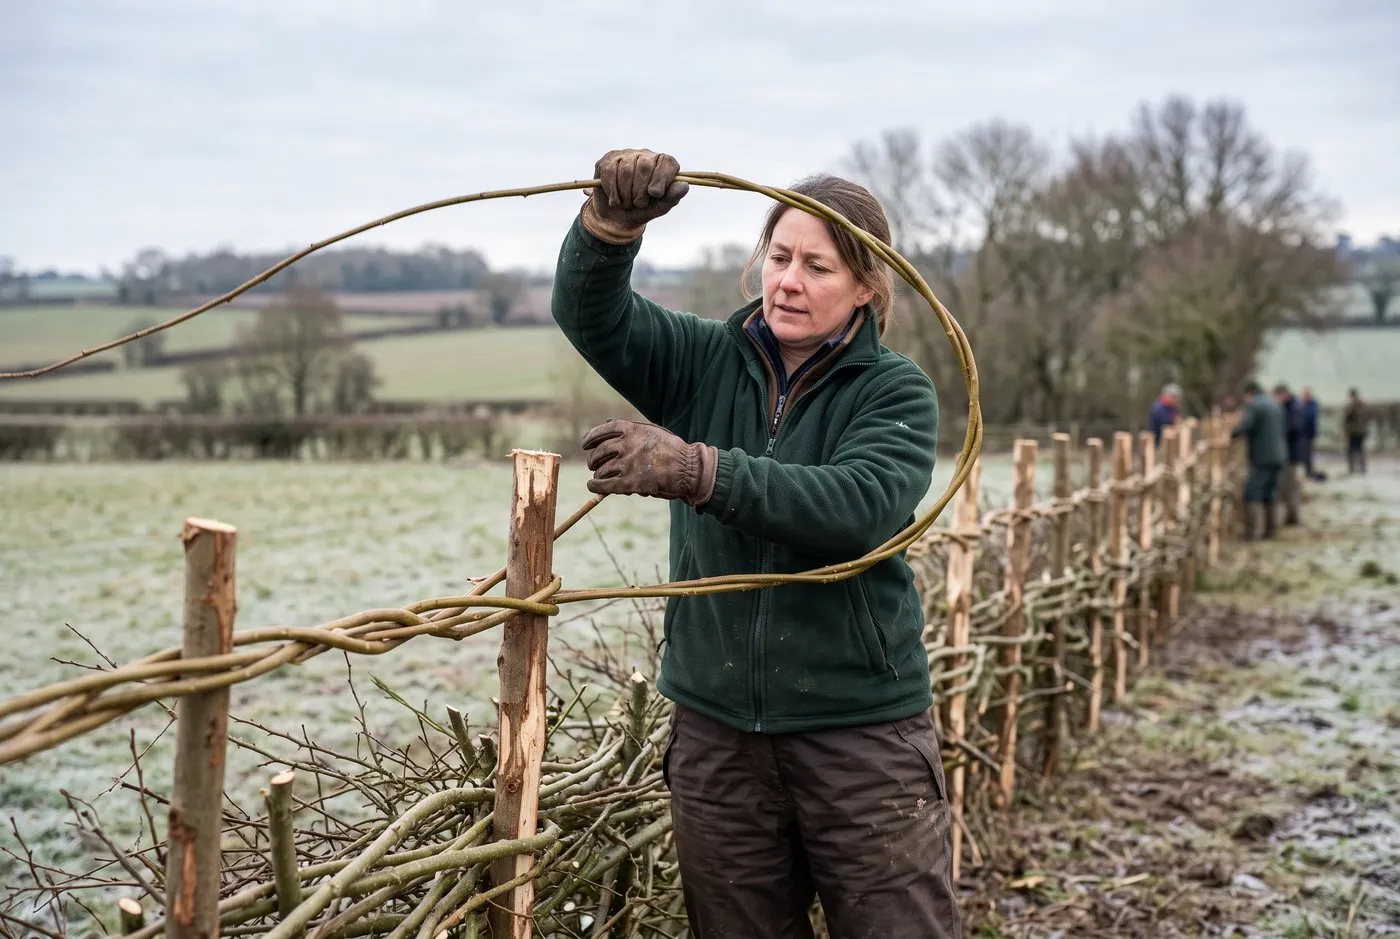 Weaving hazel binders along the stake tops on a hedgelaying course. The binders lock the pleachers and stakes into one rigid, living line.
Month-by-month hedgelaying and hedge-care calendar
| Month | Task |
|---|---|
| January | Prime laying month. Lay on frost-free days. Cut your own stakes and binders from coppiced hazel. |
| February | Finish all laying by late February, before sap rises. Drive any loose stakes and tidy binders. |
| March | Stop laying. Nesting season begins on the 1st. Leave new hedges completely alone to reshoot. |
| April | Watch laid pleachers for base shoots breaking. Do not trim or disturb. Fill obvious gaps by planting whips. |
| May | Base shoots growing fast. Keep stock off newly laid hedges until the growth toughens. |
| June | Peak regrowth. Measure your take: healthy laid hedges throw shoots 60 to 90cm this month. |
| July | Leave hedges to grow. Nesting birds still active. Note which pleachers failed for next winter’s plan. |
| August | Nesting season ends on the 31st. Still no cutting on wildlife hedges until growth slows. |
| September | Plan the coming winter’s length. Source chestnut stakes if you cannot cut your own. |
| October | Clear the hedge bottom of brambles and wire ahead of laying. Cut and season binders now. |
| November | Laying season opens. Start on established hawthorn hedges over 3m tall and gappy at the base. |
| December | Lay on dry, still days. Keep the billhook sharp. Stack brash for wildlife log and dead-hedge piles. |
Common mistakes when laying a hedge
- Cutting the pleacher too high. Cutting at knee height to save your back leaves a tall stub and a strained hinge. Pleachers snap or die back. Cut low, at ankle height, so the new growth rises from the base.
- Making the hinge too thin. A hinge under 10mm cannot carry enough sap and the stem dies. Aim for 10 to 20mm of clean living wood. On our first eight cuts we went too thin and lost five pleachers.
- Laying downhill. On a slope, laying downhill lets sap drain away from the stem and it starves. Always lay uphill, so sap keeps rising through the hinge.
- Laying too flat. A pleacher pressed near horizontal loses vigour. Keep it at 60 to 70 degrees from upright so it stays alive and pushes strong new shoots.
- Working in the wrong season. Laying in leaf, or during the nesting season, kills stems and breaks the law. Stick to the November to February window.
Frequently asked questions
What is hedgelaying?
Hedgelaying is part-cutting hedge stems and bending them over into a living fence. The cut stems, called pleachers, stay alive through a thin hinge of wood. They are woven between stakes and thicken from the base, forming a dense stock-proof barrier that also shelters wildlife.
When should you lay a hedge in the UK?
Lay hedges between November and early March, during winter dormancy. The sap is down and the plant is not in active growth, so the cut pleachers survive. Never lay during the bird nesting season, 1 March to 31 August, which is protected under the Wildlife and Countryside Act 1981. Frost-free, dry days are easiest to work.
What angle do you lay pleachers at?
Lay pleachers at 60 to 70 degrees from upright, not flat. A near-horizontal stem loses vigour and may die back. Always lay uphill on a slope, so sap continues to rise through the hinge into the stem and feeds the new growth.
Which is the best hedge to lay?
Hawthorn is the best and most widely laid hedge in the UK. It is vigorous, thorny, and reshoots reliably from the base after cutting. Blackthorn, hazel and field maple also lay well. Brittle or hollow-stemmed species such as elder are poor. A mixed native hedge of hawthorn and blackthorn is ideal.
How often do you need to re-lay a hedge?
Re-lay a hedge every 10 to 20 years, depending on growth rate. Between layings you trim it lightly to keep it dense. Left uncut, a hedge grows tall and gappy at the base within 15 to 20 years, at which point laying it again renews it from the ground up.
What tools do you need for hedgelaying?
The core tool is a billhook, a heavy curved blade for cutting pleachers. Add a chainsaw or bowsaw for thicker stems, loppers for tidying, and a mell or beetle for driving stakes. You also need chestnut or hazel stakes, long binders, and thornproof gauntlets to protect your hands.
Is hedgelaying good for wildlife?
Yes, a laid hedge is far richer for wildlife than a flailed one. The dense base gives nesting cover for birds like yellowhammers and whitethroats, and safe runs for hedgehogs and dormice. Blossom feeds pollinators in spring and haws and sloes feed birds in winter. Hedges support up to 80 percent of our woodland birds.
Now you know how to lay a hedge by hand, plan your boundary properly first with our hedge planting guide for the UK. You can also browse more of our how-to guides for the seasonal jobs that keep a hedge dense and healthy between layings.
Our team produces practical UK gardening guidance from source research, contributor records and established horticultural practice. Editorial standards are overseen by Matt W.