Install a Water Butt: The DIY Weekend Job
How to install a water butt in the UK. Fit a diverter kit, raise the tap on a plinth, and collect free rainwater from any house or shed downpipe.
Key takeaways
- A roof collects roughly 1 litre per m2 per 1mm of rain, so a 30m2 house roof yields 3,000 litres from just 100mm
- Raise the butt on a plinth so the tap sits at least 30cm high, or a watering can will not fit under it
- A rainwater diverter kit auto-overflows back down the pipe when the butt is full, so no separate overflow pipe is needed
- Water butts range from 100 litres at about 25 pounds to 250-litre slimline models near 80 to 90 pounds
- Keep the lid on to block light, which stops algae and stops mosquitoes laying larvae in the water
- In winter, drain the butt or leave a 10 percent air gap so expanding ice does not split the wall
Learning how to install a water butt is the cheapest upgrade you can make to a UK garden. A water butt catches free rainwater off a roof and stores it for dry spells, and fitting one is a genuine weekend job that most people finish in under two hours. You need a downpipe, a diverter kit, a hacksaw and a drill. That is it.
This is the hands-on install guide. If you want the wider thinking behind why rainwater beats tap water for plants and how it fits a whole-garden plan, read our overview of rainwater harvesting in UK gardens first. Here we deal with the physical job: choosing a butt, raising it on a plinth, cutting the pipe, fitting the diverter and tap, linking butts, and keeping the water clean through the year.
Why a water butt is worth fitting in the UK
A water butt pays for itself fast in this climate because the rain is free and reliable. The UK gets 600 to 1,200mm of rain a year, spread across most months. A roof turns that into a large volume of water you would otherwise send straight to the drain. The physics is simple and worth knowing before you buy.
A roof collects about 1 litre per square metre for every 1mm of rain that falls. So a modest 30m2 house roof plane sheds 30 litres from just 1mm, and 3,000 litres from 100mm. Across a full UK year that same roof can yield 18,000 to 36,000 litres. Even a small 6m2 shed roof produces 6 litres per millimetre, filling a 200-litre butt after about 33mm of rain, which most regions get inside a fortnight.
Rainwater is also better for plants than mains water. It is soft, slightly acidic, and free of the chlorine and lime in tap water. Acid lovers like camellias, blueberries and rhododendrons much prefer it. Fitting a butt is a core part of sensible garden water conservation, and it keeps you watering through a hosepipe ban when the mains supply is restricted.
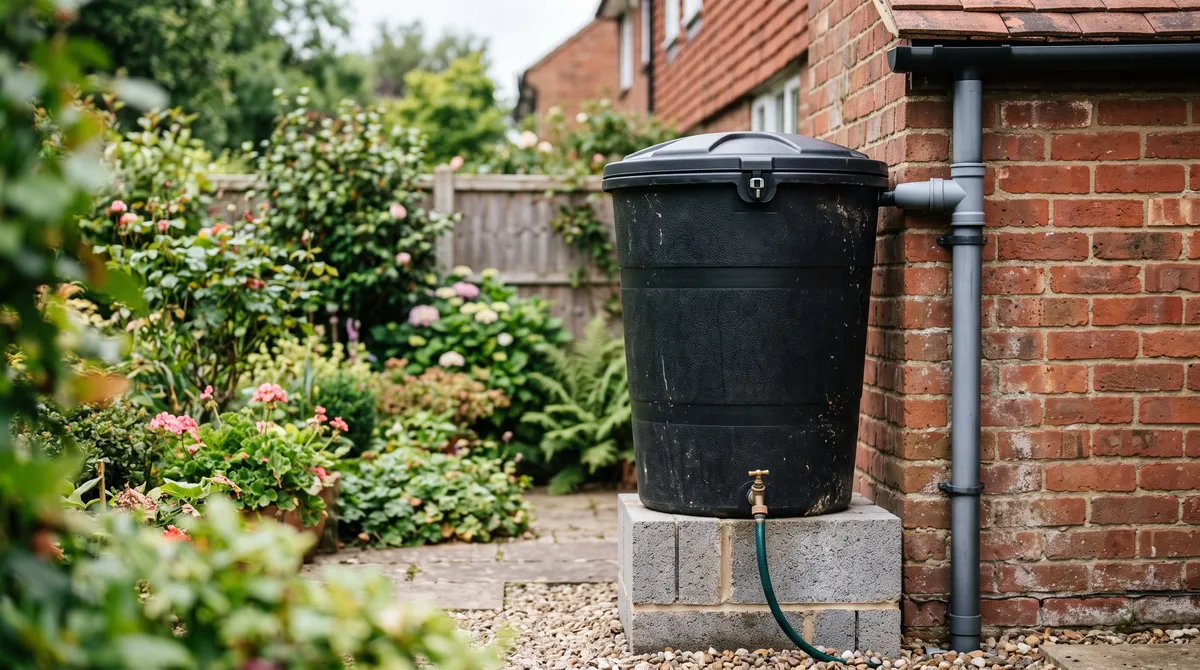
 A fitted water butt raised on a plinth beside a brick wall downpipe. The plinth lifts the tap clear so a watering can slides under it.
Choosing the right size and type of water butt
Butts come in a spread of sizes and prices, and the right one depends on your roof area and space. A small 100-litre butt costs around 25 to 35 pounds and suits a shed or a tight corner. The standard 200 to 210-litre butt is the popular choice for a house downpipe and runs 40 to 55 pounds. A 250-litre slimline model, only about 30cm deep, fits flat against a wall in a narrow passage and costs 75 to 90 pounds.
Think about footprint as much as capacity. Slimline butts trade depth for height and width, which suits side returns and passages. Round butts hold more for the money but stick out further. Wooden-effect and decorative butts cost more for the same volume, so you pay for looks. Whatever the shape, a bigger butt is rarely wasted, because a UK roof refills it many times a season.
Gardener’s tip: Buy the largest butt your space and roof will justify, then plan to link a second one later. Two 200-litre butts joined together give 400 litres of buffer, enough to carry a greenhouse and a few beds through a two-week dry spell without touching the mains.
| Size | Typical price | Footprint | Best for | Fills from |
|---|---|---|---|---|
| 100 litre | 25 to 35 pounds | Small, compact | Shed, small yard, tight corner | ~17mm rain on a 6m2 roof |
| 200 to 210 litre | 40 to 55 pounds | Medium round | Standard house downpipe | ~33mm rain on a 6m2 roof |
| 250 litre slimline | 75 to 90 pounds | Narrow, tall, ~30cm deep | Passages, side returns | ~42mm rain on a 6m2 roof |
| 2 x 200 litre linked | 90 to 120 pounds | Two medium round | Larger roofs, greenhouse supply | ~66mm rain on a 6m2 roof |
Why the butt needs a stand or plinth
The single most common beginner mistake is standing the butt straight on the ground. Then the tap sits too low, and no watering can fits under it. You end up scooping water out with a jug. A stand or plinth fixes this by raising the whole butt so the tap clears a can.
Aim to raise the tap to at least 30cm off the ground. A standard 10-litre watering can stands about 30 to 35cm tall, so you want the tap spout at or above that. Purpose-made butt stands cost 10 to 20 pounds and lift the butt around 30 to 40cm. Two or three breeze blocks or stacked paving slabs do the same job for a few pounds, as long as they sit dead level and firm.
The base matters as much as the height. A full 200-litre butt weighs over 200kg, so the ground under it must be solid. Set slabs on compacted hardcore or firm soil, and check with a spirit level in two directions. A butt that leans will not fill evenly, and a heavy leaning butt can topple. Raising the butt also gives better flow, because water pressure at the tap comes from the head of water above it.
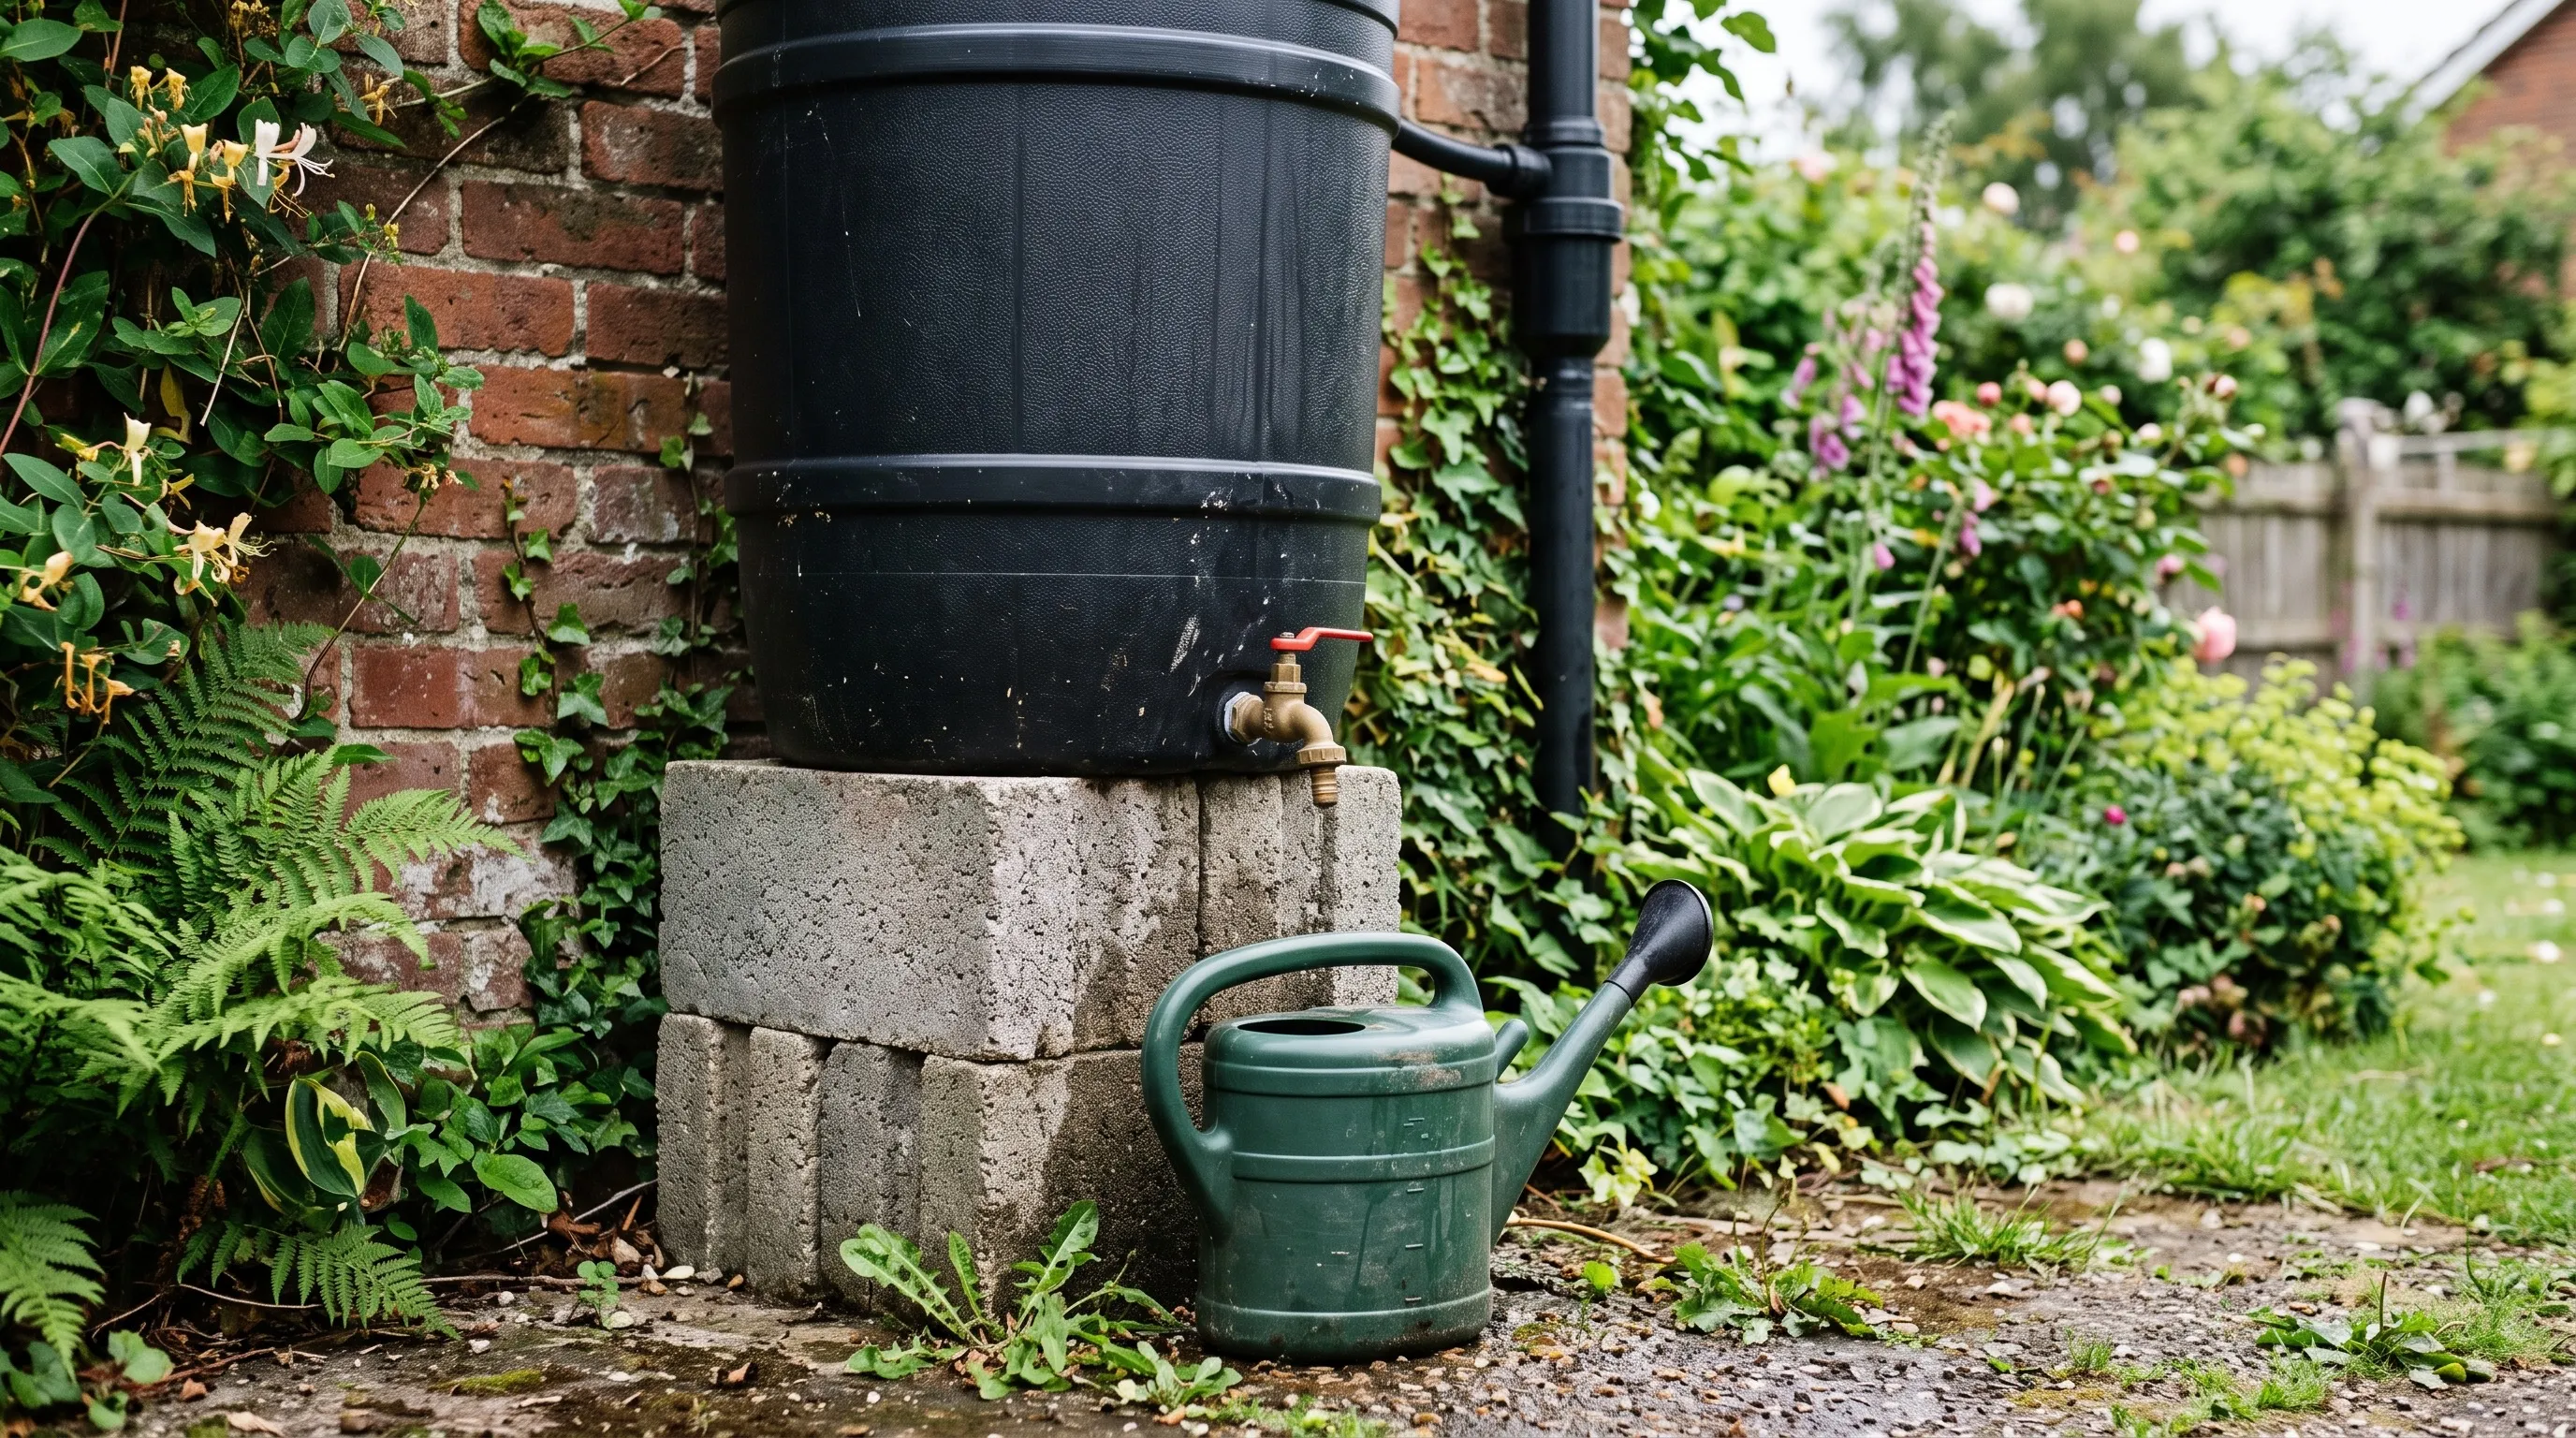 Raising the butt on blocks lifts the tap to 30cm or more, the clearance a full watering can needs to slide underneath.
Tools and parts you need before you start
Gather everything before you cut anything. The core kit is short and most of it you may already own. The one purpose-bought item is the rainwater diverter kit, which does the clever work of feeding the butt and overflowing back down the pipe.
Tools: a hacksaw to cut the downpipe, a cordless drill, a 29mm hole saw or spade bit for the tap hole, a spirit level, a tape measure, and a pencil or marker. A file or sharp knife helps clean the cut pipe edge.
Parts: the water butt itself, a stand or plinth, a rainwater diverter kit (usually 12 to 20 pounds and sized for round or square downpipes), a tap with its washers if not pre-fitted, and a lid. Add a linking kit (about 10 pounds) if you plan a second butt now or later.
Warning: Check your downpipe size and shape before buying the diverter. UK round downpipes are commonly 68mm, square ones about 65mm. A diverter sized for the wrong pipe will not seal, and you will be back at the shop mid-job with a cut pipe and no way to close it.
Step by step: fitting the butt and diverter
This is the heart of the job. Work through it in order and do not cut the pipe until the butt is in position and the height is marked. The whole sequence takes about 1 to 2 hours at a relaxed pace.
Position the butt and mark the diverter height
Stand the butt on its level plinth right beside the downpipe. Check it is firm and true with the spirit level. Now find the diverter height. Most kits want the diverter fitted so its outlet sits a little above the top inlet of the butt, letting water run down into the butt by gravity. Hold the diverter against the pipe, mark the top and bottom cut lines with a pencil, and measure with the tape so both marks are square around the pipe.
Cut the downpipe with a hacksaw
Cut cleanly through the downpipe at your mark with the hacksaw. Most kits need a single cut, with a short section removed to make room for the diverter body, so follow the exact gap the instructions give. Keep the saw square so the cut is flat. Then clean the edge with a file or knife to remove burrs and swarf, which stop the diverter seating properly.
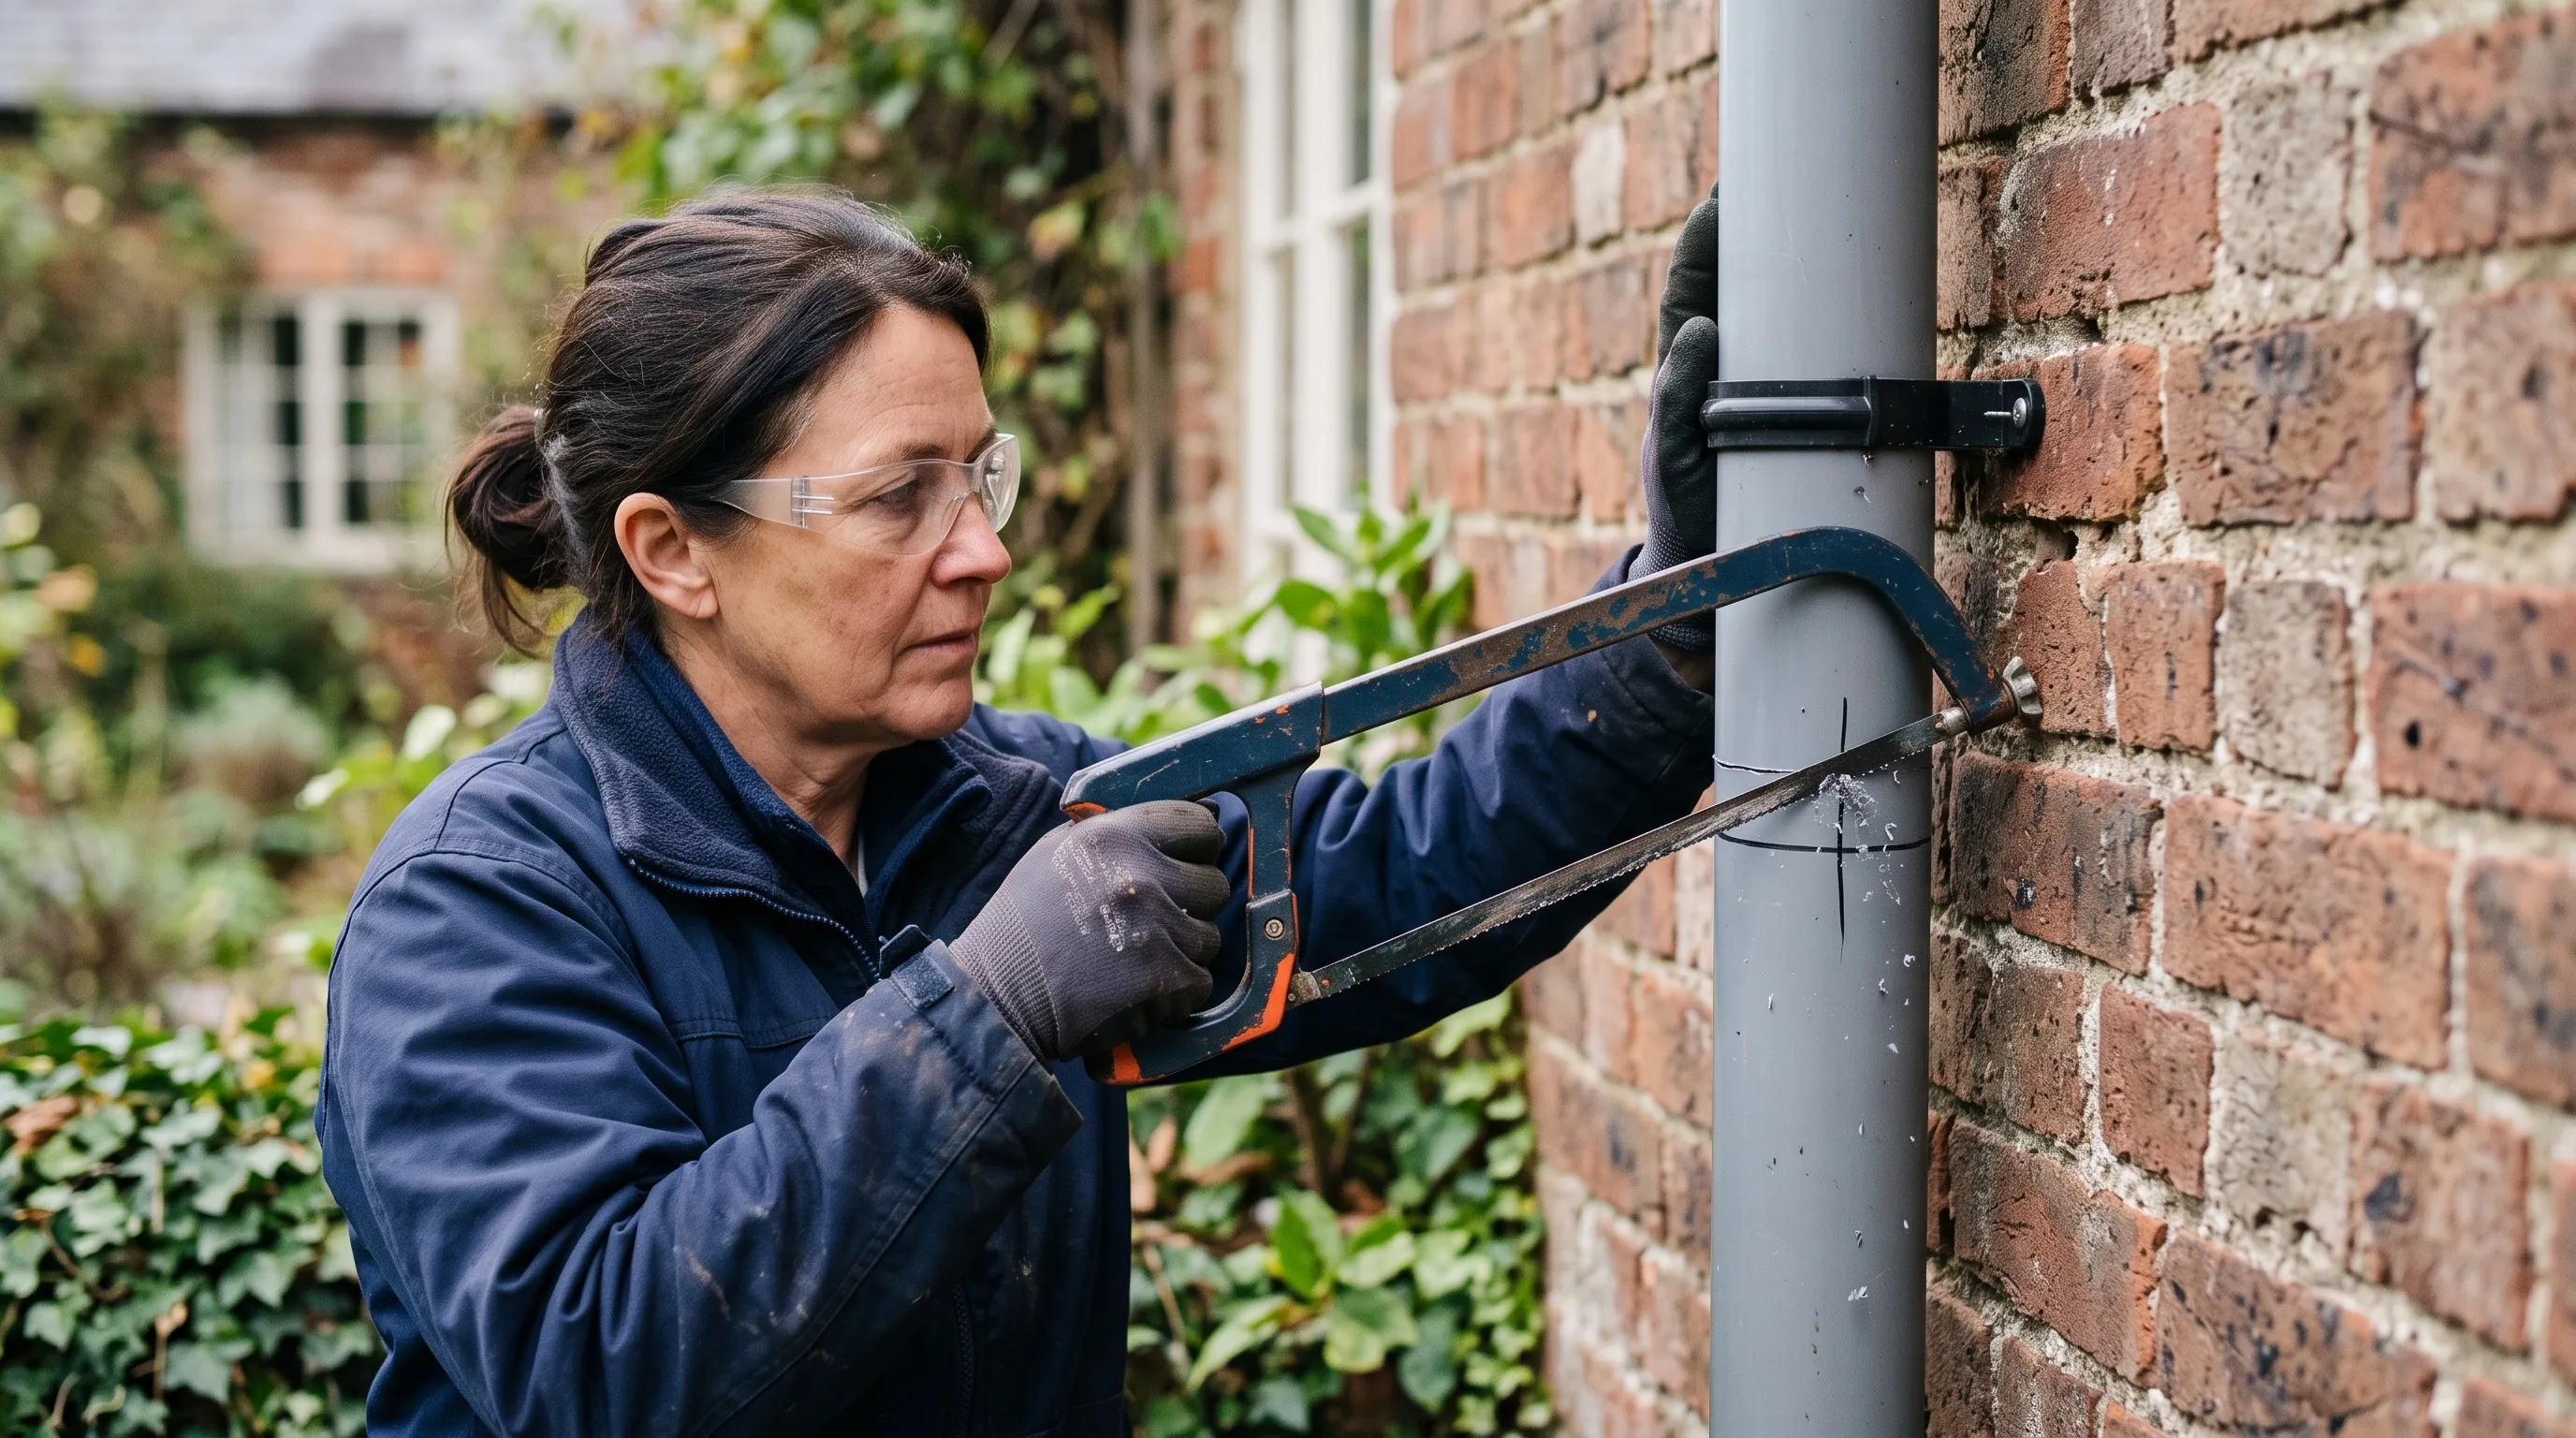 Cut the downpipe squarely with a hacksaw at the marked line, then file off any burrs so the diverter seats flush.
Fit the rain diverter
Push or clip the diverter into the cut pipe following the kit. The upper part slides onto the top pipe, the lower part onto the bottom, and the body bridges the gap. The clever bit is the auto-overflow: when the butt fills to the diverter’s level, water backs up and simply carries on down the original downpipe to the drain. No separate overflow pipe is needed with this type. Fit the short flexible connector hose from the diverter to the butt inlet.
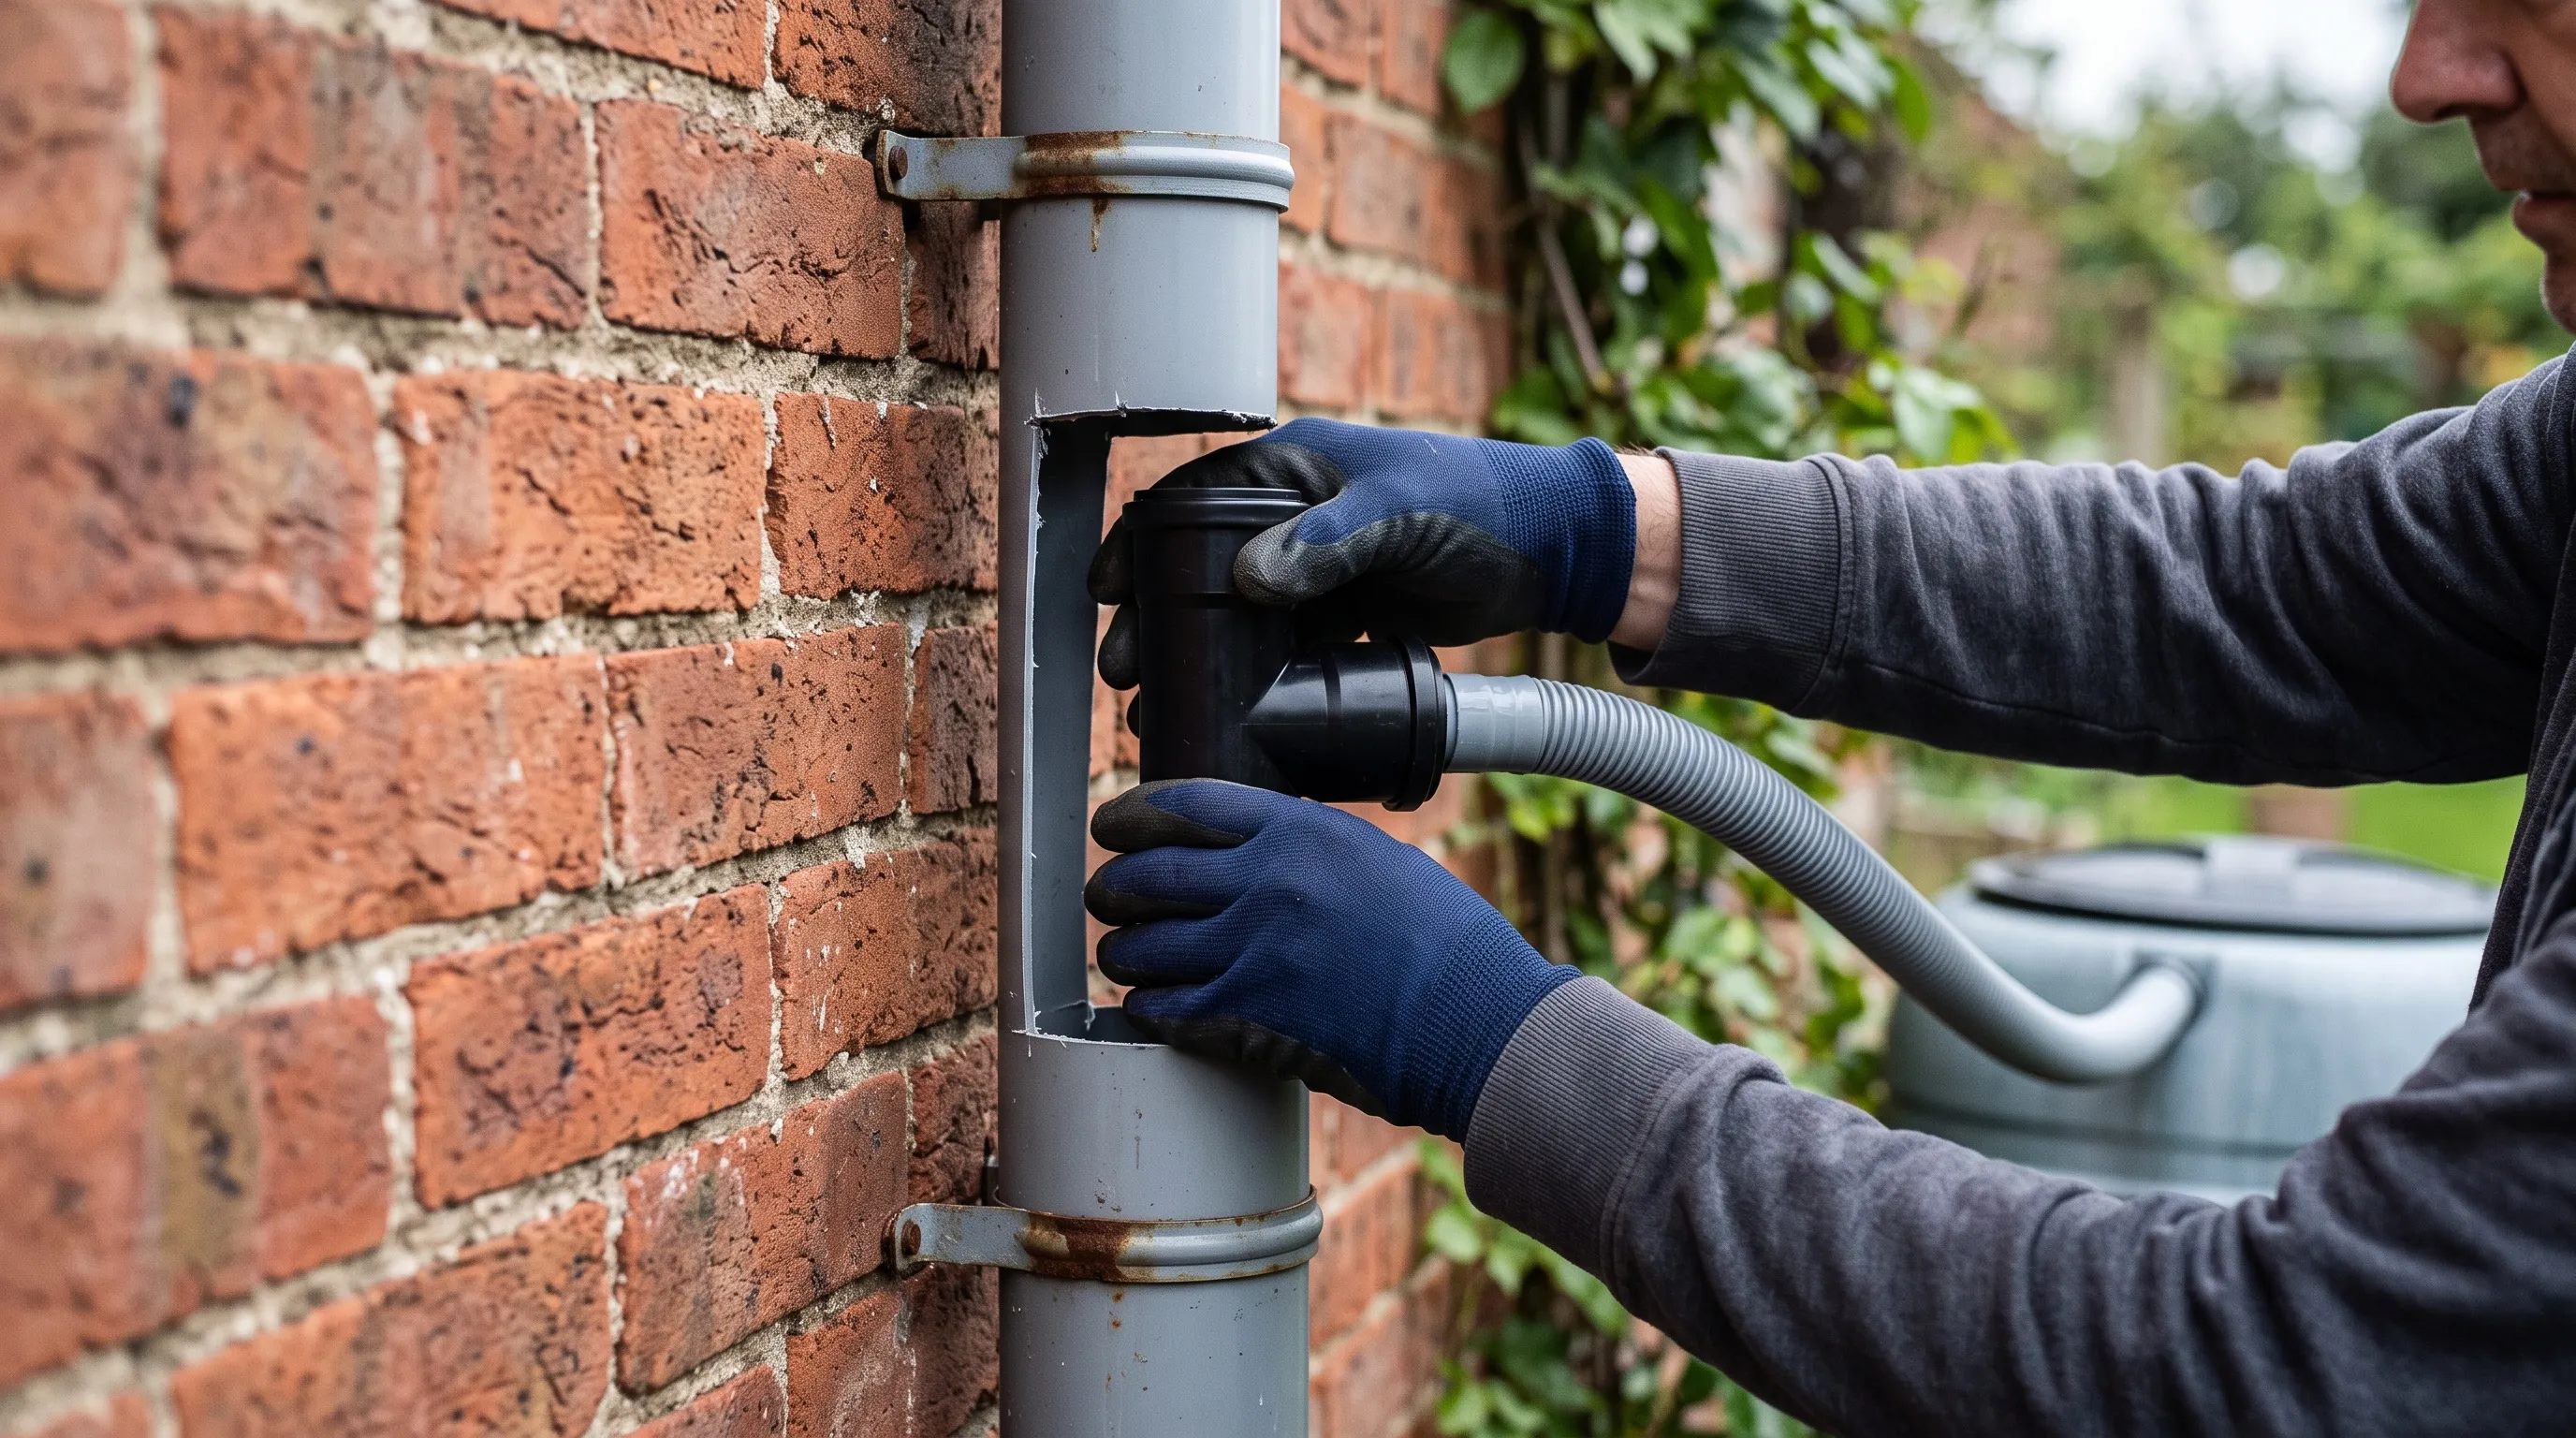 The rain diverter clips into the cut pipe and feeds water sideways to the butt, then auto-overflows back down the pipe when full.
Drill and fit the tap
If the butt has no pre-cut tap hole, drill one low on the front with a 29mm hole saw or spade bit, keeping it high enough to clear your can once the butt is on its plinth. Push the tap through with its rubber washer on the outside, fit the inner washer and back nut, and hand-tighten. Do not overtighten, or you will distort the plastic and cause a weep. A little PTFE tape on the thread helps seal it.
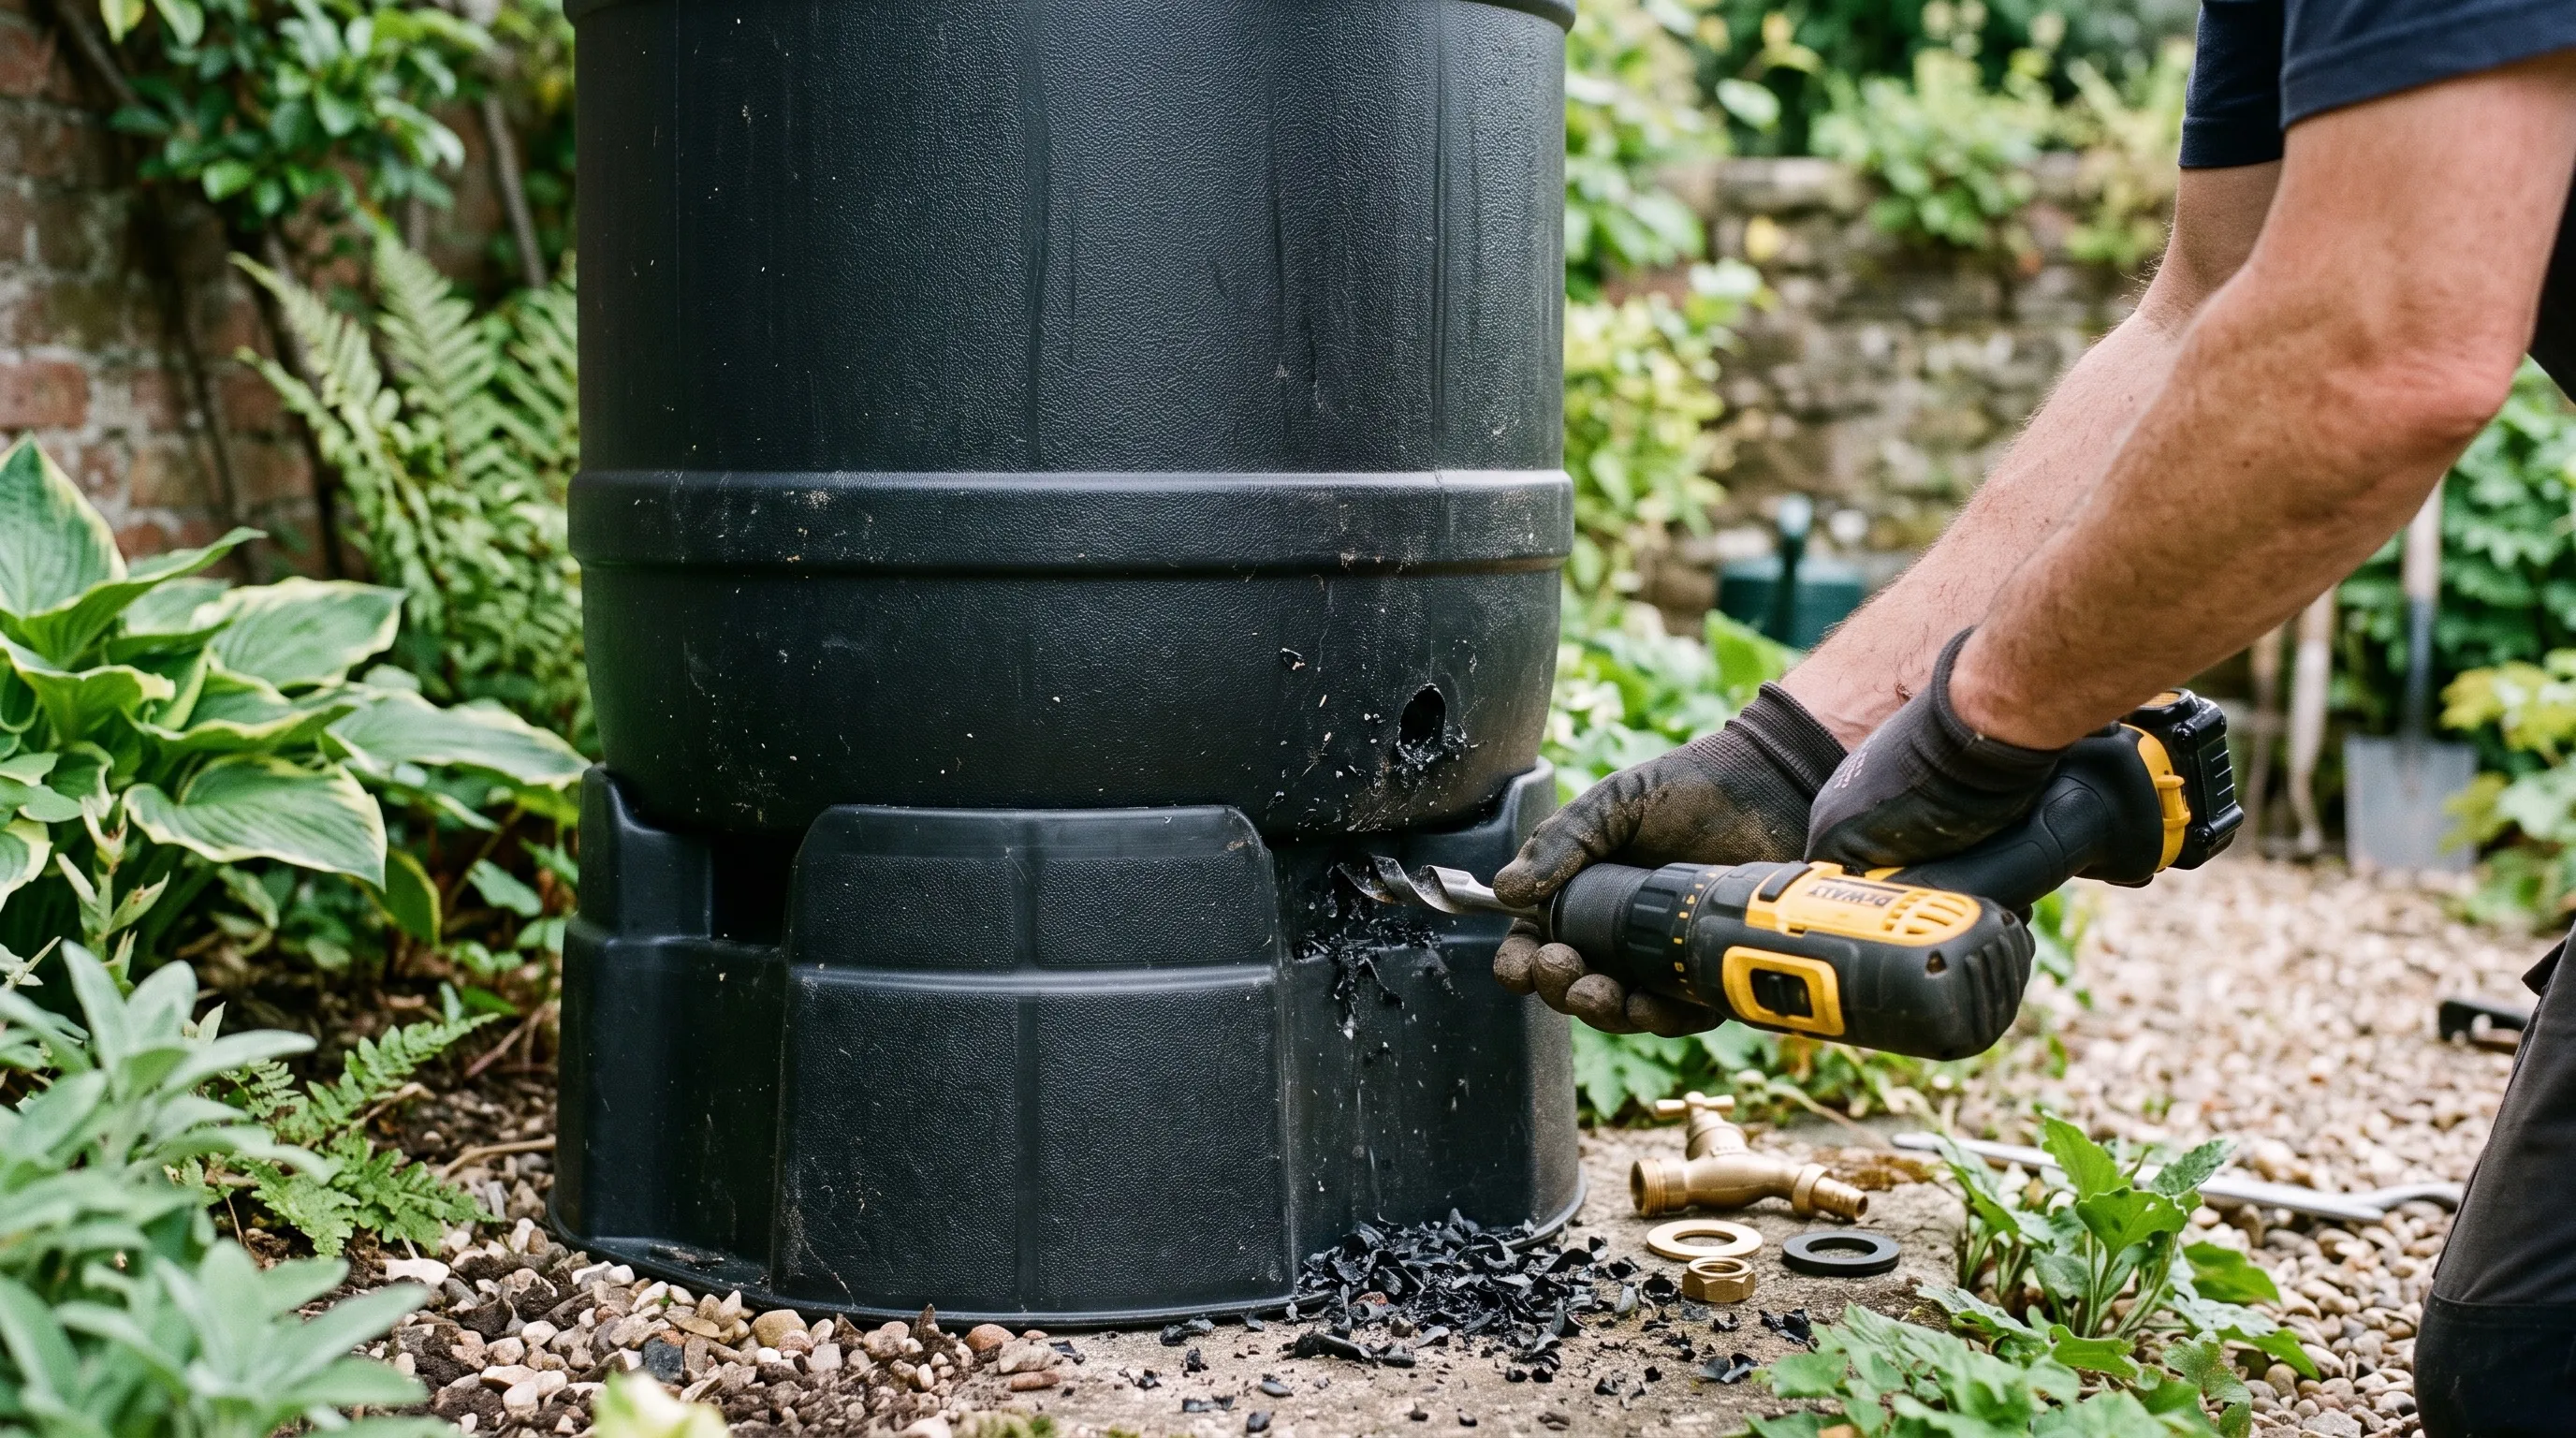 Drill the tap hole low on the front, then fit the tap with its washers and hand-tighten the back nut so it seals without cracking the plastic.
Connect the overflow and test
With a diverter kit the overflow is automatic, so you only need to make sure the diverter hose is seated in the butt inlet. If you fitted a basic top filter instead of a diverter, run an overflow hose from near the top of the butt to a drain or a second butt. Test the whole system by tipping a bucket of water down the downpipe from above, or wait for rain. Check the butt fills, the tap does not drip, and the overflow behaves. Fit the lid.
Linking two or more water butts together
One butt fills fast on a decent roof, so a linking kit doubles or trebles your storage. It joins butts near the base so they fill and empty as one connected volume. This is the cheapest way to store more water without buying one huge tank.
Stand both butts at the same height on level plinths, because linked butts balance to the same water level. Drill a hole low on the side of each butt with the kit’s hole saw, fit the connector bulkhead and washers on each, and join them with the supplied hose. Water entering the first butt now flows across into the second until both are full, then the diverter overflows as normal. You can chain a third or fourth butt the same way along a wall.
Take the water from the tap on the far butt, or fit a tap to each. Draw from the end of the chain and the whole run empties evenly. Two 200-litre butts give 400 litres, enough to see a greenhouse and several beds of drought-tolerant plants through a two-week dry spell.
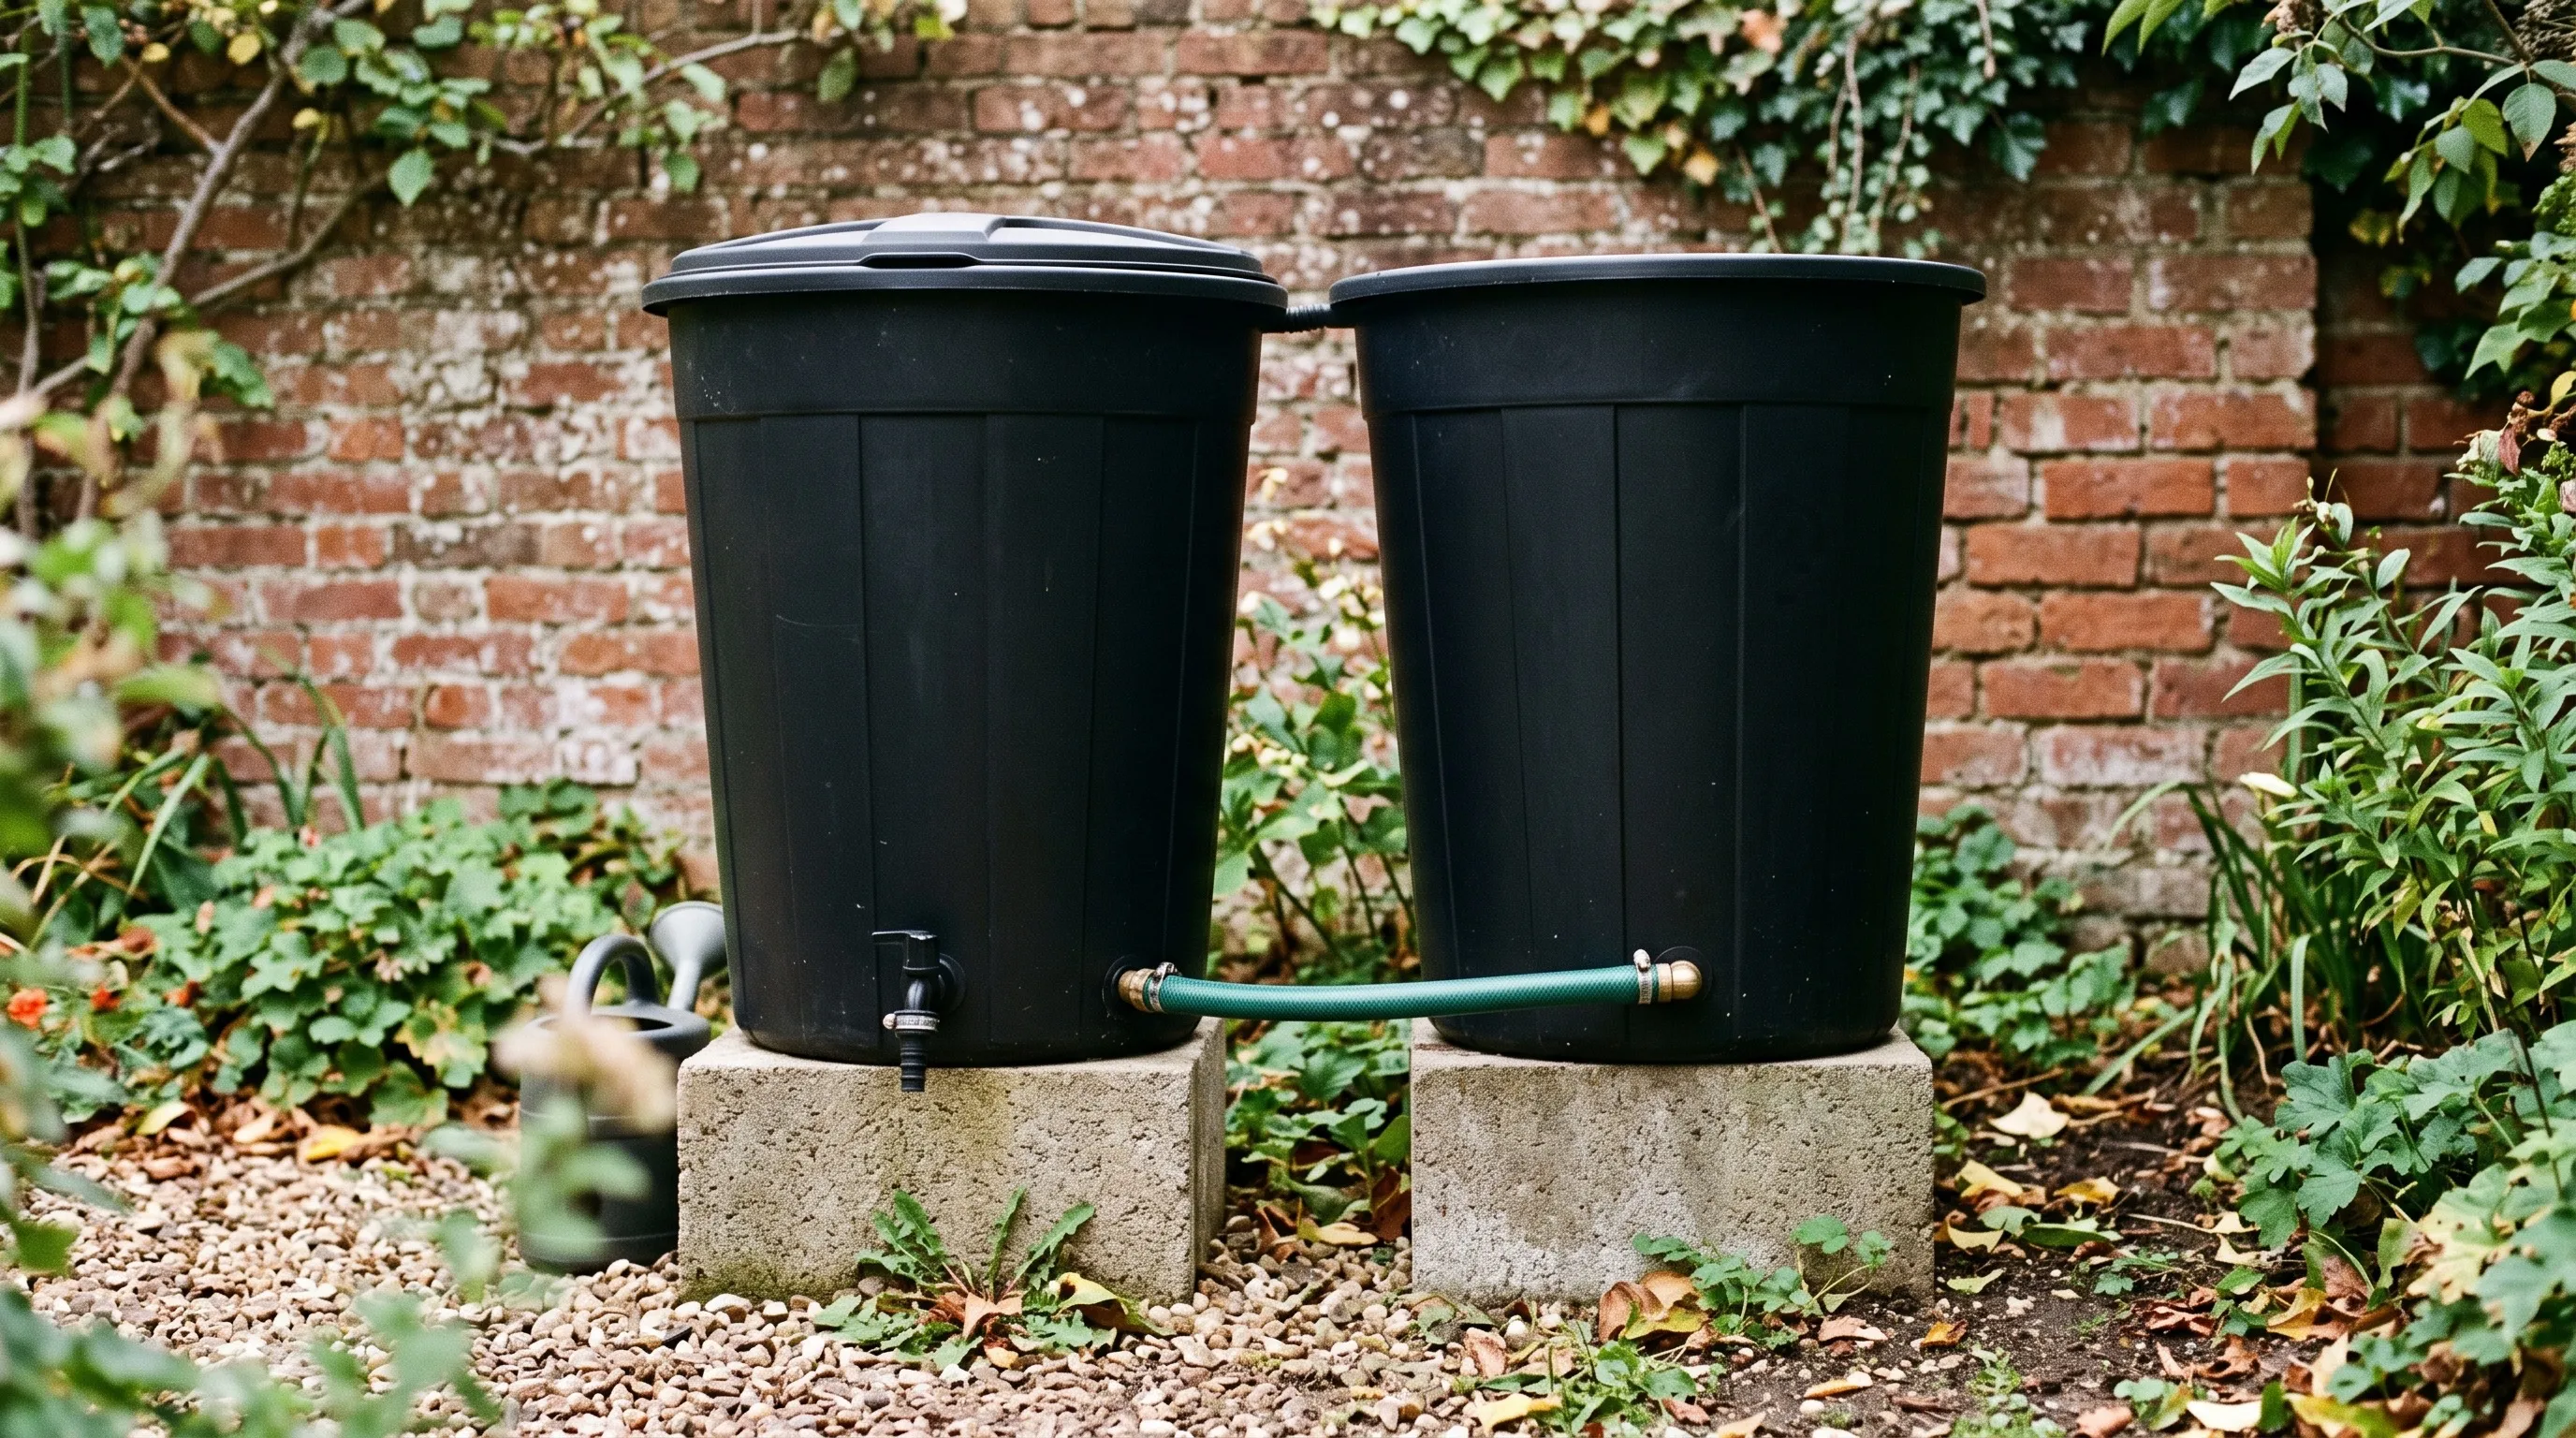 Two butts joined by a low linking kit fill and empty as one. Stand both at the same height so the water levels balance.
Managing overflow so it does not flood the base
Overflow is normal and expected. On a wet UK roof the butt fills and overflows many times a year, so the water leaving it must go somewhere sensible. A diverter kit handles this by design, sending surplus back down the downpipe to the drain the roof always used. Nothing pools at the base.
The failure to avoid is a butt that overflows onto its own foundation. Standing water softens the ground under a 200kg butt, and the butt can then sink or lean. If you use a top-filter setup without a diverter, always run the overflow hose to a gully, drain or soakaway, not onto the slab. Keep the hose sloping downhill so it drains fully and does not hold stagnant water.
For a bigger system, direct overflow into a linked butt first, and only send the final surplus to the drain. That way you capture the most water before any goes to waste. Check the overflow route after the first heavy rain to confirm it clears freely and the base stays dry.
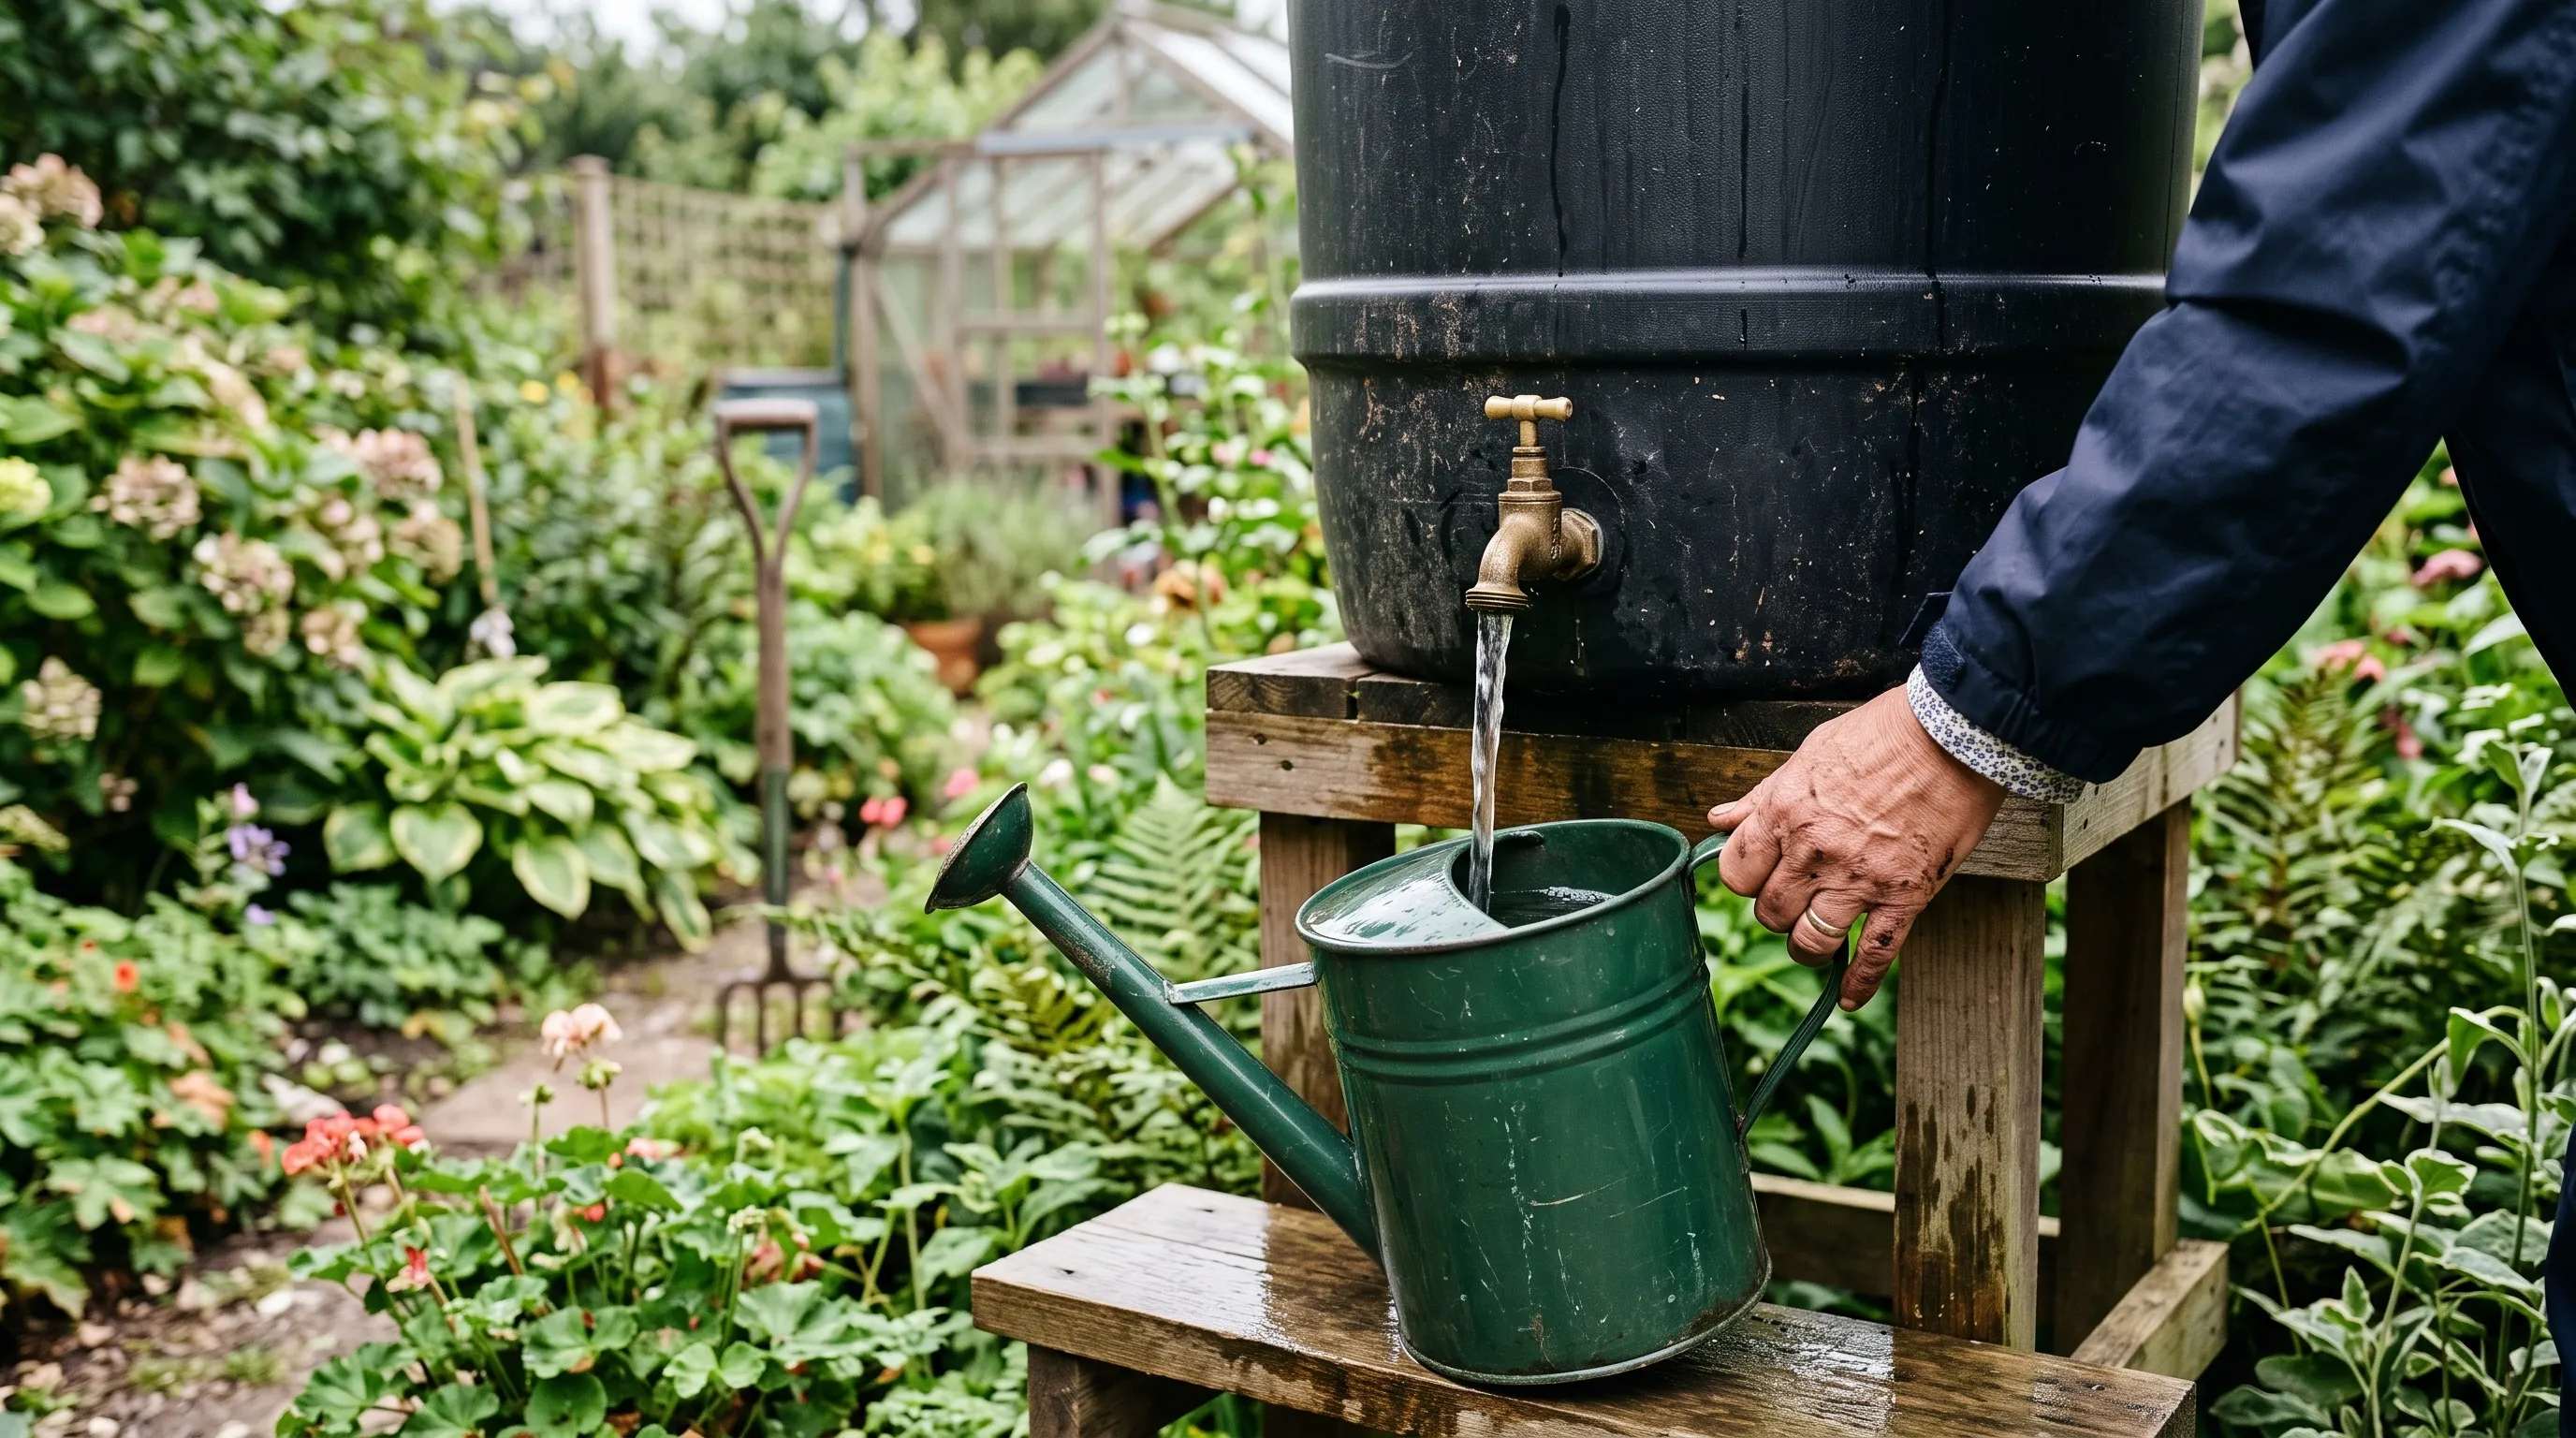 A raised butt lets you fill a watering can straight from the tap, the everyday payoff of getting the plinth height right.
Keeping the water clean and clear
Rainwater stored in the dark stays clean for months. Two things spoil it: light and debris. Light lets algae bloom and turn the water green. Debris feeds bacteria and clogs the tap. Both are easy to prevent.
Keep the lid on at all times. Algae need sunlight to grow, so a closed, opaque butt starves them out. A tight lid also stops mosquitoes laying eggs, which they do on still open water in summer, and stops leaves and helicopters dropping in. Fit a downpipe filter or leaf strainer in the diverter to catch grit and moss washed off the roof before it reaches the butt.
Once a year, ideally in late winter, empty and scrub the butt with a stiff brush and rinse it out. This clears the fine silt that settles on the base and any algae film on the walls. Do not use bleach or detergent, as residues harm plants. If the water ever smells stale, it usually means light has been getting in or debris has built up, so check the lid and filter first.
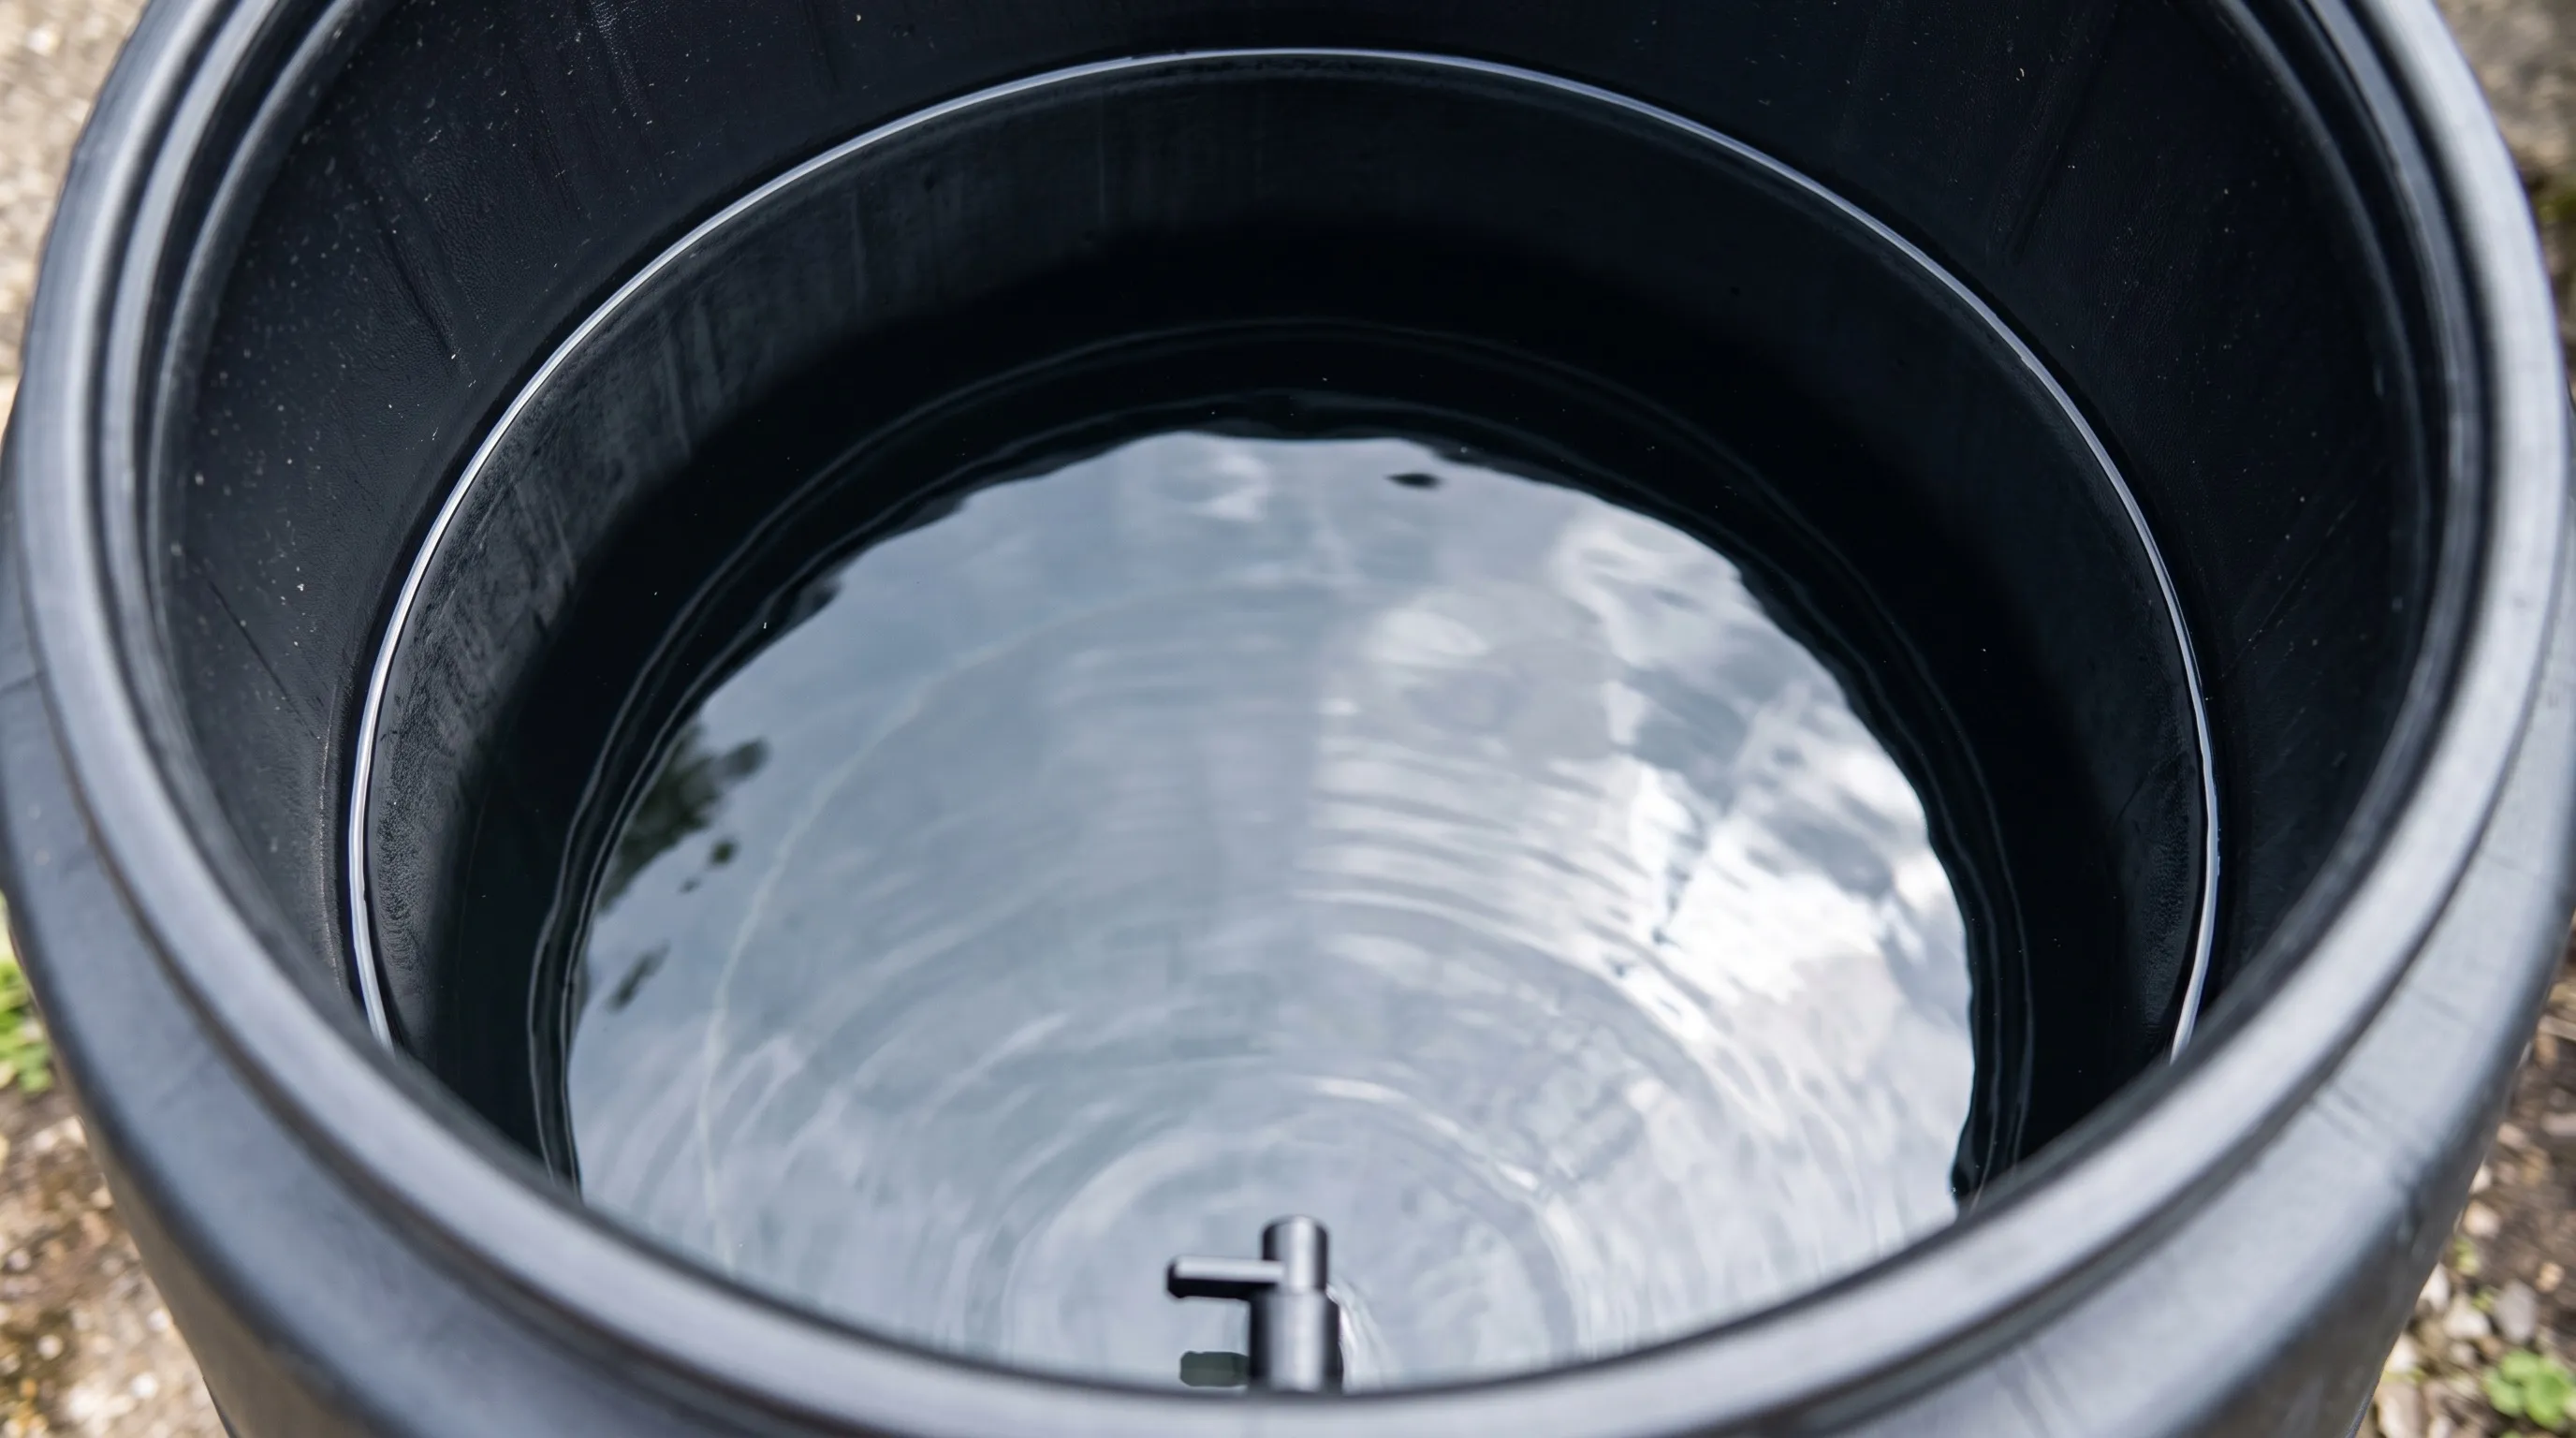 Kept dark under a tight lid, stored rainwater stays clear like this. Light is what turns a neglected butt green with algae.
Winter care so the butt survives the frost
Water expands by about 9 percent when it freezes, and that force can split a full, sealed butt along a seam or bulge its wall. UK winters bring hard frosts to most regions, so a little autumn prep saves a cracked butt.
Leave at least a 10 percent air gap at the top through winter so expanding ice has room to push up rather than out. In colder areas, or during a forecast hard freeze, drain the butt down or switch off the diverter so it stops filling. A partly empty butt with headroom rarely comes to harm. It is a full sealed butt that cracks.
The tap is the other weak point, as water sitting in the spout freezes and can split the tap body. Drain the tap after use in frosty spells, or lag it with pipe insulation. Come spring, check the butt and tap for any frost damage before you rely on them, and give the inside a scrub ready for the season.
Month-by-month water butt calendar for the UK
This calendar suits a typical UK garden. Shift it a couple of weeks later for Scotland and the north, earlier for the mild south-west.
| Month | Task |
|---|---|
| January | Keep a 10 percent air gap against ice. Lag the tap in hard frost. Check the lid is tight. |
| February | Empty and scrub the butt while demand is low. Rinse out silt and any algae film. |
| March | Reconnect the diverter if you turned it off. Check hoses and tap for frost splits. |
| April | Butt in full use as sowing starts. Check the downpipe filter for spring debris. |
| May | Top demand begins. Link a second butt now if one runs dry. Clear moss from the roof. |
| June | Peak watering. Keep the lid on against summer algae and mosquitoes. Draw from the tap daily. |
| July | Watch levels in dry spells. Use butt water first, mains only as backup during any hosepipe ban. |
| August | Clear the diverter filter of dry debris. Check the overflow route stays clear before autumn rain. |
| September | Autumn rain refills the butts fast. Check linked butts balance to the same level. |
| October | Fit or check the leaf filter as leaves fall. Butts fill quickly this month. |
| November | Clear leaves from gutters and the diverter. Start reducing the level before hard frost. |
| December | Leave headroom for ice. Drain the tap after use. Turn off the diverter in a hard freeze. |
Common water butt mistakes to avoid
Most water butt problems trace back to a handful of install errors. Avoid these four and the system runs for years without trouble.
Standing the butt straight on the ground
This is the classic error. With no plinth the tap sits too low and no watering can fits under it. Always raise the butt on a stand, blocks or slabs so the tap clears 30cm. Get this right at install and you never fight it again.
Setting the base on soft or uneven ground
A full 200-litre butt weighs over 200kg. On soft soil it sinks and leans, and a leaning butt can topple. Set the plinth on firm, compacted ground or hardcore and check it level in two directions with a spirit level before filling.
Buying the wrong diverter for the downpipe
Round and square downpipes need different diverters, and sizes vary from 65 to 68mm. Measure your pipe first. Fitting the wrong diverter leaves you with a cut pipe that will not seal and a job stuck halfway.
Leaving the lid off
An open butt goes green with algae within weeks in summer and becomes a mosquito breeding site. Keep the lid on to block light and insects, and fit a downpipe filter to keep debris out. Clean water needs darkness above all.
Frequently asked questions
How do you install a water butt on a downpipe?
Stand it on a firm plinth, then fit a diverter into the downpipe. Mark the diverter height on the pipe level with the butt inlet, cut the pipe with a hacksaw, and clip the diverter in. Run the short hose to the butt, fit the tap, and test with a bucket of water down the pipe.
How high should a water butt stand?
High enough for the tap to clear a watering can, so 30cm or more. Most people stand the butt on a purpose-made plinth, breeze blocks or paving slabs. A raised butt also gives better water pressure and lets you fill deeper cans and buckets without tipping the butt.
Do I need an overflow pipe on a water butt?
Not with a modern diverter kit, which overflows back down the pipe. When the butt fills to the diverter level, water simply carries on down the original downpipe to the drain. If you use a basic pipe-top filter instead, you will need a separate overflow hose to a drain or a second butt.
How much rain does a water butt collect in the UK?
A roof collects about 1 litre per square metre for every 1mm of rain. The UK gets 600 to 1,200mm a year, so a 30m2 house roof can shed 18,000 to 36,000 litres annually. Even a small shed roof fills a 200-litre butt many times over each season.
Can you link two water butts together?
Yes, with a linking kit that joins them near the base. Drill a hole low on each butt, fit the connector and hose, and the two fill and empty as one. Stand both at the same height so the levels balance. You can chain three or more butts the same way.
How do I stop algae growing in my water butt?
Keep the lid on to block sunlight, which algae need. A tight lid also stops mosquitoes laying larvae in the water. If algae still form, empty and scrub the butt once a year, and keep leaves and debris out with a downpipe filter.
Should I empty my water butt in winter?
Leave at least a 10 percent air gap so expanding ice cannot split the butt. In hard-frost areas, drain it down or turn off the diverter. Water expands by about 9 percent when it freezes, and a full sealed butt can crack along a seam or bulge the wall.
Now you have your butt fitted and filling, put that free water to work across the whole garden. For the bigger picture on cutting mains use and storing more rain, read our guide on garden water conservation, and browse the full range of how-to guides for your next project.
Lawrie has been gardening in the West Midlands for over 30 years. He grows his own veg using no-dig methods, keeps a wildlife-friendly garden, and writes practical advice based on real UK growing conditions.