Key takeaways
- Space pleached trees 1.2 to 2m apart, centre to centre, for a continuous screen
- The panel sits above fence height, roughly 1.8 to 2m up a clear stem
- Pre-pleached trees cost £150 to £450 each; a DIY frame runs about £15 to £30 per tree
- Stake and guy the heavy rootball hard: wind rock kills more pleached trees than cold
- Prune twice a year, mid-summer and late winter, to hold the flat panel shape
- Remove the training frame after three to four years, once branches thicken and self-support
Pleached trees are the tidiest way to screen an overlooking neighbour without giving up half your garden. A pleached tree is a hedge on stilts: a clear stem topped by a flat, trained panel of branches held above fence height. The panel sits at eye level, blocking a first-floor window, while the clear trunk keeps the ground below free to plant. This guide covers which species to choose, whether to buy pre-pleached or train your own, and the part most people skip: the frame, the staking, the tying in and the twice-yearly prune that keep the shape crisp. Get the support right and a pleached screen looks deliberate from year one.
What pleached trees are and where they work
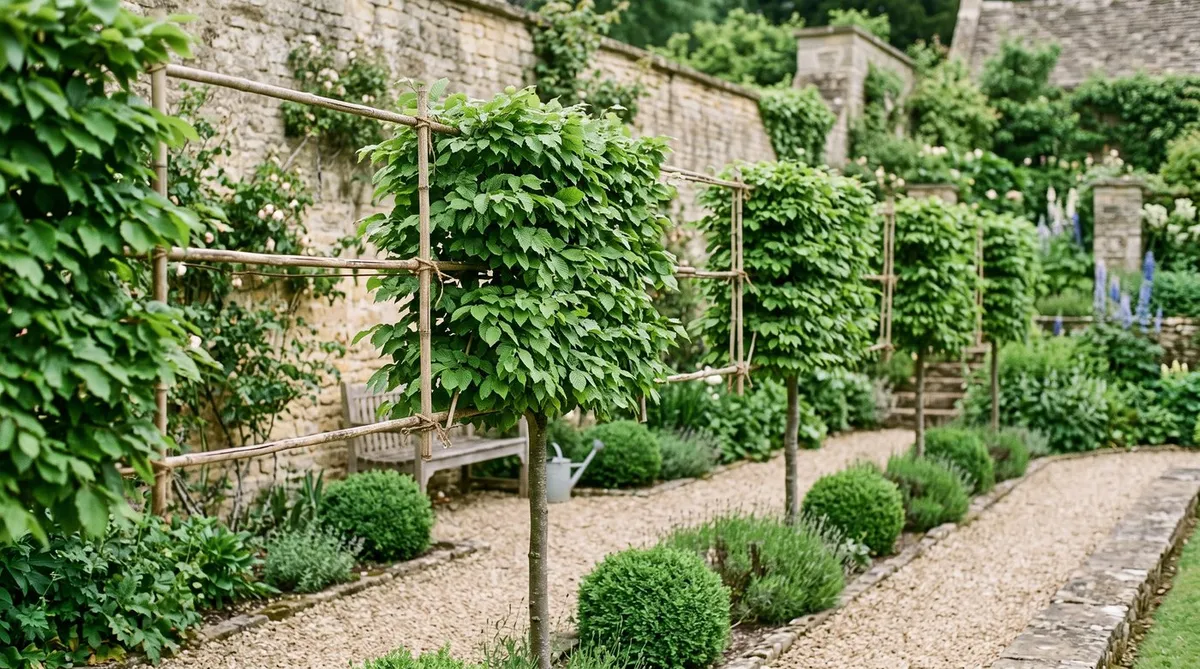
A pleached tree carries a bare stem to about 1.8 to 2m, then a flat rectangular panel of branches trained on a frame above it. The old craft of pleaching wove flexible young shoots together into a living lattice. Modern nursery pleaching does the same job with a fixed grid of bamboo canes and wire, tying branches onto it until they thicken and hold their own shape.
Pleached trees suit formal town gardens, new-build boundaries, driveways and courtyards. They read as architecture, so they hold a strong line where a loose hedge would sprawl. For the wider choice between a raised screen and a conventional living barrier, compare privacy screening hedges versus trees before you commit.
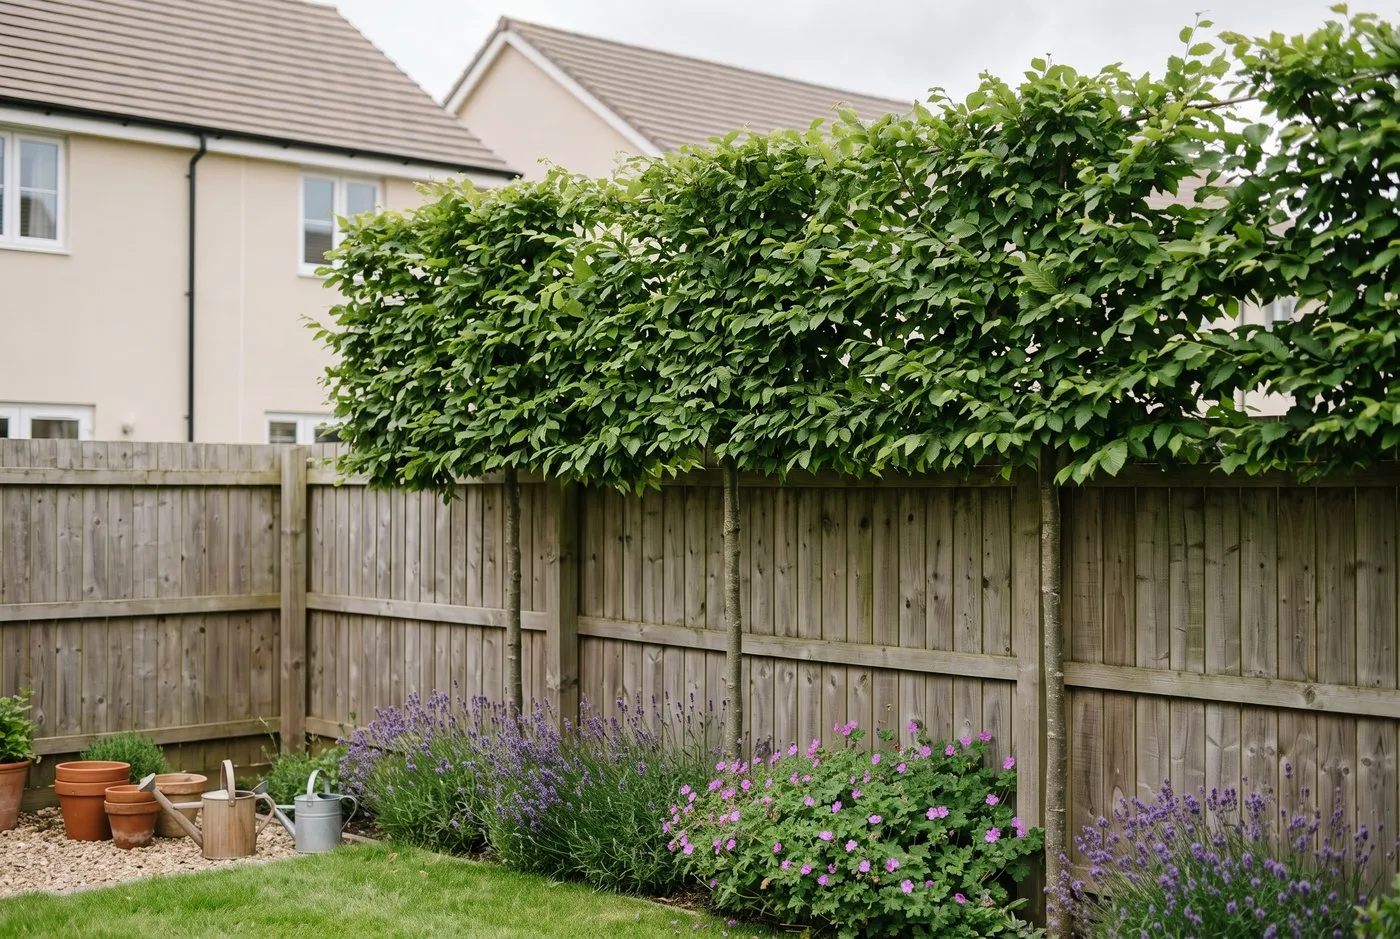 Pleached hornbeam along a new-build fence line. The panels start above the 1.8m fence, hiding first-floor windows while the clear stems keep the border below plantable.
Best trees for pleaching in UK gardens
The species you pick decides how the screen behaves through the year. Hornbeam (Carpinus betulus) is the workhorse: it takes clay, wind and hard clipping, and holds dead brown leaves through winter, a habit called marcescence. Lime (Tilia, usually T. x europaea or the aphid-free T. cordata) is the fastest and the most traditional, but it drops every leaf and can drip sticky honeydew. For a true evergreen screen, holm oak (Quercus ilex) and Photinia Red Robin hold green all winter.
| Species | Type | Winter screen | Best soil / site | Panel role | Reliability |
|---|---|---|---|---|---|
| Hornbeam (Carpinus betulus) | Deciduous, marcescent | Brown leaves held | Clay to loam, exposed sites | All-round default | 1st, most reliable |
| Holm oak (Quercus ilex) | Evergreen | Full green | Free-draining, coastal, mild | Year-round evergreen | 2nd |
| Photinia Red Robin | Evergreen | Full green, red new growth | Sheltered, free-draining | Colourful evergreen | 3rd |
| Lime (Tilia cordata) | Deciduous | Bare | Deep, moist, most soils | Fast traditional screen | 4th |
| Beech (Fagus sylvatica) | Deciduous, marcescent | Copper leaves held | Free-draining only, not wet | Warm winter tone | 5th |
For most gardens on ordinary or heavy soil, hornbeam is the gold-standard choice. It is the most forgiving to train and the cheapest of the group. Our dedicated hornbeam hedge guide covers why it beats beech on clay. Where you want green in January, holm oak or Photinia Red Robin earns the extra cost. On light, well-drained ground a beech screen glows copper all winter.
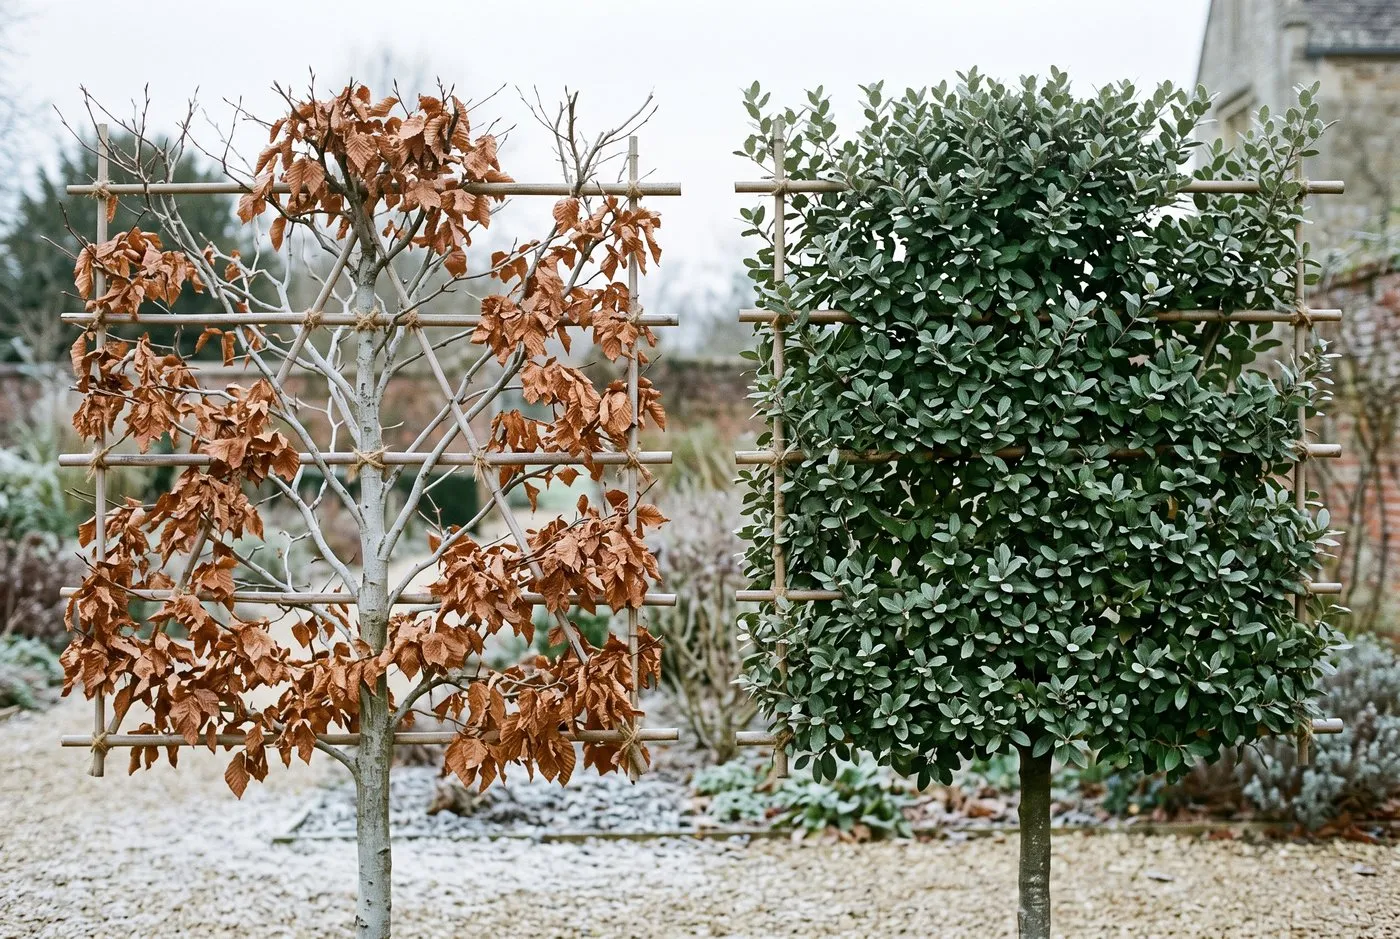 Left, a deciduous pleached panel holding copper marcescent leaves. Right, an evergreen holm oak panel in full green. The species you choose decides whether the screen works in January.
Pre-pleached or train your own?
You have two routes, and the choice comes down to budget against patience. Pre-pleached trees arrive ready-made from the nursery, already trained on a frame with a formed panel. They give an instant screen the day they go in. They cost £150 to £450 each, rising with stem girth, panel size and species. A five-tree run therefore costs roughly £900 to £2,000 before delivery, and a mature lime or holm oak sits at the top of that band.
Training your own is far cheaper. Start with feathered whips or standards at £25 to £60 each, build a frame for £15 to £30 per tree, and tie in the branches yourself. The trade-off is time: a home-trained panel takes three to five years to read as a proper screen. The skill is the same used in fruit-tree espalier work, just scaled up and lifted onto a clear stem.
Gardener’s tip: If you buy pre-pleached, measure the clear stem height before you order, not just the overall height. A tree sold at 3.5m might carry a 2.2m stem and only a 1.3m panel, which screens badly against a 1.8m fence. Ask the nursery for the stem height and the panel dimensions separately, and match every tree in the batch so the panels line up.
How a pleached tree establishes: the four stages
A pleached tree fails or thrives on how well it roots in against a huge sail area up top. Understanding the establishment stages tells you exactly where to put the effort. The whole cycle runs across the first three growing seasons.
- Settle and anchor (months 0 to 3). Water and new roots do nothing yet. The tree depends entirely on the stakes and guy. Soil temperatures below 6C mean almost no root growth, so autumn and late-winter planting simply hold until spring.
- Root push (spring, soil above 8C). Fine roots drive out into firmed, moist soil. This is when a dry rootball stalls the tree. On our sandy loam, irrigated trees rooted out within one season while unwatered ones sulked.
- Panel extension (first two summers). New shoots break along the frame and are tied in to fill the grid. Growth of 20 to 30cm of panel spread a year is typical on hornbeam once rooted.
- Self-support (years 3 to 4). Horizontal branches thicken and lignify into rigid arms. Only now can the frame come off.
The critical mistake is treating a pleached tree like a normal one and easing off the water and support after the first summer. The panel is a permanent windbreak on a small rootball. Skip the second summer’s watering, or pull the stakes at 12 months, and you get wind rock, dieback and a gappy screen. The support has to outlast the roots.
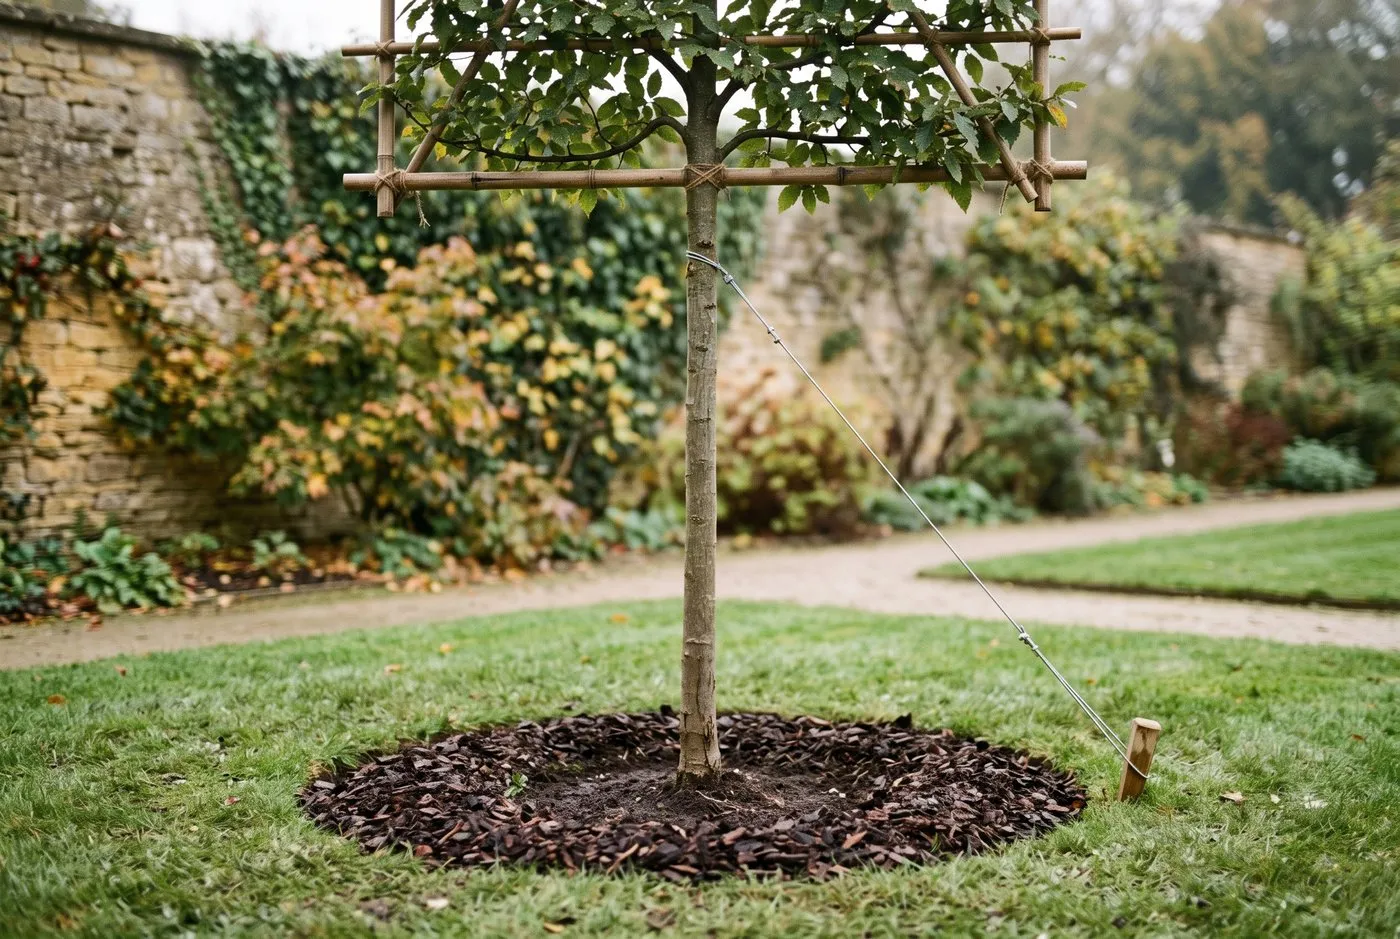 The three things that keep a pleached tree standing: a firmed rootball, angled stakes and a guy, and the bamboo-and-wire frame holding the panel flat.
How to plant a pleached tree step by step
Plant pleached trees in the dormant season, from November to March, whenever the ground is not frozen or waterlogged. Container-grown or airpot trees can go in through summer if you water hard, but autumn planting lets roots settle before the sail catches spring winds. Space the trees 1.2 to 2m apart, centre to centre, matching the gap to the frame width so the finished panels meet.
Dig a square pit about 1.5 times the width of the rootball and no deeper than the roots sit. A square hole stops roots spiralling the way they do in a round one. Fork the base and sides to break any glaze. Set the tree so the root flare sits level with the soil, never proud and never buried, and line every clear stem to the same height with a laser or string level. Backfill with the soil you dug out, firming in layers with your heel, not loose compost that lets the tree sink.
Set each stem 60 to 90cm off a fence so you can work both faces of the panel. Water in with 20 to 30 litres per tree and mulch 7 to 10cm deep, kept clear of the bark. The core method matches our full bare-root tree planting guide, with extra care over depth and levelling because the panels must align.
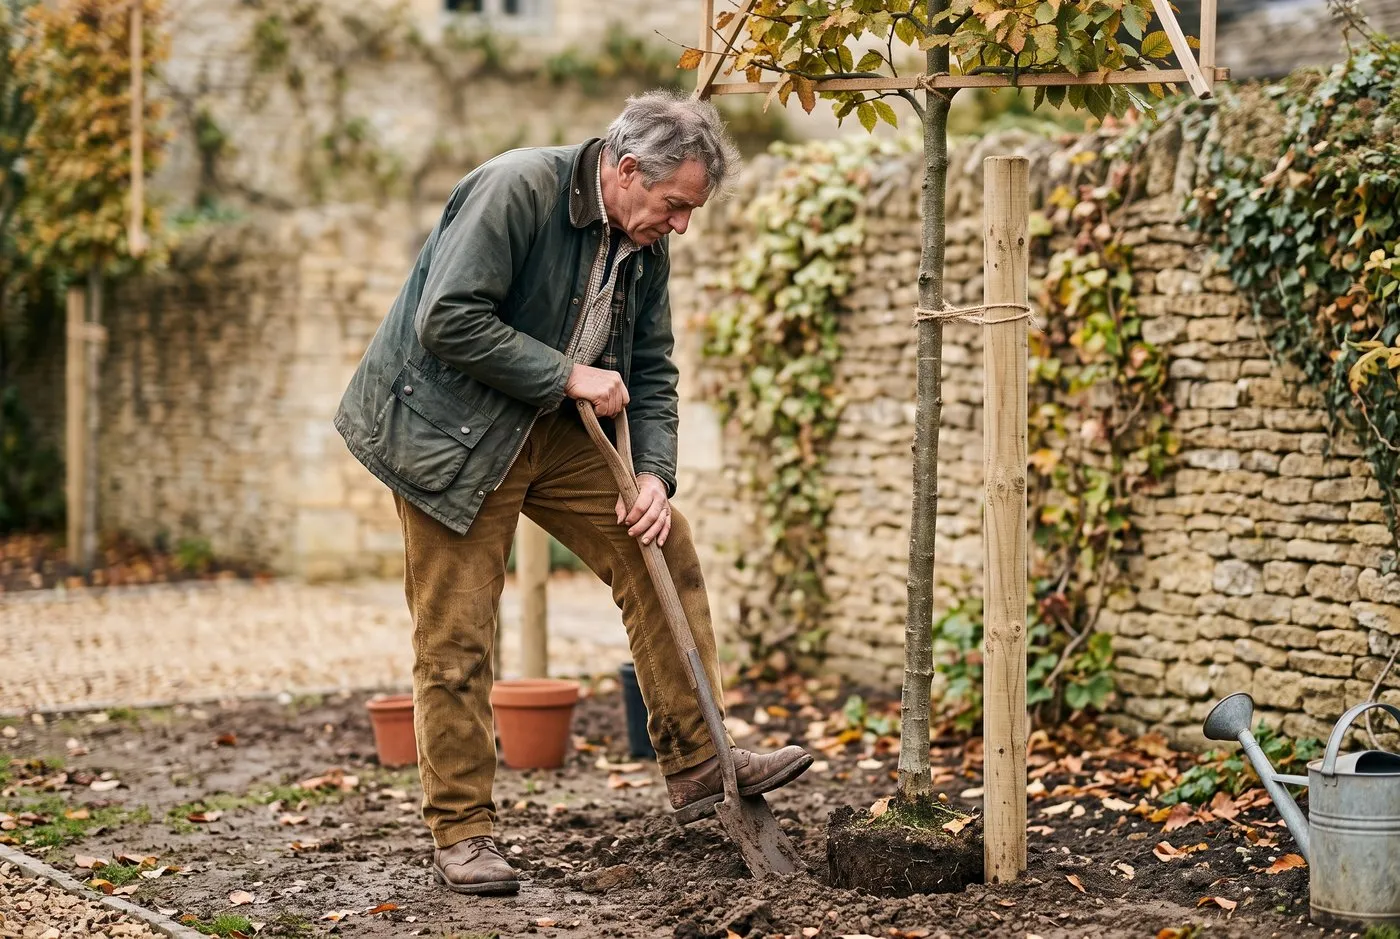 Backfilling around the rootball with the excavated soil, firming in layers to drive out air pockets. A pleached tree carries a small rootball under a large panel, so a solid anchor is everything.
Staking, guying and the training frame
Support is where pleached trees are won or lost. A standard single stake is not enough. The flat panel acts as a windbreak, and every gust levers the small rootball loose. We drive two stakes angled at 45 degrees just outside the rootball, or fit a triangular guying kit with three low anchors. On exposed sites add a single guy wire from a ground anchor to the frame. The aim is to stop the rootball moving while the stem is left free to flex and thicken.
Warning: Check every tie and stake after the first winter and again each spring. Ties left on a thickening branch cut in and strangle it, girdling the arm within two seasons. A stake that has worked loose rubs a wound at the collar. Both faults kill sections of panel and leave gaps that never fill. Loosen, re-tie and re-firm annually until the frame comes off.
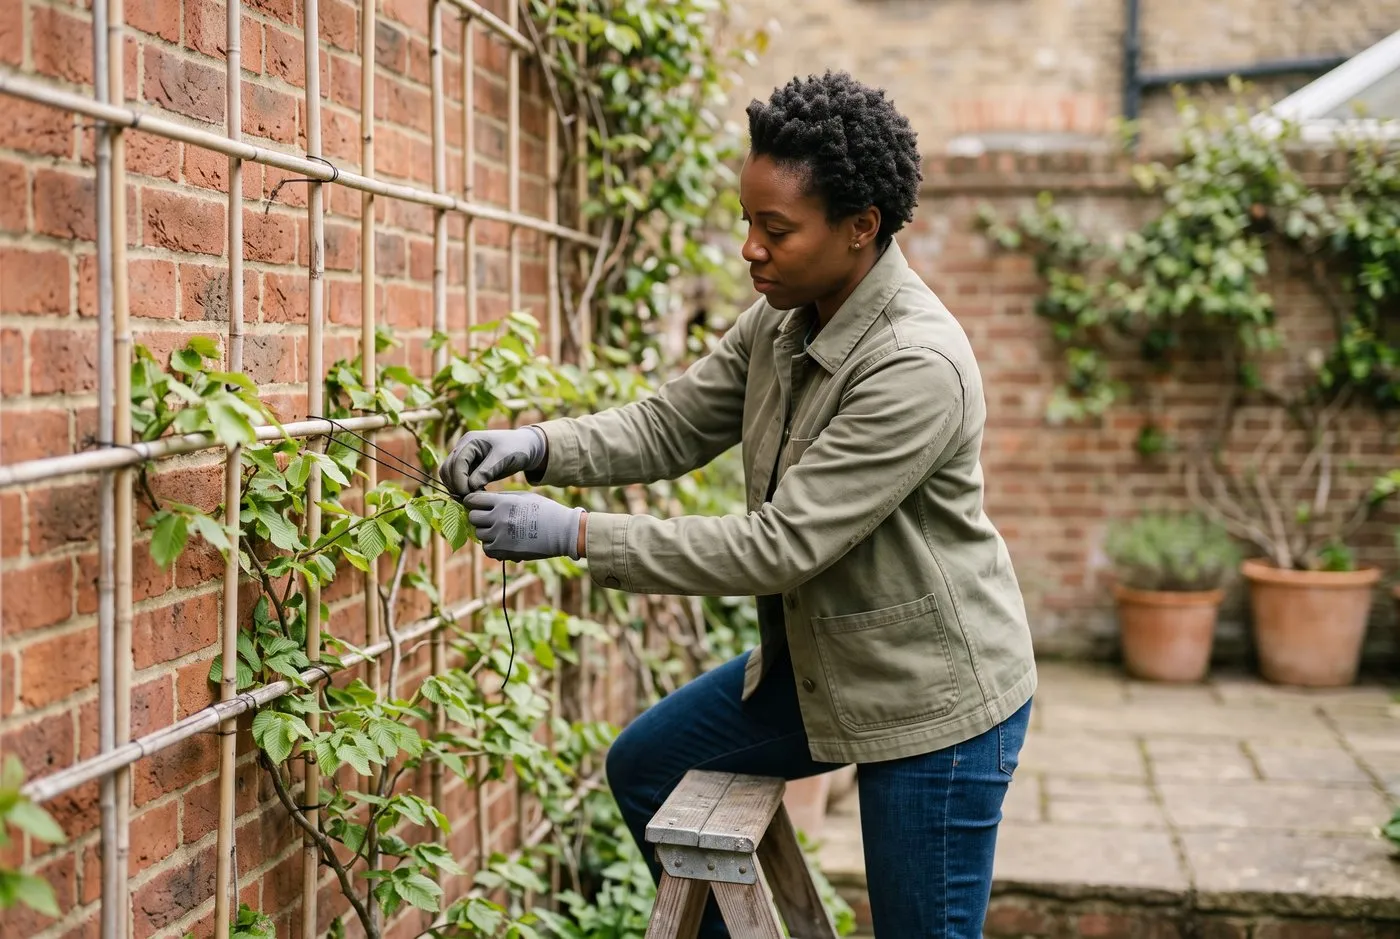 Tying young branches onto the bamboo-and-wire frame with soft ties. Spread the shoots to fill the grid and leave each tie loose enough to allow the branch to thicken.
Tying in and training the first three years
The frame does nothing on its own. You fill it. Through the first two or three summers, tie new shoots onto the canes and wires to build a solid, even panel. Use soft tree ties or biodegradable twine, never wire against bare bark. Guide horizontal branches out along the wires and space them a hand’s width apart. Anything growing straight forward or straight back gets pinched out, because it will never sit flat.
Tie in little and often from May to August while shoots are soft and bend without snapping. A branch tied early sets in the right plane. Left too long, it stiffens facing the wrong way and has to be cut out. Aim to fill the whole grid within two seasons on hornbeam or lime, a little slower on holm oak.
Keep the clear stem clean. Rub off any buds or shoots that break low on the trunk as soon as you see them, so the tree puts all its energy into the panel above. The discipline is exactly the same as training young climbers onto a support: get the shape right early and the plant does the rest.
When and how to prune pleached trees
Prune pleached trees twice a year to hold the flat panel. The main cut is in mid-summer, July or August, once the first flush of growth has hardened. Clip both faces and the top back to the frame line, removing forward and backward growth. Summer pruning slows regrowth and keeps the panel dense, the same reason summer suits trained espalier fruit trees.
The second cut is a late-winter reset, from December to February while the tree is dormant. Take out any thick or crossing branches, tidy the framework and shorten the leaders. Winter pruning drives stronger spring regrowth, so use it to fill gaps. Do not hard-prune deciduous species as the sap rises in early spring, and never cut lime or hornbeam in a hard frost.
For evergreen holm oak and Photinia, a light third tidy in early autumn keeps the faces sharp without triggering soft growth that frost then browns. Sharp, clean secateurs and loppers give a cut that heals fast and does not tear.
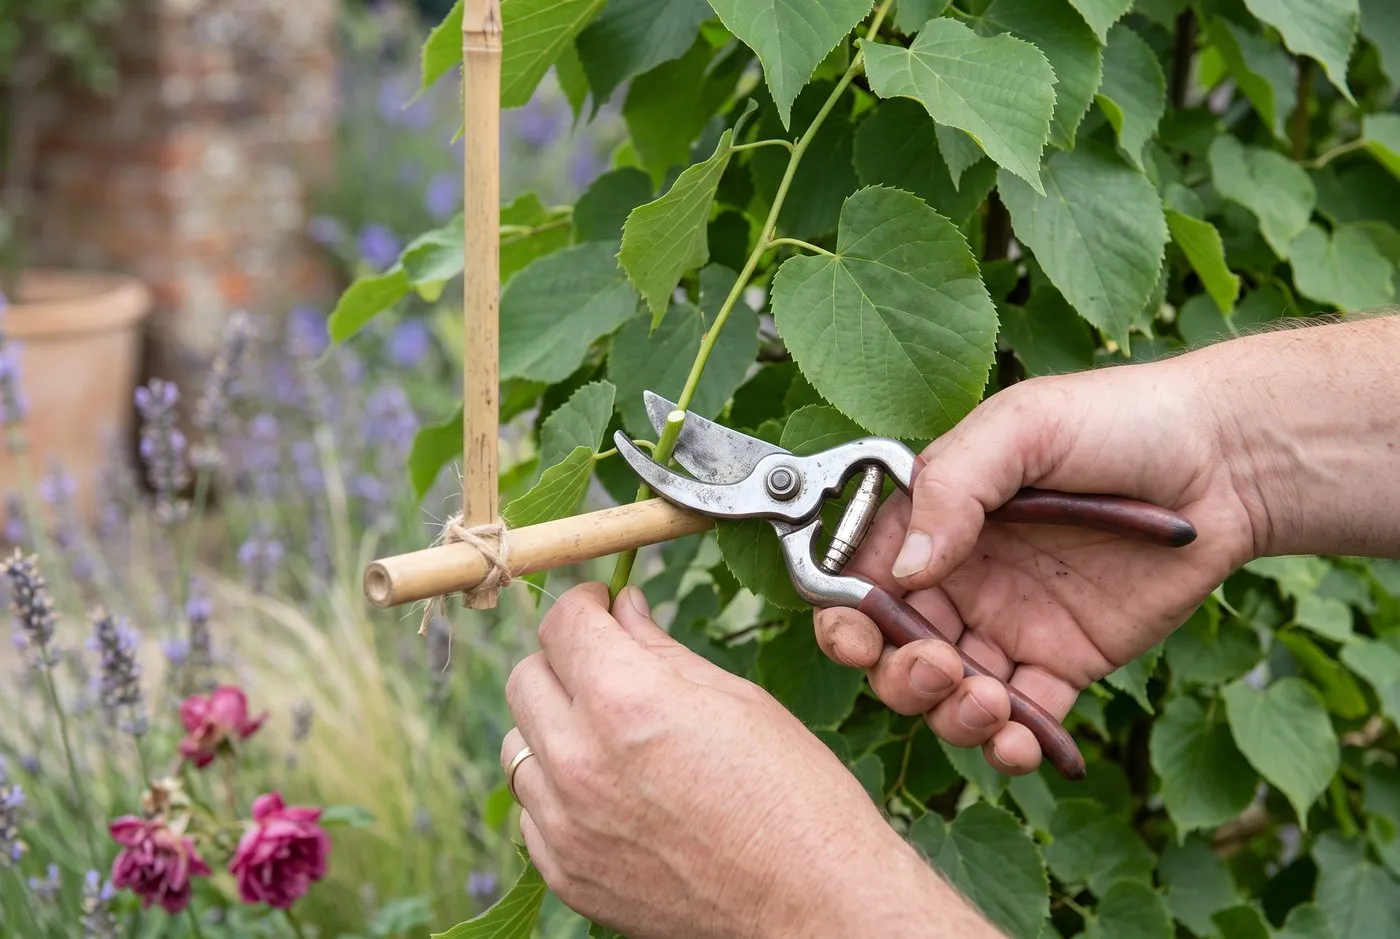 The mid-summer cut clips both faces back to the frame line. Pruning in July or August slows regrowth and keeps the flat panel dense.
Month-by-month pleached tree calendar
| Month | Task |
|---|---|
| January | Plant bare-root and rootball trees if the ground is workable. Check and loosen all ties and stakes. |
| February | Finish late-winter pruning: reset the framework, remove crossing branches, shorten leaders before the sap rises. |
| March | Last chance to plant bare-root. Apply a slow-release feed or a mulch of well-rotted manure over the root area. |
| April | Watch for wind rock in spring gales. Re-firm any loosened rootballs. Start weekly watering as growth begins. |
| May | Begin tying in soft new shoots to fill the frame. Rub off buds breaking on the clear stem. |
| June | Water deeply in dry spells, 20 to 30 litres per tree. Keep tying in. Watch limes for aphids and honeydew. |
| July | Give the main summer prune once growth hardens. Clip both faces and the top back to the frame line. |
| August | Continue tying in and light clipping. Keep watering: a thirsty panel in a heatwave wilts fast. |
| September | Light tidy on evergreens. Ease off feeding so growth hardens before winter. Order pre-pleached trees now. |
| October | Prepare planting pits. Mulch established trees. Photinia and holm oak can still be lightly shaped. |
| November | Prime planting month for deciduous trees. Stake and guy hard as you plant. Water in well. |
| December | Start dormant-season pruning on established trees. Check every stake and guy is sound before winter storms. |
The brown winter leaves are the deciding feature. A deciduous screen that vanishes in October is useless for privacy through the months you most want it. Hornbeam and beech both hold their dead foliage, but hornbeam wins on clay and in wind, exactly the conditions most UK boundaries throw at it. The RHS guidance on pleaching backs hornbeam and lime as the traditional workhorses, and the Woodland Trust profile of hornbeam explains why the tree tolerates heavy, wet ground that beech cannot.
Feeding, watering and why top-heavy trees fail
Most pleached trees that die or go gappy fail for one root cause: the small rootball cannot keep the large panel supplied, in water or in anchorage. It is never really a cold problem. A pleached tree presents a permanent windbreak on roots that have barely spread, so it dries out and rocks loose far more easily than a normal tree of the same height.
The permanent fix is two-fold. First, water like you mean it for the first two summers. Give 20 to 30 litres per tree once a week in dry spells, ideally through a leaky pipe on a timer so it soaks the whole root zone. A panel in full leaf on a 28C July day transpires hard and wilts within hours if the ball goes dry. Second, over-engineer the support and maintain it: two stakes and a guy, checked and re-firmed every spring until the frame comes off at three to four years.
Feed each spring with a slow-release tree fertiliser or a mulch of well-rotted manure over the root area, kept off the bark. Do not overfeed with high nitrogen, which throws soft, sappy growth that flops out of the frame and scorches. Steady feeding, deep watering and firm anchorage beat any quick fix. Get those three right and the screen thickens year on year.
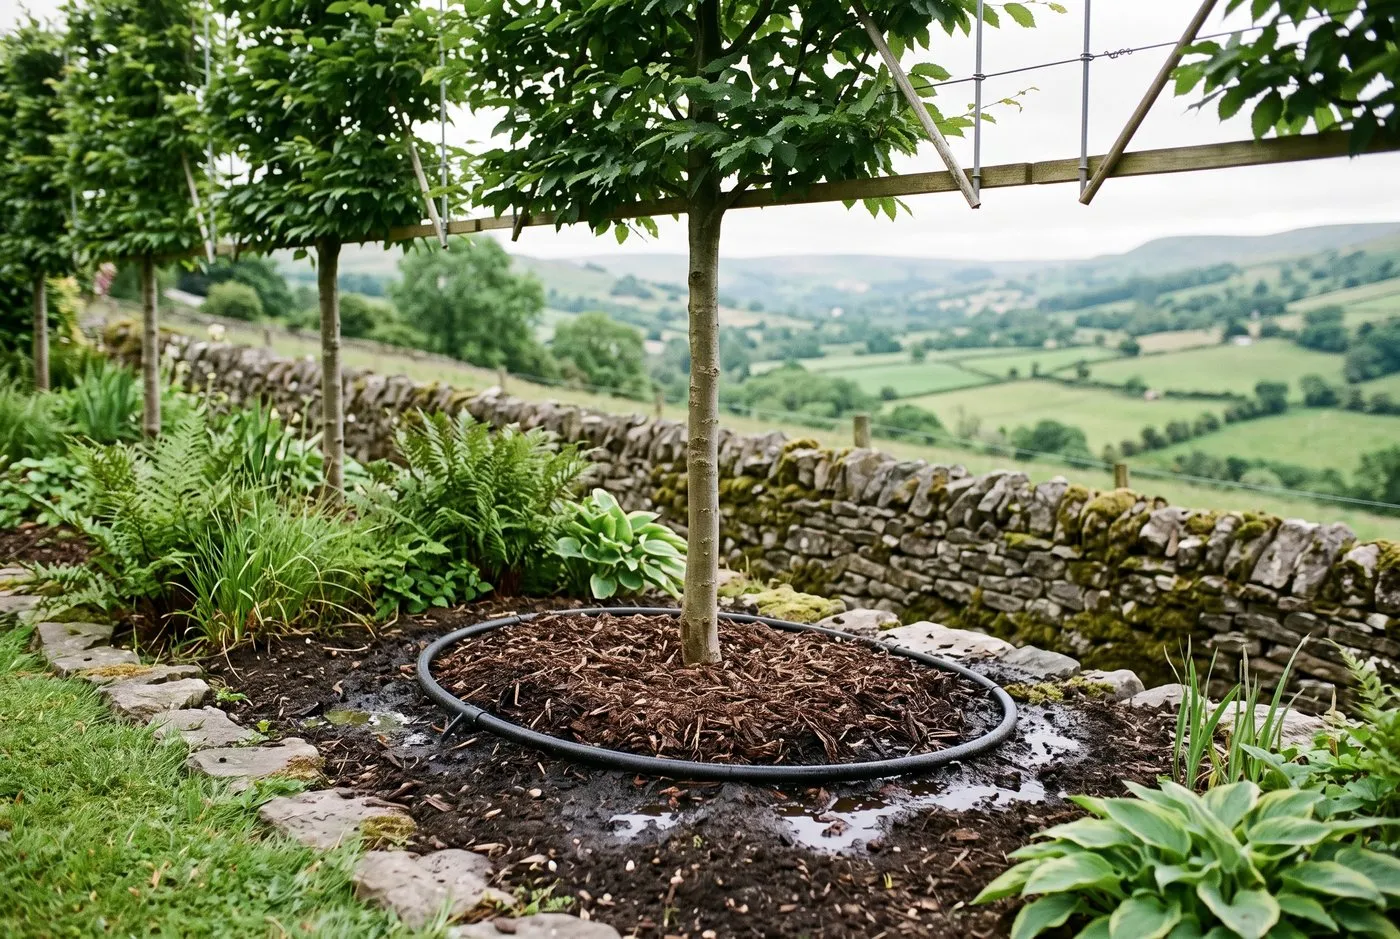 A leaky pipe on a timer soaks the whole root zone. Deep, regular water through the first two summers is what roots a top-heavy pleached tree in.
Common mistakes when planting pleached trees
- Under-staking the tree. A single stake fails a pleached tree because the panel is a sail. The rootball rocks in spring gales, roots snap, and the tree dies back. Fit two angled stakes or a triangular guying kit, and add a guy on exposed sites.
- Letting the panel go thirsty. The rootball is small for the size of top growth. Skip watering in the first two summers and the panel wilts, browns and thins. Run a leaky pipe or water 20 to 30 litres weekly in dry spells until well rooted.
- Leaving ties on too long. A soft tie left on a thickening branch cuts in and girdles the arm within two seasons. Whole sections of panel then die. Check, loosen and re-tie every spring until the frame comes off.
- Mismatched stem heights. If the clear stems are set at different heights, the panels never line up and the screen looks ragged. Level every stem to the same height at planting with a laser or string line, and buy trees matched for stem and panel size.
- Removing the frame too early. Pull the canes at 12 months and the untied branches spring out of plane and sag. Leave the frame for three to four years until the arms lignify and self-support, then remove it in stages.
Where to go next
Now you can plant and support a pleached screen properly, plan the wider boundary with our roundup of the best trees for privacy in UK gardens to decide what goes where. You can also browse all our how-to guides for planting, training and pruning projects to tackle next.
Frequently asked questions
What are pleached trees?
Pleached trees have a clear stem and a flat, trained panel of branches above. They work like a hedge on stilts, screening at eye level above a fence. The panel is trained onto a bamboo and wire frame, then clipped flat twice a year. Hornbeam, lime and holm oak are the usual choices.
How far apart do you plant pleached trees?
Plant pleached trees 1.2 to 2m apart, centre to centre. Closer spacing at 1.2 to 1.5m gives a solid screen faster and suits smaller garden trees. Wider spacing at 1.8 to 2m suits vigorous limes and keeps the cost down. Match the gaps to the frame width so the panels meet.
How much do pleached trees cost in the UK?
Pre-pleached trees cost £150 to £450 each in the UK. Price rises with stem girth, panel size and species, with mature limes and holm oaks at the top. A five-tree screen costs roughly £900 to £2,000 before delivery. Training your own from feathered whips costs far less but takes three to five years.
When should you prune pleached trees?
Prune pleached trees twice a year, in mid-summer and late winter. The mid-summer cut in July or August tidies the flat faces and slows regrowth. The late-winter cut, from December to February, resets the framework while the tree is dormant. Never hard-prune deciduous types in spring as the sap rises.
Which trees are best for pleaching?
Hornbeam, lime, beech, holm oak and Photinia Red Robin pleach best. Hornbeam suits most UK soils and holds brown winter leaves. Lime is fast but drops all its leaves. Holm oak and Photinia give a true evergreen screen. Beech wants free-draining ground and also keeps copper winter foliage.
Do pleached trees lose their leaves in winter?
Deciduous types like lime lose all their leaves in winter. Hornbeam and beech are deciduous but hold dead brown leaves through winter, a habit called marcescence, so they still screen. For a solid year-round green screen, choose evergreen holm oak or Photinia Red Robin instead. Evergreens screen fully in January.
How long before you can remove the training frame?
Remove the frame after three to four years, once branches thicken and self-support. By then the horizontal branches have lignified into rigid arms that hold their own shape. Cut the ties first and watch for a season before taking the canes out. In windy sites, leave the top wire in place longer.
Can you plant pleached trees against a fence for privacy?
Yes, pleached trees suit boundaries and overlooked gardens well. Set the stem 60 to 90cm off the fence so the panel can be worked from both sides. The clear stem keeps the border below usable for planting. This is the classic fix for a garden overlooked by a new-build or a first-floor window.
Our team produces practical UK gardening guidance from source research, contributor records and established horticultural practice. Editorial standards are overseen by Matt W.