Polytunnel Maintenance and Repair UK
Polytunnel maintenance UK guide - cover repair, wind damage fixes, full replacement timing, cleaning routine and the 7-year polythene lifespan.
Key takeaways
- Polythene covers last 5-7 years before UV degradation requires replacement
- Small tears (under 30cm) fix with clear vinyl repair tape - both sides
- Storm tears at hoop joints need patch panels and a heat gun for proper repair
- Annual October clean extends cover life by 12-18 months
- Full cover replacement: 4-6 hours with two people, calm morning, 80-180 pounds
- Anchor failure causes 60% of UK polytunnel storm damage - check rails every spring
Polytunnel maintenance is the difference between a structure that lasts 15-20 years cost-effectively and one that becomes a tip job after 3-4 years of neglected covers and bent hoops. This guide covers the routine maintenance that keeps a UK polytunnel in service, the repair techniques for tear and storm damage, the cover replacement workflow, and the seasonal checklist that prevents the next emergency.
For the wider context of polytunnel vs greenhouse choice and what to grow in each, see our polytunnel vs greenhouse UK guide. For the year-round growing calendar, see our polytunnel calendar UK guide.
What kills polytunnel covers in the UK
UK polytunnel polythene covers fail for four main reasons, ranked by frequency:
1. UV degradation (longest cause). Sunlight breaks down the polymer chains in polythene over years. Visible signs: yellowing, hazing (loss of clarity), brittleness when flexed. Standard UV-stabilised covers last 5-7 years. Premium 800-gauge (200-micron) covers reach 8 years. After this point the cover tears at the slightest stress and needs replacement.
2. Wind damage (acute cause). A loose or under-tensioned cover acts like a sail. Wind gets under the edges, lifts the polythene from the inside, and tears it at the highest-stress points - usually the base rail or door frame. A 60mph gust on a loose cover can shred it in seconds.
3. Hot-spot punctures (point cause). Polythene that touches a hot metal hoop in summer sun develops a small melt-through point. The hot spot propagates into a tear under any wind load. Prevention is anti-hot-spot tape (white adhesive UV tape) on every metal hoop.
4. Sharp object damage. Tree branches falling, low-flying pigeons hitting the top, kids’ garden equipment - acute damage from a single event. Visible as a clean tear with sharp edges rather than the woolly tear of UV damage.
The good news: methods 1, 3 and 4 produce small, repairable damage if caught early. Only #2 (wind) produces the kind of damage that ends a cover’s working life prematurely.
Annual maintenance routine
A 30-minute annual maintenance session in October extends polytunnel cover life by 12-18 months and prevents 80% of winter storm damage. Five tasks:
Task 1: Wash the cover inside and out
Algae and dust build up on the inside of the cover over summer, reducing winter light transmission by 15-25%. October is the right month - after summer growth has cleared, before winter light becomes critical for any overwintering crops.
Method: 5 litres of warm water + 1 tablespoon mild washing-up liquid. Soft sponge or cloth applied in long horizontal strokes. Rinse with clean water from a hose or watering can. Outside surface gets the same treatment - removes accumulated grime that blocks more light than people realise.
Task 2: Check and re-tension the base rail
The base rail (the timber or metal channel that the cover trenches into at ground level) is the highest-stress point on the structure. Polythene contracts in winter cold and stretches in summer heat. Over a season, the tension changes substantially.
Check method: walk around the tunnel and press the cover gently with a flat hand. It should give 2-5cm at the base before resistance, no more. If you can push it 10cm or more, the cover is loose and needs tensioning.
Tightening method: most UK polytunnels use a hot-spot rail at ground level - the polythene wraps around it and is held in place by aluminium clips or staples. Loosen the clips, pull the polythene tighter, re-secure. Adjust each side separately.
Task 3: Inspect the hot-spot tape on every hoop
Walk the inside of the tunnel and check the white anti-hot-spot tape on every metal hoop. Where the tape has peeled, lifted, or worn through, replace it. A 25mm-wide PVC anti-hot-spot tape roll costs £8-£12 and does a typical 3x6m tunnel.
Without the tape, the polythene touches the bare metal hoop in summer sun. The metal heats to 60-70C in direct sun. The polythene melts through at the contact point. Tape it.
Task 4: Check door frames and zips
Door frames take the worst wear because they get opened and closed daily. Check:
- Hinges secure and not pulling out of the timber
- Sliding-door tracks clear of debris
- Door cover polythene not torn or perished at the corners
- Zip on roll-up sides running freely (lubricate with silicone spray)
A typical UK polytunnel door zip lasts 4-6 years. Replace before it fails in November - mid-winter zip failure means the door does not close and the tunnel becomes useless until repaired.
Task 5: Anchor and ground peg check
 Ground anchors are the difference between a polytunnel that survives a gale and one that lifts off. Check every spring and reset any that have worked loose.
Walk around the tunnel and check every ground anchor (the steel pins driven into the soil through the base rail flange or pulling straps). UK soils settle and freeze-thaw cycles work the anchors loose over winter. Re-drive any that have lifted more than 30mm above the rail surface.
Specialised ground-screw anchors work better than pins on soft or sandy soils. Replace any anchors that have corroded through more than 50% of their thickness.
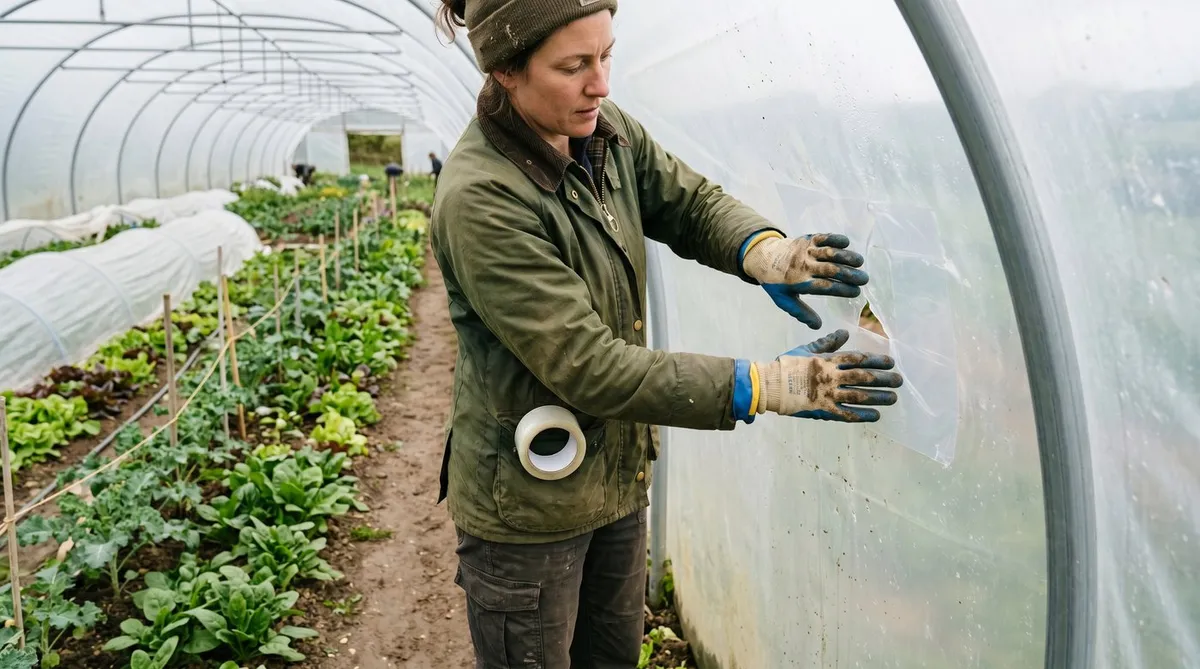
Repairing small tears
Tears under 30cm can be repaired with clear vinyl polytunnel repair tape. The repair lasts as long as the surrounding polythene if done correctly.
Materials:
- Clear vinyl repair tape, 75-100mm wide (£8-£15 a roll). First Tunnels and Premier Polytunnels both sell their own UK-suited products
- Soapy water and clean cloth
- Sharp scissors
Method:
- Wait for a dry day. Tape does not adhere to wet polythene.
- Clean both sides of the tear with soapy water, rinse, dry thoroughly with a clean cloth. Any dust or moisture prevents the tape adhering.
- Cut the tape to extend 50mm past the tear in every direction. Round the corners with scissors - sharp corners peel.
- Apply tape to the outside first. Smooth with the heel of your hand from the centre outward, working out any air bubbles.
- Apply matching tape to the inside. This is the most-skipped step and the reason most repairs fail. The sandwich-tape approach holds three times longer than single-side repair.
- Press both sides firmly along all edges. Recheck after 24 hours and re-press if any edge has lifted.
A properly-done tape repair on a clean tear lasts 2-3 years. On a hot-spot tear at a hoop joint, the repair tends to fail within a season because the stress concentration at the joint exceeds the tape strength.
Repairing storm-damaged sections
Larger tears, hoop-joint failures, and storm damage require a more substantial repair using a patch panel.
 Storm inspection - check the door frame, base rail and hoop joints first. Most acute damage starts at one of these three points.
Materials:
- Spare polythene off-cut (1m square minimum) - keep some from each cover replacement
- Hot air gun (£20-£40 from any DIY shop)
- Hot-spot or vinyl repair tape
- Sharp scissors and a metal straight-edge
Method for patch panel:
- Cut a panel of new polythene 200mm larger in every direction than the damaged area.
- Trim the damaged polythene back to a clean edge - rounded shape, no sharp corners.
- Position the patch over the damaged area, smooth flat.
- Working in 100mm sections, use the hot air gun on its lowest setting to lightly heat both layers until they bond. Press firmly with a wooden block (not your hand - the polythene is hot enough to burn).
- Edge-tape with vinyl repair tape on the outside for additional weather seal.
- Repeat on the inside if access allows.
A heat-welded patch panel lasts 4-6 years on a stable section. On a high-stress section (door frame, hoop joint, base rail) expect 1-2 years before re-repair.
When repair is not worth it
Three signals that the cover should be replaced rather than repaired:
- More than three active tears in one season. The polythene has reached UV-degradation threshold. New tears will keep appearing until full replacement.
- Visible yellowing or hazing across more than 30% of the cover. Light transmission is dropping below useful levels.
- Tears wider than 50% of a hoop section. The structural integrity of the section is compromised; repair is a temporary fix only.
At any of these points, plan replacement for the next September-October window before storm season.
Full cover replacement
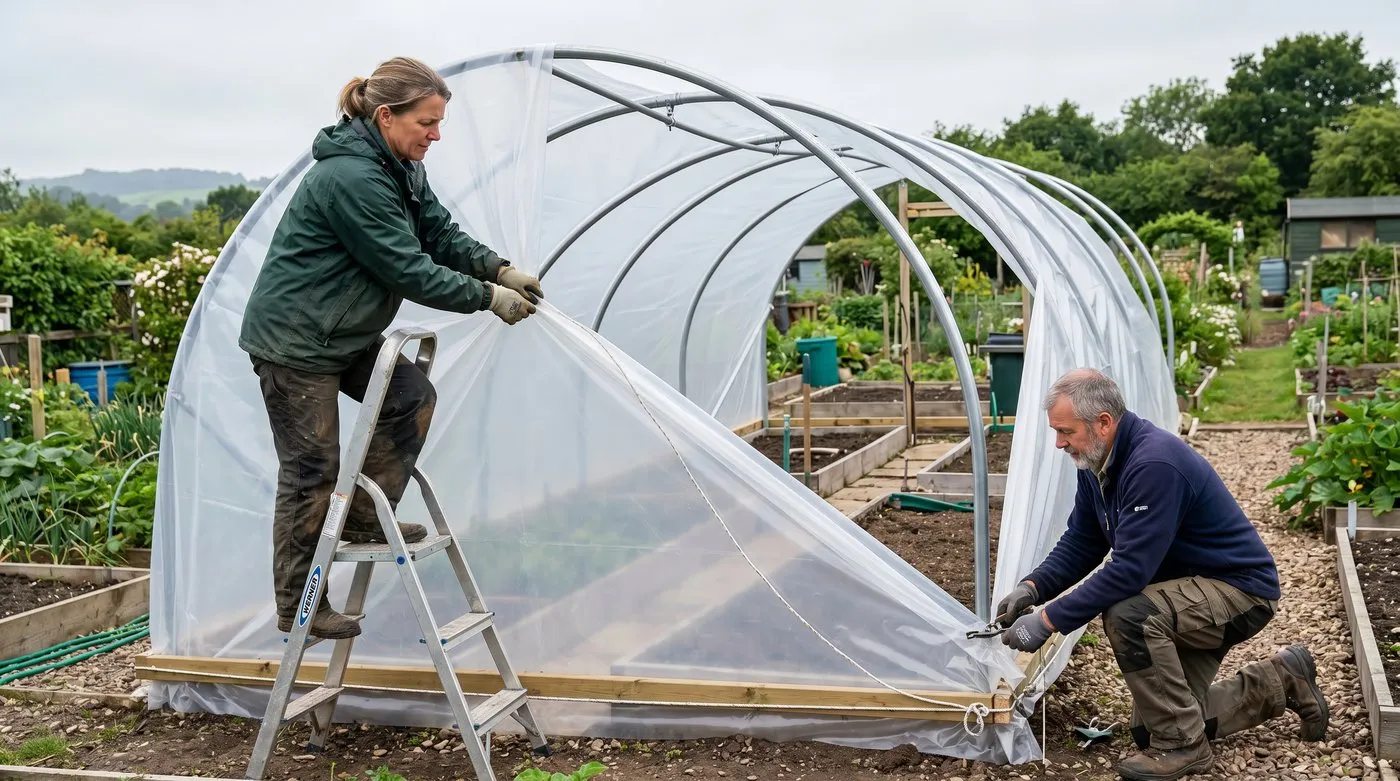 Full replacement is a 4-6 hour job for two people on a windless morning. Pick a forecast calm day - any wind makes the job impossible.
Replacing a polythene cover is a once-per-5-7-years job. The process takes 4-6 hours with two people on a calm morning. Wind above 10mph makes the job effectively impossible because the unsecured cover billows uncontrollably.
Materials:
- New polythene cover (UV-stabilised, 720-gauge minimum, sized to your tunnel)
- Anti-hot-spot tape for any hoops needing replacement
- New base-rail clips or staples
- Spirit level for tensioning checks
- Soft brush for sweeping the hoops before fitting
Method (3x6m tunnel example):
- Pick a calm morning. Check the BBC Weather forecast - winds under 10mph all day. Start before 9am while air is stillest.
- Remove the old cover. Cut along the base rail, lift off, fold and dispose. Save 1-2m² of usable polythene for future patch panels.
- Clean and check the hoops. Sweep dust off, replace any worn anti-hot-spot tape.
- Unfold the new cover flat on the lawn or grass next to the tunnel.
- Lift one end onto the tunnel - this is the two-person stage. Use a stepladder if needed.
- Pull the cover lengthwise over the tunnel hoops, keeping it square.
- Trench one long side first. Dig a 100mm-deep trench along the base rail, push the polythene edge into the trench, backfill with soil.
- Tension across the tunnel while trenching the second long side. The cover should be taut enough that pressing it gives 2-5cm of give, no more.
- Trench the two ends. Pleat the polythene at the corners to take up slack.
- Re-fit the doors and secure with the original frame fittings.
- Final tension check - walk round and re-pressure-test each side. Re-tension if needed.
UK suppliers like First Tunnels, Premier Polytunnels and Northern Polytunnels deliver a new cover cut to your model’s exact dimensions for around £130-£180.
Seasonal maintenance calendar
| Month | Task |
|---|---|
| January-February | Mid-winter inspection after major storms. Check door frame and base rail. |
| March | Spring tension check. Re-drive any anchor pegs lifted by frost. |
| April | Door zip check and lubricate. Inspect for winter-developed tears. |
| May | Hot-spot tape inspection - replace any worn sections before summer heat. |
| June-August | Light maintenance only. Watch for new tears in heatwaves. |
| September | Pre-storm prep. Check anchors and base rail. Plan repairs before October. |
| October | Annual deep clean inside and out. Re-tension all rails. Check door zips. |
| November | Final inspection before winter. Stock spare tape and patch material. |
| December | Storm watch - inspect after any 50mph+ gust event. |
The two most important months are March (post-winter check) and October (pre-winter prep). 30 minutes each saves hours of mid-winter emergency repair.
Cost of ownership over 10 years
A typical UK 3x6m polytunnel ownership cost over a decade:
| Item | Cost |
|---|---|
| Initial purchase (mid-range, fitted) | £350-£550 |
| Cover replacement at year 6 | £130-£180 |
| Repair tape and consumables (10 years) | £40-£80 |
| Hot-spot tape replacements | £20-£40 |
| Anchor pegs / strap replacements | £15-£30 |
| Door zip replacement | £25-£40 |
| 10-year total | £580-£920 |
Annualised: £58-£92 per year for a covered growing space of 18m². The cover is the largest single ongoing cost. Stretching it to 7 years instead of 5 saves £60-£80 per cycle, which is why the annual maintenance routine pays back so well.
Storm preparation checklist
When a named storm is forecast for your area (Met Office amber warning or worse):
- Close all vents and doors - secure them, ideally with extra rope or strap.
- Remove any external loose items - hanging baskets, pots, signs, anything that might blow into the cover.
- Inspect the base rail for any loose section and re-pin if needed.
- Tighten any visibly loose cover area if time allows.
- Plan for emergency repair - have repair tape and a torch to hand if the storm continues into night.
- Stay away from the tunnel during the storm - polythene can flap with serious force and a broken hoop is dangerous.
After the storm, inspect immediately. Repair small tears that same day before they propagate. Document any major damage with photos for insurance.
When to upgrade rather than repair
Three signs that a polytunnel structure needs replacing rather than maintaining:
- Multiple hoops bent or rusted through. Replacement of individual hoops is possible but cost approaches new-tunnel pricing once two or more need swapping.
- Base timber rotted out. The base rail timber is the foundation - if it rots, the whole structure becomes unstable. Replacement timber needs full disassembly anyway.
- Door frame failed. Most polytunnel structures have an integral door frame welded to the end hoops. If it fails, you face cutting out and welding in new metal - often more expensive than a new tunnel kit.
A budget polytunnel that has taken three cover replacements and is into its second decade is usually due for full replacement.
Field note: The RHS holds the standard UK reference on polytunnel design and care. First Tunnels and Premier Polytunnels both publish maintenance guides specific to their products that are worth keeping with the original instructions.
Common UK polytunnel mistakes
Mistake 1: Buying a cheap cover. A budget 600-gauge cover at £80 lasts 3-4 years. A premium 720-gauge UV-stabilised cover at £160 lasts 6-7 years. The premium cover costs less per year of service.
Mistake 2: Skipping annual cleaning. The £0 cost of soapy water adds 18 months to cover life. Skip it five years running and you replace the cover twice instead of once.
Mistake 3: Trying to replace the cover in any wind. Wait for a still day even if you have to delay by a week. Mid-job wind tears a brand-new cover faster than you can secure it.
Mistake 4: Not stocking repair materials. A small tear in November cannot wait until April. Keep a roll of clear vinyl tape and a 1m² polythene off-cut in the shed permanently.
Mistake 5: Repairing dirty polythene. Tape will not stick to algae or dust. Always wash and dry the area first.
Now you’ve covered the maintenance
For the year-round growing detail of what to plant when in a UK polytunnel, read our polytunnel calendar UK guide. For getting the highest yield per square metre out of your tunnel through multi-cropping and vertical planting, see polytunnel productivity UK: crops per m².
Lawrie has been gardening in the West Midlands for over 30 years. He grows his own veg using no-dig methods, keeps a wildlife-friendly garden, and writes practical advice based on real UK growing conditions.