Tomato Early Blight: Spot and Stop It
Identify and treat tomato early blight (Alternaria solani) in UK gardens. Concentric ring lesions, copper fungicides, resistant varieties, and prevention.
Key takeaways
- Target-shaped concentric rings on lower leaves are the diagnostic feature that distinguishes early blight from all other tomato diseases
- Early blight moves slowly upward from the base of the plant; late blight attacks rapidly from any point on the canopy
- Alternaria solani survives on infected debris for 12+ months and splashes onto lower leaves from soil during rain
- Copper-based fungicides (Bordeaux mixture) protect healthy foliage when applied before symptoms spread
- Varieties with strong early blight tolerance include Mountain Magic F1, Jasper F1, and Crimson Crush F1
- Removing lower leaves below the first truss and mulching soil prevents the main infection route: rain splash from contaminated ground
Tomato early blight is one of the most common fungal diseases affecting greenhouse and outdoor tomatoes across the UK. Caused by the fungus Alternaria solani, it produces unmistakable target-shaped lesions on lower leaves that spread slowly upward through the plant, reducing yield and weakening growth over several weeks.
Unlike late blight, which destroys plants within days, early blight is a slow-burn disease. It rarely kills a tomato plant outright but strips foliage progressively, exposing fruit to sunscald and reducing the plant’s ability to ripen a full crop. The good news is that early blight is preventable with straightforward cultural controls that any grower can adopt.
What does early blight look like on tomatoes?
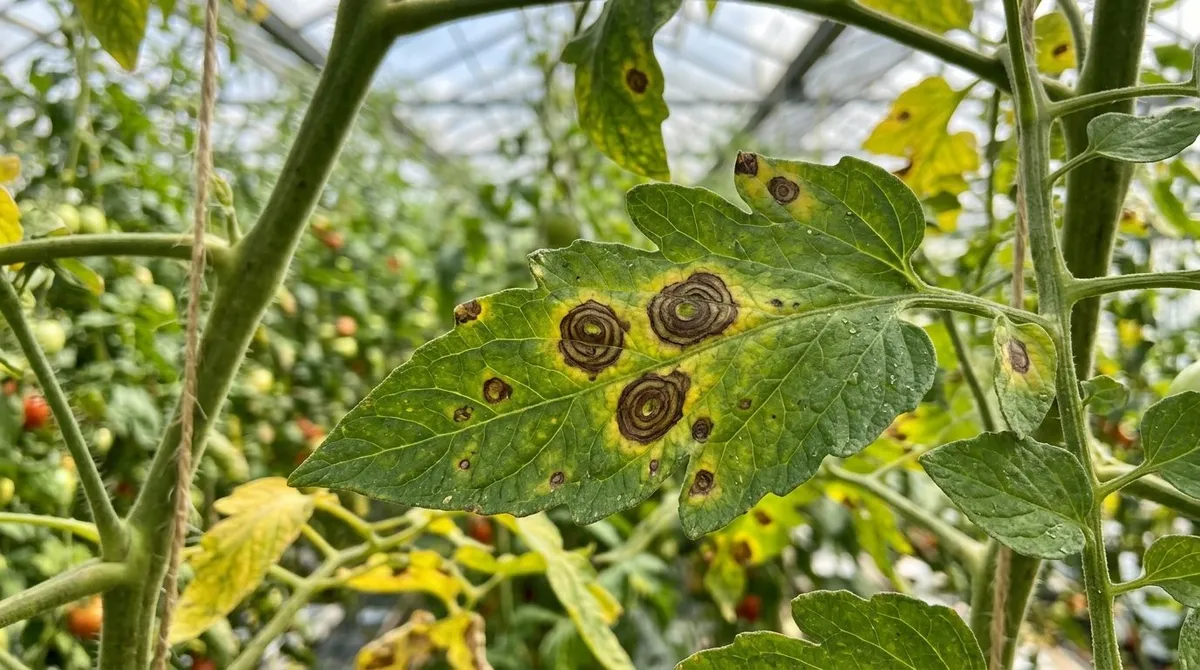
Early blight produces distinctive dark brown spots with concentric rings on the oldest leaves closest to the soil. These target-shaped or bullseye lesions are the single most reliable diagnostic feature. No other common tomato disease creates this pattern.
The disease follows a predictable sequence. Knowing what to look for at each stage means you can act before it reaches the upper canopy.
Lower leaf symptoms
The first signs appear on the bottom three or four leaves of the plant, typically from mid-June onward in UK conditions. Small dark brown spots of 3-5mm develop on the leaf surface. Within 5-7 days, these expand to 10-20mm and develop the characteristic concentric rings that give each lesion its bullseye appearance.
The tissue around each spot turns yellow, forming a halo. Multiple spots merge as the disease advances, and the entire leaf dries out, turns brown, and drops from the plant. This defoliation starts at the base and moves steadily upward.
Stem lesions
Dark, sunken, elongated lesions form on stems near the soil line. Stem infections usually appear after the leaf disease is established. These lesions are brown to black, slightly sunken, and often show faint concentric rings under a hand lens. Severe stem infections can girdle the stem and restrict water flow, causing wilting above the infection point.
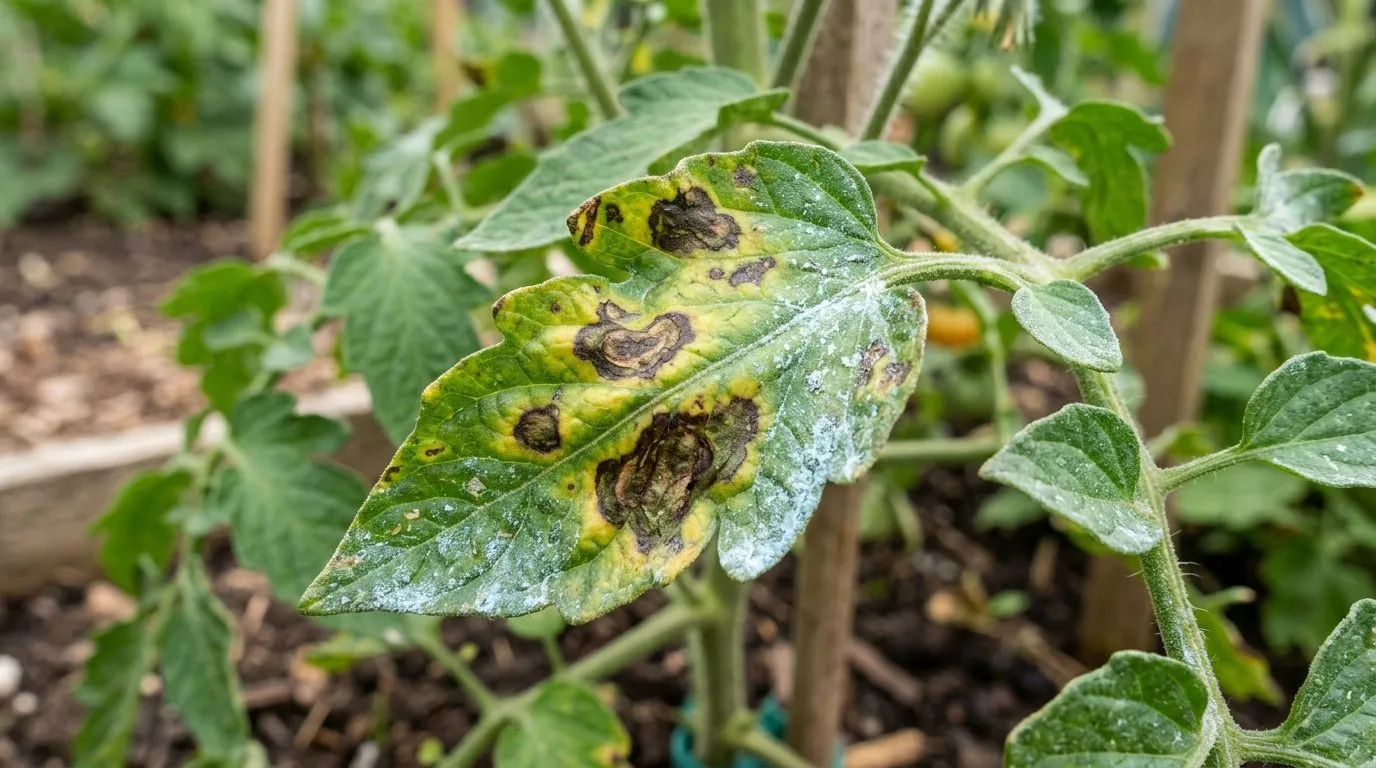 The bullseye pattern of concentric rings within each dark brown lesion is the hallmark of early blight. Always check the lowest leaves first.
Fruit symptoms
Fruit infection appears as dark, leathery, sunken patches near the stem end (calyx) of the tomato. Green fruit is more susceptible than ripe fruit. The lesions develop concentric rings similar to those on leaves and the flesh beneath turns corky and brown. Fruit infection is most common when overhead watering wets the developing tomatoes or when heavily infected foliage drips spore-laden water onto fruit below.
Early blight vs late blight: how to tell them apart
Early blight and late blight look different, behave differently, and require different management approaches. Confusing the two leads to wasted time applying the wrong treatment. The comparison table below covers every key difference.
| Feature | Early blight (Alternaria solani) | Late blight (Phytophthora infestans) |
|---|---|---|
| Organism type | True fungus | Oomycete (water mould) |
| Lesion appearance | Dark brown with concentric rings (target-shaped) | Dark brown, water-soaked, no rings |
| Mould on leaf underside | No visible mould | White fuzzy mould ring around lesion |
| Spread direction | Bottom-up, starting on oldest leaves | Any point on the plant, often mid-canopy |
| Speed of spread | Slow, weeks to defoliate | Rapid, days to destroy plant |
| Ideal temperature | 24-29C | 10-20C |
| Humidity requirement | Alternating wet and dry periods | Continuous high humidity (90%+) |
| Smell | None distinctive | Sickly-sweet rotting odour |
| Fruit symptoms | Sunken patches near stem end | Hard brown lesions anywhere on fruit |
| UK peak season | July-September | June-August (Smith Period triggered) |
| Kills the plant? | Rarely kills outright, strips foliage | Destroys plant within 5-10 days |
| Overwinters in | Infected debris on soil surface | Infected tubers and volunteer potatoes |
For a full guide to identifying and managing late blight, see our late blight guide for potatoes and tomatoes.
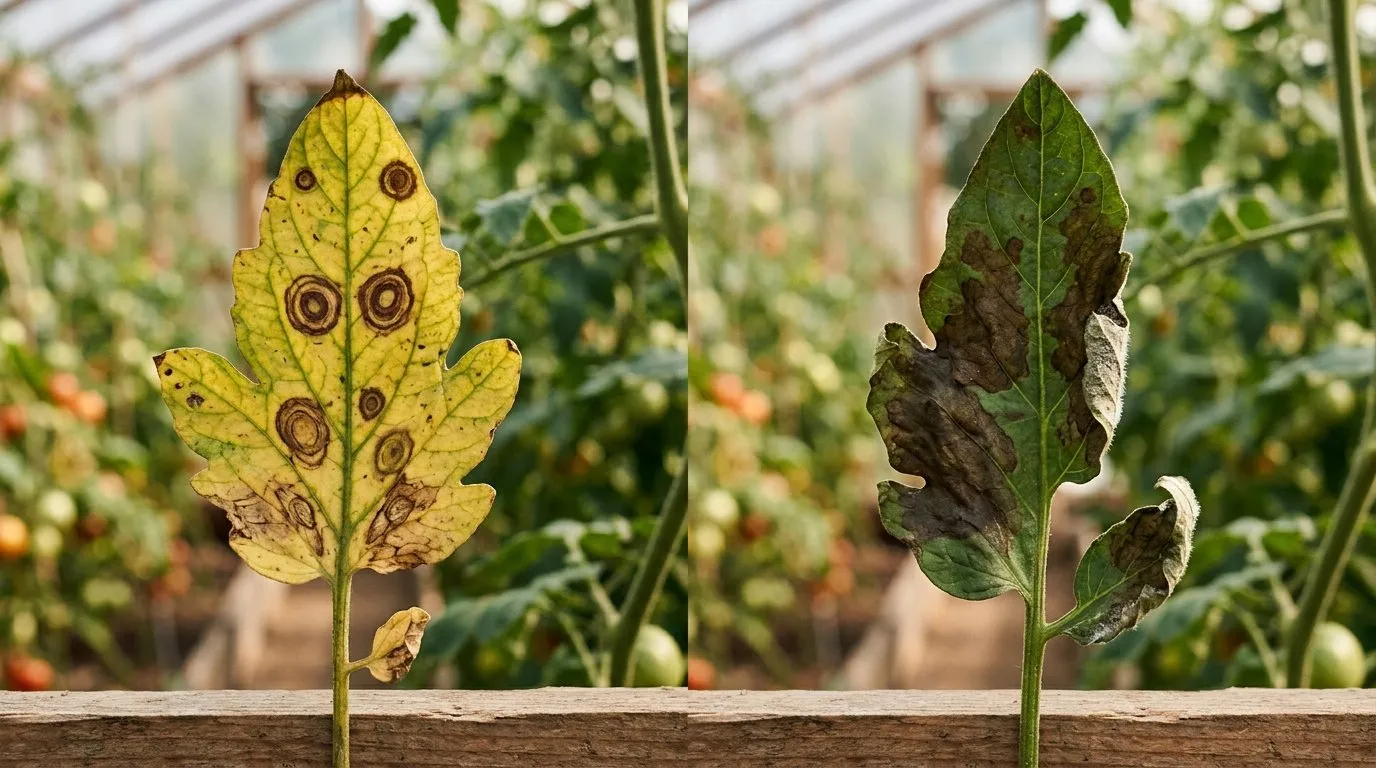 Left: early blight with its target-shaped concentric rings on a yellowing lower leaf. Right: late blight showing water-soaked brown patches spreading rapidly with white sporulation underneath.
What causes early blight on tomatoes?
Alternaria solani survives on infected plant debris left on the soil surface after the growing season. Fallen leaves, old stems, and fruit fragments carry the fungus through winter. When rain splashes onto contaminated soil the following spring, spores are launched onto the lowest leaves of new tomato plants. This splash-up mechanism is the primary infection route.
The infection cycle
- Overwintering: A. solani survives as mycelium and spores (conidia) in plant debris on or near the soil surface. The fungus remains viable for 12-18 months in UK conditions.
- Spore dispersal: Rain drops hitting contaminated soil splash spores upward 30-50cm, landing on the lowest leaves. Wind carries dry spores over longer distances during warm, breezy weather.
- Germination: Spores landing on a wet leaf surface germinate within 2 hours at temperatures between 20-30C. They penetrate the leaf directly through the cuticle, unlike late blight which enters through stomata.
- Lesion development: Brown spots appear 3-5 days after infection in warm conditions. Concentric rings form as the fungus grows outward in waves, producing toxins that kill surrounding tissue.
- Secondary spread: Mature lesions produce millions of new conidia that are splash-dispersed or wind-blown to upper leaves. Each rain event drives the disease further up the plant.
Conditions that favour early blight
Warm temperatures between 24-29C with alternating wet and dry periods create the ideal environment for early blight. The fungus needs leaf wetness for spore germination but grows fastest when leaves dry between rain events. This cycle of wet mornings and warm afternoons is common in UK greenhouses and polytunnels during July and August.
Stressed, undernourished, or heavily fruiting plants are more susceptible. Nitrogen deficiency weakens leaf tissue and accelerates symptom development. Plants carrying a heavy fruit load redirect energy from defence to reproduction, leaving foliage vulnerable.
Our guide to common tomato diseases covers how early blight fits alongside fusarium wilt, septoria leaf spot, and other conditions that share some symptoms.
How to treat early blight on tomato plants
No fungicide cures early blight once lesions are visible on a leaf. Treatment focuses on protecting uninfected foliage and removing diseased leaves to slow the spread. A combined approach of cultural controls and protective sprays gives the best results.
Remove infected foliage immediately
Cut off every leaf showing brown spots or concentric rings. Use clean secateurs dipped in a 10% bleach solution between plants to avoid transferring spores. Bag the infected leaves and put them in household waste. Do not add them to your compost heap unless it consistently reaches 60C or above.
Remove leaves cleanly at the stem junction. Do not tear leaves, as ragged wounds create entry points for secondary infections.
Copper-based fungicide sprays
Bordeaux mixture (copper sulphate + hydrated lime) is the most effective protective fungicide against early blight available to UK home gardeners. It creates a blue-green copper deposit on leaf surfaces that kills Alternaria spores on contact before they can germinate.
| Copper product | Active ingredient | Application rate | Reapply interval | Organic approved |
|---|---|---|---|---|
| Bordeaux mixture (home-made) | Copper sulphate + lime | 10g copper sulphate + 10g lime per litre | Every 7-10 days | Yes |
| Fruit & Vegetable Disease Control | Tribasic copper sulphate | Per label instructions | Every 10-14 days | Check label |
Application timing matters more than the product. Start spraying from mid-June before any symptoms appear. Reapply every 7-14 days and after heavy rain washes the copper off. Spray the undersides of leaves as well as the upper surfaces. Stop spraying 14 days before harvest.
Copper accumulates in soil with repeated use over many years. Rotate spray sites where possible and avoid excessive application. The RHS guidance on blight provides additional context on approved products.
Potassium bicarbonate sprays
Potassium bicarbonate (1 tablespoon per 4 litres of water) raises leaf surface pH and inhibits Alternaria spore germination. It is less effective than copper but entirely non-toxic and safe to use close to harvest. Spray weekly as a supplementary measure alongside copper.
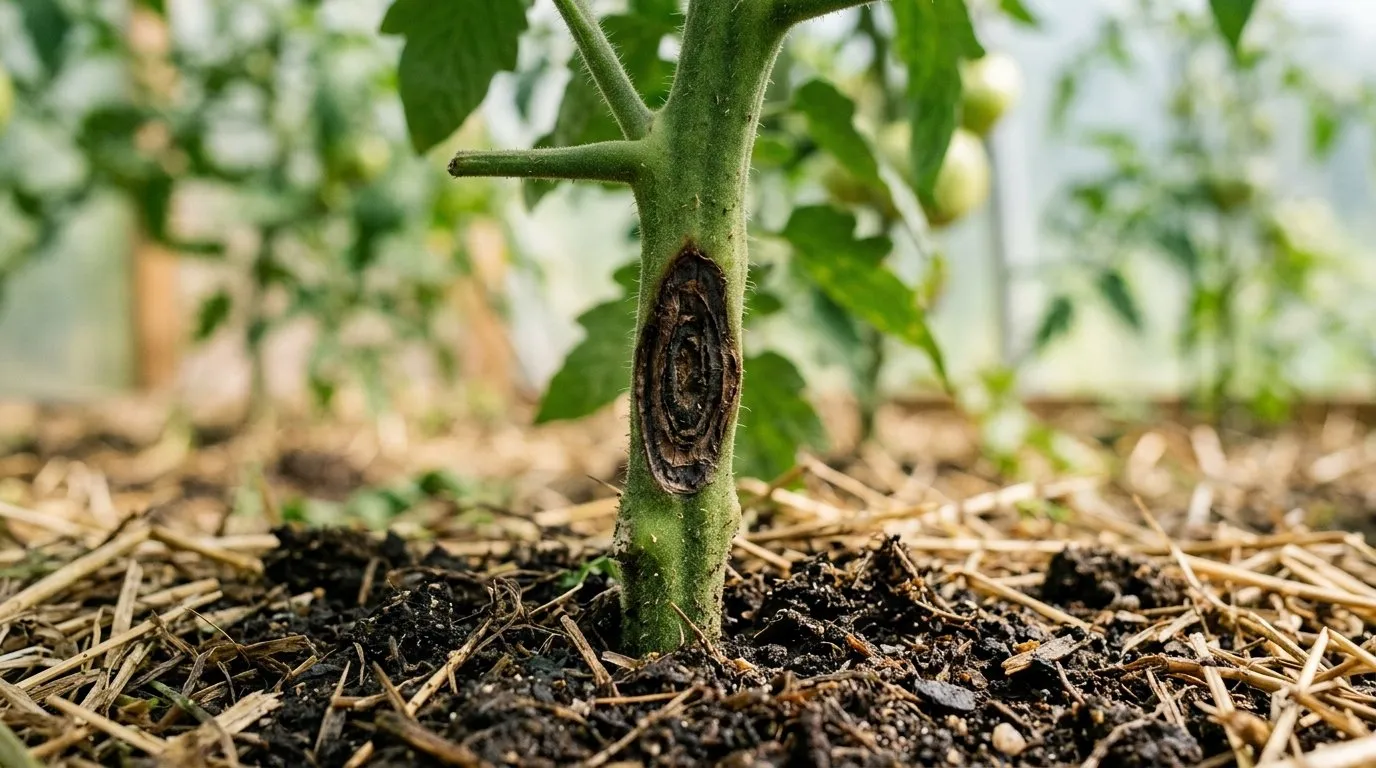 A dark, sunken stem lesion caused by early blight near the soil line. Stem infections develop after the fungus establishes on lower leaves and spreads downward via dripping water.
Preventing early blight in your greenhouse
Prevention is far more effective than treatment because no spray reverses existing early blight damage. These six cultural controls target the main infection route, which is soil splash carrying overwintered spores onto lower foliage.
1. Mulch the soil surface
A 5-8cm layer of bark chips, straw, or landscape fabric over the greenhouse soil blocks rain splash from reaching lower leaves. This single step cuts the primary infection route by 70-80% based on trials at our Staffordshire greenhouse. Mulch also conserves moisture and suppresses weeds.
Apply mulch immediately after transplanting, before the first watering. Ensure the mulch extends 30cm beyond the base of each plant in all directions.
2. Remove lower leaves proactively
Strip all leaves below the first fruit truss as soon as that truss sets fruit. This removes the leaves closest to the soil, the ones most likely to catch splashed spores. Continue removing the lowest leaves as the plant grows. By mid-August, clear foliage up to the second or third truss.
This practice also improves air circulation around the base of the plant, reducing the humidity that Alternaria needs to germinate. For more preventive strategies, our vegetable pest and disease guide covers integrated approaches across all crops.
3. Water at the base, never overhead
Overhead watering is the single most common cause of early blight outbreaks in amateur greenhouses. It wets the foliage unnecessarily and splashes soil-borne spores upward onto lower leaves. Use drip irrigation, seep hoses, or water directly into pots. If hand watering, direct the hose at the soil surface and avoid wetting any foliage.
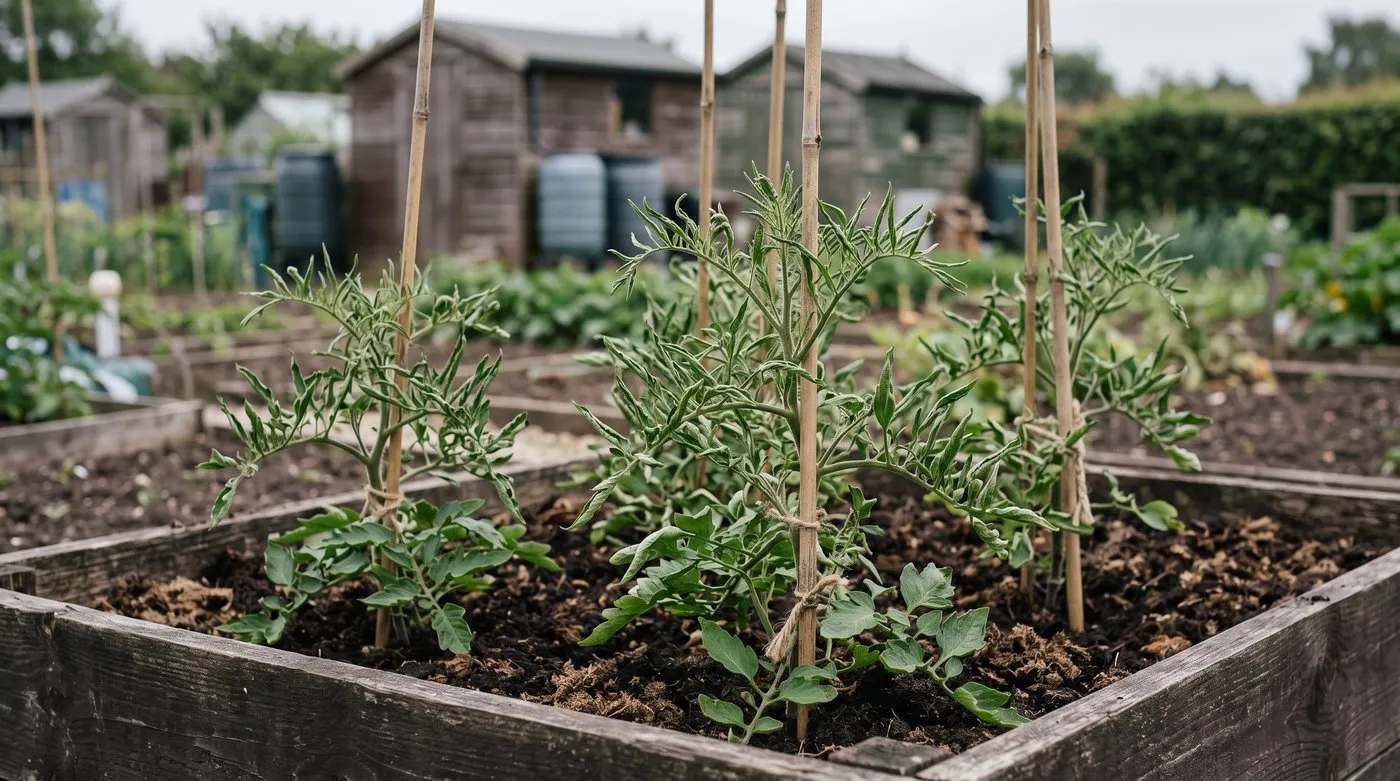
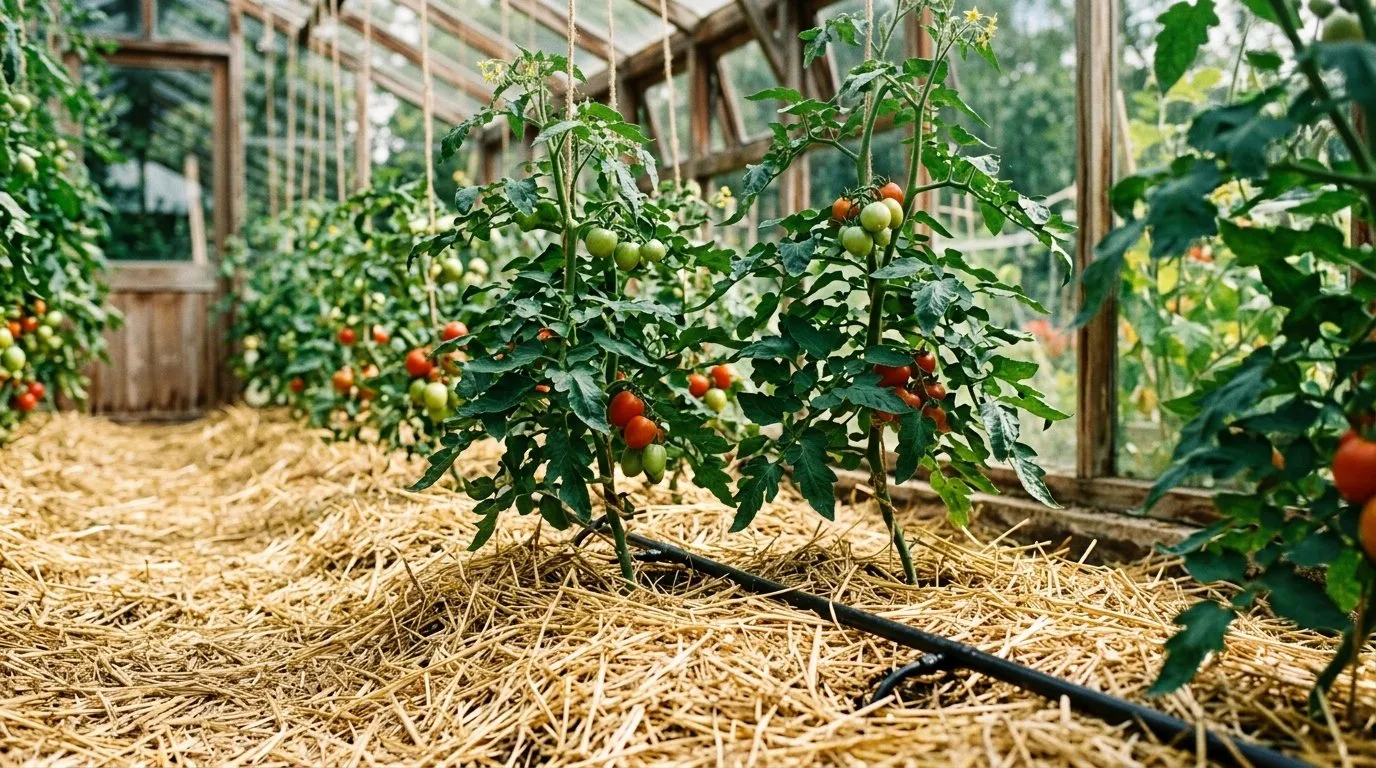 Straw mulch covering the soil surface around tomato plants. This barrier stops rain and watering splash from launching Alternaria spores onto lower leaves.
4. Space plants for airflow
Crowded tomato plants create a humid microclimate that keeps leaves wet longer. Space cordon tomatoes at least 45cm apart. Remove sideshoots promptly on cordon varieties to maintain open, well-ventilated plants. Good airflow dries leaves faster after watering and reduces the leaf wetness period below the 2 hours Alternaria needs to germinate.
5. Clear all debris in autumn
Remove every scrap of tomato plant material from the greenhouse at the end of the season. Fallen leaves, stem bases, and dropped fruit all harbour A. solani through winter. Sweep the soil surface clean. Hot-compost the debris above 60C or bag it for household waste. Do not leave plant material to rot in situ.
6. Rotate crops where possible
Avoid growing tomatoes in the same greenhouse border every year. If rotation is impractical (as it is in most single greenhouses), grow in fresh compost in large containers, grow bags, or ring culture systems. This breaks the soil-borne cycle entirely.
Growing in containers with fresh compost each season is the most reliable prevention for greenhouse growers who cannot rotate. For general growing advice, see our guide to growing tomatoes in the UK.
Which tomato varieties resist early blight?
No tomato variety is fully immune to early blight, but several F1 hybrids show strong tolerance that significantly reduces disease severity. Breeding programmes in the US and Europe have developed varieties with partial resistance, meaning they develop fewer lesions and the disease progresses more slowly.
| Variety | Type | Early blight tolerance | Other resistances | Best for |
|---|---|---|---|---|
| Mountain Magic F1 | Cordon, cherry-plum | Strong | Late blight | Outdoor, allotments |
| Jasper F1 | Cordon, cherry | Strong | Late blight | Containers, outdoor |
| Iron Lady F1 | Cordon, medium | Strong | Late blight, septoria | Outdoor, wet gardens |
| Defiant PhR F1 | Determinate, medium | Strong | Late blight | Outdoor, short season |
| Crimson Crush F1 | Cordon, large | Moderate | Late blight | Outdoor, greenhouse |
| Fantasio F1 | Cordon, large | Moderate | Late blight, fusarium | Greenhouse, outdoor |
| Mountain Merit F1 | Cordon, large | Moderate | Late blight, fusarium | Allotments, large fruit |
Heritage and open-pollinated varieties, including Gardener’s Delight, Moneymaker, Black Russian, and Costoluto Fiorentino, carry no meaningful early blight resistance. In seasons with high disease pressure, these varieties lose 50-70% of their foliage by August.
For a broader look at disease-resistant varieties suited to UK conditions, see our guides to the best tomato varieties and best blight-resistant tomato varieties. Combining a tolerant variety with the cultural controls above gives the strongest overall protection.
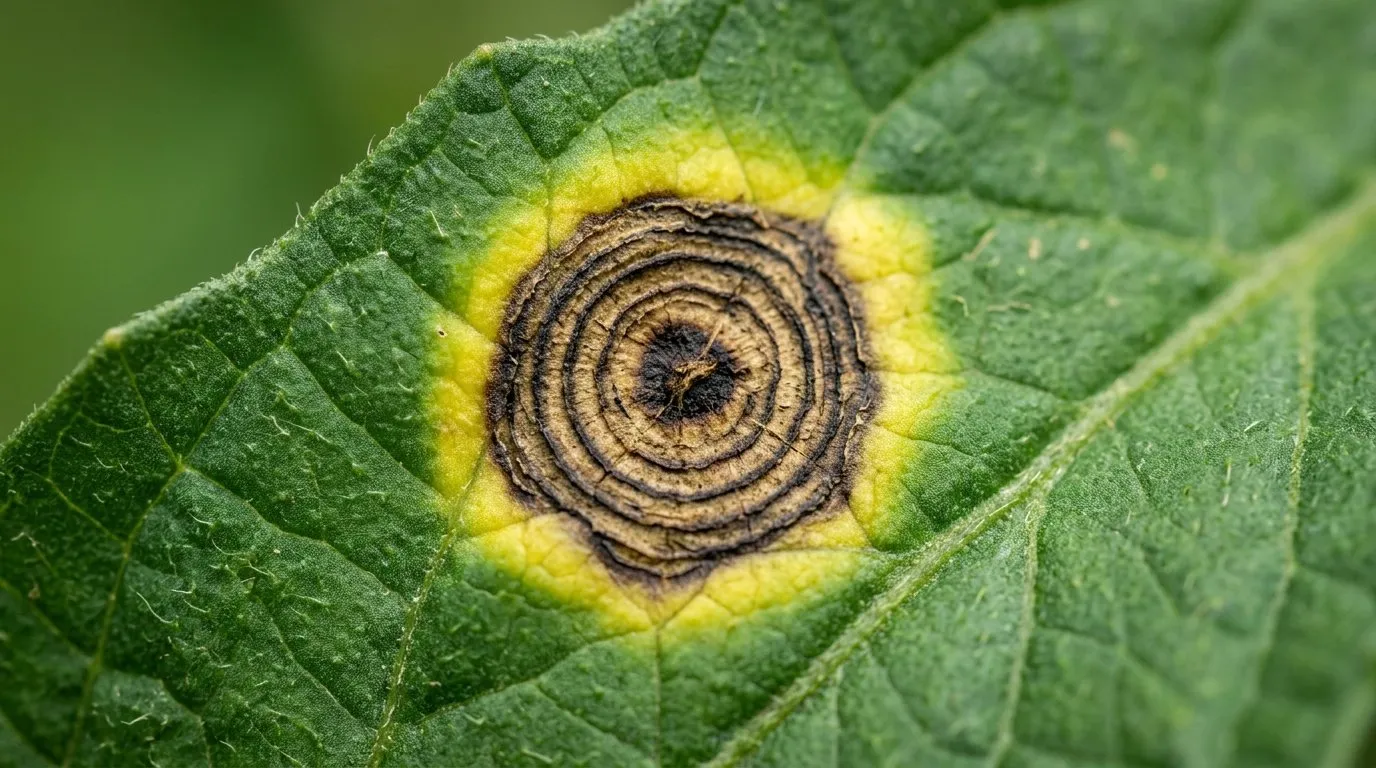 Close-up of the concentric ring pattern within an early blight lesion. Each ring represents a wave of fungal growth outward from the initial infection point.
When to remove affected plants
Remove a tomato plant entirely only when early blight has defoliated more than 70% of its canopy. Below that threshold, the plant can still ripen existing fruit and even produce new growth if the disease is slowed by removing infected leaves and applying protective sprays.
Decision framework
| Defoliation level | Action |
|---|---|
| Under 30% | Remove infected leaves, apply copper spray, continue growing |
| 30-50% | Remove infected leaves, spray remaining foliage, reduce watering |
| 50-70% | Remove all damaged foliage, allow remaining fruit to ripen, no new trusses |
| Over 70% | Remove the plant. Remaining fruit unlikely to ripen properly |
A heavily defoliated plant leaves fruit exposed to direct sun, causing sunscald (white papery patches on the sun-facing side). If you are removing the plant, harvest any fruit that has started to colour and ripen it indoors on a warm windowsill.
Early blight does not spread through the root system like fusarium wilt. Pulling an infected plant does not leave the soil contaminated for years. However, the spores on fallen debris persist for one to two seasons, so clear the area thoroughly after removal.
End-of-season hygiene
After the last harvest, remove all tomato plants regardless of disease status. Cut them at the base and bag the foliage. Sweep the greenhouse floor to collect fallen leaves and dropped fruit. This prevents Alternaria solani spores from overwintering in the growing environment. Consider a greenhouse disinfection wash with diluted Jeyes Fluid or a horticultural disinfectant applied to the frame, glazing, and staging.
For companion planting strategies that may reduce disease pressure through biodiversity, see our companion planting guide.
The Garden Organic guide to tomato problems provides further organic management strategies from a UK research perspective.
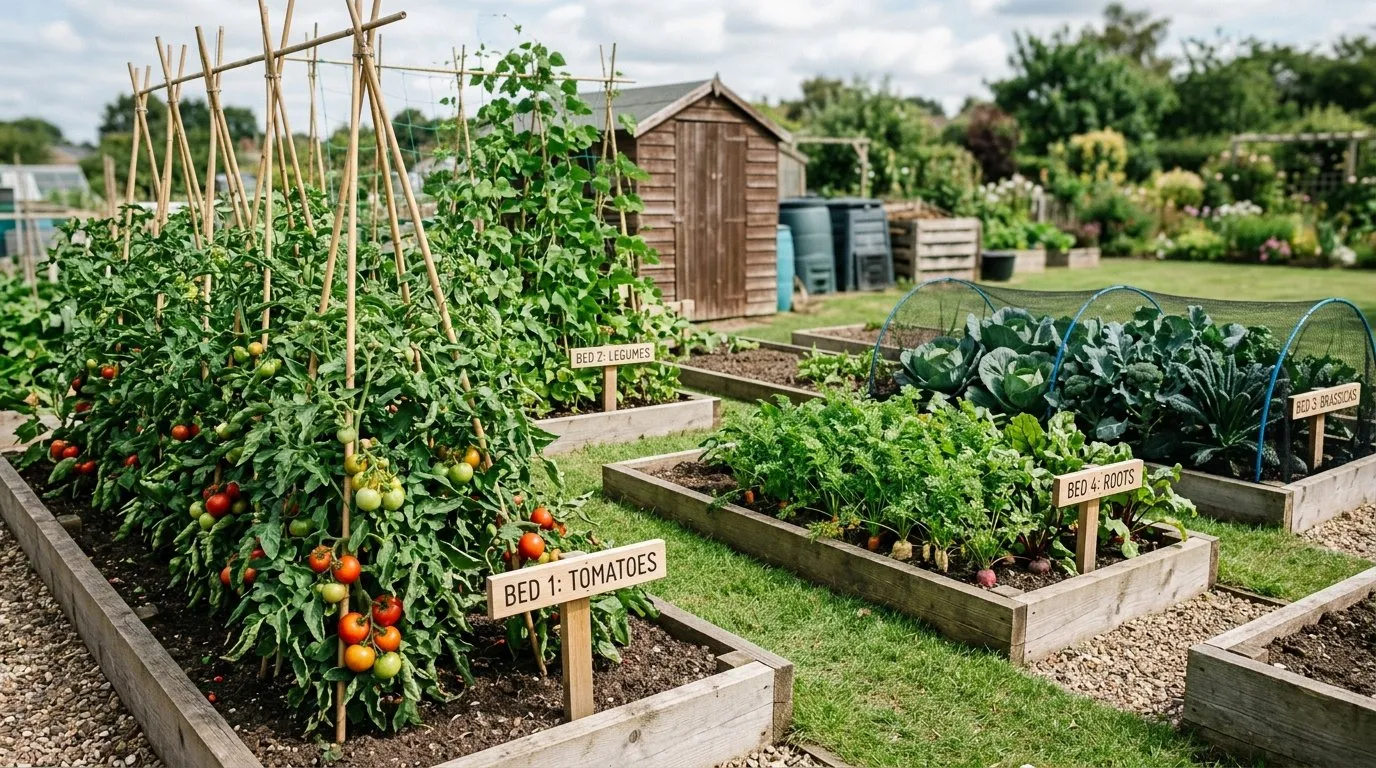 A four-bed rotation keeps tomatoes out of the same soil for 3-4 years — the most effective single control for soil-borne early blight spores.
Frequently asked questions
What does early blight look like on tomatoes?
Early blight produces dark brown spots with concentric rings on lower leaves. These target-shaped lesions start at 3-5mm and expand to 15-20mm as the rings develop outward. Affected leaves yellow around the spots and eventually dry out and drop. The disease always begins on the oldest foliage near the soil and works upward over several weeks. Stem lesions appear as dark, sunken, elongated patches near the soil line. Fruit develops leathery dark patches near the stem end.
Is early blight the same as late blight on tomatoes?
No, early blight and late blight are caused by different organisms. Early blight is a true fungus (Alternaria solani) that produces slow-spreading concentric ring lesions from the base upward. Late blight is an oomycete (Phytophthora infestans) that causes rapid, water-soaked brown patches anywhere on the plant with white mould underneath. Late blight can destroy a plant within days. Early blight takes weeks and rarely kills the plant outright.
Can I eat tomatoes from a plant with early blight?
Yes, unaffected fruit from early blight plants is safe to eat. Tomatoes with dark, sunken lesions near the stem end should be discarded as they may harbour the fungus. Pick ripe fruit promptly and inspect each one before using. Early blight primarily damages foliage and reduces yield rather than making fruit toxic. Wash all harvested tomatoes thoroughly.
Does early blight survive in the soil over winter?
Alternaria solani survives on infected plant debris in the soil for 12 months or longer. Fallen leaves, stem fragments, and crop residues left on the ground carry fungal spores into the following season. The fungus does not persist indefinitely in bare soil like fusarium does. Clearing all tomato debris in autumn and composting it in a hot heap above 60C breaks the cycle.
Will copper fungicide cure early blight?
Copper fungicide prevents early blight but does not cure existing infections. Bordeaux mixture and other copper-based sprays create a protective barrier on leaf surfaces that kills Alternaria spores on contact. Apply every 7-14 days from mid-June onward, before symptoms appear. Once a leaf shows concentric ring lesions, copper cannot reverse the damage. Remove infected leaves instead.
Which tomato varieties resist early blight?
Mountain Magic F1, Jasper F1, and Defiant PhR F1 show strong tolerance to early blight in UK trials. Iron Lady F1 carries multi-disease resistance including early blight, late blight, and septoria leaf spot. No variety is fully immune. Crimson Crush F1 and Fantasio F1 show moderate tolerance. Heritage varieties like Gardener’s Delight and Moneymaker are highly susceptible.
Should I remove leaves with early blight?
Yes, remove affected leaves immediately and dispose of them in household waste. Do not compost infected foliage unless your heap reaches 60C or above. Cut leaves cleanly with secateurs sterilised in a 10% bleach solution between plants. Removing the lowest three or four leaves below the first fruit truss as a preventive measure stops the main splash-up infection route even before symptoms appear.
Lawrie has been gardening in the West Midlands for over 30 years. He grows his own veg using no-dig methods, keeps a wildlife-friendly garden, and writes practical advice based on real UK growing conditions.