Key takeaways
- Distorted, scorched-looking shoots covered in grey mould are tulip fire primaries
- Botrytis tulipae spreads fastest in cool, wet spring weather from those grey-mould shoots
- The fungus overwinters as small black sclerotia on bulbs and in soil for two to three years
- Roguing out infected plants the moment you see them stops the spread to healthy tulips
- Never replant tulips in the same ground for at least three years after an outbreak
- Growing tulips in pots of fresh compost sidesteps contaminated soil entirely
If your tulips are coming up twisted and scorched in spring, spotted with brown blotches, or furred with a grey mould, that is tulip fire. It is caused by the fungus Botrytis tulipae, and the name fits, because a badly hit planting looks as though a flame has been run across it. It thrives in cool, wet spring weather, and it spreads from distorted, mould-covered shoots called primaries to spot and spoil every healthy tulip nearby. There is no cure once a plant is infected, but the disease is very beatable if you act fast in the first week the shoots appear.
This guide covers how to recognise tulip fire, the primary-and-secondary cycle that makes speed so important, where the fungus hides between seasons, and the control programme that works: daily inspection, ruthless roguing, bulb hygiene, a three-year soil gap, and growing in pots of fresh compost.
What tulip fire looks like
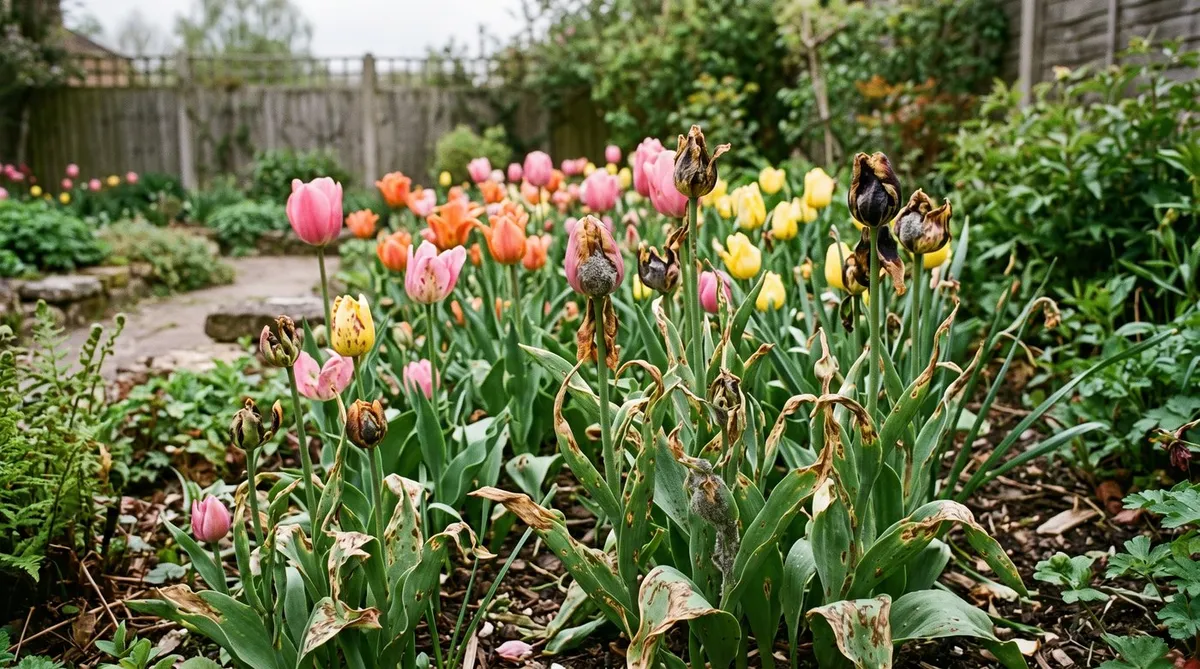
Tulip fire shows in several forms, and the worst of them is the giveaway. Some shoots emerge in spring already distorted, twisted and stunted, looking scorched or withered, as if they have been burnt. In damp weather these shoots become coated in a grey, fuzzy mould. These are the primaries, the plants grown from a heavily infected bulb, and they are the source of everything that follows.
On the plants around them, the disease shows as spotting. Leaves develop small brown or pale, bleached spots, often with a darker or water-soaked edge, and the flowers get the same, with bleached or brown flecks on the petals that ruin the bloom. In prolonged wet weather these spots enlarge, merge, and grow their own grey mould, and the leaf can collapse and rot.
The final sign is on the bulb. Lift an infected bulb and you may find rotting patches and, on or just under the skin, small, hard, black resting bodies called sclerotia, sometimes only 1-2mm across. These are the survival stage. If you see distorted grey-moulded shoots in spring, treat it as fire and act at once. Our guide to growing tulips covers healthy cultivation, and tulip types explained covers which groups are most at risk.
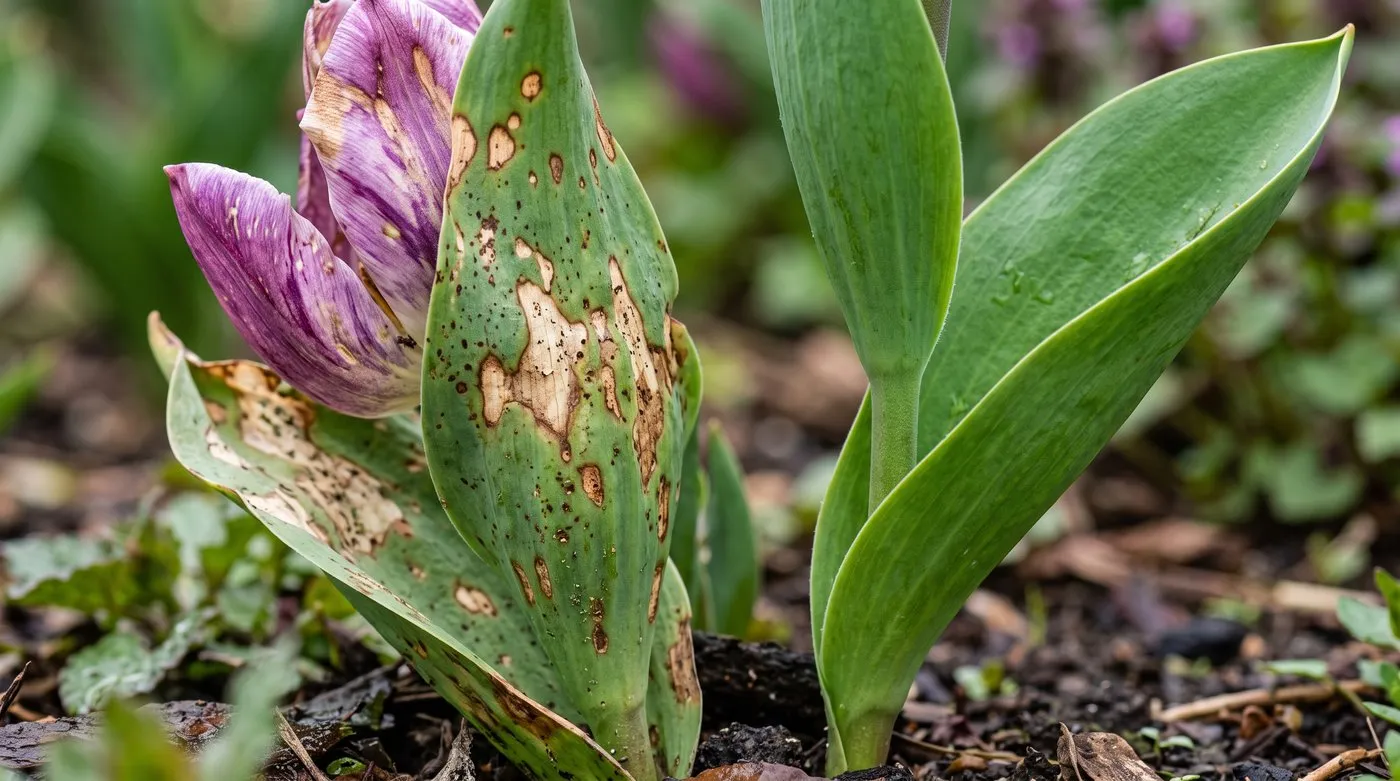 Brown and bleached spots on the leaves and petals are secondary fire, spread from the grey-moulded primary shoots nearby.
The primary-and-secondary cycle: why speed matters
Understanding the two-stage cycle is what makes tulip fire beatable, because it shows that a handful of plants launch the whole epidemic.
- Winter, sclerotia survive. The fungus overwinters as small black sclerotia on infected bulbs and loose in the soil. They can survive two to three years in the ground.
- Spring, the primaries emerge. Bulbs carrying the fungus produce those distorted, stunted primary shoots. In cool, damp conditions the primaries become covered in grey spores.
- The spore shower. Each primary sheds enormous numbers of spores into the air and onto the soil around it. This is the trigger for the whole outbreak.
- Secondary infection. Those spores land on the leaves and flowers of healthy tulips nearby and, given a film of moisture, germinate and infect, producing the brown spots. Cool, wet, still weather lets this run fast.
- Back to the bulb. Late in the season the fungus forms new sclerotia on the infected bulbs and in the soil, and the cycle closes.
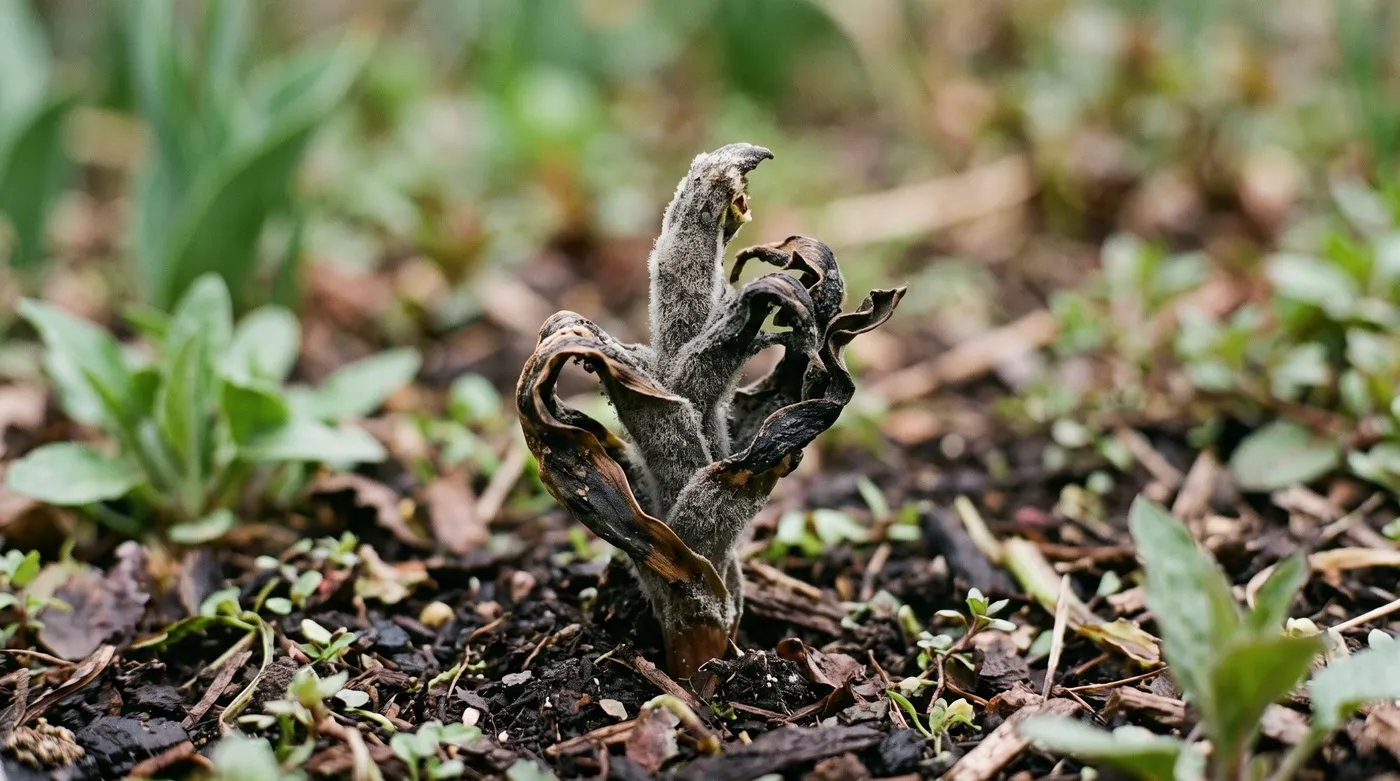 A primary shoot: distorted, stunted and furred with grey mould. A few of these launch the whole outbreak, so remove them the day you see them.
Here is the critical point most people miss: the primaries are the whole outbreak, and there are usually only a few of them. Every spotted leaf across the bed traces back to a small number of distorted, grey-moulded shoots that came up infected. Find and remove those few primaries in the first day or two, before they shed their spores, and the secondary epidemic never happens. Miss them for a week in wet weather and the spores are already everywhere. This is why daily inspection in early spring beats anything you can do later.
Roguing: the one job that stops it
Since a few primaries launch the outbreak, the single most effective control is to find and destroy them immediately. This is called roguing, and in tulips it means taking the whole plant.
Walk the tulips every day from the moment the shoots break ground. The instant you see a shoot that is distorted, twisted, stunted or carrying any grey mould, deal with it there and then. Lift the entire plant, bulb and all, because the bulb holds the fungus and pulling only the leaves leaves the source in the ground. Slide it straight into a bag on the spot, so you do not shake spores over the healthy plants as you carry it out. Then bin or burn it, never compost.
Gardener’s tip: Make the tulip walk part of your morning in late March and April, coffee in hand. You are looking for the odd shoot among hundreds that looks wrong, twisted, scorched or furred. Pull those few and you have done more in two minutes than any spray could manage.
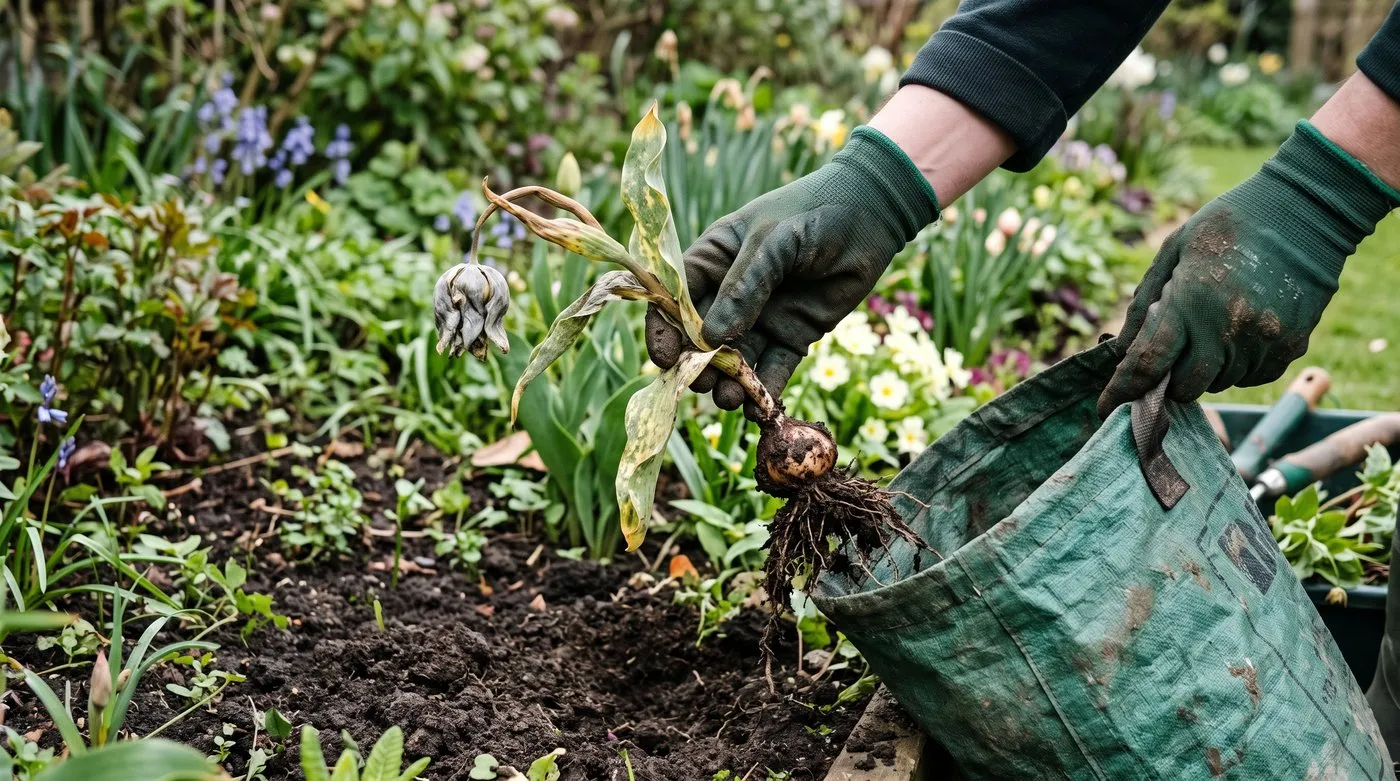 Roguing a primary: lift the whole plant, bulb included, straight into a bag so spores are not scattered. Speed in early spring is everything.
Bulb hygiene and the three-year soil gap
Two more habits close off the ways the fungus persists between seasons.
Inspect bulbs before planting. When you buy or lift tulip bulbs, check each one and discard any showing black sclerotia, sunken rotten patches or a mouldy base. Planting a single infected bulb seeds next spring’s primaries. It costs nothing to sort them at planting and throw out the marked ones. Plant only clean, firm bulbs. Our guide to when to plant tulip bulbs covers timing, and planting a little later, into November, into well-drained soil helps the bulbs get away cleanly.
Leave a three-year gap. Because the sclerotia survive two to three years in the soil, never replant tulips in ground that has had fire for at least three years. Grow anything else there in the meantime and move the tulips to a fresh bed. This rotation is not optional after an outbreak; replanting into contaminated soil simply restarts the disease.
Clear up in autumn. Remove and destroy all tulip foliage and debris at the end of the season rather than leaving it to rot in place, since the fungus builds its resting bodies on dying tissue. Deadhead spent flowers promptly too, as covered in our guide to spring bulb care after flowering.
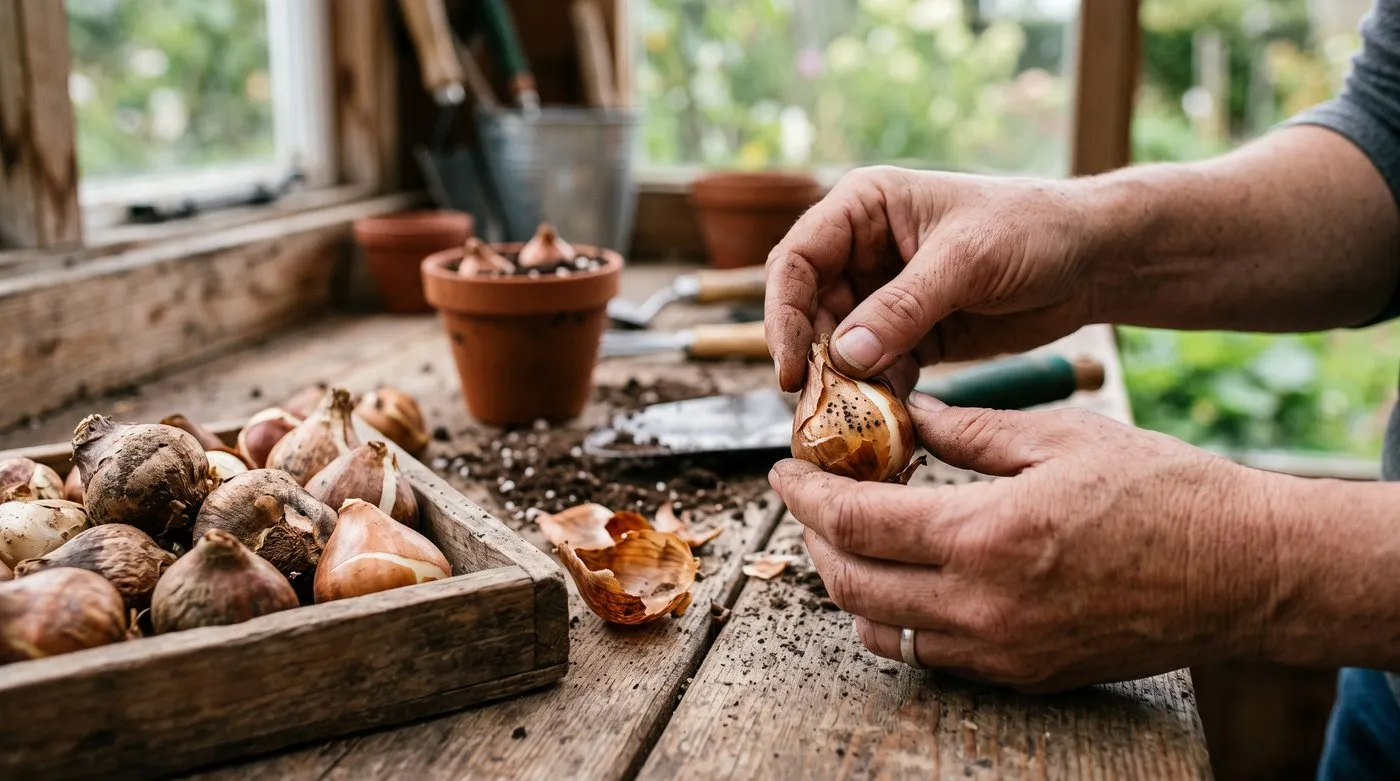 Check every bulb before planting and throw out any with black sclerotia or rotten patches. One infected bulb seeds next spring’s outbreak.
Growing tulips in pots to dodge the disease
The most reliable way to keep growing tulips on ground that has had fire is to grow them in pots of fresh compost and skip the contaminated soil entirely.
A pot of new compost each year has no sclerotia in it, so the main overwintering source is removed. Space the pots so air moves between them, water at the base rather than over the foliage, and still inspect the bulbs before planting and the shoots as they emerge, because spores can blow in. But the risk is a fraction of that in an infected bed. After flowering, discard the compost rather than reusing it, and start fresh next year.
Pot growing also lets you move tulips around and enjoy them at the door, and it suits a small garden where soil rotation is impossible. For a long spring display, layered planting works well, as our guide to bulb lasagne planting explains, using fresh compost each season.
 Tulips in pots of fresh compost sidestep the contaminated soil where the fungus survives. Discard the compost after flowering and start fresh.
Control methods ranked by effectiveness
Treating these as equal is how people spray spotted leaves while the primaries keep shedding spores. Ordered by what each actually delivers.
| Control | Role | Effectiveness | What it cannot do |
|---|---|---|---|
| Daily inspection and roguing of primaries | Primary | Stops the outbreak at source if done within a day or two | Cannot help once spores have spread in wet weather |
| Discarding infected bulbs at planting | Primary prevention | Removes the seed of next year’s primaries | Cannot detect fungus hidden inside a clean-looking bulb |
| Three-year soil rotation | Primary prevention | Starves the sclerotia of a host for their survival span | Slow; needs alternative planting space |
| Growing in pots of fresh compost | Strategic | Sidesteps contaminated soil almost entirely | Cannot stop wind-blown spores completely |
| Autumn clear-up and deadheading | Prevention | Removes the dying tissue the fungus builds sclerotia on | Cannot remove sclerotia already in the soil |
| Spacing and air flow | Prevention | Shortens leaf-wet time, slows secondary spread | Cannot stop primaries emerging from infected bulbs |
The gold standard is the first row, done fast: walk the tulips daily in spring and rogue the primaries within a day of seeing them. Combined with bulb hygiene and a three-year gap, it beats fire without a drop of fungicide. Spraying barely features here, because by the time you have visible spotting to spray, the primaries have already done their work.
Month-by-month tulip fire calendar
| Month | What to do |
|---|---|
| September-October | Inspect bulbs before buying and planting. Discard any with black sclerotia or rot. |
| November | Plant clean bulbs into fresh ground or fresh compost, spaced for air flow. |
| March | Shoots emerge. Start the daily inspection walk. Watch for distorted, twisted shoots. |
| April | Peak risk in cool wet weather. Rogue every primary the day you see it, bulb and all. |
| May | Continue removing any spotted plants. Deadhead spent flowers promptly. |
| June | Lift bulbs if storing. Inspect and discard any with sclerotia. Clear all foliage. |
| July-August | Store clean bulbs dry and airy. Plan a three-year gap for any bed that had fire. |
| Winter | Buy fresh compost for next year’s pots. Order clean new bulbs from a reputable supplier. |
Common mistakes with tulip fire
- Missing the primaries in the first week. A few distorted shoots launch the whole outbreak. Miss them for a week in wet weather and the spores are everywhere. Inspect daily and rogue at once.
- Pulling only the leaves. The bulb carries the fungus. Lift the whole plant, bulb included, or you leave the source in the ground.
- Replanting tulips in the same soil too soon. The sclerotia survive two to three years. Replanting sooner restarts the disease. Leave a three-year gap.
- Composting infected plants. The fungus survives and you spread it. Bag infected plants on the spot and bin or burn them.
- Planting unsorted bulbs. A single bulb with sclerotia seeds next spring’s primaries. Check and discard marked bulbs before planting.
The short version on tulip fire
Tulip fire looks devastating and is genuinely beatable, because the whole outbreak is launched by a small number of distorted, grey-moulded shoots that you can find and remove. Walk the tulips every day in early spring, and the moment you see a twisted or mouldy shoot, lift the entire plant, bulb and all, into a bag and take it out of the garden. Do that within a day or two and the disease stops before it starts.
Back it up with clean bulbs, a ruthless three-year gap before replanting tulips in affected soil, and fresh compost in pots, and fire need never spoil your display again. There is no spray that matches catching the primaries early, so make the daily April walk the habit that carries the whole thing. For more bulb and border troubles, see the garden problems section, and the RHS guidance on tulip fire is a sound second reference on the fungus.
Frequently asked questions
What does tulip fire look like?
Distorted, scorched-looking shoots, brown spots on leaves and petals, and grey fuzzy mould. Badly infected shoots emerge twisted and stunted, as if burnt, and become covered in a grey spore mould in damp weather. Healthy plants nearby then develop small brown or bleached spots on the leaves and flowers, each of which can spread further in the wet.
What causes tulip fire?
The fungus Botrytis tulipae, which infects tulips in cool, wet spring weather. It overwinters as small black resting bodies called sclerotia on the bulbs and in the soil. In spring these produce distorted primary shoots covered in grey spores, which then infect nearby healthy tulips. Damp, still, crowded conditions let it spread fastest.
Can tulip fire be cured?
No, there is no cure once a plant is infected, so the answer is removal. Lift and destroy infected plants at once to stop them spreading spores. You cannot treat a diseased tulip back to health. The strategy is to remove the sources fast, discard infected bulbs, and avoid replanting tulips in the same soil for three years.
Can I plant tulips where I had tulip fire?
No, wait at least three years before replanting tulips in that soil. The sclerotia survive in the ground for two to three years, so replanting sooner risks a fresh outbreak. Grow other plants there in the meantime, and plant your tulips in a different bed or in pots of fresh compost until the ground is clear.
Should I remove tulips with fire?
Yes, lift the whole infected plant, bulb included, and destroy it. Do not just pull the leaves, because the bulb carries the fungus. Bag the plant on the spot to avoid scattering spores, and bin or burn it rather than composting. Removing the first infected shoots within a day or two is the single most effective control.
Do tulips in pots get tulip fire?
They can, but pots of fresh compost greatly reduce the risk. Using new compost each year avoids the contaminated soil where sclerotia survive. Space the pots for air flow, water at the base, and inspect the bulbs before planting. Pot growing is the best way to keep enjoying tulips on ground that has had fire.
Are some tulips resistant to tulip fire?
No tulip is fully resistant, but some species tulips suffer less than large hybrids. Botanical or species tulips such as Tulipa tarda and Tulipa turkestanica tend to be tougher and are often left in the ground. The big showy Darwin and Triumph hybrids, grown densely, are the most vulnerable to a bad outbreak in a wet spring.
Our team produces practical UK gardening guidance from source research, contributor records and established horticultural practice. Editorial standards are overseen by Matt W.