Key takeaways
- Aucuba blackening is usually root stress, not disease: winter wet, drought, frost or scorch, not a spray-treatable infection
- Winter waterlogging on clay is the single most common cause; blackening starts at leaf tips and spreads inward
- Frost blackens only the soft new spring growth; established old leaves shrug off UK cold
- Gold-variegated forms like 'Crotonifolia' scorch black in full sun and dry soil; move them to shade
- Cut damaged stems back to clean green wood in April; an aucuba stumped to 30cm nearly always reshoots
- Phytophthora root rot is the rare killer: check for brown-red staining under the bark at the stem base
Aucuba, the spotted laurel, is one of the toughest evergreen shrubs you can grow in a shady UK garden. So it comes as a shock when the glossy leaves start turning black, spreading from the tips inward until half the plant looks scorched and dead. Most gardeners assume a disease and reach for a fungicide.
That is almost always the wrong response. Aucuba blackening is a symptom of stress, not infection. Get the cause right and the fix is usually free, and the plant recovers far more often than it dies.
Why is my aucuba turning black?
Aucuba blackening is almost always caused by root stress, not by a disease you can spray. The Royal Horticultural Society attributes blackened spotted laurel foliage mainly to wet soil around the roots, especially through cold, wet winters, plus sun scorch on some cultivars. Frost damage and summer drought account for most of the rest. True infection, phytophthora root rot, is the rare exception rather than the rule.
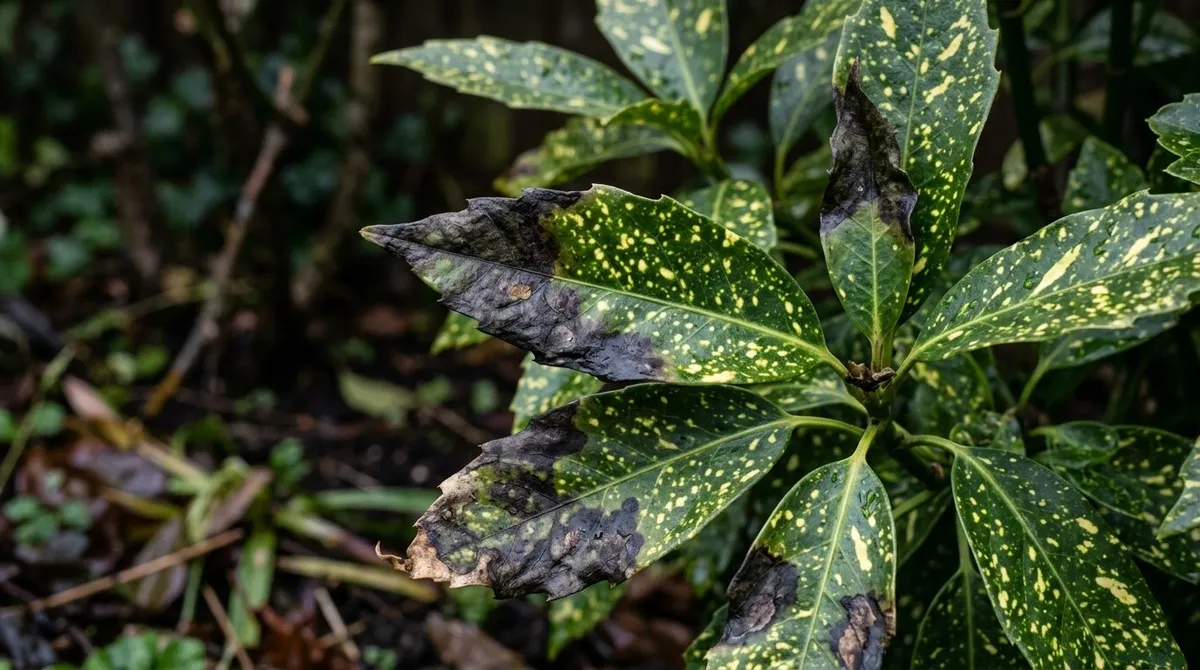
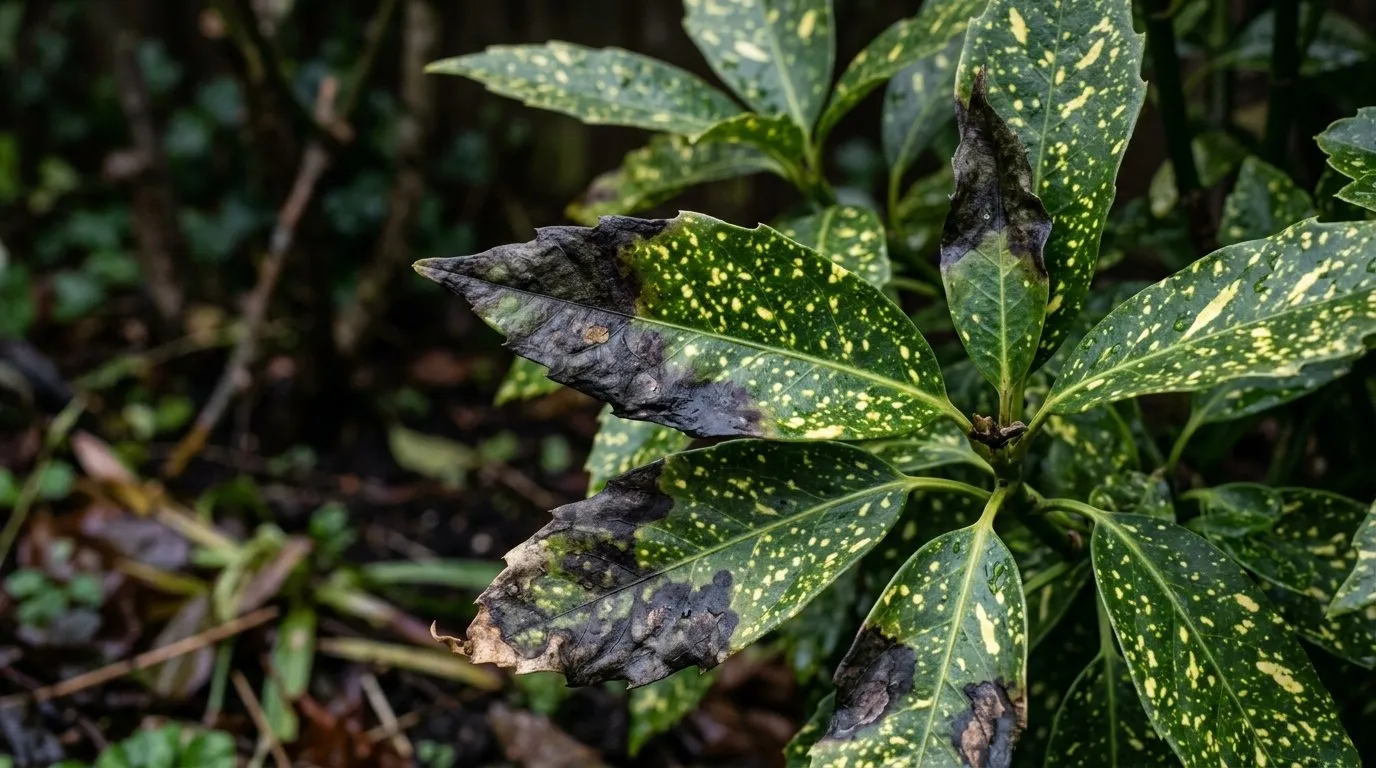 Classic aucuba blackening: dark patches creep in from the leaf tips and margins. This pattern points to root stress, not a leaf disease.
The four causes of spotted laurel leaves turning black
Four causes account for almost all aucuba blackening in UK gardens. Each leaves a slightly different signature on the plant, so you can usually tell them apart by which leaves blacken, when it happens, and the pattern of the damage.
Winter waterlogging is the most common by a wide margin. Cold, saturated soil starves the roots of oxygen, they start to die back, and the leaves blacken from the tips as the plant loses its water supply. Summer drought does something similar from the other direction: shallow roots dry out, and the plant sheds leaves that turn black and crisp. Hard frost blackens only the soft new growth, while sun scorch burns the gold-variegated cultivars.
Get the diagnosis right and the cure follows. The table below is the quickest way to narrow it down.
Aucuba blackening diagnostic table
| Cause | When it shows | Which leaves | Pattern | Fix |
|---|---|---|---|---|
| Winter waterlogging | Late winter to spring | Lower and older leaves first | Black from tips inward, whole leaves drop, soil wet underfoot | Improve drainage, fork in grit, raise the bed |
| Summer drought | Hot, dry spells (Jun-Aug) | Outer and newest leaves | Black, crisp margins, leaves curl then drop | Deep water weekly, mulch, shade the roots |
| Hard frost | After a sharp late frost | Only soft new spring growth | Sudden blackening of tips and new shoots, old leaves fine | Cut damaged tips back in spring, protect new growth |
| Sun scorch | Sunny, dry summers | Gold-variegated leaves in full sun | Black-brown burnt patches on yellow-spotted areas | Move to shade, mulch, water in drought |
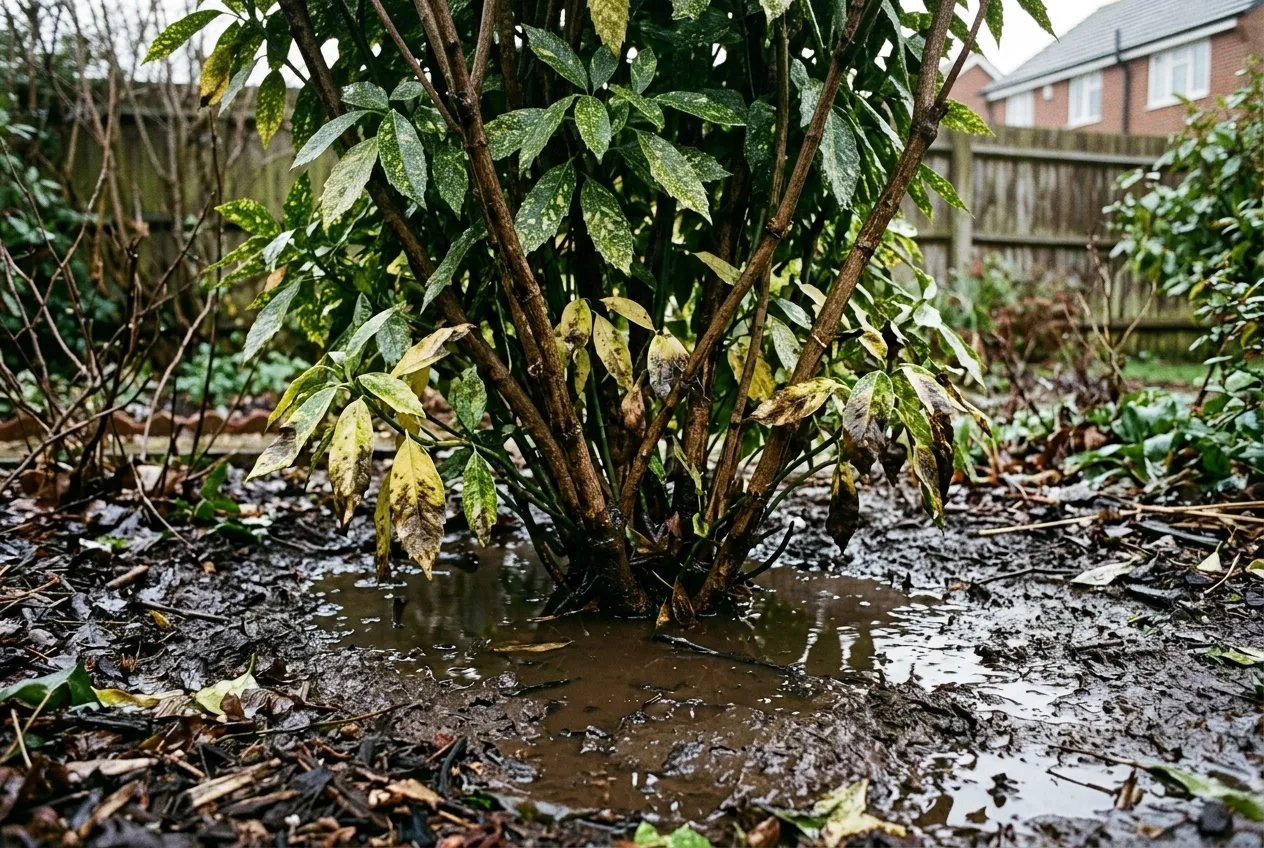 Winter waterlogging is the top cause. Cold, saturated clay around the roots starves them of oxygen and the lower leaves blacken first.
How to tell the four causes apart
Start with timing, because it rules out half the options straight away. Blackening that appears in late winter or early spring, on the older lower leaves, with soil that squelches underfoot, is waterlogging. Blackening that appears in a hot dry August, on the outer and newest leaves, with dusty dry soil, is drought. The season alone often settles it.
Next, look at which leaves are hit. Frost only touches the soft new growth: the tender spring shoots and any young leaves. If your old, leathery leaves are untouched but the new tips have gone black overnight after a cold snap, that is frost, and it is the least serious of the four. Sun scorch is just as specific. It only shows on the yellow-spotted parts of gold-variegated cultivars, and only where sun hits them. A plain green aucuba almost never scorches.
Finally, dig a finger into the soil. Wet and cold means drainage. Bone dry means water. This five-minute check saves you from spraying a healthy plant or feeding a drowning one.
Winter waterlogging: the most common cause
Winter waterlogging is the single biggest reason aucubas turn black in UK gardens. Aucuba will grow in almost any soil, the RHS notes, as long as it is not very wet. On heavy clay that stays saturated from November to March, the roots sit in cold, airless water for months. Root tips die back, the plant cannot draw water up, and the leaves blacken from the tips inward. The lower, older leaves usually go first.
The trap is that a drowning plant and a thirsty plant can look similar: both drop blackened leaves. The difference is the soil. If the ground is wet and cold and the blackening started over winter, waterlogging is your answer. Feeding or watering makes it worse.
Summer drought on shallow roots
Summer drought blackens aucuba from the outside in, the opposite pattern to waterlogging. Aucuba roots run relatively shallow, so a long dry spell dries them out fast, especially on sandy soil or under the rain shadow of a wall or large tree. The newest and outermost leaves blacken and crisp at the margins, curl, then drop. It often hits plants that are otherwise in a good spot.
The classic culprit is a mature aucuba growing against a house wall or under the eaves, where rain rarely reaches. Newly planted shrubs are also vulnerable in their first two summers, before the roots spread. A plant robbing water from a nearby hedge or tree suffers the same way.
The fix is straightforward. Water deeply once a week in dry spells, a full can or two at the base rather than a daily splash, so the water reaches the deeper roots. Mulch with 5-7cm of composted bark or leaf mould over damp soil in spring to lock moisture in. Aucuba copes well in dry shade once established, but it needs help through its first couple of summers and through any drought while young.
Frost damage on soft new growth
Hard frost blackens only the soft new growth, never the tough old leaves. This is the least serious of the four causes and the easiest to identify. After a sharp late frost in April or May, the tender new shoots and young leaves suddenly go black and limp, while the leathery mature foliage around them stays perfectly green. The contrast is the giveaway.
Aucuba is a hardy shrub, comfortable through normal UK winters, so it is not winter cold that catches it. It is the late spring frost hitting the vulnerable new flush after the plant has woken up. Plants in frost pockets, low-lying spots where cold air pools, and recently pruned shrubs pushing soft growth are the ones most often hit.
Do not panic and do not cut immediately. Wait until the risk of further frost has passed, usually late May in the Midlands, then cut the blackened tips back to the first healthy pair of buds. The plant pushes a fresh flush within weeks. To reduce the risk on young or newly pruned plants, throw fleece over them on clear, cold spring nights, as covered in our guide to protecting plants from frost.
Warning: Do not hard-prune an aucuba in autumn or early winter. Cutting late in the year forces a flush of soft growth that the first frosts blacken straight away, and leaves the plant with less foliage to weather the cold. Always save hard pruning for April, once the frosts are behind you.
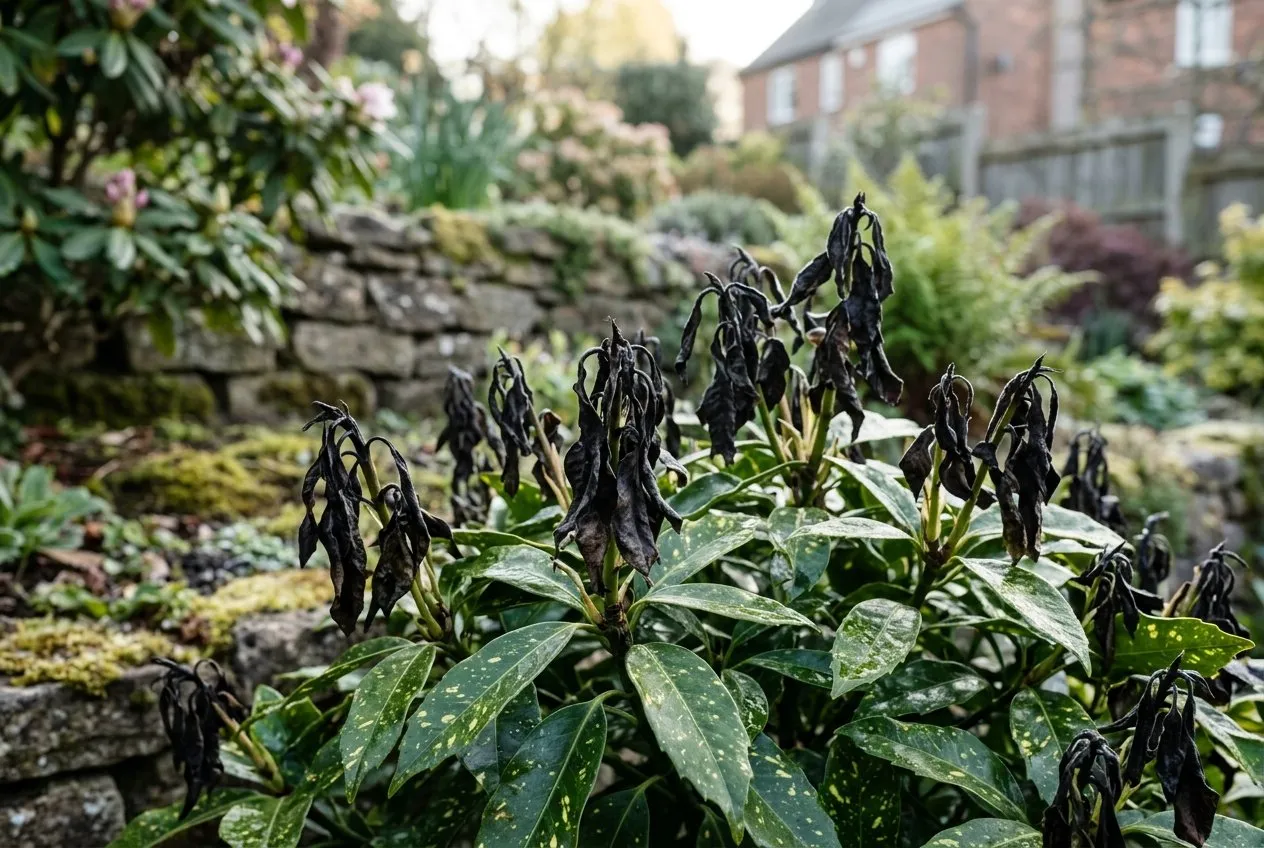 Frost hits only the soft new growth. When the young tips blacken but the old leaves stay green, a late frost is the cause.
Sun scorch on gold-variegated aucuba
Sun scorch blackens the gold-variegated cultivars, not the plain green ones. Forms like ‘Crotonifolia’ and ‘Gold Dust’ carry heavy yellow spotting, and those pale, low-chlorophyll patches burn in strong sun on dry soil. The scorch shows as brown-black patches on the yellow areas of the leaf, worst on the side facing the sun and worst in a dry summer.
The RHS is clear on this: cultivars with heavy yellow spotting are prone to leaf scorch when planted in full sun and very dry soil, and should go in shadier positions. It is a siting problem, not a disease. A gold-spotted aucuba baking against a south-facing wall is in the wrong place.
Move affected plants to partial or full shade in autumn or early spring. Aucuba transplants well while dormant, so this is a realistic fix rather than a last resort. If moving is not possible, mulch heavily to keep the roots cool and moist, and water through every dry spell. Plain green aucubas tolerate far more sun, so they are the better choice for a brighter spot. Aucuba earns its place among the best shrubs for shade precisely because shade is where it performs at its best.
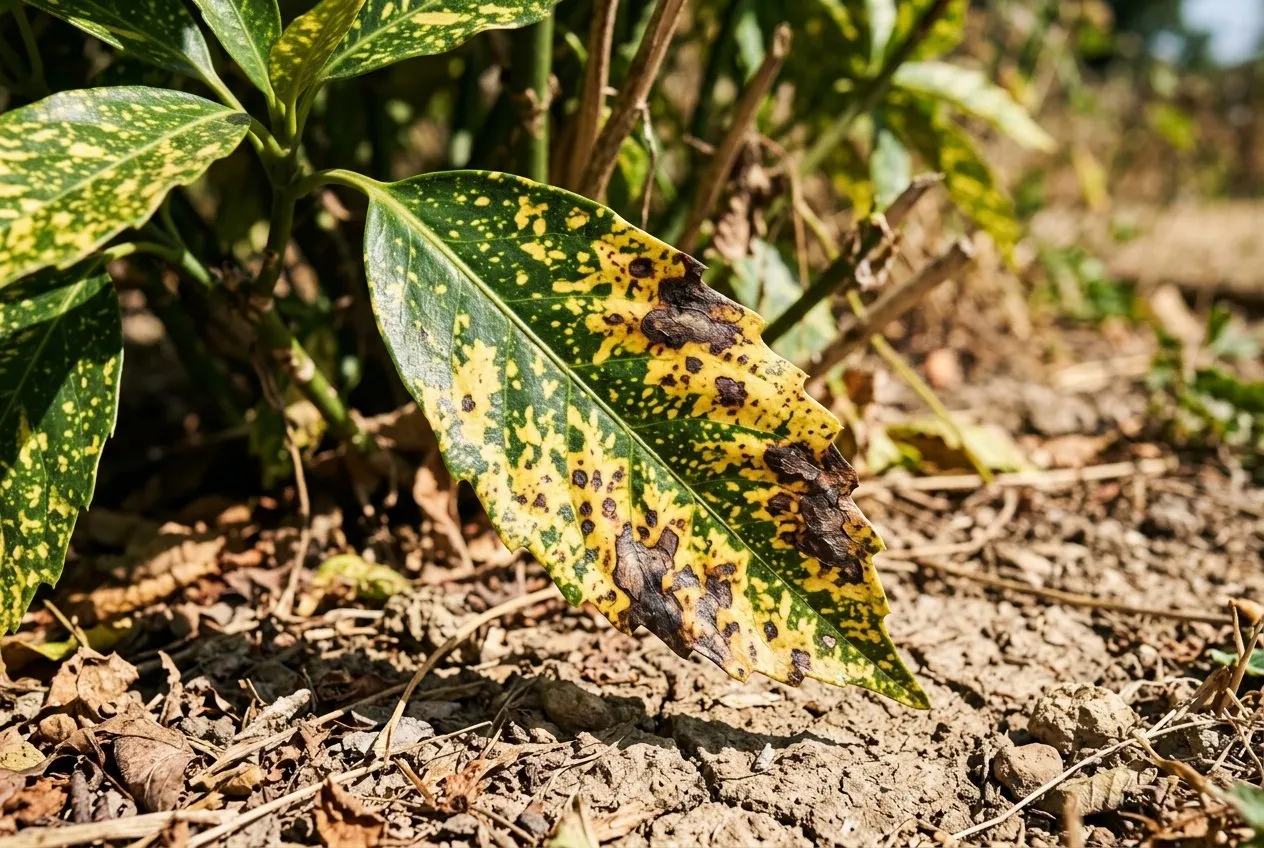 Sun scorch on a gold-spotted ‘Crotonifolia’. The burnt patches sit on the yellow areas, which have less chlorophyll and burn first.
Phytophthora root rot: the rarer serious cause
Phytophthora root rot is the one genuinely serious cause of aucuba blackening, and it is uncommon. This soil-borne water mould attacks the roots and stem base, usually where drainage is poor and the ground stays wet. Above ground it shows as wilting, yellowing or sparse foliage and dieback of whole branches, often on one side of the plant first. It looks like advanced waterlogging, and the two overlap, because wet soil is what lets phytophthora take hold.
The way to tell root rot from simple waterlogging is to check the stem base. Scrape a little bark away near soil level. Healthy tissue is green or cream underneath. Phytophthora shows brown or black discoloured wood below the bark, often as an inverted V rising from the base, according to the RHS. The roots, if you lift the plant, are dark, soft and break easily rather than being firm and pale.
There is no chemical cure available to gardeners. If root rot is confirmed and the plant is far gone, remove and destroy it, replace the soil in the planting hole with fresh topsoil, and replant with something less susceptible. If only part of the plant is affected, improving drainage sharply and cutting out the dead wood sometimes lets a vigorous shrub outgrow it. The RHS keeps a full guide to phytophthora root rot that is worth reading if your stem-base check comes back brown. A blackened aucuba with green wood under the bark and firm roots does not have this problem, so most gardeners can rule it out in five minutes. If the pattern instead matches a wider soil fungus, our guide to honey fungus covers the other main root killer to check for.
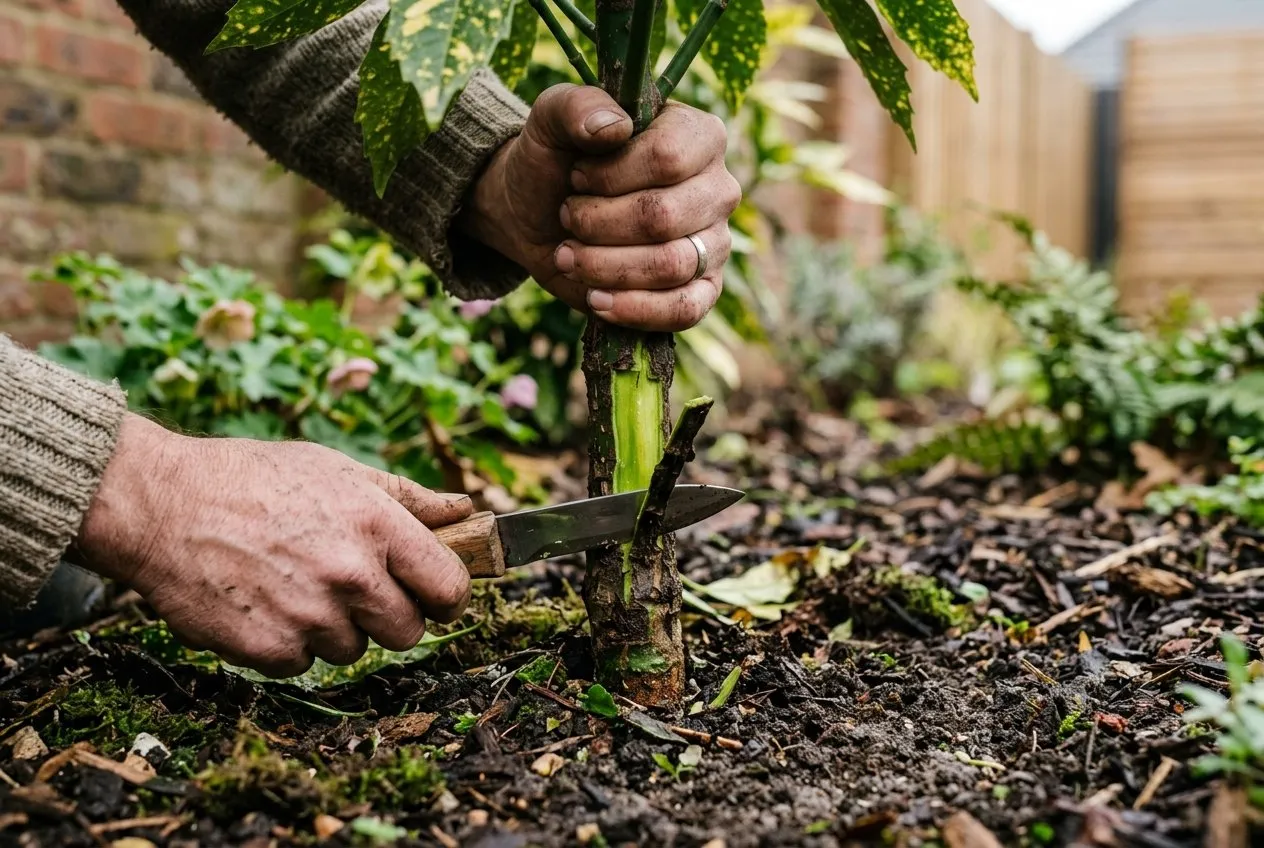 The five-minute test: scrape the bark at the stem base. Green or cream wood means the plant is healthy; brown-red staining points to root rot.
The rescue programme: cutting back to clean wood
Aucuba is one of the most forgiving shrubs for hard renovation, which is why a blackened plant is so often saveable. It reshoots readily from old wood, even from bare stumps, so drastic pruning that would kill many shrubs simply resets an aucuba. The rule is to cut in spring and cut back to living tissue.
Wait until April, once hard frosts have passed. Working stem by stem, cut each blackened or dead stem back to clean, green, live wood, checking the cut face is green and not brown. On a badly hit plant, that can mean cutting the whole shrub down to 30-40cm stumps. This looks brutal, but an aucuba stumped this low almost always throws fresh shoots from the base within one growing season. Use sharp, clean secateurs or loppers, and cut just above an outward-facing bud or node.
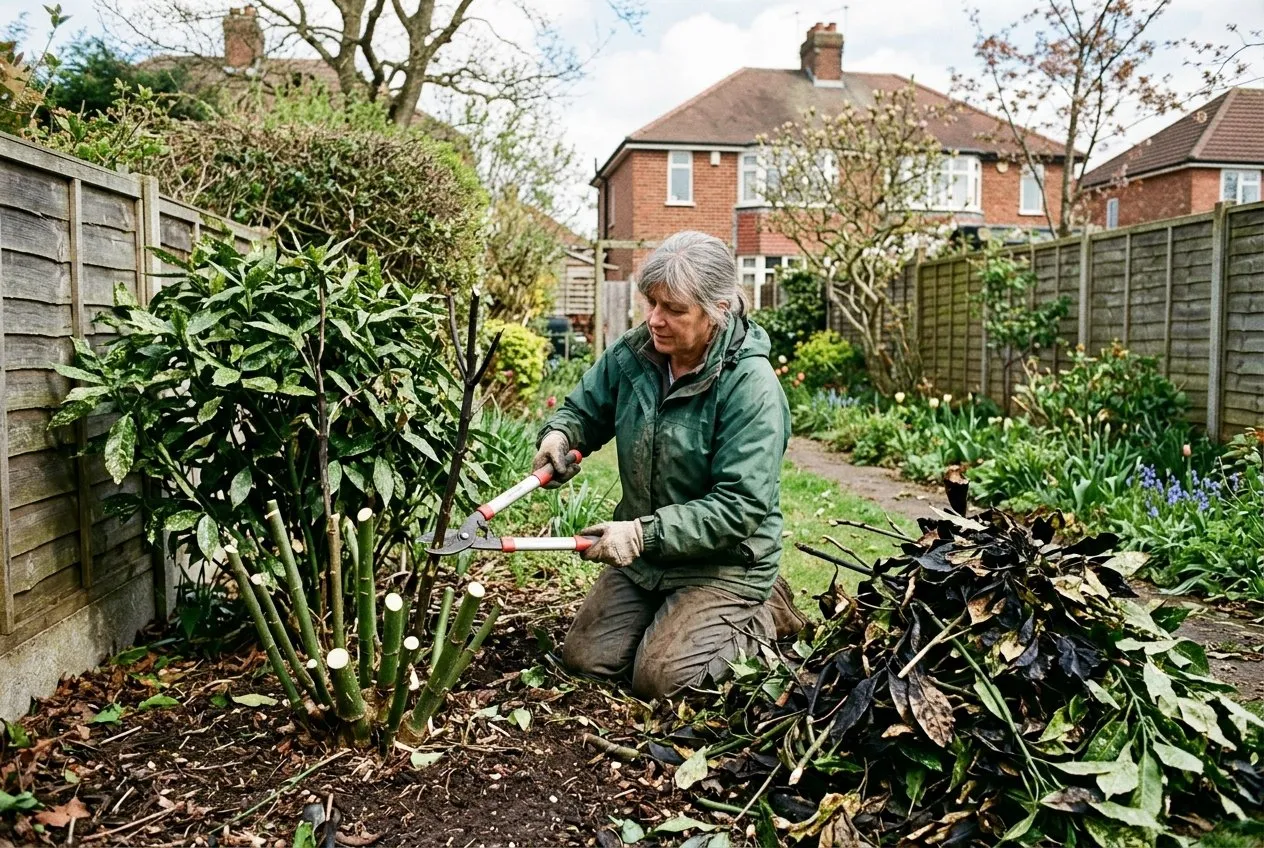 The April rescue cut. Take each damaged stem back to clean green wood, even down to 30-40cm stumps on a badly hit plant.
Month-by-month aucuba recovery calendar
Timing the rescue and the aftercare matters as much as the cut itself. This calendar sets out what to do through the year to bring a blackened aucuba back and keep it healthy.
| Month | Task |
|---|---|
| January | Clear pooling water from the base; do not prune or feed while dormant and wet |
| February | Check stems for green wood; plan the drainage fix before growth starts |
| March | Fork coarse grit into wet clay around the roots; mulch, keeping stems clear |
| April | Main rescue cut: take blackened stems back to clean green wood, once frosts pass |
| May | Watch for reshoots from cut stems; fleece soft new growth on cold nights |
| June | Water new growth in dry spells; feed lightly with a balanced fertiliser |
| July | Deep water weekly in drought; check gold forms for scorch and shade if needed |
| August | Keep watering in dry heat; do not let the recovering plant dry out |
| September | Best month to move a scorched or badly sited plant to shade |
| October | Mulch with composted bark over damp soil; clear fallen blackened leaves |
| November | Improve drainage before winter wet; avoid any hard pruning now |
| December | Leave the plant alone; ensure roots are not sitting in standing water |
Preventing aucuba blackening for good
Prevention comes down to three things: drainage, position and cultivar choice. Get those right at planting and blackening rarely troubles you again. Most problems trace back to a plant in the wrong spot or in ground that holds winter water.
Drainage first. Aucuba tolerates most soils but hates sitting wet, so on clay you must open the ground up with grit and organic matter, or plant on a raised mound. If your whole garden struggles with standing water, that is worth fixing at source before you replant, because better drainage keeps every shrub root healthier through the wet months.
Position next. Aucuba grows well in partial or heavy shade, and that is where variegated forms belong to avoid scorch. Reserve any sunnier spots for the plain green types, which cope with more light. Keep plants out of frost pockets to protect the spring flush, and away from the dry rain shadow of walls where drought bites.
Cultivar choice finishes the job. Plain green aucubas are the most trouble-free: they tolerate more sun, more shade and more neglect. Compact forms reach 1.5-2m rather than the 3m of the biggest types, so they suit small gardens without hard annual pruning. Choose the plant to fit the place and you avoid most of the stress that turns leaves black.
Common mistakes that make aucuba blackening worse
Spraying a fungicide
Aucuba blackening is almost never a fungal disease, so a fungicide does nothing but cost money and time. While you spray, the real cause, usually wet roots, carries on unchecked. Diagnose first, treat the cause, and reach for a fungicide only if a lab or the RHS confirms an actual pathogen, which is rare.
Cutting the whole plant back in autumn
Hard pruning in autumn forces soft new growth that the first frost blackens, and strips the plant of foliage before winter. Always save the rescue cut for April. Cutting in the wrong season turns a recoverable plant into a struggling one.
Watering a waterlogged plant
A blackening aucuba often looks stressed, so the instinct is to water. On a waterlogged plant that is the worst thing you can do. Check the soil first: wet and cold means the roots are already drowning, and more water finishes them off. Fix drainage instead.
Leaving a variegated aucuba in full sun
Moving a gold-spotted form out of the sun is the whole fix for scorch, yet many gardeners keep topping up water and wondering why it keeps burning. Water helps, but shade solves it. Move the plant in autumn and the scorch stops returning.
Digging out a plant that would recover
Aucuba reshoots so reliably from old wood that pulling out a blackened plant is usually premature. Unless the stem base shows brown-red root-rot staining, give it the April cut and a season to respond first. Most come back.
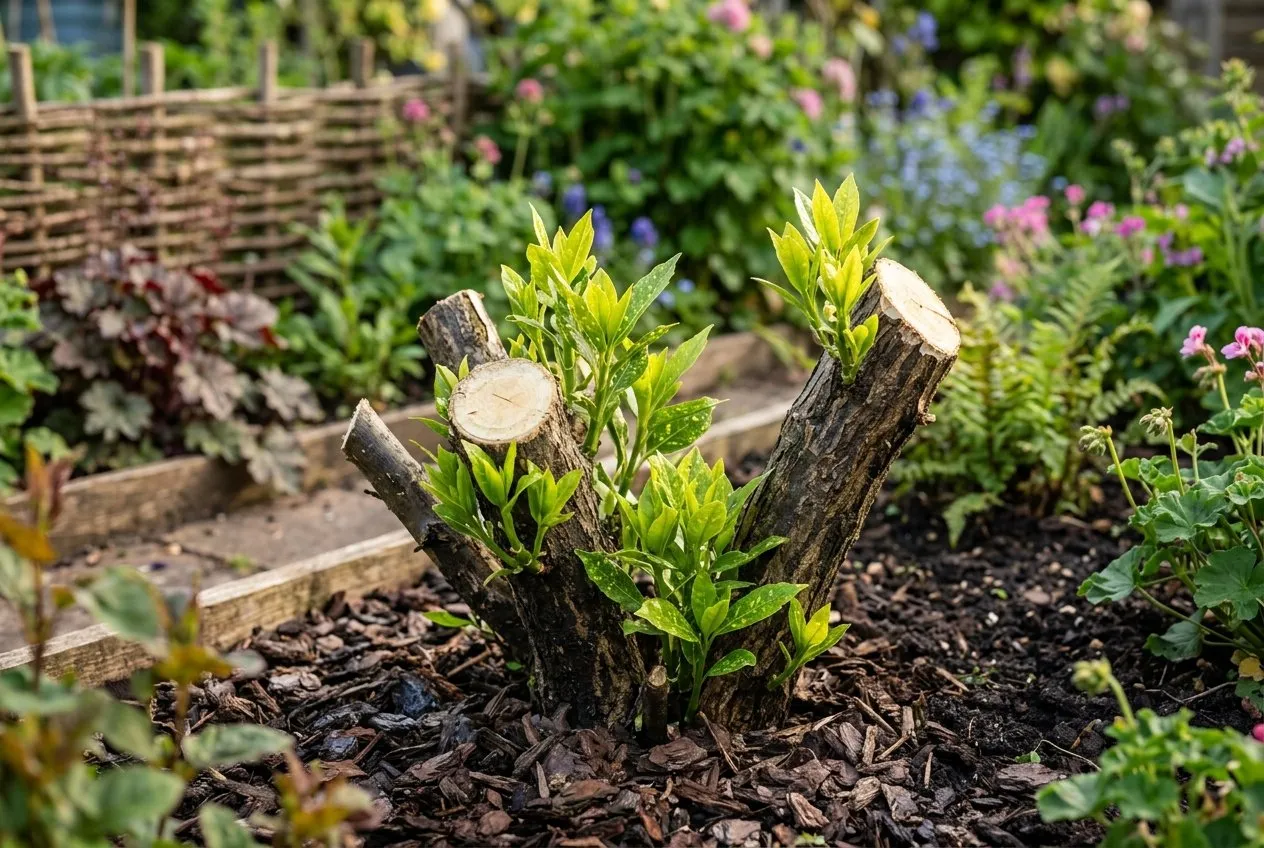 Reshoots from cut stumps by early summer. Aucuba’s willingness to break from old wood is why blackened plants so often recover.
When aucuba blackening signals a wider problem
Sometimes blackening is a clue that the whole spot is wrong for evergreen shrubs, not just for this one plant. If an aucuba blackens year after year despite a hard cut and grit, and nearby laurels or camellias struggle too, the site itself is the issue: heavy, permanently wet clay, or deep dry shade with no water. In that case, changing the plant rarely helps as much as changing the conditions.
This is the same diagnostic thinking behind other shrub failures. A dying laurel hedge and a failing camellia on the same ground usually share a root cause with a blackened aucuba: winter wet, drought, or a soil-borne rot. Diagnose the site, not just the plant, and you fix all three at once.
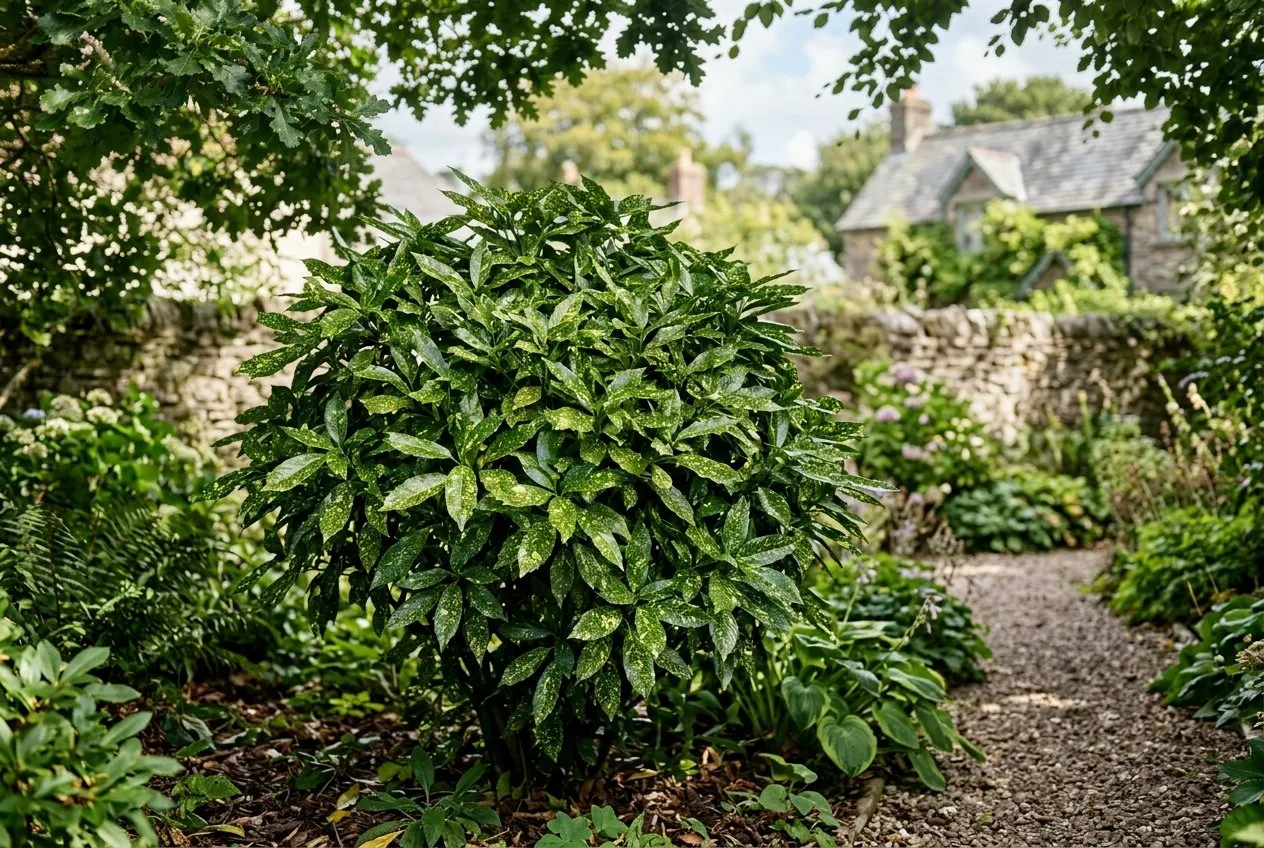 A recovered ‘Crotonifolia’ in the right spot: partial shade, free-draining soil and a spring mulch keep the leaves glossy and black-free.
Frequently asked questions
Why is my aucuba turning black?
Almost always root stress, not a disease. Winter waterlogging is the most common cause in UK gardens, followed by summer drought, hard frost on soft new growth, and sun scorch on gold-variegated forms. The RHS lists wet soil around the roots as the main trigger. True infection is rare, so there is usually nothing to spray for.
Will a blackened aucuba recover?
Yes, in most cases it recovers well. Aucuba is one of the toughest evergreen shrubs for regrowth. Cut the affected stems back to clean green wood in April and improve the drainage. A plant cut right down to 30cm stumps almost always reshoots from the base within one growing season.
Should I cut off black aucuba leaves?
Remove badly blackened leaves and stems in spring. Wait until April, then cut each affected stem back to clean, green, live wood. Do not strip every leaf in autumn, as remaining foliage protects the plant over winter. Cutting in spring lets fresh growth replace the damage quickly through the warm months.
Does frost turn aucuba black?
Yes, hard frost blackens the soft new growth. Established old leaves usually shrug off UK cold, but tender spring shoots and recently pruned growth blacken after a sharp late frost. The damage looks alarming but is rarely fatal. Cut the blackened tips back to healthy wood once the frosts have finished.
Why are my aucuba leaves scorched and black in the sun?
Gold-variegated cultivars scorch in full sun and dry soil. Forms like ‘Crotonifolia’ and ‘Gold Dust’ carry heavy yellow spotting that burns black in strong sun, especially on dry ground. Move affected plants to partial or full shade, mulch well, and water in droughts. Plain green aucubas tolerate sun far better.
How do I know if my aucuba has root rot?
Check for brown-red staining under the bark at the base. Scrape a little bark away near soil level. Healthy wood is green or cream, while phytophthora root rot shows brown or black discoloured tissue, often as an inverted V. Rotted roots are dark, soft and break easily. There is no chemical cure available to gardeners.
How do I stop my aucuba blackening again?
Fix the drainage and choose the right position. On clay, fork in coarse grit and mulch yearly to move winter water away from the roots. Plant gold-variegated forms in shade to avoid scorch, and water through summer droughts. Get siting and drainage right and blackening rarely returns.
If your spotted laurel shares a bed with other struggling evergreens, our guide to growing skimmia covers another tough shade evergreen worth matching to the right spot before you replant.
Our team produces practical UK gardening guidance from source research, contributor records and established horticultural practice. Editorial standards are overseen by Matt W.