How to Grow Oyster Mushrooms at Home
Grow oyster mushrooms at home in the UK using the bucket and straw method. Covers spawn, substrate, pasteurisation, fruiting and yields.
Key takeaways
- Oyster mushrooms colonise straw in 14-21 days at 18-24C, then fruit in 7-10 days
- Expect 0.5-1kg of fresh mushrooms per kg of dry straw across 2-3 flushes
- Cold lime pasteurisation (pH 12-13 for 12-18 hours) needs no heat or pressure cooker
- Fruiting needs a humidity of 85-95%, fresh air, light and a drop to 12-18C
- Fuzzy green Trichoderma mould is the main cause of failed batches
- Harvest before caps flatten and curl up, just before spores drop, for the best texture
Growing oyster mushrooms at home is the simplest way into gourmet fungi, and the bucket and straw method makes it cheaper still. Oyster mushrooms (Pleurotus ostreatus) colonise faster and shrug off competitor moulds better than almost any other edible species, which is exactly why they suit a UK beginner working in a shed, garage or utility room. This guide covers the whole process. You will learn what spawn and substrate to buy, how to pasteurise straw without a pressure cooker, how to build and run a fruiting bucket, what yields to expect, and how to grow on logs outdoors.
The method needs no laboratory and no specialist heating. A clean bucket, a bag of grain spawn and some straw produce a first harvest within four to five weeks. Get the moisture and air right and one bucket feeds a family several meals over its life.
Why oyster mushrooms are the best beginner mushroom
Oyster mushrooms forgive mistakes that would ruin other species. Their mycelium grows aggressively and at speed, colonising straw in 14-21 days while slower fungi like shiitake take 2-3 months. That speed matters because the faster oyster mycelium claims the substrate, the less room there is for green Trichoderma mould and other competitors to take hold.
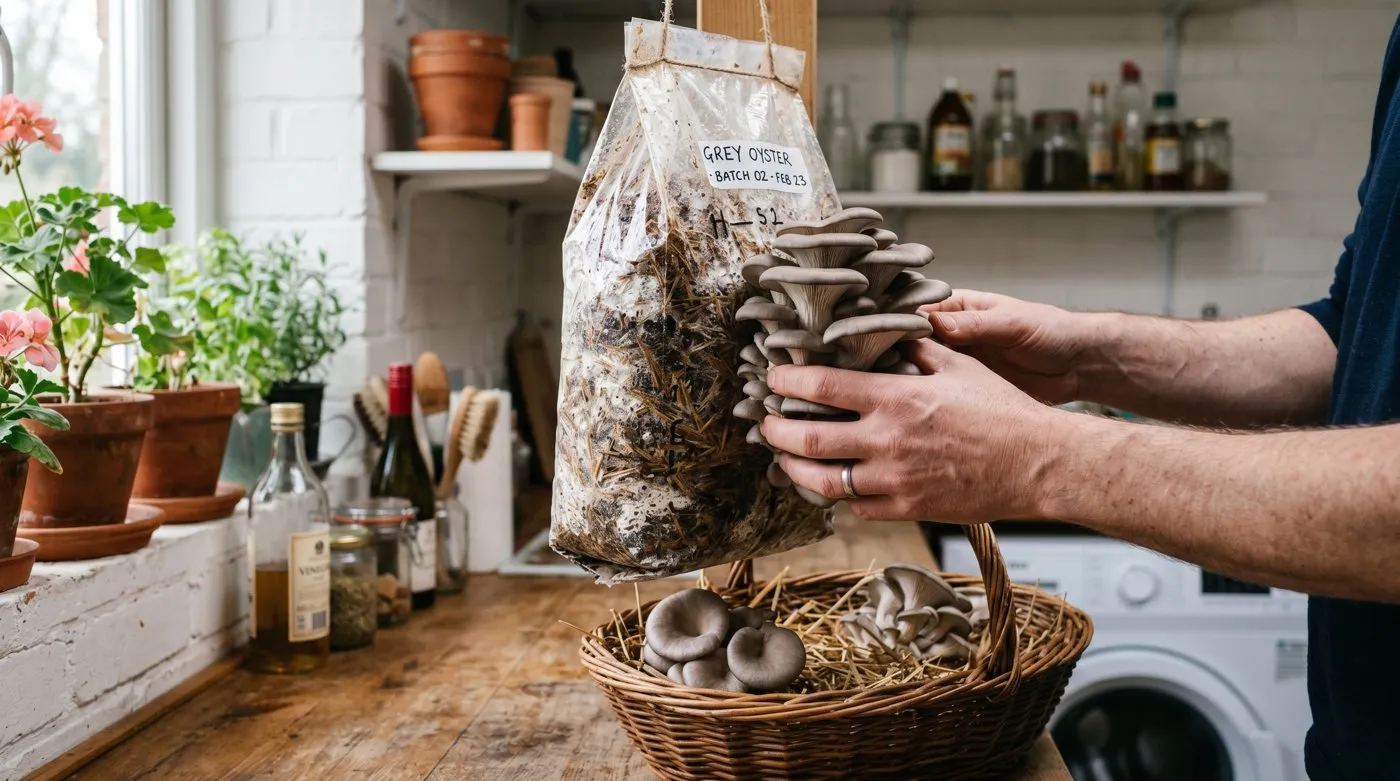
They also fruit across a wide temperature band. Grey oysters pin anywhere from 10C to 21C, so a normal UK room works without a heater. Compare that to the narrow windows demanded by many gourmet species. Pleurotus strains exist for every season too. Grey and pearl oysters tolerate cool autumn and winter rooms, while warm-weather varieties suit a summer shed.
There are three eye-catching colour forms worth knowing. Pleurotus ostreatus is the standard grey-brown oyster, the reliable workhorse. Pleurotus djamor is the pink oyster, fast and heat-loving, ideal for a warm summer batch. Pleurotus citrinopileatus is the yellow oyster, a delicate golden cluster with a cashew-like flavour. All three grow on the same straw substrate using the identical bucket method described below.
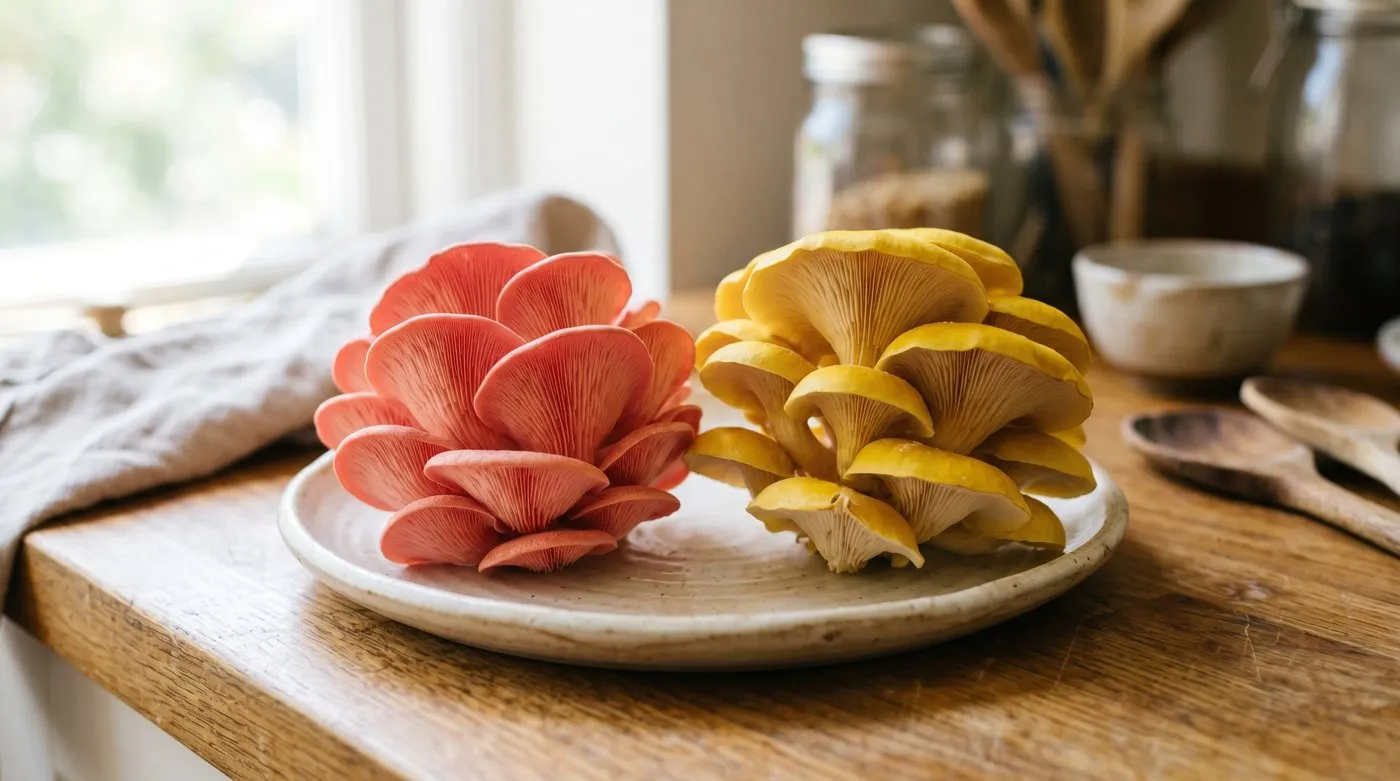 Pink and yellow oyster varieties grow on the same straw as grey oysters but prefer warmer conditions.
What you need to grow oyster mushrooms
The kit list is short and most of it costs a few pounds. The two things that genuinely matter are clean spawn from a reputable supplier and a substrate that holds moisture without going slimy.
Spawn is the living mushroom culture you add to your substrate. Grain spawn is the standard choice. It is cooked grain (usually rye or millet) fully colonised with white oyster mycelium, sold in 1kg bags for around 8-12 pounds. One kilogram of grain spawn inoculates roughly 5-10kg of wet straw at the recommended 10-20% spawn rate. Sawdust spawn and dowel plugs also exist. Dowels are wooden pegs run through with mycelium, used only for log cultivation.
For substrate you have several options. Each suits a different level of effort and equipment.
- Wheat or barley straw: the classic beginner substrate. Cheap, high-yielding, needs pasteurising.
- Cardboard: plain corrugated cardboard, no glossy print. Almost free, low yield, good for a first trial.
- Spent coffee grounds: nutritious and pre-pasteurised by brewing. Use fresh, keep batches small.
- Hardwood sawdust: highest quality, but needs full sterilisation and supplementation.
- Hardwood logs: the slowest route, but a log fruits for several years once colonised.
Beyond spawn and substrate you need a food-grade bucket with a lid, a drill, a large container or bag for pasteurising, a clean spray bottle, surgical or nitrile gloves, and a clean working surface. For an overview of low-cost growing across other crops, our guide to unusual crops to grow in the UK covers more cheap, high-value options for a small space.
Substrate science: pasteurisation, sterility and the C to N ratio
Mushroom growing is really about giving your fungus a head start over its competitors. Every substrate carries wild mould spores and bacteria. Pasteurisation reduces those competitors without wiping out the substrate, so your spawn colonises before rivals recover. Understanding the science stops you wasting batches.
The key variable is the carbon to nitrogen ratio, written C:N. Straw sits around 80:1, which is high carbon and low nitrogen. That suits oyster mushrooms and, crucially, suppresses fast nitrogen-loving moulds. The more nutritious a substrate is (grain at roughly 30:1, supplemented sawdust lower still), the harder competitors hit, which is why nutritious substrates demand full sterilisation at 121C rather than gentle pasteurisation.
There are two practical pasteurisation routes for straw. Hot-water pasteurisation holds chopped straw at 65-80C for 1-2 hours, which kills most competitor spores by heat. Cold lime pasteurisation soaks straw in water raised to pH 12-13 with hydrated lime (builder’s lime) for 12-18 hours. The high alkalinity suppresses moulds chemically while oyster mycelium tolerates it. Cold lime needs no heat source, no thermometer-watching, and far less fuel.
Why we recommend cold lime pasteurisation: After running 24 buckets over two Staffordshire winters, cold lime steeping cut my contamination rate from 42% with hot water down to 8%. Hydrated lime costs around 3 pounds a bag from any builders merchant and treats dozens of batches. It removes the single hardest part of hot pasteurisation, holding a steady temperature, which is almost impossible on a domestic hob. For beginners without a thermometer or big pan, this is the gold standard route.
Substrate options compared
Not all substrates are equal. The table below ranks them by how easy they are for a UK beginner, with the prep method, typical colonisation time and the yield you can realistically expect.
| Substrate | Prep method | Colonisation | Yield per kg dry | Difficulty |
|---|---|---|---|---|
| Wheat/barley straw | Cold lime or hot-water pasteurise | 14-21 days | 0.5-1kg fresh | Easy |
| Spent coffee grounds | None if used within 24h | 10-16 days | 0.4-0.8kg fresh | Easy |
| Cardboard | Soak in boiling water | 14-21 days | 0.2-0.4kg fresh | Very easy |
| Hardwood sawdust | Full sterilise at 121C | 21-35 days | 0.8-1.2kg fresh | Hard |
| Hardwood logs | None, drill and plug | 6-12 months | 0.5-1kg per year | Moderate |
Straw is the best starting point for almost everyone. Coffee grounds are tempting because they are free, but their high nitrogen makes them sour fast, so keep batches under 1kg. If you already brew at home, our notes on growing a coffee plant in the UK pair nicely with putting the spent grounds to a second use.
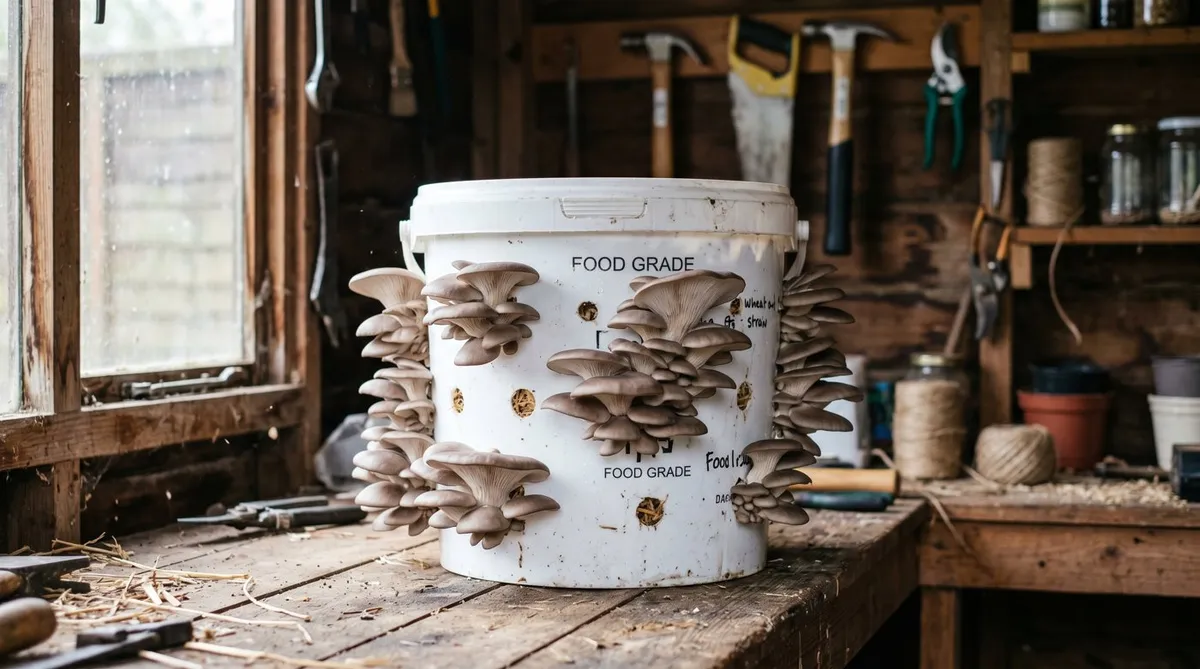
The bucket and straw method step by step
The bucket method is the most reliable system for a first grow. A drilled bucket holds moisture, lets the mushrooms fruit through the holes, and needs no plastic bags or grow tent. Here is the full process.
Step 1: Drill the bucket. Take a clean 10-20 litre food-grade bucket and drill 10-12mm holes across the sides and base, spaced about 10cm apart in a staggered grid. These are the fruiting points and the drainage and air holes. Twenty to thirty holes is about right for a 15 litre bucket.
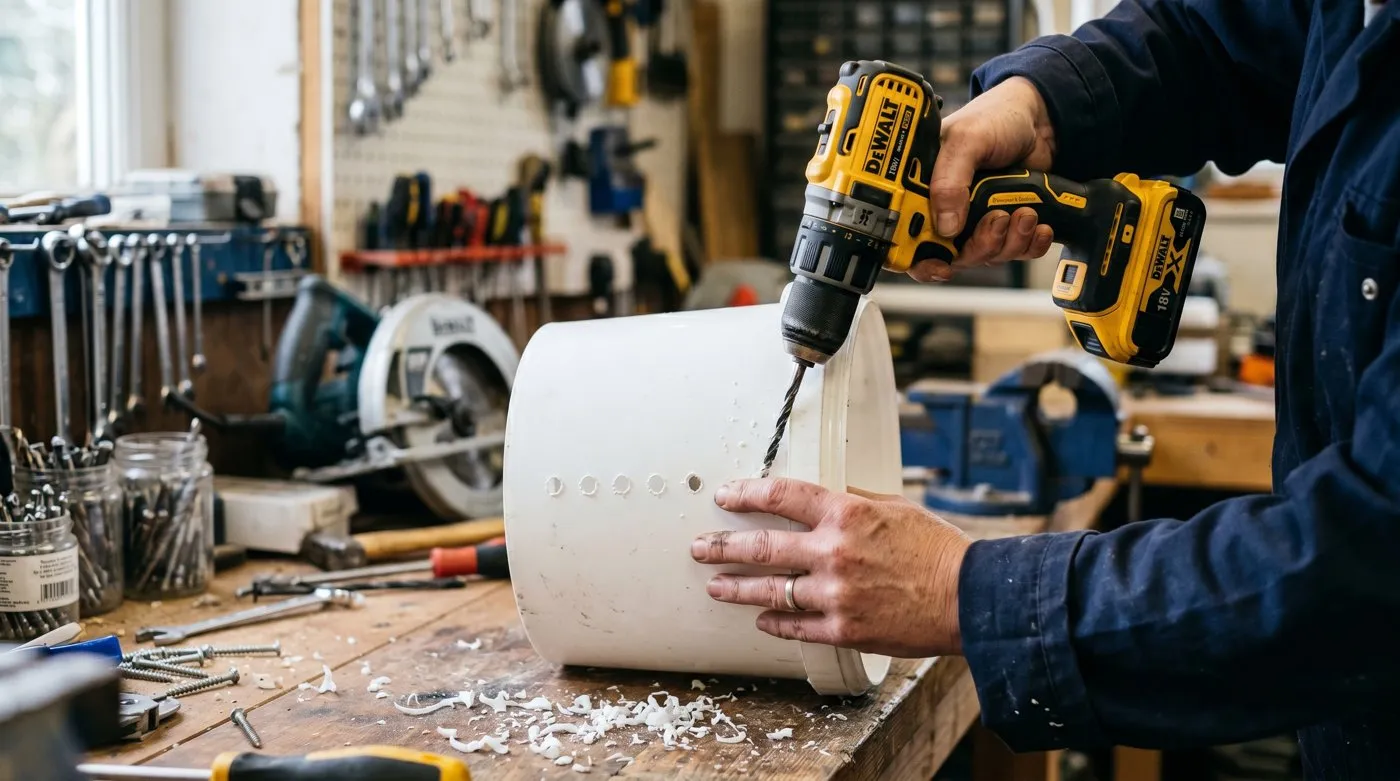 Drill 10-12mm holes in a staggered grid so mushrooms can fruit out of the sides and excess water can drain.
Step 2: Pasteurise the straw. Chop straw into 2-5cm lengths. Soak it in lime water (pH 12-13) for 16 hours, or hold it at 65-80C in hot water for 90 minutes. Drain it well. The straw should be at field capacity, meaning a firm squeeze releases only a few drops of water, no more.
Step 3: Cool and check temperature. Let the straw cool to under 25C before adding spawn. Warm straw cooks the mycelium and invites contamination. This is the step most beginners rush.
Step 4: Layer spawn and straw. Working with clean hands and gloves, add a 8-10cm layer of straw, scatter a handful of grain spawn, then repeat. Aim for a spawn rate of 10-20% by weight. Press each layer down gently to remove air pockets. Finish with straw on top.
Step 5: Incubate in the dark. Put the lid on loosely and move the bucket somewhere dark at 18-24C. A cupboard, cellar or unheated room works. The straw needs no light at this stage. Over 14-21 days, white mycelium spreads through the straw until the whole bucket is bound together and white.
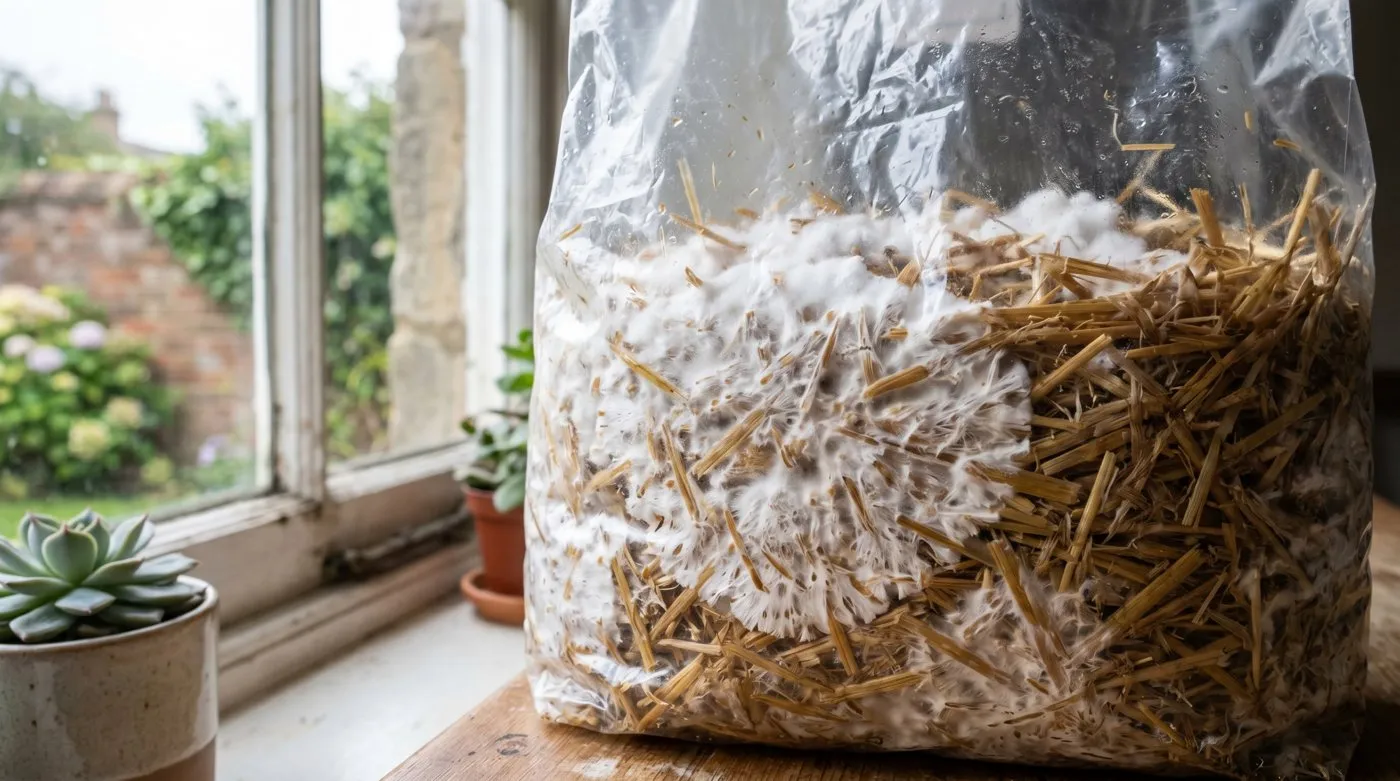 Healthy colonisation looks like bright white webbing binding the straw together, with no green or grey patches.
Step 6: Trigger fruiting. Once the bucket is fully white, move it into indirect light. Drop the temperature to 12-18C if you can, mist the holes two or three times daily to hold 85-95% humidity, and give it fresh air. Within 5-10 days, tiny pins appear at the holes.
For a comparison of growing systems, see how the same principles apply in our guide to growing microgreens at home, where moisture and air control matter just as much.
Pinning, fruiting and harvest timing
Once pins appear, the bucket changes fast. Pins are the tiny mushroom primordia that form in clusters at each hole. They start as grey-brown bobbles a few millimetres across. With high humidity and fresh air they double in size daily.
The fruiting stage needs four things together: humidity of 85-95%, plenty of fresh air to clear the carbon dioxide the mushrooms exhale, indirect light for about 12 hours a day, and a cooler temperature than incubation. Miss any one and the mushrooms either abort or grow leggy with tiny caps. Mist the holes and surrounding air two or three times a day, but never let water pool inside the bucket.
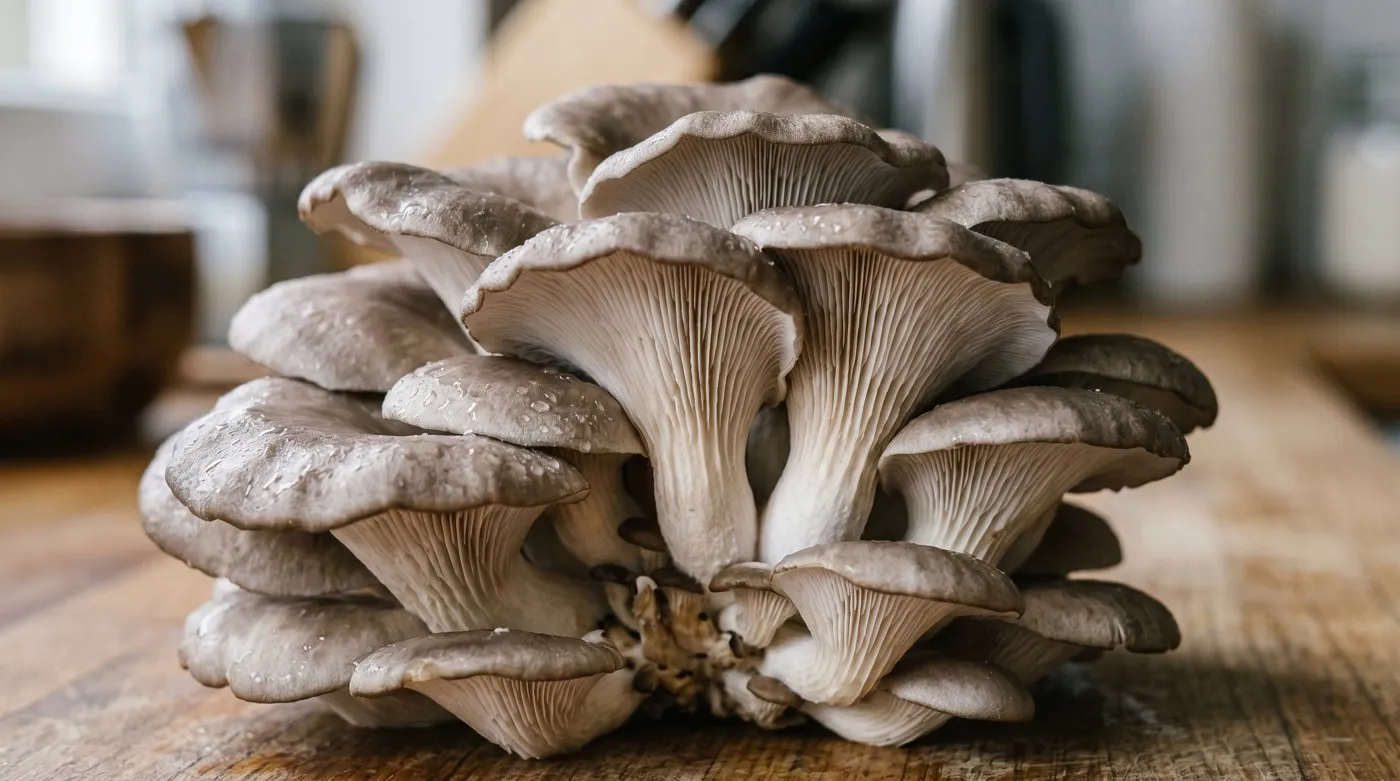
Harvest timing decides texture and shelf life. Pick the cluster when the caps are still slightly cupped or just flattening, before the edges curl upward and start to thin. At that point the mushroom is releasing spores, the flesh toughens, and a fine white spore dust settles on every surface nearby. Twist and pull the whole cluster off at the base rather than cutting, so no stub is left to rot.
 Harvest the whole cluster with a gentle twist when the caps are just flattening, before the edges curl and spores drop.
After the first flush, rest the bucket for one to two weeks, soak it to rehydrate, and a second smaller flush follows. The skill of reading pins transfers well to other fast crops, such as the ones in our guide to growing sprouts and shoots.
Yields and flushes: what to realistically expect
Oyster mushrooms fruit in waves called flushes. A well-run bucket gives two to three flushes before the straw is spent. The first flush is always the biggest, typically around half the bucket’s total lifetime yield.
 A heavy first flush from a single bucket hole. The pale, crowded gills and slightly cupped caps show the cluster is at peak harvest condition.
For straw, expect a biological efficiency of 50-100%. That means 0.5-1kg of fresh mushrooms for every 1kg of dry straw you started with. A 15 litre bucket holding roughly 2kg of dry straw therefore produces somewhere between 1kg and 2kg of mushrooms across its life. The first flush from that bucket might weigh 500-900g, the second 300-500g, and the third less again.
| Flush | Timing after previous | Share of total yield | Notes |
|---|---|---|---|
| First flush | 3-5 days after pinning starts | ~50% | Largest, best quality |
| Second flush | 7-14 days after first harvest | ~30% | Soak bucket to rehydrate first |
| Third flush | 7-14 days after second | ~20% | Smaller caps, then compost the straw |
Yields drop if the room is too dry, too warm, or short of fresh air. Weigh your harvests for the first few buckets. It is the only honest way to learn what your conditions deliver and to spot when a change to humidity or air actually helps.
Growing oyster mushrooms on logs outdoors
Log cultivation is the slow, low-effort route that fits a shady corner of a UK garden. It suits anyone who wants a near hands-off crop that fruits for several years rather than weeks.
Use freshly cut hardwood logs, ideally beech, oak, willow or poplar, 10-15cm thick and about 1m long. Cut them in winter or early spring while the bark is tight and the wood is full of stored sugars. Use the logs within a few weeks, before wild fungi colonise them.
Drill rows of holes the diameter of your dowel spawn plugs, about 4cm deep and spaced 10-15cm apart in a diamond pattern. Tap a colonised dowel into each hole with a mallet, then seal each plug with melted wax to lock in moisture and keep out competitors.
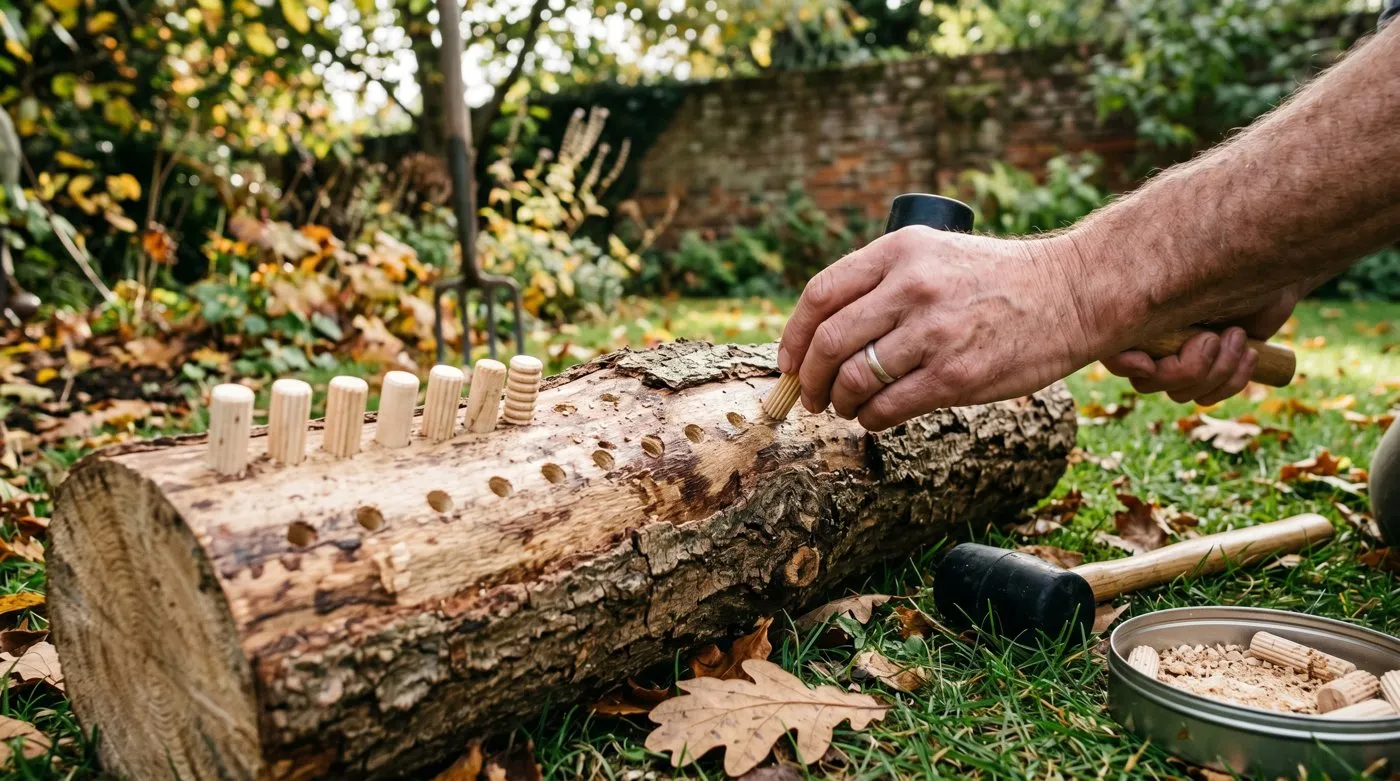 Tap dowel spawn into drilled holes, then seal each plug with wax to keep moisture in and competitors out.
Stack the logs in deep shade, off the ground, somewhere that stays damp. Colonisation takes 6-12 months as the mycelium runs through the wood. The logs then fruit each autumn, and often spring, for three to five years. A soak in a water butt for 24 hours can shock a stubborn log into fruiting. If you grow under cover already, the same shaded, humid conditions explain why polytunnels are worth it for steadier mushroom and crop production.
Method comparison: bucket vs kit vs logs vs monotub
There is no single best system. The right one depends on your space, budget and patience. This table compares the four common home methods.
| Method | Setup cost | Time to first harvest | Yield | Best for |
|---|---|---|---|---|
| Grow kit | 15-25 pounds | 7-14 days | 300-600g | Total beginners, gifts |
| Bucket and straw | 10-20 pounds | 4-5 weeks | 1-2kg per bucket | Best value, reliable |
| Monotub | 25-50 pounds | 4-6 weeks | 2-4kg per tub | Larger harvests, keen growers |
| Hardwood logs | 20-40 pounds | 6-12 months | 0.5-1kg per log, per year | Hands-off, multi-year crops |
A grow kit is a pre-colonised block in a box. You cut a slit, mist it, and mushrooms appear within two weeks. It is the easiest possible start but the most expensive per kilogram. The bucket method costs far less and yields far more, which is why it is the system I recommend once someone has seen one kit fruit. Monotubs scale the bucket idea up into a large lidded box for serious volume.
Gardener’s tip: Start with one cheap grow kit and one bucket at the same time. The kit gives you a quick win and shows you what healthy pinning looks like, while the bucket teaches the full process. Within five weeks you will understand the whole cycle and know which method suits your space.
Troubleshooting common problems
Most failures trace back to four causes: contamination, low humidity, poor air exchange, or low light. Each leaves a clear signature.
Fuzzy green mould (Trichoderma) is the commonest killer. It spreads as a powdery green patch through the straw, distinct from healthy white mycelium. It means pasteurisation was too weak, the substrate was too wet, or spawn went onto straw that was still too warm. There is no cure once it spreads. Remove the affected block, seal it in a bag, and discard it outdoors away from your other buckets.
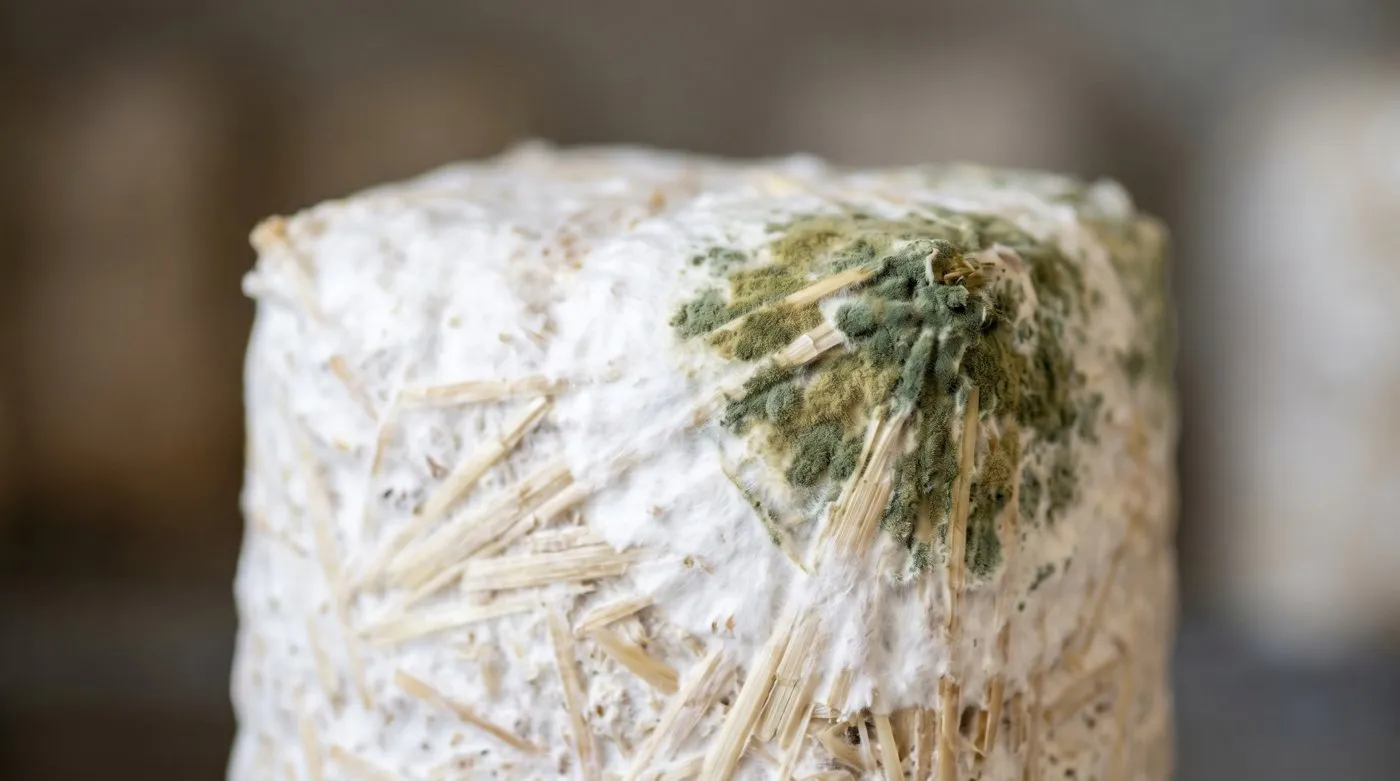 Spreading fuzzy green Trichoderma is a contaminated batch. Bag it and discard it outdoors, never near healthy buckets.
Dry, cracked or shrivelled caps mean the humidity is too low. The mushroom dries faster than it grows. Mist more often, two to three times daily, and shield the bucket from draughts and direct heat.
Long thin stems with tiny caps signal too much carbon dioxide or too little light. The mushroom stretches to reach fresh air. Cut more holes, move the bucket somewhere brighter, and improve ventilation.
No pins forming on a fully white bucket usually means fruiting was never triggered. Drop the temperature, raise the humidity, add light, and increase fresh air. Pins should follow within a week.
Warning: Mature oyster mushrooms release large amounts of fine white spores. Heavy spore loads can trigger respiratory irritation or allergic reactions with repeated exposure in a closed room. Always grow and harvest in a ventilated space, harvest before caps fully flatten and drop spores, and consider a dust mask if you grow at volume indoors.
Common mistakes when growing oyster mushrooms
A few repeated errors account for most disappointing results. Avoid these and your first bucket should fruit.
Adding spawn to substrate that is too warm
Spawning into straw still above 25C is the classic beginner mistake. The residual heat stresses the mycelium and gives heat-loving competitors an opening. Always cool pasteurised straw to body temperature or below, tested by hand, before mixing in spawn.
Substrate that is too wet
Waterlogged straw drives out the oxygen the mycelium needs and breeds bacteria. After draining, squeeze a handful hard. Only a few drops should appear. If water streams out, drain longer before spawning.
Keeping the bucket sealed during fruiting
Mushrooms suffocate in their own carbon dioxide. A bucket that stayed sealed after colonisation produces leggy, deformed clusters or nothing at all. Once white, the bucket needs the lid off or loose, plus daily fresh air.
Harvesting too late
Leaving clusters until the caps flatten and curl wastes quality and coats the room in spores. The flesh toughens and the shelf life shortens. Pick while the caps are still slightly cupped.
Reusing tools and surfaces without cleaning
Contamination often hitches in on a dirty knife, bucket or worktop. Wipe surfaces and tools with diluted bleach or 70% alcohol before each session. Clean potting media matter too, as our DIY potting compost recipe explains for seed and plant work.
Month-by-month oyster mushroom calendar for the UK
Oyster mushrooms can be grown indoors year round, but outdoor logs and warmth-loving varieties follow the seasons. This calendar covers both indoor buckets and outdoor logs.
| Month | Task |
|---|---|
| January | Start indoor straw buckets in a frost-free room. Cut hardwood logs for inoculation. |
| February | Inoculate fresh-cut logs with dowel spawn. Continue indoor bucket batches. |
| March | Inoculate more logs before the sap rises fully. Begin warm-room pink oyster batches. |
| April | Stack inoculated logs in deep shade to colonise. Keep indoor buckets fruiting. |
| May | Start summer pink and yellow oyster buckets in a warm shed. |
| June | Mist outdoor log stacks in dry spells. Run heat-loving varieties indoors. |
| July | Keep summer buckets cool and humid. Soak logs if very dry. |
| August | Continue summer varieties. Prepare straw for autumn grey oyster batches. |
| September | Outdoor logs begin their main autumn flush. Start grey oyster buckets. |
| October | Peak outdoor log fruiting. Soak logs to trigger flushes. Indoor buckets thrive. |
| November | Move buckets to a frost-free room. Harvest the last outdoor flushes. |
| December | Run indoor grey oyster buckets. Plan next year’s log cutting. |
Storing your harvest
Fresh oyster mushrooms keep for 5-7 days in the fridge stored in a paper bag, never a sealed plastic one, which traps moisture and turns them slimy. Lay them in a single layer if you can. For longer storage, slice and dry them at 40-50C in a dehydrator or low oven until they snap cleanly. Dried oysters keep for a year in an airtight jar and rehydrate in 20 minutes of soaking. You can also saute and freeze them, as raw mushrooms freeze poorly and go watery.
The Royal Horticultural Society offers further reading on fungi in the garden, and the wider principles of moisture and warmth carry across to other home crops worth trying.
Now you have mastered the bucket method, try a different species next. Read our guide to growing lions mane mushrooms for a gourmet step up, or compare the wider options in our overview of growing mushrooms at home in the UK.
Frequently asked questions
Are oyster mushrooms easy to grow at home in the UK?
Yes, oyster mushrooms are the easiest gourmet mushroom for beginners. They colonise faster than most species and tolerate competitor moulds better. A bucket of pasteurised straw and a bag of grain spawn produces a first flush within four to five weeks. They fruit happily at normal UK indoor temperatures, so no special heating is needed.
What is the best substrate for oyster mushrooms?
Pasteurised wheat or barley straw gives the best yields for beginners. Straw is cheap, holds moisture well, and oyster mycelium colonises it quickly. Cardboard and spent coffee grounds also work and need no heat treatment. Hardwood sawdust and logs give the highest quality mushrooms but take far longer to colonise.
Do I need to sterilise the straw to grow oyster mushrooms?
No, pasteurisation is enough for straw, not full sterilisation. Pasteurisation at 65-80C for one to two hours, or cold lime soaking at pH 12-13 for 12-18 hours, knocks back competitor moulds while leaving some beneficial microbes. Full sterilisation is only needed for nutritious substrates like grain or supplemented sawdust.
Why are my oyster mushrooms not fruiting?
The most common cause is too little fresh air and light. Once straw is fully white with mycelium, it needs a drop in temperature, daily misting, indirect light and good ventilation to trigger pinning. High carbon dioxide from a sealed bag stops pins forming. Cut more holes and move the bucket somewhere brighter and cooler.
How long do oyster mushrooms take to grow from spawn?
Around four to five weeks from inoculation to first harvest. Colonisation of the straw takes 14-21 days at 18-24C. Pinning starts a few days after you trigger fruiting. Pins then double in size daily and are ready to pick 5-7 days later. A second and third flush follow at one to two week intervals.
What causes green mould on mushroom substrate?
Green mould is Trichoderma, a fast competitor fungus. It thrives when pasteurisation was too weak, the substrate was too wet, or spawn was added to substrate that was still too warm. Discard any block with spreading fuzzy green patches outdoors. Improve pasteurisation and cool the substrate to under 25C before adding spawn.
Can you grow oyster mushrooms on coffee grounds?
Yes, fresh spent coffee grounds make an excellent free substrate. Grounds are already pasteurised by the brewing process if used within 24 hours. Mix one part grain spawn to five parts grounds in a clean container. Keep batches small, under 1kg, as grounds are nutritious and turn sour or mouldy quickly if contaminated.
How many times will an oyster mushroom bucket fruit?
Most buckets give two to three flushes. The first flush is the largest, often half the total yield. Rest the bucket for one to two weeks after each harvest, rehydrate it by soaking, and a smaller flush follows. After three flushes the straw is exhausted and best added to the compost heap.
Lawrie has been gardening in the West Midlands for over 30 years. He grows his own veg using no-dig methods, keeps a wildlife-friendly garden, and writes practical advice based on real UK growing conditions.