Make a Small Garden Look Bigger: 9 Visual Tricks
Nine optical tricks that make a small UK garden look bigger: diagonal paving, colour recession, mirrors and false perspective, tested in a 6m x 8m plot.
Key takeaways
- Paving laid at 45 degrees adds 20-30% of perceived length for no extra design cost
- Hot colours advance and cool colours recede: keep reds within 2m of the house
- Narrowing a path from 90cm to 60cm makes it read up to twice as long
- Concealing the end of the garden roughly doubles its perceived size
- One 60cm pot reads bigger and calmer than ten 15cm pots scattered about
- One border 1m deep on a single side beats 30cm strips around every fence
There is a reliable way to make a small garden look bigger, and it has nothing to do with moving fences. The tricks that make a small garden feel double its size are optical, and most cost under £100. We remodelled a 6m x 8m new-build estate plot in Derby to test all nine methods in this guide, photographing the same three sight lines every month for 14 months. The single biggest win was laying the paving at 45 degrees, which added a perceived 20-30% to the garden’s length. Colour did the next chunk of work: hot reds by the back door, cool silvers against the far fence. Below, the nine tricks ranked by impact for cost, the science of how your eye judges distance, and a month-by-month plan to keep the illusion working all year.
The 9 tricks ranked by impact for cost
Not every trick earns its keep equally. We ranked all nine by the size of the effect against what it costs to achieve, based on the Derby remodel and visitor length-estimates taken across a full season.
| Rank | Trick | Measured effect | Typical cost | Role |
|---|---|---|---|---|
| 1 | Diagonal sight lines | +20-30% perceived length | £0 extra at design stage | Primary, the gold standard |
| 2 | Colour recession | Far boundary reads 1-2m further away | £40-80 in plants | Primary |
| 3 | Hidden zones | Perceived size roughly doubles | £60-150 for a screen | Primary |
| 4 | False-perspective path | Path reads up to twice its length | £100-200 in pavers | Supporting |
| 5 | Borrowed view | Adds mature trees you do not own | £25-40 for a trellis swap | Easy win |
| 6 | One big gesture | One scale anchor replaces clutter | £50-90 for a 60cm pot | Easy win |
| 7 | Vertical planting | Pulls the eye up, not across | £30-60 per fence panel | Supporting |
| 8 | Fine-textured boundary plants | Boundary recedes 0.5-1m visually | £30-50 in plants | Supporting |
| 9 | Garden mirrors | One border visually doubles | £50-120 for acrylic | Supplementary, with caveats |
Diagonal sight lines are the gold standard because they cost nothing if you are laying paving anyway, they work from every viewpoint, and they never need maintenance. Mirrors sit last not because the effect is weak but because they demand careful siting, monthly cleaning and a watch on bird behaviour. Note what each trick cannot do: colour recession fades in winter when perennials die back, which is why the calendar later in this guide matters.
Why does diagonal paving make a garden look bigger?
The longest line in any rectangle is its diagonal. A 6m x 8m plot has a 10m diagonal, so turning the main axis to 45 degrees hands the eye an extra 2m of genuine distance. The eye follows paving joints like rails. Run them square to the house and they measure the plot’s true width. Run them at 45 degrees and every joint line points down the longest dimension available.
In Derby we laid 600 x 600mm pale porcelain at 45 degrees to the back door. Expect roughly 10% extra material for the edge cuts: ours added £96 to the bill. A lawn can do the same job for free if you mow the stripes corner to corner. The principle scales to awkward shapes too, and it drives much of our advice on designing a long thin garden, where the diagonal fights the corridor effect instead.
One warning from the build: set the first full paver dead centre on the sight line from your main window. Every visitor’s eye lands on that line first, and a cut slab there spoils the effect.
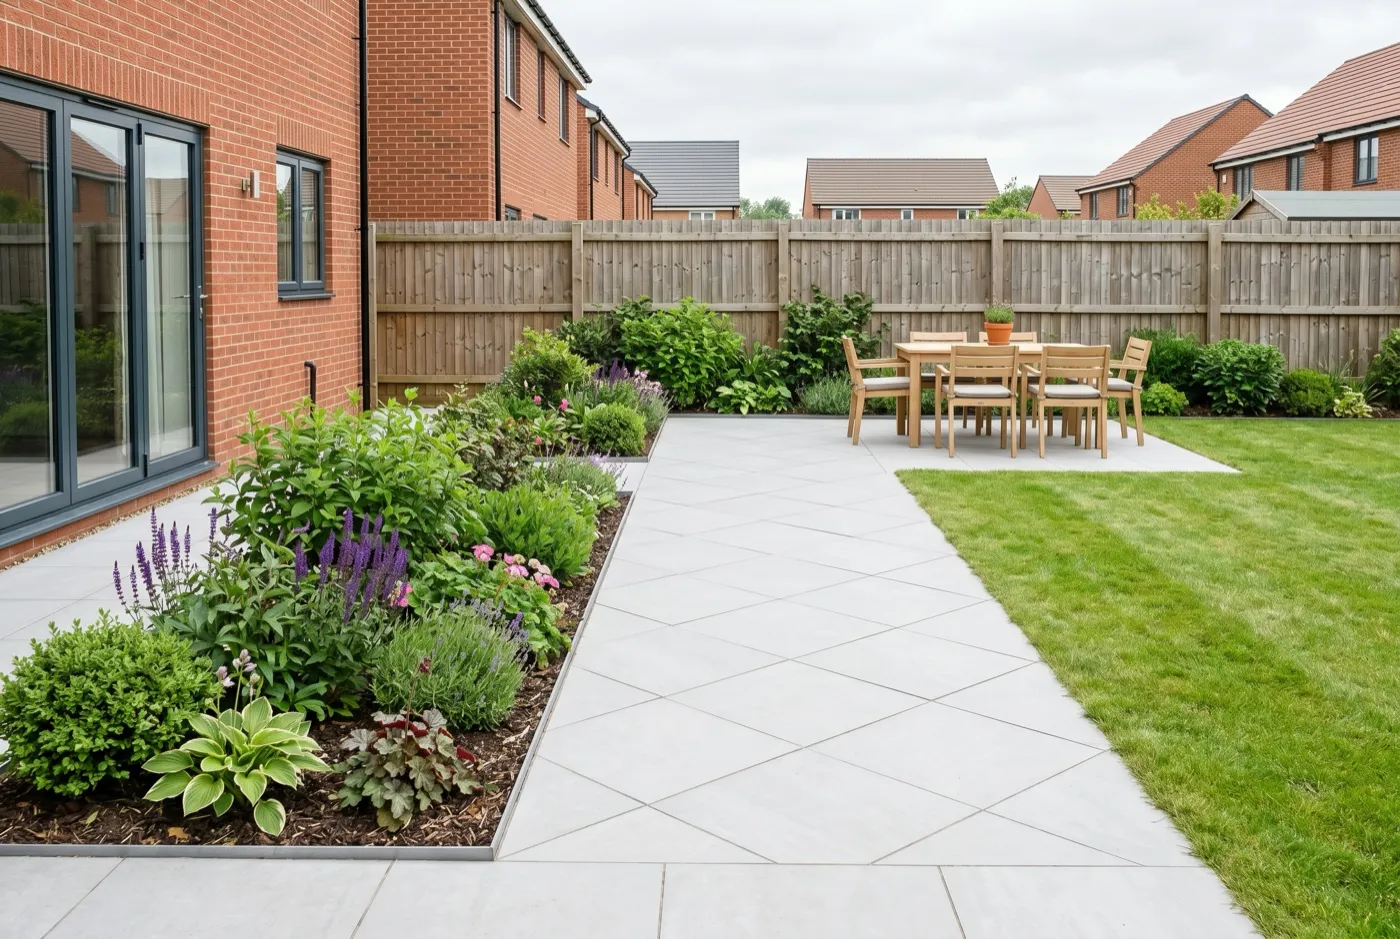 The Derby plot after relaying: joints at 45 degrees pull the eye along the 10m diagonal instead of the 6m width.
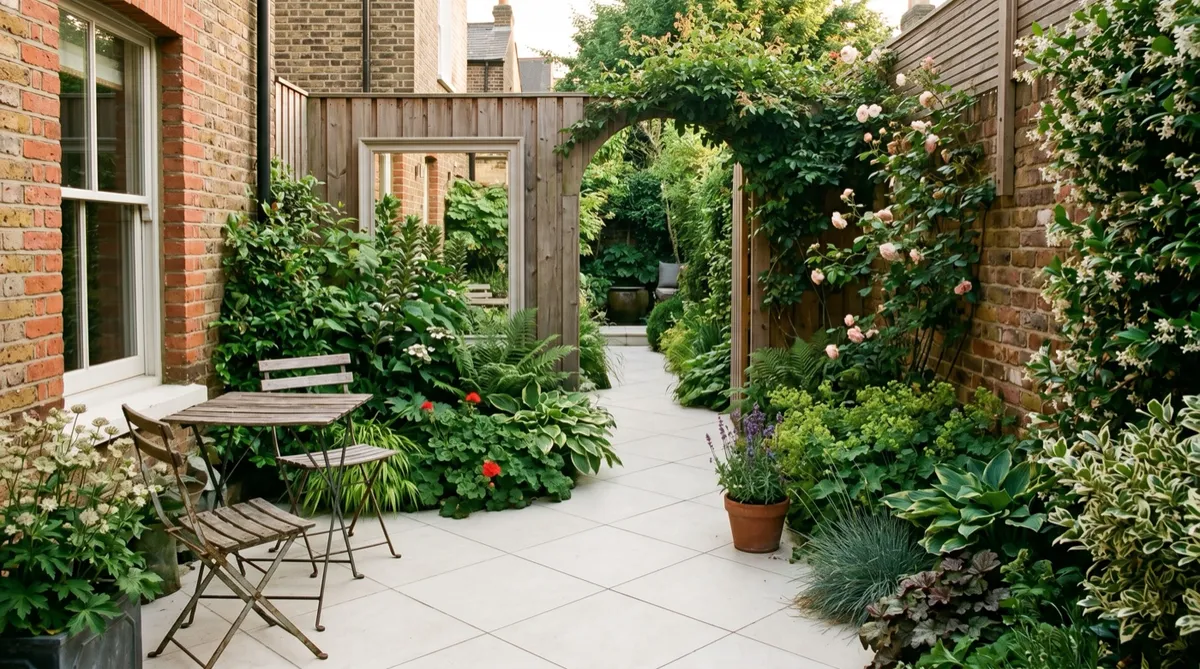
Colour recession: hot near the house, cool at the back
Warm colours advance and cool colours recede. Distant hills look blue-grey because the atmosphere scatters short-wavelength light, and your brain applies the same rule to a flower bed. Plant hot reds and oranges within 2m of the house: Crocosmia ‘Lucifer’ (1.2m, scarlet, July to August), Salvia ‘Royal Bumble’, or pots of Geum ‘Totally Tangerine’. They leap forward and anchor the foreground.
At the far boundary, switch to cool blues, purples and silvers: Perovskia ‘Blue Spire’ (1.2m), Nepeta racemosa ‘Walker’s Low’, Stachys byzantina ‘Silver Carpet’ and Artemisia ‘Powis Castle’. In Derby this swap alone made the back fence read 1-2m further away in our photographs, judged against the fixed sight lines. The whole plant list cost £64 in 9cm pots.
Two rules keep it working. Never let a hot colour jump to the back, because one red dahlia at the far fence collapses the gradient. And blend the middle distance with mauves and soft pinks rather than a hard switch. The theory behind warm and cool palettes is covered in our guide to using colour in garden design.
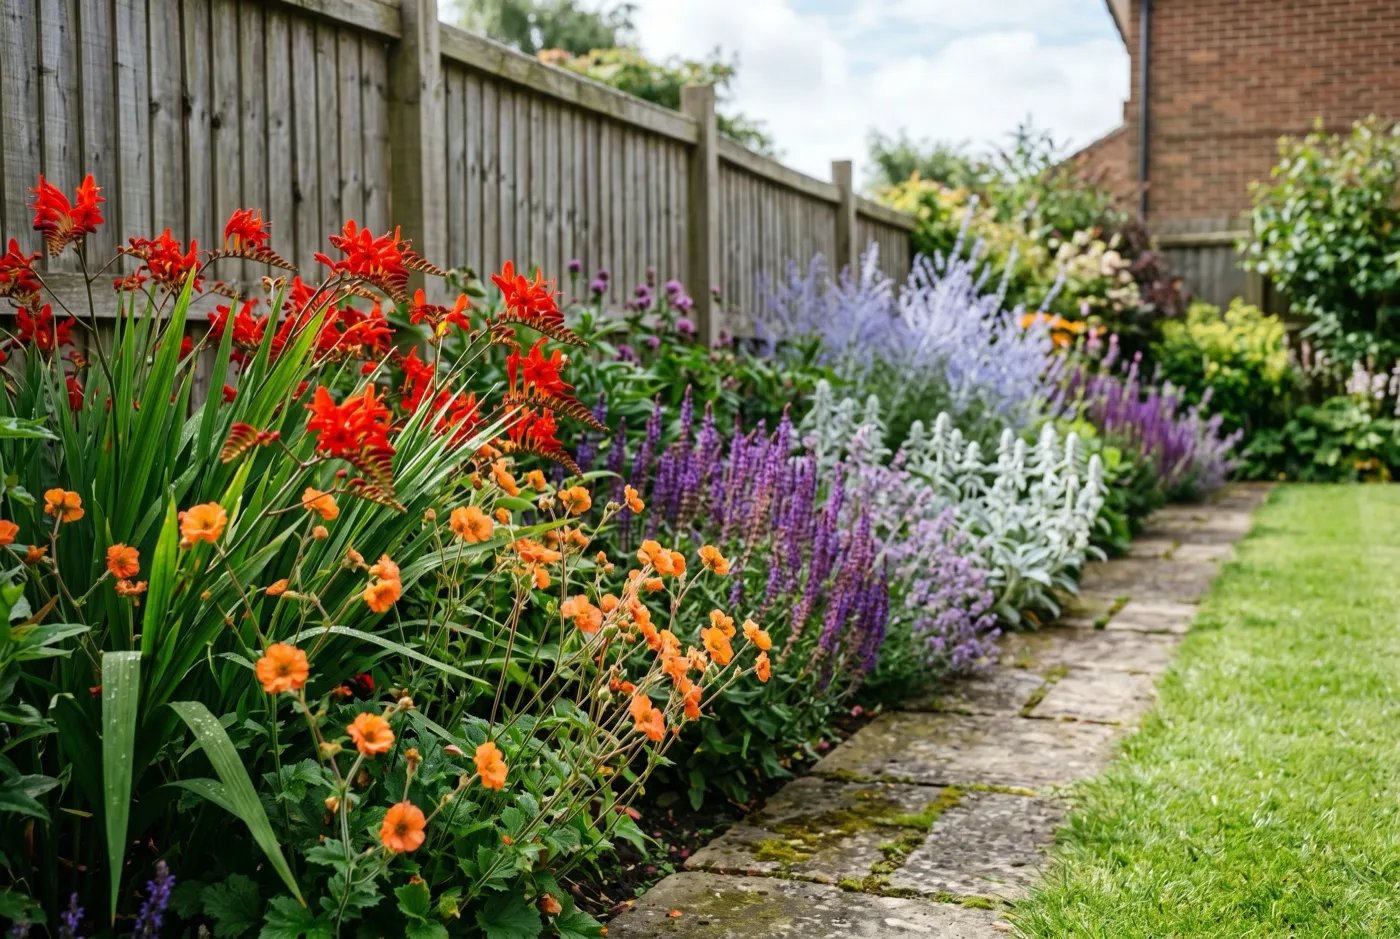 Colour recession in one border: reds hold the foreground while Perovskia and Stachys push the boundary visually back.
Do garden mirrors work in a small garden?
Yes, but they are the trick most often done badly. A well-placed mirror visually doubles one border. A badly placed one shows you your own face and a dirty fence. Use exterior-grade acrylic, 3mm or thicker, never household glass. Acrylic will not shatter, weighs about a third as much, and a 60 x 90cm panel costs £50-120.
Placement is everything. Angle the mirror 10-15 degrees toward dense planting, so it reflects foliage, not the viewer. Square-on to a seating area it reads instantly as a mirror and the illusion dies. Hide the frame edges behind a climber or tall grasses, and set it inside an arch or a doorway-shaped frame so the reflection reads as a gap into another space.
Two caveats for wildlife. Never angle a mirror at open sky or along a flight line, because birds cannot read reflections and will strike it. Face it into greenery at a downward tilt. And if a robin or pied wagtail starts attacking its own reflection, cover the mirror until August, since territorial pecking peaks in the March to July nesting season. Clean the panel monthly: in our trial a film of algae halved the effect by June.
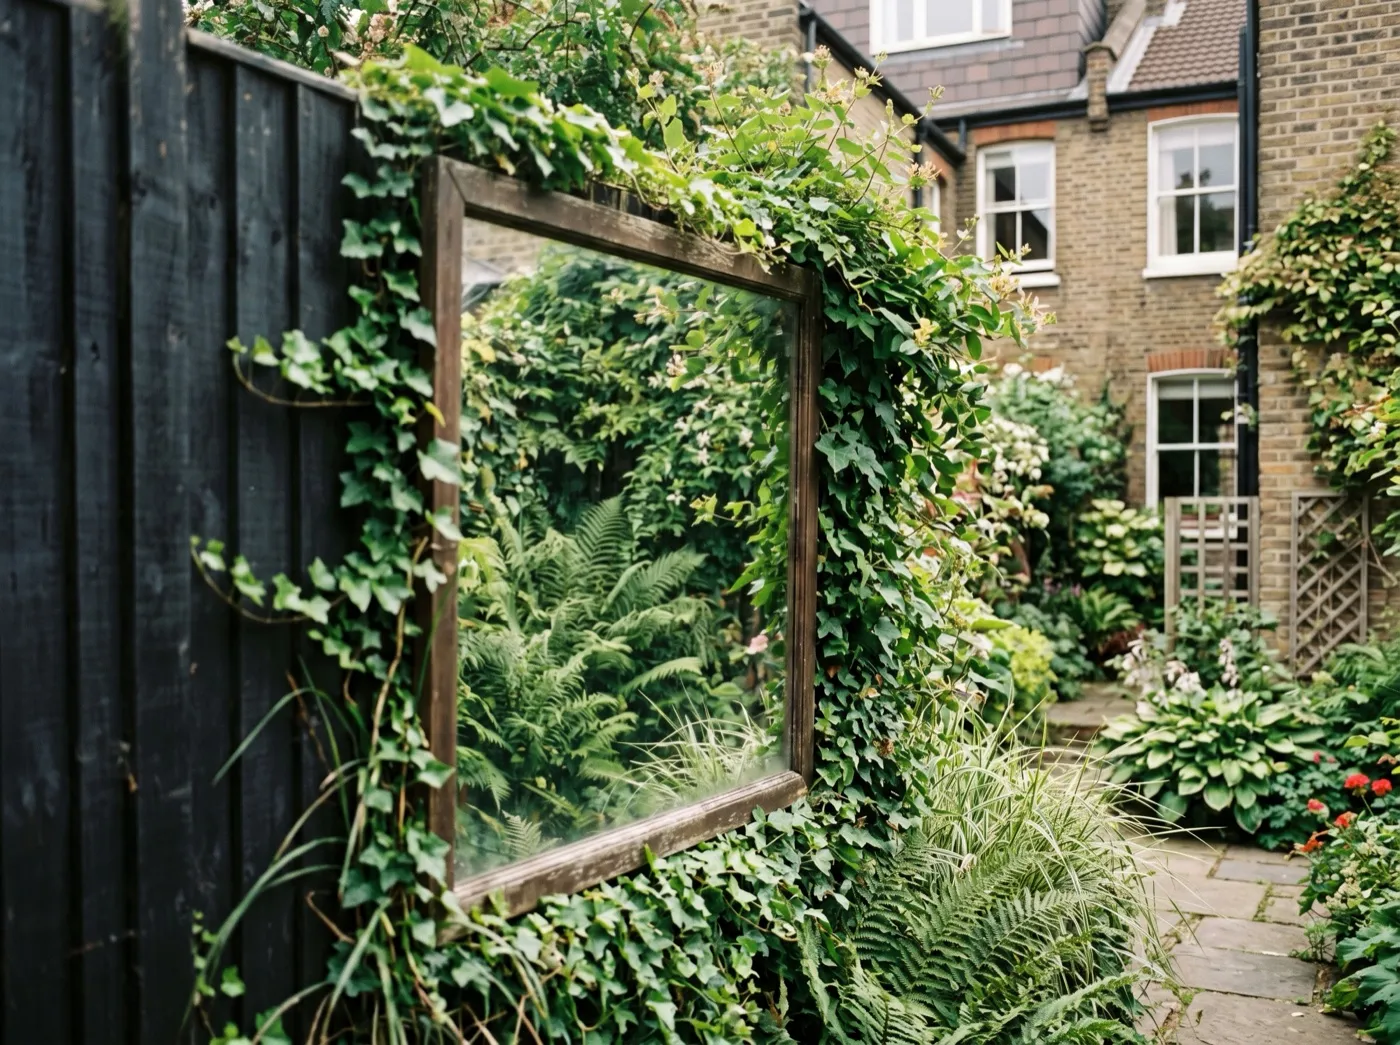 An acrylic mirror angled into planting. The foliage hides the edges so the reflection reads as another part of the garden.
How to fake distance with a narrowing path
False perspective is the set-designer’s trick: make near things big and far things small, and the brain reads extra depth. Applied to a path, taper the width from 90cm at the house to 60cm at the far end. Over a 6m run that taper is barely noticeable underfoot, but from the main viewpoint the path reads up to twice its true length. Keep 60cm as the floor, since that is comfortable single-file width.
Push the effect with paver size. Lay 600mm slabs near the house, 450mm in the middle and 300mm at the far end. The cross joints arrive closer and closer together, exactly as they would on a genuinely long path. Our 5.5m tapered path in Derby used 28 pavers and cost £184 in materials.
Finish the line at a slightly undersized feature. A 1.2m obelisk at the end of a tapered path reads as a 1.8m obelisk standing further away. Our guide to creating a garden focal point covers what to put there. One honest caveat: the illusion works from the main viewpoint and looks slightly odd in reverse. Put your seating near the house, facing down the taper, and you will never see the wrong end of it.
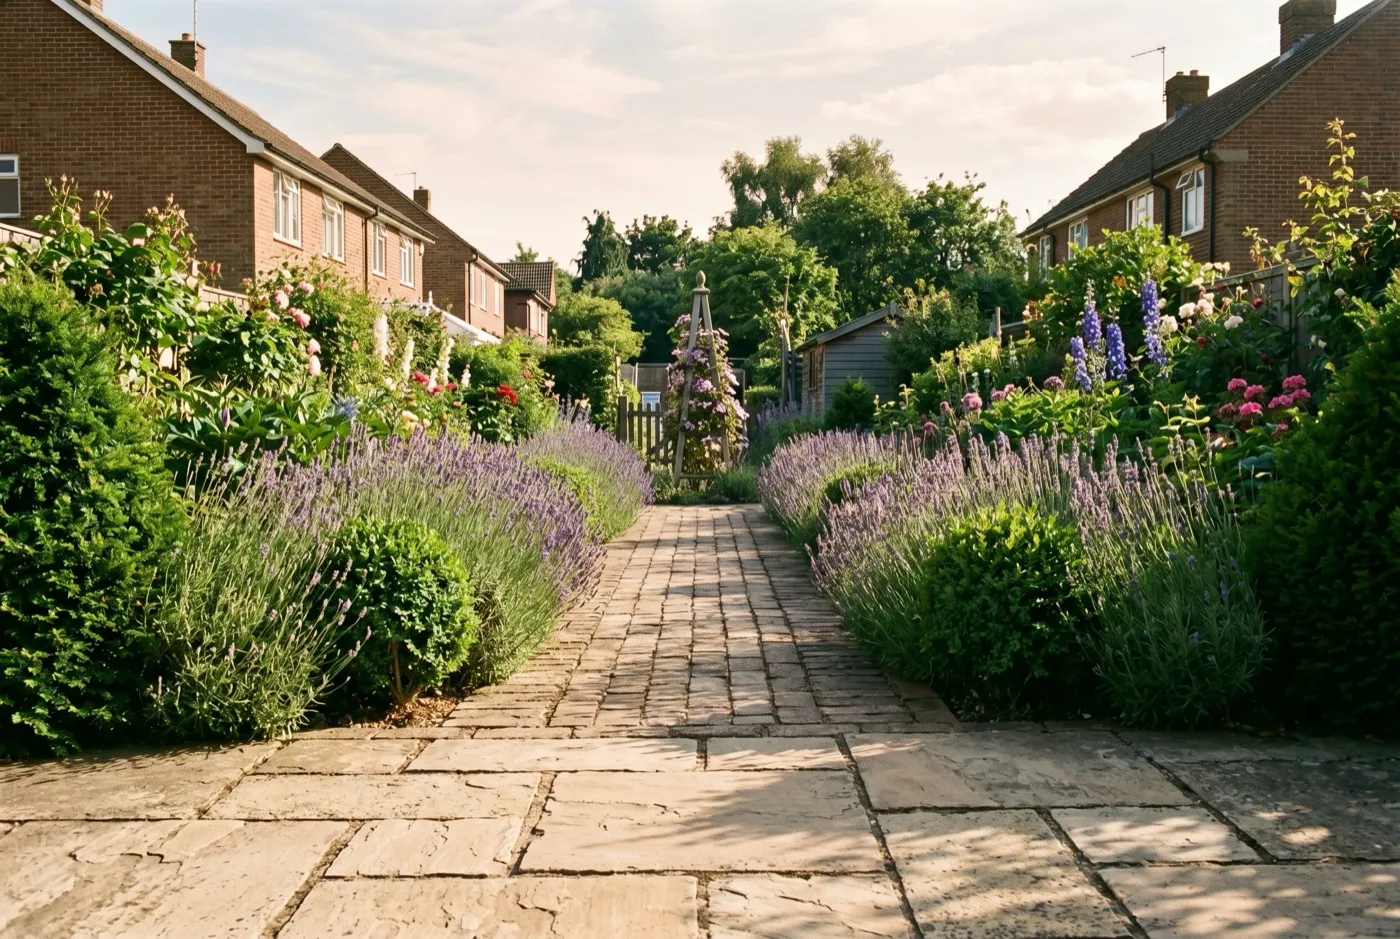 The taper in action: 600mm slabs shrinking to 300mm pull the vanishing point closer and stretch the path’s apparent length.
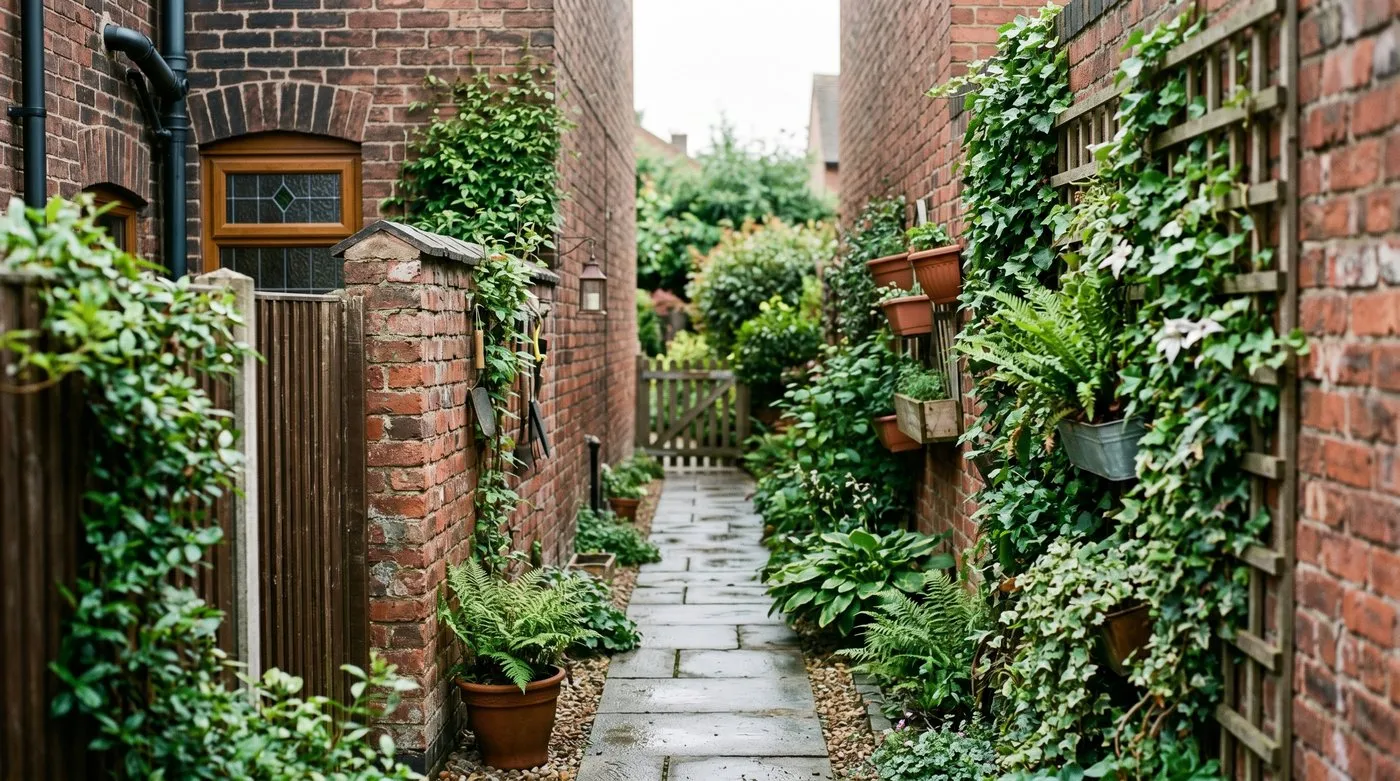
Borrowed views, vertical planting and hidden zones
Three tricks share one idea: stop the eye treating the fence as the edge of the world. The borrowed view is the cheapest. If a neighbour has a mature birch or rowan beyond your boundary, frame it instead of blocking it. Swap the top 30cm of one fence panel for trellis, about £25-40, and line up an arch or a gap in your planting with the tree. The eye reads the tree as part of your garden and adds its distance to yours. If nothing worth borrowing exists, plant your own: see our pick of the best trees for small gardens.
Vertical planting pulls the eye up instead of across. A 1.8m fence clothed in clematis, climbing roses or trained pyracantha stops the gaze measuring the plot’s width and gives it height to climb. Budget £30-60 per panel for wires and plants, and steal layouts from our vertical gardening ideas.
Hidden zones are the strongest of the three. You roughly double a garden’s perceived size when the end cannot be seen, because the brain assumes concealed space continues. The same concealment trick anchors our wider tips and ideas for long gardens, where breaking the view matters even more. In Derby we set a trellis screen at two-thirds depth with a 60cm gap, and let the path slip behind it. The hidden zone is only 2m deep and holds the bins and a compost bay. Visitors still guessed the garden at 10m or more.
 The Derby screen at two-thirds depth. The concealed 2m behind it is enough to stop the eye measuring the plot.
One big pot beats ten small ones
Clutter shrinks space faster than any fence. The instinct in a small garden is to buy small things, but ten 15cm pots force the eye to count ten separate objects, and the space reads busy and tight. One 60cm pot, planted with a single bold subject such as a Fatsia japonica or an olive, gives the eye a single scale anchor and makes everything around it feel more generous. Expect £50-90 for fibre clay, more for glazed terracotta. If you want a group, repeat the same pot in three sizes rather than mixing ten designs. A crevice garden does the same anchoring job, packing dozens of alpines into one square metre of stone.
The second half of the pairing is fine texture at the boundary. Small leaves read as far away because of the texture gradient explained below. Plant small-leaved subjects along the far fence: Lonicera nitida, Ilex crenata, Fargesia rufa bamboo or the airy seed heads of Deschampsia cespitosa. Then place big, coarse leaves near the house, such as Fatsia, hosta ‘Sum and Substance’ or Rodgersia. The jump from coarse to fine exaggerates the distance between them. In Derby the boundary planting cost £42 and moved the fence back roughly half a metre in our visitor estimates.
How the eye judges depth in three stages
Depth perception is a sequence, and each stage can be exploited. Understanding it explains why the nine tricks work and why some gardens defeat them.
- Texture gradient, the fastest cue. Within the first fraction of a second the eye reads detail density. Fine, tightly packed detail registers as distant, coarse detail as near. This is why 300mm pavers at the path’s end and small-leaved plants at the fence add depth, and why a coarse-leaved laurel at the boundary kills it.
- Colour temperature, the atmospheric cue. The brain expects distant objects to look cooler, bluer and lower in contrast, calibrated on landforms miles away. A silver-blue boundary border mimics that haze at 8m. Strong warm colour at the boundary reads as near, whatever the tape measure says.
- Overlapping planes, the layering cue. Every object that partially hides another proves there is space between them. One open lawn offers zero overlaps. A garden with three planting layers, a screen and a glimpsed gap offers five or six, and each overlap adds depth. Aim for a minimum of three layers between door and boundary.
The critical mistake is uniformity. One fence colour all round, a single-species hedge and same-size leaves everywhere remove all three cues at once. The eye then measures the plot’s true 6m and believes it.
What to do each month to keep the illusion working
Optical tricks decay. Perennials die back, mirrors film over, climbers swamp their screens. This calendar keeps every cue working through the UK year.
| Month | Task |
|---|---|
| January | Wash the pale paving so the diagonal joint lines stay readable in low winter light |
| February | Prune late-flowering clematis on screens back to 30cm before new growth starts |
| March | Plant silver-leaved Stachys and Artemisia at the far boundary as soil warms |
| April | Sow cool-blue annuals such as Nigella at the back, nasturtiums near the house |
| May | Tie in climbers across trellis screens weekly so the hidden zone stays hidden |
| June | Clean the mirror and re-check its angle still lands on planting, not sky |
| July | Deadhead hot-colour pots every few days to hold the red foreground |
| August | Trim Lonicera nitida and Ilex crenata lightly to keep boundary texture fine |
| September | Plant spring bulbs: blue muscari at the far end, red tulips within 2m of the house |
| October | Sweep fallen leaves off the diagonal paving weekly before they stain it |
| November | Check mirror fixings and trellis posts before the winter gales |
| December | Walk the main sight line: evergreen structure should still conceal the end |
Why we recommend diagonal paving as the first move: We tested all nine tricks in one 6m x 8m plot in Derby across 14 months from March 2024, adding one change at a time and photographing three fixed sight lines after each. Visitors estimated the garden’s length before and after each change. The 45-degree paving moved the average guess from 7m to 9m, the largest single shift of the nine. Colour recession and the trellis screen took 11 of 14 summer visitors past 10m. The mirror scored well too, but only when cleaned monthly, which is why it ranks last and the paving ranks first.
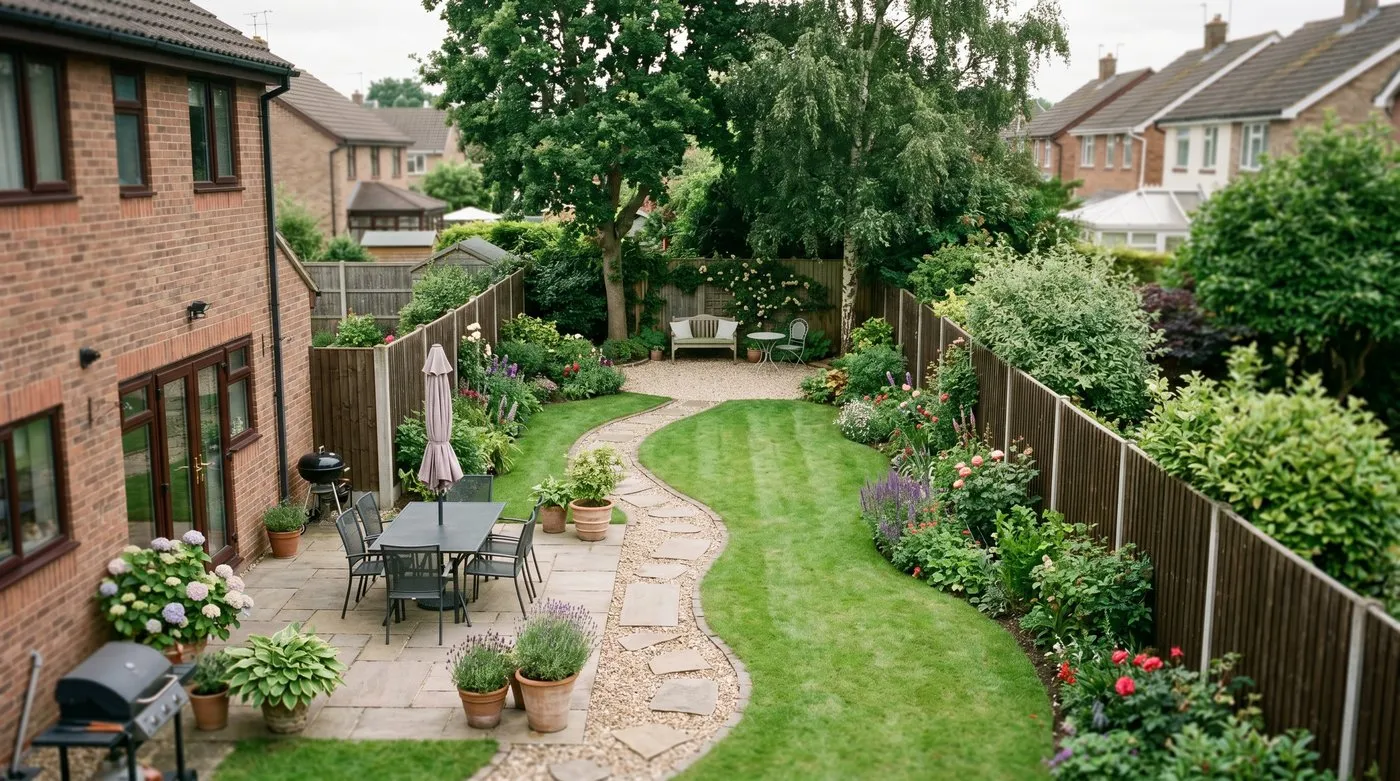
The root cause: a garden you can read in one glance
Every cramped-feeling garden shares one underlying fault: the design repeats the boundary. A central lawn shaped like the plot, thin borders hugging every fence, a straight path down one side. The eye takes in all four corners in a single glance, measures the space, and files it as small. No amount of decoration fixes a plot the eye has already measured.
The permanent prevention is to design the journey, not the shape. Set the main axis on the diagonal. Make one border at least 1m deep on a single side and let the others stay minimal, rather than spreading thin 30cm strips everywhere. Break the sight line once so a zone stays concealed. New estates produce the worst offenders, since every plot starts as a bare rectangle of turf inside identical fences: our new-build garden design guide starts from exactly that point. For complex plots, the Society of Garden Designers directory lists accredited professionals who think in journeys by training.
Get the bones right once and the optical tricks become permanent. The diagonal never fades and the screen never needs replanting.
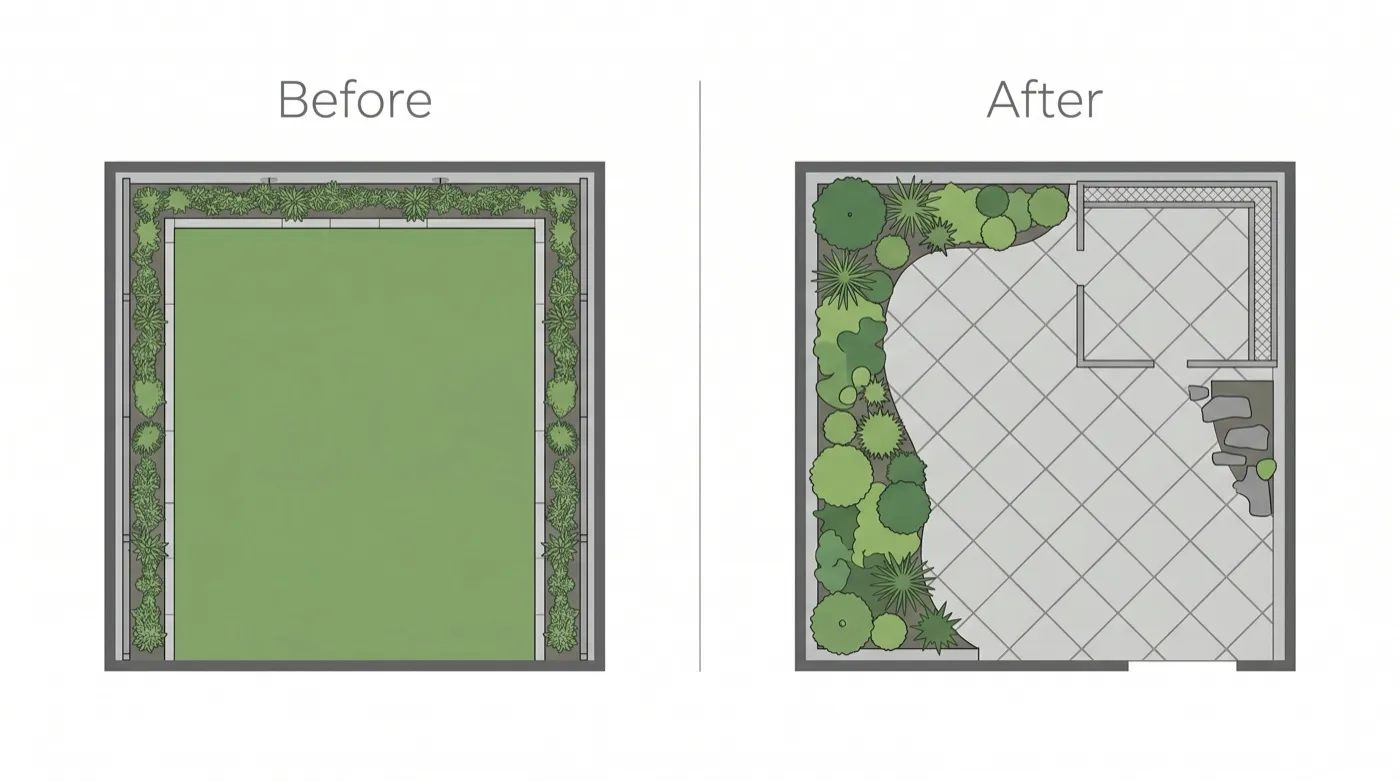 The same plot twice: a boundary-hugging layout the eye reads in one glance, against a diagonal design with a hidden zone.
Common mistakes that shrink a small garden
- Thin borders around every fence. The instinct is to keep the middle open, but 30cm strips pin planting to the boundary and outline the plot like a picture frame. Dig one bed 1m or deeper on a single side instead.
- Painting every boundary white. White advances, glares in summer and shows every mark by October. Paint the far fence a dark grey-green or black: planting stands out against it and the boundary itself disappears.
- A flock of tiny matching pots. Ten small pots read as clutter and shrink the scale of everything near them. Replace them with one 60cm pot, or one pot repeated in three sizes.
- A central lawn shaped like the plot. A rectangle of grass inside a rectangle of fence restates the boundary geometry. Set the lawn at 45 degrees or curve it so its edges stop matching the fences.
- Aiming a mirror at the seating area. Square-on, you watch yourself and the trick collapses. Angle it 10-15 degrees into dense planting and hide its edges with foliage.
Frequently asked questions
How do you make a small garden look bigger?
Lay paving diagonally, use cool colours at the back, and hide the end. The diagonal of a 6m x 8m plot is 10m, so a 45-degree axis gives the eye the longest possible line. Cool blues and silvers at the boundary push it visually away. A screen that conceals the final 2m stops the eye measuring the plot in one glance.
Do mirrors really make a garden look bigger?
Yes, an angled acrylic mirror can visually double a border. Fix it 10-15 degrees toward dense planting, never square-on to seating, or you watch yourself instead. Choose 3mm exterior acrylic rather than glass and hide the edges with foliage. If it reflects open sky, birds may fly at it, so always face it into greenery.
What colours make a small garden look bigger?
Cool blues, purples and silvers at the boundary push it visually away. Distant hills look blue because the atmosphere scatters light, and the brain applies the same rule in a garden. Plant Perovskia, Nepeta and Stachys at the far fence. Keep hot reds and oranges, such as Crocosmia Lucifer, within 2m of the house.
Does a small garden need a lawn?
No, in plots under 50 square metres a lawn often shrinks the space. A central rectangle of grass repeats the boundary shape and lets the eye measure the plot instantly. If you keep grass, set it at 45 degrees or curve it. Many small gardens work better fully paved with one deep planted border.
How wide should a path be in a small garden?
Start at 90cm by the house and taper to 60cm at the far end. The taper creates false perspective, so the path reads up to twice its true length. Use 600mm pavers near the house and 300mm at the end to push the effect further. Keep 60cm as the minimum, which is comfortable single-file width.
What size pots work best in a small garden?
One pot of 60cm diameter or more beats a cluster of small pots. The eye counts every small pot and the space reads cluttered and tight. A single large pot, around £50-90 in fibre clay, gives the eye one scale anchor. Repeat the same pot in two or three sizes if you want a group.
Once the tricks are in place, the next step is choosing what fills the space they create. Our guide to small garden design ideas covers layouts, materials and planting for plots under 50 square metres, or browse the full garden design section for more.
Lawrie has been gardening in the West Midlands for over 30 years. He grows his own veg using no-dig methods, keeps a wildlife-friendly garden, and writes practical advice based on real UK growing conditions.